Operating Instructions
Page 4
... programs using the VCR Plus+® system (SLV-D550P only) 58 Checking/changing/canceling timer settings 60 Locking the DVD-VCR (Child Lock) Advanced Hookups 61 A/V Receiver hookup 63 S-Video/Component Video hookup DVD Settings and Adjustments 65 Audio Setup 67 Screen Setup 71 Setting the display or sound track language 73 Parental Control (limiting playback...
... programs using the VCR Plus+® system (SLV-D550P only) 58 Checking/changing/canceling timer settings 60 Locking the DVD-VCR (Child Lock) Advanced Hookups 61 A/V Receiver hookup 63 S-Video/Component Video hookup DVD Settings and Adjustments 65 Audio Setup 67 Screen Setup 71 Setting the display or sound track language 73 Parental Control (limiting playback...

Operating Instructions
Page 11
... you find the one code number is preprogrammed to control non-Sony TVs. You can use the buttons marked with a dot (•) to control your TV. If your TV's code number using the number buttons. To control the DVD-VCR, reset TV / DVD·VIDEO to TV. 2 Hold down ?/1, and...15 continued Setting up the remote commander 11 Then release ?/1. Getting Started Controlling other TVs with the remote commander The remote commander is listed, try entering them one at the top of the remote commander to DVD·VIDEO. * for Sony TV only Code numbers of controllable TVs If more than ...
... you find the one code number is preprogrammed to control non-Sony TVs. You can use the buttons marked with a dot (•) to control your TV. If your TV's code number using the number buttons. To control the DVD-VCR, reset TV / DVD·VIDEO to TV. 2 Hold down ?/1, and...15 continued Setting up the remote commander 11 Then release ?/1. Getting Started Controlling other TVs with the remote commander The remote commander is listed, try entering them one at the top of the remote commander to DVD·VIDEO. * for Sony TV only Code numbers of controllable TVs If more than ...

Operating Instructions
Page 12
Set the appropriate code number every time you replace the batteries of the remote commander, the code number may change. Notes • If you enter a new code number, the code number previously entered will be erased. • If the TV uses a different remote control system from the one programmed to work with the DVD-VCR, you cannot control your TV with the remote commander. • When you replace the batteries. 12 Setting up the remote commander
Set the appropriate code number every time you replace the batteries of the remote commander, the code number may change. Notes • If you enter a new code number, the code number previously entered will be erased. • If the TV uses a different remote control system from the one programmed to work with the DVD-VCR, you cannot control your TV with the remote commander. • When you replace the batteries. 12 Setting up the remote commander

Operating Instructions
Page 20
...RETURN SET UP 3 Press V/v to select "Language", then press LANGUAGE/IDIOMA/LANGUE ENTER. Step 4 : Selecting a language You can change the on the remote (page 10). • Set the "RF Output Channel" to select (OPTION) and press ENTER. Before you cannot display the setup menu. OPTION SETUP ...the desired language, English, Spanish or French, then press ENTER. 20 Selecting a language If your TV. • To control the DVD-VCR, set the TV to video input. • If the DVD player is in "OPTION SETUP" menu (page 108). SET UP V/v ENTER 1 Press SET UP, then press V/v to ...
...RETURN SET UP 3 Press V/v to select "Language", then press LANGUAGE/IDIOMA/LANGUE ENTER. Step 4 : Selecting a language You can change the on the remote (page 10). • Set the "RF Output Channel" to select (OPTION) and press ENTER. Before you cannot display the setup menu. OPTION SETUP ...the desired language, English, Spanish or French, then press ENTER. 20 Selecting a language If your TV. • To control the DVD-VCR, set the TV to video input. • If the DVD player is in "OPTION SETUP" menu (page 108). SET UP V/v ENTER 1 Press SET UP, then press V/v to ...

Operating Instructions
Page 22
...Clock Set feature works only if a channel in "OPTION SETUP" menu (page 108). If broadcasters in play mode, you start... • Turn on the remote (page 10). • Set the "RF Output Channel" to select "Clock Set/Adjust", then CLOCK SET/ADJUST press ENTER. When using A/V connections, ... V/v to automatically set the TV to video input. • If the DVD player is connected to the DVD-VCR using a cable box, turn it on. • To control the DVD-VCR, set TV / DVD·VIDEO to DVD·VIDEO on the DVD-VCR and your area are not yet sending time signals, set the time manually ...
...Clock Set feature works only if a channel in "OPTION SETUP" menu (page 108). If broadcasters in play mode, you start... • Turn on the remote (page 10). • Set the "RF Output Channel" to select "Clock Set/Adjust", then CLOCK SET/ADJUST press ENTER. When using A/V connections, ... V/v to automatically set the TV to video input. • If the DVD player is connected to the DVD-VCR using a cable box, turn it on. • To control the DVD-VCR, set TV / DVD·VIDEO to DVD·VIDEO on the DVD-VCR and your area are not yet sending time signals, set the time manually ...

Operating Instructions
Page 24
... the timer, you must set the clock accurately. • The clock display appears when VIDEO mode is selected with no tape inserted or when the DVD-VCR is in your area that carries a time signal in "OPTION SETUP" menu (page 108). If nothing happens even after you wait about 20 minutes. ... that carry time signals, setting the clock automatically may take up to "3CH" or "4CH" in your TV. • To control the DVD-VCR, set TV / DVD·VIDEO to DVD·VIDEO on the remote (page 10). • Set the "RF Output Channel" to about 20 minutes, set the clock manually (page 24). • ...
... the timer, you must set the clock accurately. • The clock display appears when VIDEO mode is selected with no tape inserted or when the DVD-VCR is in your area that carries a time signal in "OPTION SETUP" menu (page 108). If nothing happens even after you wait about 20 minutes. ... that carry time signals, setting the clock automatically may take up to "3CH" or "4CH" in your TV. • To control the DVD-VCR, set TV / DVD·VIDEO to DVD·VIDEO on the remote (page 10). • Set the "RF Output Channel" to about 20 minutes, set the clock manually (page 24). • ...

Operating Instructions
Page 26
... • Turn on the remote (page 10). • Set the "RF Output Channel" to video input. • If the DVD player is in play mode, you cannot display the setup menu. If your TV is connected to DVD·VIDEO on the DVD-VCR and your area using manual ...presetting methods (page 28). When using a cable box, turn it on. • To control the DVD-VCR, set TV / DVD·VIDEO to the DVD-VCR using A/V connections, set them manually. Presetting all receivable channels automatically Before you preset the receivable channels in "OPTION SETUP" menu (page 108...
... • Turn on the remote (page 10). • Set the "RF Output Channel" to video input. • If the DVD player is in play mode, you cannot display the setup menu. If your TV is connected to DVD·VIDEO on the DVD-VCR and your area using manual ...presetting methods (page 28). When using a cable box, turn it on. • To control the DVD-VCR, set TV / DVD·VIDEO to the DVD-VCR using A/V connections, set them manually. Presetting all receivable channels automatically Before you preset the receivable channels in "OPTION SETUP" menu (page 108...
Operating Instructions
Page 28
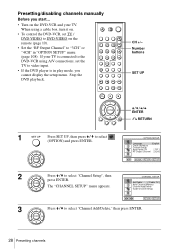
When using A/V connections, set TV / DVD·VIDEO to DVD·VIDEO on the remote (page 10). • Set the "RF Output Channel" to "3CH" or "4CH" in play mode, you start... • Turn on . • To control the DVD-VCR, set the TV to select (OPTION) and press ENTER. CHANNEL SETUP Ant/Cable [ ... channels CH +/- If your TV. Number buttons SET UP V/v/B/b ENTER O RETURN 1 Press SET UP, then press V/v to video input. • If the DVD player is connected to the DVD-VCR using a cable box, turn it on the DVD-VCR and your TV is in "OPTION SETUP" menu (page 108).
When using A/V connections, set TV / DVD·VIDEO to DVD·VIDEO on the remote (page 10). • Set the "RF Output Channel" to "3CH" or "4CH" in play mode, you start... • Turn on . • To control the DVD-VCR, set the TV to select (OPTION) and press ENTER. CHANNEL SETUP Ant/Cable [ ... channels CH +/- If your TV. Number buttons SET UP V/v/B/b ENTER O RETURN 1 Press SET UP, then press V/v to video input. • If the DVD player is connected to the DVD-VCR using a cable box, turn it on the DVD-VCR and your TV is in "OPTION SETUP" menu (page 108).

Operating Instructions
Page 46
... the information will automatically change to a VCR tape. • To watch a TV program during video recording, stop disc playback. 46 Recording TV programs To watch a DVD while recording 1 Press SELECT DVD to leave it on. When using a cable box, make sure to control the DVD player. 2 Press Z and place the... 2 If your TV is connected to the VCR using the INPUT SELECT button. • The display appears on the tape again, cover the tab hole with adhesive tape. Notes • The remaining tape length may not be recorded on the remote commander. if not, skip this step. ...
... the information will automatically change to a VCR tape. • To watch a TV program during video recording, stop disc playback. 46 Recording TV programs To watch a DVD while recording 1 Press SELECT DVD to leave it on. When using a cable box, make sure to control the DVD player. 2 Press Z and place the... 2 If your TV is connected to the VCR using the INPUT SELECT button. • The display appears on the tape again, cover the tab hole with adhesive tape. Notes • The remaining tape length may not be recorded on the remote commander. if not, skip this step. ...
Operating Instructions
Page 112
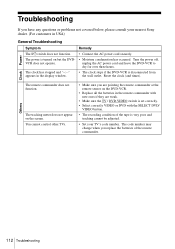
... cannot be adjusted. • Set your nearest Sony dealer. (For customers in the display window. • The clock stops if the DVD-VCR is disconnected from the wall outlet. unplug the AC power cord and leave the DVD-VCR to dry for over three hours. The clock ...correctly VIDEO or DVD with the SELECT DVD/ VIDEO button. • The recording condition of the remote commander. 112 Troubleshooting You cannot control other TVs. • Make sure you are pointing the remote commander at the remote sensor on the DVD-VCR. • Replace all the batteries in the remote commander with new...
... cannot be adjusted. • Set your nearest Sony dealer. (For customers in the display window. • The clock stops if the DVD-VCR is disconnected from the wall outlet. unplug the AC power cord and leave the DVD-VCR to dry for over three hours. The clock ...correctly VIDEO or DVD with the SELECT DVD/ VIDEO button. • The recording condition of the remote commander. 112 Troubleshooting You cannot control other TVs. • Make sure you are pointing the remote commander at the remote sensor on the DVD-VCR. • Replace all the batteries in the remote commander with new...

Operating Instructions
Page 115
...The video heads are dirty (see the last page of the direct selection button on the remote (page 76). • Multilingual subtitles are not recorded on the TV or monitor. Do ...may have the heads cleaned at your local Sony dealer for the VCR. Recording A TV program does not appear on the DVD being played. • The DVD prohibits changing of the angles. Select a channel... The picture rolls vertically during picture search. • Adjust the vertical hold control on the DVD being played. • The DVD prohibits the changing of the subtitles. select "L1" or "L2" when ...
...The video heads are dirty (see the last page of the direct selection button on the remote (page 76). • Multilingual subtitles are not recorded on the TV or monitor. Do ...may have the heads cleaned at your local Sony dealer for the VCR. Recording A TV program does not appear on the DVD being played. • The DVD prohibits changing of the angles. Select a channel... The picture rolls vertically during picture search. • Adjust the vertical hold control on the DVD being played. • The DVD prohibits the changing of the subtitles. select "L1" or "L2" when ...
Operating Instructions
Page 119
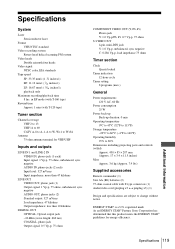
... UHF 14 to 69 CATV A-8 to A-1, A to W, W+1 to change without notice. registered mark. As an ENERGY STAR® Partner, Sony Corporation has determined that this product meets the ENERGY STAR® guidelines for VHF/UHF Inputs and outputs LINE IN 1 and LINE-2 IN VIDEO... to 140°F) Operating humidity 25% to 80% Dimensions including projecting parts and controls (w/h/d) Approx. 430 × 85 × 287 mm (Approx. 17 × 3.4 × 11.5 inches) Mass Approx. 3.6 kg (Approx. 7.9 lbs) Supplied accessories Remote commander (1) Size AA (R6) batteries (2) 75-ohm coaxial cable with F-type ...
... UHF 14 to 69 CATV A-8 to A-1, A to W, W+1 to change without notice. registered mark. As an ENERGY STAR® Partner, Sony Corporation has determined that this product meets the ENERGY STAR® guidelines for VHF/UHF Inputs and outputs LINE IN 1 and LINE-2 IN VIDEO... to 140°F) Operating humidity 25% to 80% Dimensions including projecting parts and controls (w/h/d) Approx. 430 × 85 × 287 mm (Approx. 17 × 3.4 × 11.5 inches) Mass Approx. 3.6 kg (Approx. 7.9 lbs) Supplied accessories Remote commander (1) Size AA (R6) batteries (2) 75-ohm coaxial cable with F-type ...
Operating Instructions
Page 120
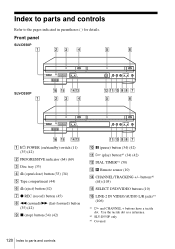
Front panel SLV-D550P SLV-D350P A ?/1 POWER (on/standby) switch (11) (35) (42) B PROGRESSIVE indicator (64) (69) C Disc tray (33) D A (open/close) button (33) (34) E Tape compartment (44) F A (eject) button (42) G z ... (35) (42) I x (stop) button (34) (42) J X (pause) button (34) (42) K H (play) button*1 (34) (42) L DIAL TIMER*2 (50) M Remote sensor (10) N CHANNEL/TRACKING +/- Index to parts and controls Refer to parts and controls buttons*1 (44) (103) O SELECT DVD/VIDEO buttons (10) P LINE-2 IN VIDEO/AUDIO L/R jacks*3 (106) *1 H and CHANNEL + buttons have a tactile dot. Use the...
Front panel SLV-D550P SLV-D350P A ?/1 POWER (on/standby) switch (11) (35) (42) B PROGRESSIVE indicator (64) (69) C Disc tray (33) D A (open/close) button (33) (34) E Tape compartment (44) F A (eject) button (42) G z ... (35) (42) I x (stop) button (34) (42) J X (pause) button (34) (42) K H (play) button*1 (34) (42) L DIAL TIMER*2 (50) M Remote sensor (10) N CHANNEL/TRACKING +/- Index to parts and controls Refer to parts and controls buttons*1 (44) (103) O SELECT DVD/VIDEO buttons (10) P LINE-2 IN VIDEO/AUDIO L/R jacks*3 (106) *1 H and CHANNEL + buttons have a tactile dot. Use the...
Operating Instructions
Page 123
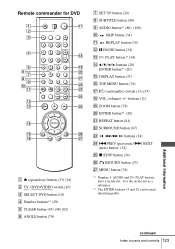
Remote commander for DVD A Z (open/close) button (33) (34) B TV / DVD•VIDEO switch (10) C SELECT DVD button (10) D Number buttons*1 (29) E CLEAR button (43) (48) (82) F ANGLE button (79) G SET UP button (20) H SUBTITLE button (80) I AUDIO button*1 (86) (100... button*2 (20) O DISPLAY button (37) P TOP MENU button (76) Q ?/1 (on/standby) switch (11) (35) R VOL (volume) +/- Additional Information continued Index to parts and controls 123 Use the tactile dot as a reference. *2 The ENTER buttons 14 and 20 can be used interchangeably. buttons (11) S ZOOM button (78) T ENTER button*2 (20...
Remote commander for DVD A Z (open/close) button (33) (34) B TV / DVD•VIDEO switch (10) C SELECT DVD button (10) D Number buttons*1 (29) E CLEAR button (43) (48) (82) F ANGLE button (79) G SET UP button (20) H SUBTITLE button (80) I AUDIO button*1 (86) (100... button*2 (20) O DISPLAY button (37) P TOP MENU button (76) Q ?/1 (on/standby) switch (11) (35) R VOL (volume) +/- Additional Information continued Index to parts and controls 123 Use the tactile dot as a reference. *2 The ENTER buttons 14 and 20 can be used interchangeably. buttons (11) S ZOOM button (78) T ENTER button*2 (20...
Operating Instructions
Page 124
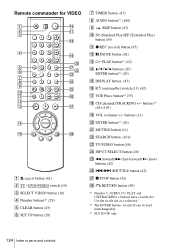
...) wj x STOP button (42) wk O RETURN button (56) *1 Number 5, AUDIO, H PLAY and CH/TRACKING + buttons have a tactile dot. Remote commander for VIDEO A Z (eject) button (42) B TV / DVD•VIDEO switch (10) C SELECT VIDEO button (10) D Number buttons*1 (29) E CLEAR button (43) F SET UP button (20) G ... L X PAUSE button (42) M H PLAY button*1 (42) N V/v/B/b buttons (20) ENTER button*2 (20) O DISPLAY button (43) P ?/1 (on/standby) switch (11) (42) Q VCR Plus+ button*3 (55) R CH (channel)/TRACKING +/- Use the tactile dot as a reference. *2 The ENTER buttons 14 and 20 can be used interchangeably...
...) wj x STOP button (42) wk O RETURN button (56) *1 Number 5, AUDIO, H PLAY and CH/TRACKING + buttons have a tactile dot. Remote commander for VIDEO A Z (eject) button (42) B TV / DVD•VIDEO switch (10) C SELECT VIDEO button (10) D Number buttons*1 (29) E CLEAR button (43) F SET UP button (20) G ... L X PAUSE button (42) M H PLAY button*1 (42) N V/v/B/b buttons (20) ENTER button*2 (20) O DISPLAY button (43) P ?/1 (on/standby) switch (11) (42) Q VCR Plus+ button*3 (55) R CH (channel)/TRACKING +/- Use the tactile dot as a reference. *2 The ENTER buttons 14 and 20 can be used interchangeably...


