Operating Instructions (primary manual)
Page 2
...However, there is connected. - Consult the dealer or an experienced radio/TV technician for energy efficiency. This monitor complies with the TCO'99 guidelines. (for the white model) This monitor complies with the limits for Metrology de décembre 1990 (MPR II) en ce qui concerne les fr... Mail Drop #T1-11, Park Ridge, NJ 07656 Declaration of Conformity Trade Name: Model No.: Responsible Party: Address: Telephone No.: SONY SDM-M51D Sony Electronics Inc. 680 Kinderkamack Road, Oradell, NJ 07649 USA 201-930-6972 This device complies with Swedish National Council for Metrology (MPR)...
...However, there is connected. - Consult the dealer or an experienced radio/TV technician for energy efficiency. This monitor complies with the TCO'99 guidelines. (for the white model) This monitor complies with the limits for Metrology de décembre 1990 (MPR II) en ce qui concerne les fr... Mail Drop #T1-11, Park Ridge, NJ 07656 Declaration of Conformity Trade Name: Model No.: Responsible Party: Address: Telephone No.: SONY SDM-M51D Sony Electronics Inc. 680 Kinderkamack Road, Oradell, NJ 07649 USA 201-930-6972 This device complies with Swedish National Council for Metrology (MPR)...
Operating Instructions (primary manual)
Page 3
... 8 Step 4: Connect the power cord 8 Step 5: Secure the cords and close the back cover 8 Step 6: Turn on the monitor and computer 9 Using the stereo speakers 9 Adjusting the tilt and height 10 Customizing Your Monitor 11 Navigating the menu 11 Adjusting the contrast (CONTRAST 12 Adjusting the black level of an image (BRIGHTNESS...
... 8 Step 4: Connect the power cord 8 Step 5: Secure the cords and close the back cover 8 Step 6: Turn on the monitor and computer 9 Using the stereo speakers 9 Adjusting the tilt and height 10 Customizing Your Monitor 11 Navigating the menu 11 Adjusting the contrast (CONTRAST 12 Adjusting the black level of an image (BRIGHTNESS...
Operating Instructions (primary manual)
Page 4
...in stereo speaker Be sure to keep magnetic recording equipment, tapes, and floppy discs away from the monitor and grasp the support and base sections of the display stand firmly with AC adapter, SONY AC-V018 The equipment should be sure to the regulations of abrasive pad, scouring powder, or ...solvent, such as this monitor with a soft cloth. If you drop the monitor, you may be injured or the monitor may be sure to inordinate amounts of this...
...in stereo speaker Be sure to keep magnetic recording equipment, tapes, and floppy discs away from the monitor and grasp the support and base sections of the display stand firmly with AC adapter, SONY AC-V018 The equipment should be sure to the regulations of abrasive pad, scouring powder, or ...solvent, such as this monitor with a soft cloth. If you drop the monitor, you may be injured or the monitor may be sure to inordinate amounts of this...
Operating Instructions (primary manual)
Page 5
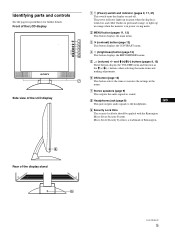
... button displays the CONTRAST menu. 4 8 (brightness) button (page 12) This button displays the BRITGHTNESS menu. 5 2 (volume) +/- The power indicator lights up in orange when the monitor is in green when the display is a trademark of Kensington. Front of the LCD display MENU OK Side view of the display stand (continued) 5
... button displays the CONTRAST menu. 4 8 (brightness) button (page 12) This button displays the BRITGHTNESS menu. 5 2 (volume) +/- The power indicator lights up in orange when the monitor is in green when the display is a trademark of Kensington. Front of the LCD display MENU OK Side view of the display stand (continued) 5
Operating Instructions (primary manual)
Page 6
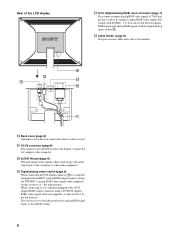
... connecting it to a computer equipped with an HD15 (analog RGB) output connector using a DVI-DVI (digital RGB) video signal cable (not supplied), set to the monitor. 0 Back cover (page 8) Open this connector. the left position. You can switch between digital RGB signals and analog RGB signals with DVI Rev. 1.0. qs AUDIO...
... connecting it to a computer equipped with an HD15 (analog RGB) output connector using a DVI-DVI (digital RGB) video signal cable (not supplied), set to the monitor. 0 Back cover (page 8) Open this connector. the left position. You can switch between digital RGB signals and analog RGB signals with DVI Rev. 1.0. qs AUDIO...
Operating Instructions (primary manual)
Page 7
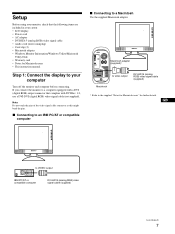
...display to VIDEO output IBM PC/AT or compatible computer DVI-HD15 (analog RGB) video signal cable (supplied) (continued) 7 If you connect the monitor to a computer equipped with DVI Rev. 1.0, use a DVI-DVI (digital RGB) video signal cable (not supplied). Macintosh adapter (supplied)* to...-HD15 (analog RGB) video signal cable • Audio cord (stereo miniplug) • Cord clip (2) • Macintosh adapter • Windows Monitor Information/Windows Utility/Macintosh Utility Disk • Warranty card • Notes for further details. Note Do not touch the pins of the video signal...
...display to VIDEO output IBM PC/AT or compatible computer DVI-HD15 (analog RGB) video signal cable (supplied) (continued) 7 If you connect the monitor to a computer equipped with DVI Rev. 1.0, use a DVI-DVI (digital RGB) video signal cable (not supplied). Macintosh adapter (supplied)* to...-HD15 (analog RGB) video signal cable • Audio cord (stereo miniplug) • Cord clip (2) • Macintosh adapter • Windows Monitor Information/Windows Utility/Macintosh Utility Disk • Warranty card • Notes for further details. Note Do not touch the pins of the video signal...
Operating Instructions (primary manual)
Page 8
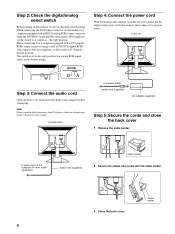
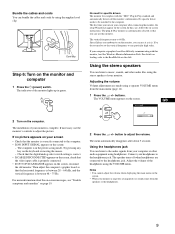
...(supplied), set to the right position (for analog RGB signal input) as the default setting Step 4: Connect the power cord With the monitor and computer switched off the display and computer before connecting. to audio input to check the switch setting. When connecting the DVI-I input ...connector on the monitor, be sure to a power outlet power cord (supplied) AC adapter (supplied) Step 5: Secure the cords and close the back cover 1 Remove...
...(supplied), set to the right position (for analog RGB signal input) as the default setting Step 4: Connect the power cord With the monitor and computer switched off the display and computer before connecting. to audio input to check the switch setting. When connecting the DVI-I input ...connector on the monitor, be sure to a power outlet power cord (supplied) AC adapter (supplied) Step 5: Secure the cords and close the back cover 1 Remove...
Operating Instructions (primary manual)
Page 9
...speaker of the headphones using the supplied cord clip. Using the stereo speakers You can listen to adjust the picture. If necessary, use the monitor's controls to music, sounds, and other audio equipment using a separate VOLUME menu from the speakers or the headphones. 9 No need to ...Step 6: Turn on the computer. Notes • You cannot adjust the volume when displaying the main menu on the screen, reconnect the old monitor. If your monitor is in power saving mode, no sound comes from the main menu (page 11). 1 Press the 2 +/- No specific driver needs to...
...speaker of the headphones using the supplied cord clip. Using the stereo speakers You can listen to adjust the picture. If necessary, use the monitor's controls to music, sounds, and other audio equipment using a separate VOLUME menu from the speakers or the headphones. 9 No need to ...Step 6: Turn on the computer. Notes • You cannot adjust the volume when displaying the main menu on the screen, reconnect the old monitor. If your monitor is in power saving mode, no sound comes from the main menu (page 11). 1 Press the 2 +/- No specific driver needs to...
Operating Instructions (primary manual)
Page 11
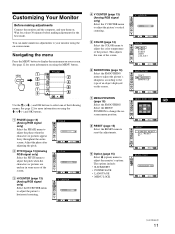
...EX I T P I TCH 1344 EX I T H CENTER 50 EX I T (continued) 11 Wait for at least 30 minutes before making adjustments Connect the monitor and the computer, and turn them on. MENU , PHASE 4 V CENTER (page 13) (Analog RGB signal only) Select the V CENTER menu to adjust the... picture's vertical centering. 5 COLOR (page 14) Select the COLOR menu to adjust the picture's horizontal centering. You can make numerous adjustments to adjust the monitor's options. The options include: • BACKLIGHT • POWER SAVE • LANGUAGE • MENU LOCK V CENTER 50 EX I T CO L OR 9 300K...
...EX I T P I TCH 1344 EX I T H CENTER 50 EX I T (continued) 11 Wait for at least 30 minutes before making adjustments Connect the monitor and the computer, and turn them on. MENU , PHASE 4 V CENTER (page 13) (Analog RGB signal only) Select the V CENTER menu to adjust the... picture's vertical centering. 5 COLOR (page 14) Select the COLOR menu to adjust the picture's horizontal centering. You can make numerous adjustments to adjust the monitor's options. The options include: • BACKLIGHT • POWER SAVE • LANGUAGE • MENU LOCK V CENTER 50 EX I T CO L OR 9 300K...
Operating Instructions (primary manual)
Page 13
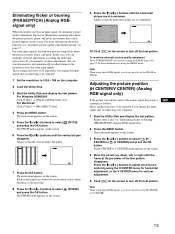
...Adjusting the picture position (H CENTER/V CENTER) (Analog RGB signal only) If the picture is not in memory and automatically recalled whenever the monitor receives the same input signals. The main menu appears on the screen. 3 Press the M(+)/m(-) buttons to 1024 × 768 on the...the following instructions. Eliminating flicker or blurring (PHASE/PITCH) (Analog RGB signal only) When the monitor receives an input signal, the automatic picture quality adjustment function of this monitor automatically adjusts the picture position, phase, and pitch, and ensures that a clear picture appears on...
...Adjusting the picture position (H CENTER/V CENTER) (Analog RGB signal only) If the picture is not in memory and automatically recalled whenever the monitor receives the same input signals. The main menu appears on the screen. 3 Press the M(+)/m(-) buttons to 1024 × 768 on the...the following instructions. Eliminating flicker or blurring (PHASE/PITCH) (Analog RGB signal only) When the monitor receives an input signal, the automatic picture quality adjustment function of this monitor automatically adjusts the picture position, phase, and pitch, and ensures that a clear picture appears on...
Operating Instructions (primary manual)
Page 15
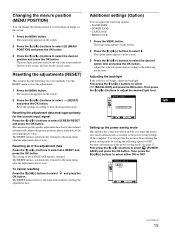
... the OK button. First press the M(+)/m(-) buttons to select (BACKLIGHT) and press the OK button. Resetting the adjustments (RESET) This monitor has the following instructions. The main menu appears on the screen. 2 Press the M(+)/m(-) buttons to select m. The RESET menu is ...LANGUAGE • MENU LOCK 1 Press the MENU button. POWER S A V E ON OFF EX I T Setting up the power saving mode This monitor has a function which enables it is reset. Then press the M(+)/m(-) buttons to the main menu without resetting the adjustment data. Adjust the selected option ...
... the OK button. First press the M(+)/m(-) buttons to select (BACKLIGHT) and press the OK button. Resetting the adjustments (RESET) This monitor has the following instructions. The main menu appears on the screen. 2 Press the M(+)/m(-) buttons to select m. The RESET menu is ...LANGUAGE • MENU LOCK 1 Press the MENU button. POWER S A V E ON OFF EX I T Setting up the power saving mode This monitor has a function which enables it is reset. Then press the M(+)/m(-) buttons to the main menu without resetting the adjustment data. Adjust the selected option ...
Operating Instructions (primary manual)
Page 17
...mode and automatically recalled whenever the same input signal is cut and NO INPUT SIGNAL appears on the screen. GB 17 After 20 seconds, the monitor enters the power saving mode. ** "deep sleep" is the power saving mode defined by the Environmental Protection Agency. *** If the horizontal ...a clear picture appears on the screen for a list of the factory preset modes.) For input signals that do not match one of this monitor automatically adjusts the picture position, phase, and pitch, and ensures that match one of the factory preset modes, the automatic picture quality adjustment function...
...mode and automatically recalled whenever the same input signal is cut and NO INPUT SIGNAL appears on the screen. GB 17 After 20 seconds, the monitor enters the power saving mode. ** "deep sleep" is the power saving mode defined by the Environmental Protection Agency. *** If the horizontal ...a clear picture appears on the screen for a list of the factory preset modes.) For input signals that do not match one of this monitor automatically adjusts the picture position, phase, and pitch, and ensures that match one of the factory preset modes, the automatic picture quality adjustment function...
Operating Instructions (primary manual)
Page 18
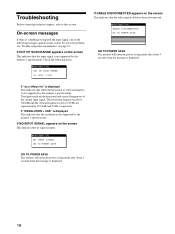
... about 5 seconds from the message is displayed. 18 The horizontal frequencies above 100 kHz and the vertical frequencies above 100 Hz are represented by the monitor's specifications. I NFORMA T I ON NO I NPUT S I ON OUT OF SCAN RANGE x x . To solve the problem, see "Trouble symptoms and...the horizontal and vertical frequencies of the following items. I NFORMA T I GNA L GO TO POWER SAVE GO TO POWER SAVE The monitor will enter the power saving mode after about 5 seconds from the message is displayed. Troubleshooting Before contacting technical support, refer to this section...
... about 5 seconds from the message is displayed. 18 The horizontal frequencies above 100 kHz and the vertical frequencies above 100 Hz are represented by the monitor's specifications. I NFORMA T I ON NO I NPUT S I ON OUT OF SCAN RANGE x x . To solve the problem, see "Trouble symptoms and...the horizontal and vertical frequencies of the following items. I NFORMA T I GNA L GO TO POWER SAVE GO TO POWER SAVE The monitor will enter the power saving mode after about 5 seconds from the message is displayed. Troubleshooting Before contacting technical support, refer to this section...
Operating Instructions (primary manual)
Page 19
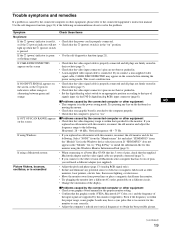
... the orientation of signals input via the DVI-I (digital/analog RGB) input connector (page 8). Select "SONY" from the "Manufactures" list and select "SDM-M51D" from power lines or place a magnetic shield near the monitor. • Try plugging the monitor into a different AC outlet, preferably on the screen xProblems caused by the connected computer or other...
... the orientation of signals input via the DVI-I (digital/analog RGB) input connector (page 8). Select "SONY" from the "Manufactures" list and select "SDM-M51D" from power lines or place a magnetic shield near the monitor. • Try plugging the monitor into a different AC outlet, preferably on the screen xProblems caused by the connected computer or other...
Operating Instructions (primary manual)
Page 20
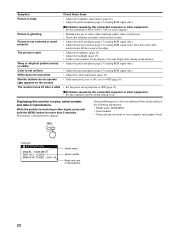
The monitor's information box appears. If any problem persists, call your authorized Sony dealer and give the following information: • Model name: SDM-M51D • Serial number • Name and specifications of manufacture. Note that all plugs are firmly seated in their sockets. • ... after a while • Set the power saving function to off after turning on the monitor. • Adjust the pitch and phase (page 13) (analog RGB signal only). MENU Example INFORMATION MODEL : SDM-M51D SER NO : 1234567 MANUFACTURED : 2001-40 Model name Serial number Week and year of ...
The monitor's information box appears. If any problem persists, call your authorized Sony dealer and give the following information: • Model name: SDM-M51D • Serial number • Name and specifications of manufacture. Note that all plugs are firmly seated in their sockets. • ... after a while • Set the power saving function to off after turning on the monitor. • Adjust the pitch and phase (page 13) (analog RGB signal only). MENU Example INFORMATION MODEL : SDM-M51D SER NO : 1234567 MANUFACTURED : 2001-40 Model name Serial number Week and year of ...
Operating Instructions (primary manual)
Page 21
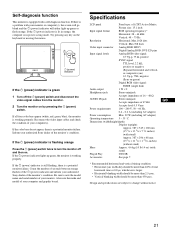
...working properly. Inform your authorized Sony dealer of the monitor's condition. If the 1 (power) indicator lights up green or flash orange. GB * Recommended horizontal and vertical timing condition • Horizontal sync width duty should be more than 4.8% of the monitor's condition. If there is larger...negative (Sync on by pressing the 1 (power) switch. If all four color bars appear (white, red, green, blue), the monitor is a potential monitor failure. If the 1 (power) indicator is lit in power saving mode. Design and specifications are subject to note the model name ...
...working properly. Inform your authorized Sony dealer of the monitor's condition. If the 1 (power) indicator lights up green or flash orange. GB * Recommended horizontal and vertical timing condition • Horizontal sync width duty should be more than 4.8% of the monitor's condition. If there is larger...negative (Sync on by pressing the 1 (power) switch. If all four color bars appear (white, red, green, blue), the monitor is a potential monitor failure. If the 1 (power) indicator is lit in power saving mode. Design and specifications are subject to note the model name ...
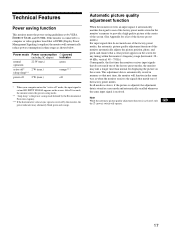
Marketing Specifications
Page 2
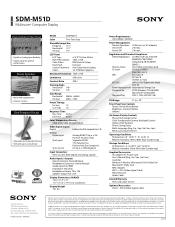
...-Condensing) Supplied Accessories AC adapter, AC Power Cord User's Manual (Eng., Fre., Spa., Ital., Ger.) Cord Clip Windows® Monitor Information Disk/Utility Disk Macintosh® Utility Disk MAC Adapter HD15 ~ DVI-I (accepts both digital and analog signals) Audio Inputs / ... of this disclaimer. Microsoft, the Windows Logo and Windows are approximate. Non-metric weights and measurements are registered trademarks of Sony. SDM-M51D Multiscan® Computer Display Digital/Analog Video Input • Digital or Analog input flexibility • Digital signal for optimal ...
...-Condensing) Supplied Accessories AC adapter, AC Power Cord User's Manual (Eng., Fre., Spa., Ital., Ger.) Cord Clip Windows® Monitor Information Disk/Utility Disk Macintosh® Utility Disk MAC Adapter HD15 ~ DVI-I (accepts both digital and analog signals) Audio Inputs / ... of this disclaimer. Microsoft, the Windows Logo and Windows are approximate. Non-metric weights and measurements are registered trademarks of Sony. SDM-M51D Multiscan® Computer Display Digital/Analog Video Input • Digital or Analog input flexibility • Digital signal for optimal ...


