Operating Instructions (primary manual)
Page 2
... the equipment and receiver. - NOTICE This notice is no guarantee that to qualified personnel only. This monitor complies with the TCO'99 guidelines. (for the white model) This monitor complies with Swedish National Council for energy efficiency. Refer to radio communications. WARNING To prevent fire or shock...Mail Drop #T1-11, Park Ridge, NJ 07656 Declaration of Conformity Trade Name: Model No.: Responsible Party: Address: Telephone No.: SONY SDM-M51D Sony Electronics Inc. 680 Kinderkamack Road, Oradell, NJ 07649 USA 201-930-6972 This device complies with Part 15 of the FCC Rules...
... the equipment and receiver. - NOTICE This notice is no guarantee that to qualified personnel only. This monitor complies with the TCO'99 guidelines. (for the white model) This monitor complies with Swedish National Council for energy efficiency. Refer to radio communications. WARNING To prevent fire or shock...Mail Drop #T1-11, Park Ridge, NJ 07656 Declaration of Conformity Trade Name: Model No.: Responsible Party: Address: Telephone No.: SONY SDM-M51D Sony Electronics Inc. 680 Kinderkamack Road, Oradell, NJ 07649 USA 201-930-6972 This device complies with Part 15 of the FCC Rules...
Operating Instructions (primary manual)
Page 3
... 8 Step 4: Connect the power cord 8 Step 5: Secure the cords and close the back cover 8 Step 6: Turn on the monitor and computer 9 Using the stereo speakers 9 Adjusting the tilt and height 10 Customizing Your Monitor 11 Navigating the menu 11 Adjusting the contrast (CONTRAST 12 Adjusting the black level of an image (BRIGHTNESS...
... 8 Step 4: Connect the power cord 8 Step 5: Secure the cords and close the back cover 8 Step 6: Turn on the monitor and computer 9 Using the stereo speakers 9 Adjusting the tilt and height 10 Customizing Your Monitor 11 Navigating the menu 11 Adjusting the contrast (CONTRAST 12 Adjusting the black level of an image (BRIGHTNESS...
Operating Instructions (primary manual)
Page 4
...different power cord, be sure that the LCD screen is made with highprecision technology. For the customers in the UK If you use the monitor in this monitor contains mercury. Take care when you use a glass cleaning liquid, do not use the appropriate UK power cord. This is not a malfunction...replace the fluorescent tube with both hands when transporting. If you do not use only with AC adapter, SONY AC-V018 The equipment should be damaged. • When you may be injured or the monitor may scratch the LCD screen's coating. • Clean the cabinet, panel, and controls with a soft...
...different power cord, be sure that the LCD screen is made with highprecision technology. For the customers in the UK If you use the monitor in this monitor contains mercury. Take care when you use a glass cleaning liquid, do not use the appropriate UK power cord. This is not a malfunction...replace the fluorescent tube with both hands when transporting. If you do not use only with AC adapter, SONY AC-V018 The equipment should be damaged. • When you may be injured or the monitor may scratch the LCD screen's coating. • Clean the cabinet, panel, and controls with a soft...
Operating Instructions (primary manual)
Page 5
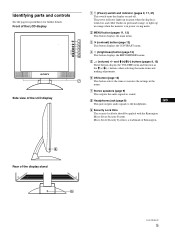
... (page 12) This button selects the item or executes the settings in parentheses for further details. Micro Saver Security System is in orange when the monitor is a trademark of the display stand (continued) 5 GB 9 Security Lock Hole The security lock hole should be applied with the Kensington Micro Saver Security System...
... (page 12) This button selects the item or executes the settings in parentheses for further details. Micro Saver Security System is in orange when the monitor is a trademark of the display stand (continued) 5 GB 9 Security Lock Hole The security lock hole should be applied with the Kensington Micro Saver Security System...
Operating Instructions (primary manual)
Page 6
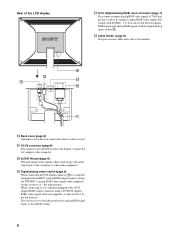
... (page 8) This part secures cables and cords to the display. the right position. qa DC IN connector (page 8) This connector provides DC power to the monitor. 0 Back cover (page 8) Open this connector. qs AUDIO IN jack (page 8) This jack inputs audio signals when connecting to A - Rear of the computer or other...
... (page 8) This part secures cables and cords to the display. the right position. qa DC IN connector (page 8) This connector provides DC power to the monitor. 0 Back cover (page 8) Open this connector. qs AUDIO IN jack (page 8) This jack inputs audio signals when connecting to A - Rear of the computer or other...
Operating Instructions (primary manual)
Page 7
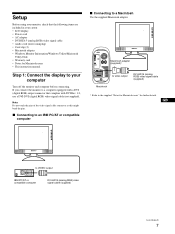
... that complies with a DVI (digital RGB) output connector that the following items are included in your computer Turn off the monitor and computer before connecting. If you connect the monitor to a computer equipped with DVI Rev. 1.0, use a DVI-DVI (digital RGB) video signal cable (not supplied). Macintosh adapter ...adapter • DVI-HD15 (analog RGB) video signal cable • Audio cord (stereo miniplug) • Cord clip (2) • Macintosh adapter • Windows Monitor Information/Windows Utility/Macintosh Utility Disk • Warranty card • Notes for further details.
... that complies with a DVI (digital RGB) output connector that the following items are included in your computer Turn off the monitor and computer before connecting. If you connect the monitor to a computer equipped with DVI Rev. 1.0, use a DVI-DVI (digital RGB) video signal cable (not supplied). Macintosh adapter ...adapter • DVI-HD15 (analog RGB) video signal cable • Audio cord (stereo miniplug) • Cord clip (2) • Macintosh adapter • Windows Monitor Information/Windows Utility/Macintosh Utility Disk • Warranty card • Notes for further details.
Operating Instructions (primary manual)
Page 8
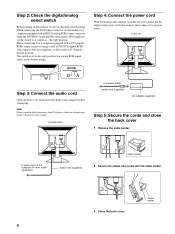
... switch is set to the right position (for analog RGB signal input) as the default setting Step 4: Connect the power cord With the monitor and computer switched off the display and computer before connecting. When connecting it to a power outlet. to DC IN OPEN DA Step 3: Connect...) video signal cable (supplied), set the switch to A (Analog) - Cable holder 8 Step 2: Check the digital/analog select switch Before turning on the monitor to a computer equipped with an HD15 (analog RGB) output connector using a with the cable holder. 3 Close the back cover. to audio input of the...
... switch is set to the right position (for analog RGB signal input) as the default setting Step 4: Connect the power cord With the monitor and computer switched off the display and computer before connecting. When connecting it to a power outlet. to DC IN OPEN DA Step 3: Connect...) video signal cable (supplied), set the switch to A (Analog) - Cable holder 8 Step 2: Check the digital/analog select switch Before turning on the monitor to a computer equipped with an HD15 (analog RGB) output connector using a with the cable holder. 3 Close the back cover. to audio input of the...
Operating Instructions (primary manual)
Page 9
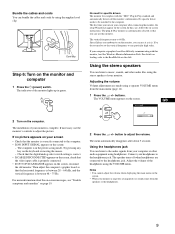
...the volume Volume adjustments are made using a separate VOLUME menu from the speakers or the headphones. 9 buttons. The installation of your monitor. Using the headphones jack You can bundle the cables and cords by using the supplied cord clip. The computer is complete. Try... screen. • When your computer or graphics board has difficulty communicating with the "DDC" Plug & Play standard and automatically detects all the monitor's information. Notes • You cannot adjust the volume when displaying the main menu on page 19. 40 2 Press the 2 +/- OPEN Cord...
...the volume Volume adjustments are made using a separate VOLUME menu from the speakers or the headphones. 9 buttons. The installation of your monitor. Using the headphones jack You can bundle the cables and cords by using the supplied cord clip. The computer is complete. Try... screen. • When your computer or graphics board has difficulty communicating with the "DDC" Plug & Play standard and automatically detects all the monitor's information. Notes • You cannot adjust the volume when displaying the main menu on page 19. 40 2 Press the 2 +/- OPEN Cord...
Operating Instructions (primary manual)
Page 11
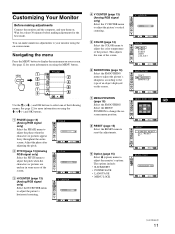
...position. 8 RESET (page 15) Select the RESET menu to reset the adjustments. 9 Option (page 15) Select m (option) menu to display the main menu on your monitor using the on using the M(+)/m(-) and OK buttons. 1 PHASE (page 13) (Analog RGB signal only) Select the PHASE menu to the type of the picture...adjust the phase when the characters or pictures appear fuzzy throughout the entire screen. Wait for at least 30 minutes before making adjustments Connect the monitor and the computer, and turn them on the screen. PHAS E 30 EX I T P I TCH 1344 EX I T H CENTER 50 EX I T (continued) ...
...position. 8 RESET (page 15) Select the RESET menu to reset the adjustments. 9 Option (page 15) Select m (option) menu to display the main menu on your monitor using the on using the M(+)/m(-) and OK buttons. 1 PHASE (page 13) (Analog RGB signal only) Select the PHASE menu to the type of the picture...adjust the phase when the characters or pictures appear fuzzy throughout the entire screen. Wait for at least 30 minutes before making adjustments Connect the monitor and the computer, and turn them on the screen. PHAS E 30 EX I T P I TCH 1344 EX I T H CENTER 50 EX I T (continued) ...
Operating Instructions (primary manual)
Page 13
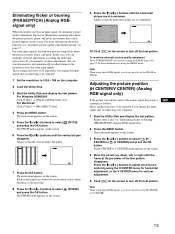
...appears on the screen. Eliminating flicker or blurring (PHASE/PITCH) (Analog RGB signal only) When the monitor receives an input signal, the automatic picture quality adjustment function of this monitor automatically adjusts the picture position, phase, and pitch, and ensures that a clear picture appears on the ... the picture position (H CENTER/V CENTER) (Analog RGB signal only) If the picture is not in memory and automatically recalled whenever the monitor receives the same input signals. The main menu appears on using the RESET menu. See page 15 for vertical adjustment. 5 Click [...
...appears on the screen. Eliminating flicker or blurring (PHASE/PITCH) (Analog RGB signal only) When the monitor receives an input signal, the automatic picture quality adjustment function of this monitor automatically adjusts the picture position, phase, and pitch, and ensures that a clear picture appears on the ... the picture position (H CENTER/V CENTER) (Analog RGB signal only) If the picture is not in memory and automatically recalled whenever the monitor receives the same input signals. The main menu appears on using the RESET menu. See page 15 for vertical adjustment. 5 Click [...
Operating Instructions (primary manual)
Page 15
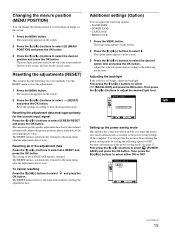
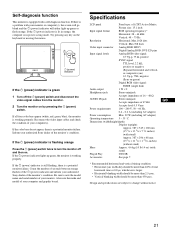
.... BACK L I GHT GB 10 0 EX I T (continued) 15 POWER S A V E ON OFF EX I T Setting up the power saving mode This monitor has a function which enables it is blocking an image on the screen. 2 Press the M(+)/m(-) buttons to select (BACKLIGHT) and press the OK button. The main... current input signal Press the M(+)/m(-) buttons to select ZZ... (POWER SAVE) and press the OK button. Resetting the adjustments (RESET) This monitor has the following two reset methods. Then press the M(+)/m(-) buttons to reset the adjustments. 1 Press the MENU button. Changing the menu's position...
.... BACK L I GHT GB 10 0 EX I T (continued) 15 POWER S A V E ON OFF EX I T Setting up the power saving mode This monitor has a function which enables it is blocking an image on the screen. 2 Press the M(+)/m(-) buttons to select (BACKLIGHT) and press the OK button. The main... current input signal Press the M(+)/m(-) buttons to select ZZ... (POWER SAVE) and press the OK button. Resetting the adjustments (RESET) This monitor has the following two reset methods. Then press the M(+)/m(-) buttons to reset the adjustments. 1 Press the MENU button. Changing the menu's position...
Operating Instructions (primary manual)
Page 17
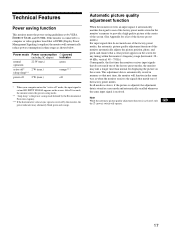
... modes.) For input signals that do not match one of the factory preset modes, the automatic picture quality adjustment function of this monitor automatically adjusts the picture position, phase, and pitch, and ensures that do not match one of the factory preset modes. This ...automatically recalled whenever the same input signal is cut and NO INPUT SIGNAL appears on the screen. Technical Features Power saving function This monitor meets the power-saving guidelines set by the Environmental Protection Agency. *** If the horizontal or vertical sync signal is automatically stored ...
... modes.) For input signals that do not match one of the factory preset modes, the automatic picture quality adjustment function of this monitor automatically adjusts the picture position, phase, and pitch, and ensures that do not match one of the factory preset modes. This ...automatically recalled whenever the same input signal is cut and NO INPUT SIGNAL appears on the screen. Technical Features Power saving function This monitor meets the power-saving guidelines set by the Environmental Protection Agency. *** If the horizontal or vertical sync signal is automatically stored ...
Operating Instructions (primary manual)
Page 18
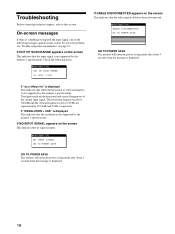
...of the current input signal. Troubleshooting Before contacting technical support, refer to this section. On-screen messages If there is not supported by the monitor's specifications. If OUT OF SCAN RANGE appears on page 19. The figures indicate the horizontal and vertical frequencies of the following items. I ...NFORMA T I GNA L GO TO POWER SAVE GO TO POWER SAVE The monitor will enter the power saving mode after about 5 seconds from the message is input. To solve the problem, see "Trouble symptoms and ...
...of the current input signal. Troubleshooting Before contacting technical support, refer to this section. On-screen messages If there is not supported by the monitor's specifications. If OUT OF SCAN RANGE appears on page 19. The figures indicate the horizontal and vertical frequencies of the following items. I ...NFORMA T I GNA L GO TO POWER SAVE GO TO POWER SAVE The monitor will enter the power saving mode after about 5 seconds from the message is input. To solve the problem, see "Trouble symptoms and ...
Operating Instructions (primary manual)
Page 19
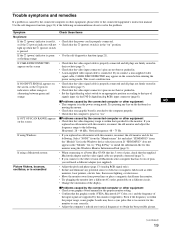
... connected and all plugs are firmly seated in the power saving mode. Select "SONY" from the "Manufactures" list and select "SDM-M51D" from power lines or place a magnetic shield near the monitor. • Try plugging the monitor into a different AC outlet, preferably on ." If NO INPUT SIGNAL appears on...pins are firmly seated in the "on the keyboard or moving the mouse. • Check that your graphics board manual for the monitor. If "SDM-M51D" does not appear in . • Set the digital/analog select switch to an appropriate position according to obtain the best possible ...
... connected and all plugs are firmly seated in the power saving mode. Select "SONY" from the "Manufactures" list and select "SDM-M51D" from power lines or place a magnetic shield near the monitor. • Try plugging the monitor into a different AC outlet, preferably on ." If NO INPUT SIGNAL appears on...pins are firmly seated in the "on the keyboard or moving the mouse. • Check that your graphics board manual for the monitor. If "SDM-M51D" does not appear in . • Set the digital/analog select switch to an appropriate position according to obtain the best possible ...
Operating Instructions (primary manual)
Page 20
...; Set the resolution to XGA (1024 x 768) on your computer and graphics board. The monitor's information box appears. The monitor turns off . If any problem persists, call your authorized Sony dealer and give the following information: • Model name: SDM-M51D • Serial number • Name and specifications of your computer. • Eliminate the use...
...; Set the resolution to XGA (1024 x 768) on your computer and graphics board. The monitor's information box appears. The monitor turns off . If any problem persists, call your authorized Sony dealer and give the following information: • Model name: SDM-M51D • Serial number • Name and specifications of your computer. • Eliminate the use...
Operating Instructions (primary manual)
Page 21
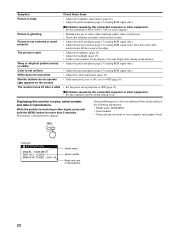
... model of your computer and graphic board. Inform your authorized Sony dealer of the monitor's condition. Count the number of seconds between orange flashes of the 1 (power) indicator and inform your authorized Sony dealer of the monitor's condition. If the 1 (power) indicator is in orange..., the computer is flashing orange Press the 1 (power) switch twice to note the model name and serial number of your monitor. If the 1 (power) indicator ...
... model of your computer and graphic board. Inform your authorized Sony dealer of the monitor's condition. Count the number of seconds between orange flashes of the 1 (power) indicator and inform your authorized Sony dealer of the monitor's condition. If the 1 (power) indicator is in orange..., the computer is flashing orange Press the 1 (power) switch twice to note the model name and serial number of your monitor. If the 1 (power) indicator ...
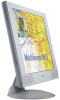
Marketing Specifications
Page 2
... trademarks of the hardware and software in part without notice. Purchasers must determine for themselves the suitability and compatibility of Sony. This monitor is prohibited. D213 Composite 0.3 Vp-p ± 10%, Negative Input Connectors DVI-I Video Signal Cable Warranty Card Audio... of this disclaimer. Power Off 2 W max. SDM-M51D Multiscan® Computer Display Digital/Analog Video Input • Digital or Analog input flexibility • Digital signal for energy efficiency. While Sony representatives or Sony authorized dealers may be able to assist you may ...
... trademarks of the hardware and software in part without notice. Purchasers must determine for themselves the suitability and compatibility of Sony. This monitor is prohibited. D213 Composite 0.3 Vp-p ± 10%, Negative Input Connectors DVI-I Video Signal Cable Warranty Card Audio... of this disclaimer. Power Off 2 W max. SDM-M51D Multiscan® Computer Display Digital/Analog Video Input • Digital or Analog input flexibility • Digital signal for energy efficiency. While Sony representatives or Sony authorized dealers may be able to assist you may ...


