Operating Instructions
Page 8
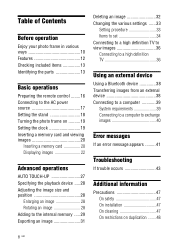
... various ways 10 Features 12 Checking included items 13 Identifying the parts 13 Basic operations Preparing the remote control ........16 Connecting to the AC power source 17 Setting the stand 18 Turning the photo frame on ..........19 Setting the clock 19 Inserting a memory card and viewing images 20 Inserting a memory card 20 Displaying images...
... various ways 10 Features 12 Checking included items 13 Identifying the parts 13 Basic operations Preparing the remote control ........16 Connecting to the AC power source 17 Setting the stand 18 Turning the photo frame on ..........19 Setting the clock 19 Inserting a memory card and viewing images 20 Inserting a memory card 20 Displaying images...

Operating Instructions
Page 12
... and skin smoothing. And the photo frame can be able to view the images immediately. Images are also automatically rotated when the photo frame is a digital photo frame for mass storage compatible devices x... enjoy the images in the album to your memory card. Features The Sony DPF-V900/V700 is set in /zoom out or fit to screen ...photo frame automatically rotates images to exchange the images 12 GB x Support for easily displaying images taken with a Bluetooth compatible mobile phone or other devices, such as the display order. You can enjoy beautiful images by remote control...
... and skin smoothing. And the photo frame can be able to view the images immediately. Images are also automatically rotated when the photo frame is a digital photo frame for mass storage compatible devices x... enjoy the images in the album to your memory card. Features The Sony DPF-V900/V700 is set in /zoom out or fit to screen ...photo frame automatically rotates images to exchange the images 12 GB x Support for easily displaying images taken with a Bluetooth compatible mobile phone or other devices, such as the display order. You can enjoy beautiful images by remote control...

Operating Instructions
Page 13
Continued 13 GB Front A LCD screen B Remote sensor When using the supplied remote control, point it at this manual) (1) • Warranty (1) (In some regions, the warranty is different. Before operation Checking included items Make ... the LCD screen size is not supplied.) Identifying the parts For details, see the pages indicated in the parentheses. The illustrations are included. • Digital photo frame (1) • Remote control (1) • AC adaptor (1) • AC power cord (1) • Operating Instructions (this sensor. The locations and names of buttons and connectors ...
Continued 13 GB Front A LCD screen B Remote sensor When using the supplied remote control, point it at this manual) (1) • Warranty (1) (In some regions, the warranty is different. Before operation Checking included items Make ... the LCD screen size is not supplied.) Identifying the parts For details, see the pages indicated in the parentheses. The illustrations are included. • Digital photo frame (1) • Remote control (1) • AC adaptor (1) • AC power cord (1) • Operating Instructions (this sensor. The locations and names of buttons and connectors ...
Operating Instructions
Page 14
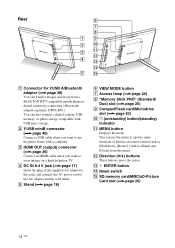
... connect a digital camera, USB memory, or photo storage compatible with a computer. E Stand (.page 18) F VIEW MODE button G Access lamp (.page 20) H "Memory Stick PRO" (Standard/ Duo) slot (.page 20) I CompactFlash card/Microdrive slot (.page 20) J 1 (on a high definition TV. D DC IN 8.4 V jack (.page 17) Insert the plug of buttons on remote control such as... adaptor and the wall outlet. M ENTER button N Reset switch O SD memory card/MMC/xD-Picture Card slot (.page 20) 14 GB You can use the photo frame with USB mass storage.
... connect a digital camera, USB memory, or photo storage compatible with a computer. E Stand (.page 18) F VIEW MODE button G Access lamp (.page 20) H "Memory Stick PRO" (Standard/ Duo) slot (.page 20) I CompactFlash card/Microdrive slot (.page 20) J 1 (on a high definition TV. D DC IN 8.4 V jack (.page 17) Insert the plug of buttons on remote control such as... adaptor and the wall outlet. M ENTER button N Reset switch O SD memory card/MMC/xD-Picture Card slot (.page 20) 14 GB You can use the photo frame with USB mass storage.

Operating Instructions
Page 15
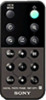
Before operation Remote control A VIEW MODE button B (clock) button C (slideshow) button D MENU button E BACK button F 1 (on/standby) button G (add to album) button H (zoom in)/ (zoom out) buttons I (index) button This button switches from the image preview screen to index view screen. J Direction (B/b/v/V) buttons K (enter) button L (rotation) button (.page 28) 15 GB
Before operation Remote control A VIEW MODE button B (clock) button C (slideshow) button D MENU button E BACK button F 1 (on/standby) button G (add to album) button H (zoom in)/ (zoom out) buttons I (index) button This button switches from the image preview screen to index view screen. J Direction (B/b/v/V) buttons K (enter) button L (rotation) button (.page 28) 15 GB

Operating Instructions
Page 16
... a Sony CR2025 lithium battery. Pull out the protective sheet before use as shown in fire. WARNING Battery may not function properly. Do not recharge, disassemble or dispose of the battery holder, pull out the battery holder. Use of another battery may present a risk of the remote control towards the remote sensor on the photo frame. 2 Remove...
... a Sony CR2025 lithium battery. Pull out the protective sheet before use as shown in fire. WARNING Battery may not function properly. Do not recharge, disassemble or dispose of the battery holder, pull out the battery holder. Use of another battery may present a risk of the remote control towards the remote sensor on the photo frame. 2 Remove...
Operating Instructions
Page 17
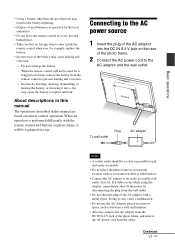
...socket outlet should be as close as possible to unit and easily accessible. • Do not place the photo frame in an unsteady location such as on photo frame, it into the DC IN 8.4 V jack on remote control operation. Do not recharge the battery. - About descriptions in this manual The operations described in a narrow ... the plug from the wall outlet. • Do not short the plug of the photo frame, and remove the AC power cord from the DC IN 8.4 V jack of the AC adaptor with the remote control and buttons on an uneven table or tilted surface. • Connect the AC adaptor ...
...socket outlet should be as close as possible to unit and easily accessible. • Do not place the photo frame in an unsteady location such as on photo frame, it into the DC IN 8.4 V jack on remote control operation. Do not recharge the battery. - About descriptions in this manual The operations described in a narrow ... the plug from the wall outlet. • Do not short the plug of the photo frame, and remove the AC power cord from the DC IN 8.4 V jack of the AC adaptor with the remote control and buttons on an uneven table or tilted surface. • Connect the AC adaptor ...

Operating Instructions
Page 19
...turns into green from red. When you can start . After disabling demo mode, you power on the remote control. The menu screen is displayed. 4 Select the format of the photo frame needs to be adjusted in order to display an accurate time in the clock and calendar view modes. ...Doing so may damage the photo frame. During demo mode, you connect the AC adaptor to the photo frame. Continued 19 GB Basic operations Turning the photo frame on Turning on the power Press 1 (on/standby) on the photo frame or remote control to turn on the power, and the standby ...
...turns into green from red. When you can start . After disabling demo mode, you power on the remote control. The menu screen is displayed. 4 Select the format of the photo frame needs to be adjusted in order to display an accurate time in the clock and calendar view modes. ...Doing so may damage the photo frame. During demo mode, you connect the AC adaptor to the photo frame. Continued 19 GB Basic operations Turning the photo frame on Turning on the power Press 1 (on/standby) on the photo frame or remote control to turn on the power, and the standby ...
Operating Instructions
Page 22
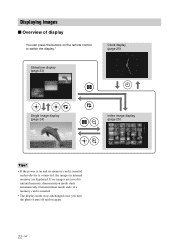
... of display You can press the buttons on the remote control to internal memory, demonstration mode starts automatically. If no device is on again. 22 GB Demonstration mode ends, if a memory card is inserted. • The display mode stays unchanged once you turn the photo frame off and on and no memory card is...
... of display You can press the buttons on the remote control to internal memory, demonstration mode starts automatically. If no device is on again. 22 GB Demonstration mode ends, if a memory card is inserted. • The display mode stays unchanged once you turn the photo frame off and on and no memory card is...
Operating Instructions
Page 25
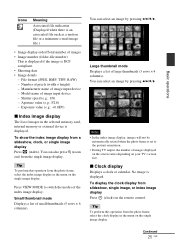
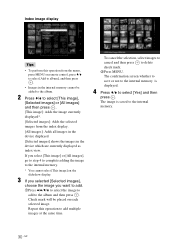
... display. You can select an image by pressing B/b/v/V. Exposure value (e.g.: +0.0EV) x Index image display The list of images in the menu on the remote control. Number of the index image display. File format (JPEG, BMP, TIFF, RAW) - x Clock display Displays a clock or calendar. Tip To perform... images • Image number (folder-file number) This is displayed if the image is displayed. To display the clock display from the photo frame, select the clock display in the selected memory card, internal memory or external device is set to switch the modes of pixels (width...
... display. You can select an image by pressing B/b/v/V. Exposure value (e.g.: +0.0EV) x Index image display The list of images in the menu on the remote control. Number of the index image display. File format (JPEG, BMP, TIFF, RAW) - x Clock display Displays a clock or calendar. Tip To perform... images • Image number (folder-file number) This is displayed if the image is displayed. To display the clock display from the photo frame, select the clock display in the selected memory card, internal memory or external device is set to switch the modes of pixels (width...
Operating Instructions
Page 28
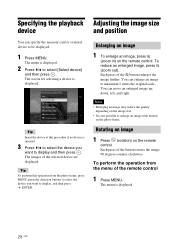
... v/V to maximum 5 times the original scale. Enlarging an image 1 To enlarge an image, press (zoom in) on the remote control. To perform the operation from the photo frame, press MENU, press the direction buttons to select the device you want to display and then press . Tip To perform this ...procedure if no device is displayed. 28 GB Each press of the remote control 1 Press MENU. Notes • Enlarging...
... v/V to maximum 5 times the original scale. Enlarging an image 1 To enlarge an image, press (zoom in) on the remote control. To perform the operation from the photo frame, press MENU, press the direction buttons to select the device you want to display and then press . Tip To perform this ...procedure if no device is displayed. 28 GB Each press of the remote control 1 Press MENU. Notes • Enlarging...
Operating Instructions
Page 29
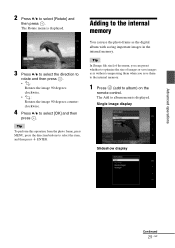
Tip In [Image file size] of the menu, you save images as the digital album with saving important images in the internal memory. The Add to album menu is displayed. 3 Press v/V to select the direction to rotate and then ... the size of images or save them to the internal memory. 1 Press (add to album) on the remote control. 2 Press v/V to select the item, and then press ENTER. Tip To perform this operation from the photo frame, press MENU, press the direction buttons to select [Rotate] and then press . The Rotate menu is displayed...
Tip In [Image file size] of the menu, you save images as the digital album with saving important images in the internal memory. The Add to album menu is displayed. 3 Press v/V to select the direction to rotate and then ... the size of images or save them to the internal memory. 1 Press (add to album) on the remote control. 2 Press v/V to select the item, and then press ENTER. Tip To perform this operation from the photo frame, press MENU, press the direction buttons to select [Rotate] and then press . The Rotate menu is displayed...
Operating Instructions
Page 30
Repeat this operation from the menu, press MENU on remote control, press v/V to select [Add to album], and then press . • Images in the device which are currently displayed as index view. The confirmation screen whether ...
Repeat this operation from the menu, press MENU on remote control, press v/V to select [Add to album], and then press . • Images in the device which are currently displayed as index view. The confirmation screen whether ...
Operating Instructions
Page 35
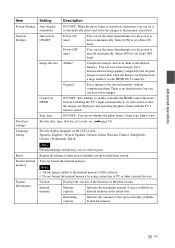
...to the internal memory. Reset Returns all settings to the original images is noticeable when the images are displayed, and operating the photo frame with the TV's remote control. Select [ON] to turn on a large monitor via the HDMI OUT connector. General Settings Auto power ON/OFF Power-ON ...timer You can set the timer (hour/minute) for the power to their factory defaults except for the power to set whether the photo frame's Sony logo ...
...to the internal memory. Reset Returns all settings to the original images is noticeable when the images are displayed, and operating the photo frame with the TV's remote control. Select [ON] to turn on a large monitor via the HDMI OUT connector. General Settings Auto power ON/OFF Power-ON ...timer You can set the timer (hour/minute) for the power to their factory defaults except for the power to set whether the photo frame's Sony logo ...
Operating Instructions
Page 37
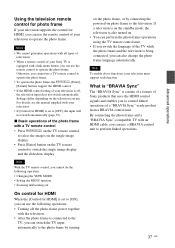
... out On control for HDMI When the [Control for HDMI] is set to control linked operations of a "BRAVIA Sync"-ready product from a BRAVIA control unit. Note With the TV remote control, you cannot do the following operations: • Turning off the photo frame power together with your Sony TV is ...a name of a feature of Sony products that uses the HDMI control signals and enables you to [...
... out On control for HDMI When the [Control for HDMI] is set to control linked operations of a "BRAVIA Sync"-ready product from a BRAVIA control unit. Note With the TV remote control, you cannot do the following operations: • Turning off the photo frame power together with your Sony TV is ...a name of a feature of Sony products that uses the HDMI control signals and enables you to [...
Operating Instructions
Page 53
... C Changing the settings 33 Cleaning 47 Clock display 25 Analog clock mode 26 Calender mode 26 Digital clock mode 26 Connecting Computer 39 External device 38 TV 36 Connecting to the AC power source 17 Control for HDMI 35 D Date/time settings 19, 35 DC IN 8.4 V 17 Deleting an image 32 ... use 50 SD memory card 49 xD-Picture Card 50 P Placing in portrait or landscape orientation 18 Playback device 28 Precautions 47 R Remote control 16 Replacing the battery of the remote control 16 Reset 35 Rotating an image 28 S Screen Settings 34 Setting the clock 19 Setting the stand 18 Single image display 24...
... C Changing the settings 33 Cleaning 47 Clock display 25 Analog clock mode 26 Calender mode 26 Digital clock mode 26 Connecting Computer 39 External device 38 TV 36 Connecting to the AC power source 17 Control for HDMI 35 D Date/time settings 19, 35 DC IN 8.4 V 17 Deleting an image 32 ... use 50 SD memory card 49 xD-Picture Card 50 P Placing in portrait or landscape orientation 18 Playback device 28 Precautions 47 R Remote control 16 Replacing the battery of the remote control 16 Reset 35 Rotating an image 28 S Screen Settings 34 Setting the clock 19 Setting the stand 18 Single image display 24...


