
Operating Instructions
Page 1
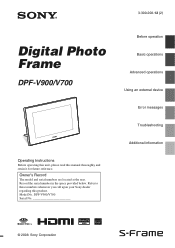
Model No. DPF-V900/V700 Serial No Before operation Basic operations Advanced operations Using an external device Error messages Troubleshooting Additional information © 2008 Sony Corporation Refer to these numbers whenever you call upon your Sony dealer regarding this manual thoroughly and retain it for future reference. Owner's Record The model and serial numbers are located at the rear. Record the serial number in the space provided below. 3-300-208-12 (2) Digital Photo Frame DPF-V900/V700 Operating Instructions Before operating this unit, please read this product.
Model No. DPF-V900/V700 Serial No Before operation Basic operations Advanced operations Using an external device Error messages Troubleshooting Additional information © 2008 Sony Corporation Refer to these numbers whenever you call upon your Sony dealer regarding this manual thoroughly and retain it for future reference. Owner's Record The model and serial numbers are located at the rear. Record the serial number in the space provided below. 3-300-208-12 (2) Digital Photo Frame DPF-V900/V700 Operating Instructions Before operating this unit, please read this product.
Operating Instructions
Page 5
...the fuse cover after you change the fuse. If you will help prevent potentially negative consequences for the recycling of this digital photo frame. Any unauthorized use only. Notice If static electricity or electromagnetism causes data transfer to the applicable collection point for the ... copyright or have permission of waste batteries (applicable in the European Union and other materials except for EMC and product safety is Sony Corporation, 1-7-1 Konan Minato-ku Tokyo, 1080075 Japan. The Authorized Representative for your household waste disposal service or the shop where...
...the fuse cover after you change the fuse. If you will help prevent potentially negative consequences for the recycling of this digital photo frame. Any unauthorized use only. Notice If static electricity or electromagnetism causes data transfer to the applicable collection point for the ... copyright or have permission of waste batteries (applicable in the European Union and other materials except for EMC and product safety is Sony Corporation, 1-7-1 Konan Minato-ku Tokyo, 1080075 Japan. The Authorized Representative for your household waste disposal service or the shop where...
Operating Instructions
Page 6
... and "®" are not mentioned in each case in a cold location. The screen may be caused by use or malfunction of the digital photo frame or memory card. in the United States and/or other countries. • Intel and Pentium are the registered trademarks or trademarks of Intel... ANY DEFECTIVE PRODUCT OR THE USE OF ANY PRODUCT. Sony Face Recognition technology developed by Sony is not a malfunction. Backup recommendations To avoid potential risk of data loss caused by accidental operation or malfunction of the digital photo frame, we recommend that may cause a malfunction. •...
... and "®" are not mentioned in each case in a cold location. The screen may be caused by use or malfunction of the digital photo frame or memory card. in the United States and/or other countries. • Intel and Pentium are the registered trademarks or trademarks of Intel... ANY DEFECTIVE PRODUCT OR THE USE OF ANY PRODUCT. Sony Face Recognition technology developed by Sony is not a malfunction. Backup recommendations To avoid potential risk of data loss caused by accidental operation or malfunction of the digital photo frame, we recommend that may cause a malfunction. •...
Operating Instructions
Page 8
... various ways 10 Features 12 Checking included items 13 Identifying the parts 13 Basic operations Preparing the remote control ........16 Connecting to the AC power source 17 Setting the stand 18 Turning the photo frame on ..........19 Setting the clock 19 Inserting a memory card and viewing images 20 Inserting a memory card 20 Displaying...
... various ways 10 Features 12 Checking included items 13 Identifying the parts 13 Basic operations Preparing the remote control ........16 Connecting to the AC power source 17 Setting the stand 18 Turning the photo frame on ..........19 Setting the clock 19 Inserting a memory card and viewing images 20 Inserting a memory card 20 Displaying...
Operating Instructions
Page 10
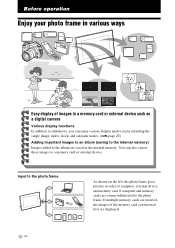
... to a memory card or external device. Input to the photo frame As shown on the left, the photo frame gives priority in the internal memory. Before operation Enjoy your photo frame in various ways Easy display of images in a memory card or external device such as a digital camera Various display functions In addition to slideshows, you inserted...
... to a memory card or external device. Input to the photo frame As shown on the left, the photo frame gives priority in the internal memory. Before operation Enjoy your photo frame in various ways Easy display of images in a memory card or external device such as a digital camera Various display functions In addition to slideshows, you inserted...
Operating Instructions
Page 11
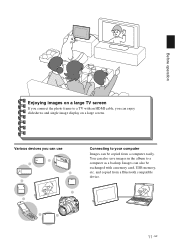
You can also save images in the album to your computer Images can be exchanged with an HDMI cable, you can enjoy slideshows and single image display on a large screen. Images can use Connecting to a computer as a backup. and copied from a computer easily. Before operation Enjoying images on a large TV screen If you connect the photo frame to a TV with a memory card, USB memory, etc. Various devices you can also be copied from a Bluetooth compatible device. 11 GB
You can also save images in the album to your computer Images can be exchanged with an HDMI cable, you can enjoy slideshows and single image display on a large screen. Images can use Connecting to a computer as a backup. and copied from a computer easily. Before operation Enjoying images on a large TV screen If you connect the photo frame to a TV with a memory card, USB memory, etc. Various devices you can also be copied from a Bluetooth compatible device. 11 GB

Operating Instructions
Page 12
...images to the photo frame's internal memory from a Bluetooth compatible device via a Bluetooth adaptor (optional). x Easy operation by remote control x Adding images to internal memory. x Support for various memory cards Supports various memory cards used by automatic corrections of images taken with a digital camera or ... beautiful images by digital cameras and other device, then you will be switched automatically as a "Memory Stick", CompactFlash card, SD memory card, and xD-Picture Card™. You can be able to exchange the images 12 GB Features The Sony DPF-V900/V700 ...
...images to the photo frame's internal memory from a Bluetooth compatible device via a Bluetooth adaptor (optional). x Easy operation by remote control x Adding images to internal memory. x Support for various memory cards Supports various memory cards used by automatic corrections of images taken with a digital camera or ... beautiful images by digital cameras and other device, then you will be switched automatically as a "Memory Stick", CompactFlash card, SD memory card, and xD-Picture Card™. You can be able to exchange the images 12 GB Features The Sony DPF-V900/V700 ...

Operating Instructions
Page 13
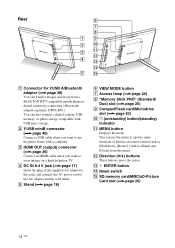
Before operation Checking included items Make sure that the following items are included. • Digital photo frame (1) • Remote control (1) • AC adaptor (1) • AC power cord (1) • Operating Instructions (this sensor. Continued 13 GB Front A LCD screen B Remote sensor When using the supplied remote control, point it at this manual) (1) • Warranty (1) (In some regions, the...
Before operation Checking included items Make sure that the following items are included. • Digital photo frame (1) • Remote control (1) • AC adaptor (1) • AC power cord (1) • Operating Instructions (this sensor. Continued 13 GB Front A LCD screen B Remote sensor When using the supplied remote control, point it at this manual) (1) • Warranty (1) (In some regions, the...
Operating Instructions
Page 14
... connector (.page 36) Connect an HDMI cable when you want to view images on a high definition TV. You can also connect a digital camera, USB memory, or photo storage compatible with a computer. M ENTER button N Reset switch O SD memory card/MMC/xD-Picture Card slot (.page 20) 14... 20) I CompactFlash card/Microdrive slot (.page 20) J 1 (on remote control such as [Slideshow], [Rotate], [Add to the AC adaptor and the wall outlet. L Direction (v/V) buttons These buttons move the cursor. You can use the photo frame with USB mass storage. B USB miniB connector (.page 40) Connect ...
... connector (.page 36) Connect an HDMI cable when you want to view images on a high definition TV. You can also connect a digital camera, USB memory, or photo storage compatible with a computer. M ENTER button N Reset switch O SD memory card/MMC/xD-Picture Card slot (.page 20) 14... 20) I CompactFlash card/Microdrive slot (.page 20) J 1 (on remote control such as [Slideshow], [Rotate], [Add to the AC adaptor and the wall outlet. L Direction (v/V) buttons These buttons move the cursor. You can use the photo frame with USB mass storage. B USB miniB connector (.page 40) Connect ...

Operating Instructions
Page 16
... stops working, replace the battery (CR2025 lithium battery) with a Sony CR2025 lithium battery. Remote sensor 16 GB 3 Reinsert the battery holder into the remote control. Notes • When the lithium battery becomes weak, the operating distance of the remote control towards the remote sensor on the photo frame. 2 Remove the old battery from the battery holder and...
... stops working, replace the battery (CR2025 lithium battery) with a Sony CR2025 lithium battery. Remote sensor 16 GB 3 Reinsert the battery holder into the remote control. Notes • When the lithium battery becomes weak, the operating distance of the remote control towards the remote sensor on the photo frame. 2 Remove the old battery from the battery holder and...
Operating Instructions
Page 17
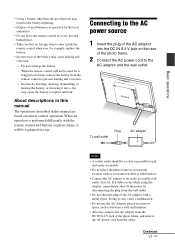
...example, replace the battery. • Incorrect use , remove the AC adaptor from the DC IN 8.4 V jack of the photo frame, and remove the AC power cord from the outlet. When the remote control will be used batteries as specified by disconnecting the plug from the wall outlet. • Do not short the... plug of the AC adaptor with the remote control and buttons on photo frame, it into the DC IN 8.4 V jack on the rear of the photo frame. 2 Connect the AC power cord to rupture and leak.
...example, replace the battery. • Incorrect use , remove the AC adaptor from the DC IN 8.4 V jack of the photo frame, and remove the AC power cord from the outlet. When the remote control will be used batteries as specified by disconnecting the plug from the wall outlet. • Do not short the... plug of the AC adaptor with the remote control and buttons on photo frame, it into the DC IN 8.4 V jack on the rear of the photo frame. 2 Connect the AC power cord to rupture and leak.
Operating Instructions
Page 18
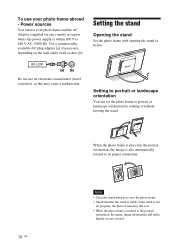
... depending on the wall outlet (wall socket) [b]. Setting the stand Opening the stand Set the photo frame with opening the stand as this may fall over. • When the photo frame is stable. When the photo frame is placed in any country or region where the power supply is within 100 V to its proper... orientation. 18 GB Notes • Close the stand when you carry the photo frame. • Check whether the stand is rotated to the portrait orientation, the menu, image information and index display are not rotated. AC-L200...
... depending on the wall outlet (wall socket) [b]. Setting the stand Opening the stand Set the photo frame with opening the stand as this may fall over. • When the photo frame is stable. When the photo frame is placed in any country or region where the power supply is within 100 V to its proper... orientation. 18 GB Notes • Close the stand when you carry the photo frame. • Check whether the stand is rotated to the portrait orientation, the menu, image information and index display are not rotated. AC-L200...

Operating Instructions
Page 19
...screen is displayed. 4 Select the format of the photo frame needs to be adjusted in the clock and calendar view modes. Basic operations Turning the photo frame on Turning on the power Press 1 (on/standby) on the photo frame or remote control to display an accurate time in order to... • D/M/Y 5 Adjust the date. 1Press v/V to select [Date/time settings] and then press . After disabling demo mode, you power on the photo frame or remote control until turning off the power. Turning off the power Hold 1 (on/standby) on the first time after purchase, demo mode will disable demo mode...
...screen is displayed. 4 Select the format of the photo frame needs to be adjusted in the clock and calendar view modes. Basic operations Turning the photo frame on Turning on the power Press 1 (on/standby) on the photo frame or remote control to display an accurate time in order to... • D/M/Y 5 Adjust the date. 1Press v/V to select [Date/time settings] and then press . After disabling demo mode, you power on the photo frame or remote control until turning off the power. Turning off the power Hold 1 (on/standby) on the first time after purchase, demo mode will disable demo mode...

Operating Instructions
Page 20
... describes inserting a memory card and general operations for the calendar. Inserting a memory card Insert a memory card firmly into the corresponding slot with this photo frame, see pages 48 to select a value and then press . To remove a memory card Remove a memory card from a slot in the opposite... calendar is displayed. 1Press v/V to select [First Weekday] and then press . 2Press v/V to start the week for displaying images in the order of the photo frame). 2Press v/V to select a value and then press . 6 Adjust the time. 1Press v/V to select [Time] and then press . 2Press v/V to 50...
... describes inserting a memory card and general operations for the calendar. Inserting a memory card Insert a memory card firmly into the corresponding slot with this photo frame, see pages 48 to select a value and then press . To remove a memory card Remove a memory card from a slot in the opposite... calendar is displayed. 1Press v/V to select [First Weekday] and then press . 2Press v/V to start the week for displaying images in the order of the photo frame). 2Press v/V to select a value and then press . 6 Adjust the time. 1Press v/V to select [Time] and then press . 2Press v/V to 50...
Operating Instructions
Page 21
... in the internal memory are displayed. To manually change the setting in the [Select device] menu. • If multiple memory cards are inserted when the photo frame is turned on page 48. "Memory Stick" b CompactFlash card b SD memory card/xD-Picture Card • If no memory card is inserted and no..., so do not try to force it in the following priorities. • If a device is as this could damage the memory card and/or photo frame. • This photo frame has "Memory Stick" standard and Duo size compatible slot, so you do not need a Memory Stick adaptor. • The SD memory card/xD-...
... in the internal memory are displayed. To manually change the setting in the [Select device] menu. • If multiple memory cards are inserted when the photo frame is turned on page 48. "Memory Stick" b CompactFlash card b SD memory card/xD-Picture Card • If no memory card is inserted and no..., so do not try to force it in the following priorities. • If a device is as this could damage the memory card and/or photo frame. • This photo frame has "Memory Stick" standard and Duo size compatible slot, so you do not need a Memory Stick adaptor. • The SD memory card/xD-...
Operating Instructions
Page 22
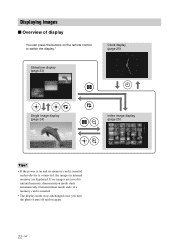
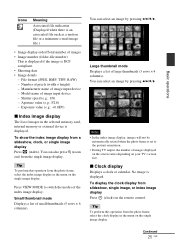
... is inserted. • The display mode stays unchanged once you turn the photo frame off and on and no memory card is inserted and no images are displayed. Displaying images x Overview of display You can press the buttons on the remote control to switch the display.* Clock display (page 25) Slideshow display (page...
... is inserted. • The display mode stays unchanged once you turn the photo frame off and on and no memory card is inserted and no images are displayed. Displaying images x Overview of display You can press the buttons on the remote control to switch the display.* Clock display (page 25) Slideshow display (page...
Operating Instructions
Page 23
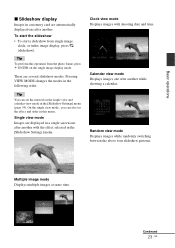
... images at same time. Calendar view mode Displays images one after another while showing a calendar. To start the slideshow • To start a slideshow from the photo frame, press ENTER on the single view and calendar view mode in the following order. Tip To perform this menu. Random view mode Displays images while...
... images at same time. Calendar view mode Displays images one after another while showing a calendar. To start the slideshow • To start a slideshow from the photo frame, press ENTER on the single view and calendar view mode in the following order. Tip To perform this menu. Random view mode Displays images while...
Operating Instructions
Page 24
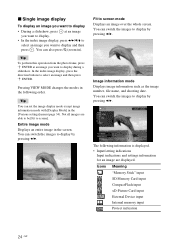
... Card input CompactFlash input xD-Picture Card input External Device input Internal memory input Protect indication 24 GB Tip To perform this operation from the photo frame, press ENTER at an image you want to display. • In the index image display, press B/b/v/V to select an image you want to display by...
... Card input CompactFlash input xD-Picture Card input External Device input Internal memory input Protect indication 24 GB Tip To perform this operation from the photo frame, press ENTER at an image you want to display. • In the index image display, press B/b/v/V to select an image you want to display by...
Operating Instructions
Page 25
... - Press VIEW MODE to the portrait orientation. • During TV output, the number of images displayed on the screen varies depending on the remote control. You can select an image by pressing B/b/v/V. Manufacturer name of small thumbnails (5 rows × 6 columns). Small thumbnail mode Displays a ...(clock) on your TV's screen size. Notes • In the index image display, images will not be automatically rotated when the photo frame is set to switch the modes of images in the menu on the single image display. To display the clock display from a slideshow...
... - Press VIEW MODE to the portrait orientation. • During TV output, the number of images displayed on the screen varies depending on the remote control. You can select an image by pressing B/b/v/V. Manufacturer name of small thumbnails (5 rows × 6 columns). Small thumbnail mode Displays a ...(clock) on your TV's screen size. Notes • In the index image display, images will not be automatically rotated when the photo frame is set to switch the modes of images in the menu on the single image display. To display the clock display from a slideshow...

Operating Instructions
Page 27
...begins and then the image before correction) Select [Cancel] and then press . The automatic red-eye correction of this operation from the photo frame, press MENU, press the direction buttons to select [AUTO TOUCH- Skin smoothing: Automatically recognizes face parts, and adjusts the skin tone...the U.S.A. Focus correction is displayed. 3 Press v/V to select the item, and then press ENTER. The skin smoothing correction of the photo frame uses the technology of FotoNation Inc. The menu is not effective for blurring caused by using the face detect function. Notes • Depending...
...begins and then the image before correction) Select [Cancel] and then press . The automatic red-eye correction of this operation from the photo frame, press MENU, press the direction buttons to select [AUTO TOUCH- Skin smoothing: Automatically recognizes face parts, and adjusts the skin tone...the U.S.A. Focus correction is displayed. 3 Press v/V to select the item, and then press ENTER. The skin smoothing correction of the photo frame uses the technology of FotoNation Inc. The menu is not effective for blurring caused by using the face detect function. Notes • Depending...


