
Operating Instructions
Page 1
3-300-208-12 (2) Digital Photo Frame DPF-V900/V700 Operating Instructions Before operating this unit, please read this product. Record the serial number in the space provided below. Refer to these numbers whenever you call upon your Sony dealer regarding this manual thoroughly and retain it for future reference. Owner's Record The model and serial numbers are located at the rear. DPF-V900/V700 Serial No Before operation Basic operations Advanced operations Using an external device Error messages Troubleshooting Additional information © 2008 Sony Corporation Model No.
3-300-208-12 (2) Digital Photo Frame DPF-V900/V700 Operating Instructions Before operating this unit, please read this product. Record the serial number in the space provided below. Refer to these numbers whenever you call upon your Sony dealer regarding this manual thoroughly and retain it for future reference. Owner's Record The model and serial numbers are located at the rear. DPF-V900/V700 Serial No Before operation Basic operations Advanced operations Using an external device Error messages Troubleshooting Additional information © 2008 Sony Corporation Model No.
Operating Instructions
Page 5
...also infringe their rights. Disposal of waste batteries (applicable in the European Union and other materials except for your nearest Sony service station. The recycling of materials will help to conserve natural resources. For more detailed information about recycling of this ... materials will help to conserve natural resources. Never use or modification of there's portrait may influence the picture of this digital photo frame. For more detailed information about recycling of this product, please contact your local Civic Office, your safety and convenience. ...
...also infringe their rights. Disposal of waste batteries (applicable in the European Union and other materials except for your nearest Sony service station. The recycling of materials will help to conserve natural resources. For more detailed information about recycling of this ... materials will help to conserve natural resources. Never use or modification of there's portrait may influence the picture of this digital photo frame. For more detailed information about recycling of this product, please contact your local Civic Office, your safety and convenience. ...
Operating Instructions
Page 6
... in picture quality and colors with face recognition feature. Sony Face Recognition technology developed by Sony is used. • The Bluetooth word mark and logos are owned by use or malfunction of the digital photo frame or memory card. Other trademarks and trade names are ...those of their respective companies. ROM", , "MagicGate", and are trademarks or registered trademarks of Sony Corporation. • HDMI, , and High-Definition Multimedia Interface...
... in picture quality and colors with face recognition feature. Sony Face Recognition technology developed by Sony is used. • The Bluetooth word mark and logos are owned by use or malfunction of the digital photo frame or memory card. Other trademarks and trade names are ...those of their respective companies. ROM", , "MagicGate", and are trademarks or registered trademarks of Sony Corporation. • HDMI, , and High-Definition Multimedia Interface...
Operating Instructions
Page 8
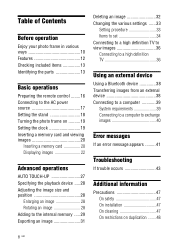
... various ways 10 Features 12 Checking included items 13 Identifying the parts 13 Basic operations Preparing the remote control ........16 Connecting to the AC power source 17 Setting the stand 18 Turning the photo frame on ..........19 Setting the clock 19 Inserting a memory card and viewing images 20 Inserting a memory card 20 Displaying...
... various ways 10 Features 12 Checking included items 13 Identifying the parts 13 Basic operations Preparing the remote control ........16 Connecting to the AC power source 17 Setting the stand 18 Turning the photo frame on ..........19 Setting the clock 19 Inserting a memory card and viewing images 20 Inserting a memory card 20 Displaying...
Operating Instructions
Page 10
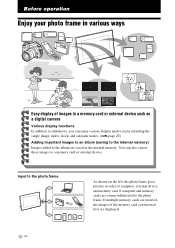
... priority in order of computer, external device, and memory card if computer and memory cards are connected/inserted to the photo frame. If multiple memory cards are inserted, the images of the memory card you can also export these images to a memory card or external ...to the internal memory) Images added to the album are saved in the internal memory. Before operation Enjoy your photo frame in various ways Easy display of images in a memory card or external device such as a digital camera Various display functions In addition to slideshows, you inserted first are displayed. 10 GB
... priority in order of computer, external device, and memory card if computer and memory cards are connected/inserted to the photo frame. If multiple memory cards are inserted, the images of the memory card you can also export these images to a memory card or external ...to the internal memory) Images added to the album are saved in the internal memory. Before operation Enjoy your photo frame in various ways Easy display of images in a memory card or external device such as a digital camera Various display functions In addition to slideshows, you inserted first are displayed. 10 GB
Operating Instructions
Page 11
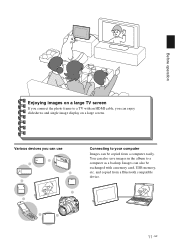
Images can also be exchanged with an HDMI cable, you can enjoy slideshows and single image display on a large TV screen If you can also save images in the album to a computer as a backup. and copied from a computer easily. Before operation Enjoying images on a large screen. Various devices you connect the photo frame to your computer Images can be copied from a Bluetooth compatible device. 11 GB You can use Connecting to a TV with a memory card, USB memory, etc.
Images can also be exchanged with an HDMI cable, you can enjoy slideshows and single image display on a large TV screen If you can also save images in the album to a computer as a backup. and copied from a computer easily. Before operation Enjoying images on a large screen. Various devices you connect the photo frame to your computer Images can be copied from a Bluetooth compatible device. 11 GB You can use Connecting to a TV with a memory card, USB memory, etc.

Operating Instructions
Page 12
...Sony DPF-V900/V700 is set in either the portrait or landscape position. x Support for mass storage compatible devices x Connecting to a high definition TV to exchange the images 12 GB Images are also automatically rotated when the photo frame is a digital photo frame for various memory cards Supports various memory cards used by digital... cameras and other device without using a computer. x AUTO TOUCH-UP features You can enjoy beautiful images by remote control x ...
...Sony DPF-V900/V700 is set in either the portrait or landscape position. x Support for mass storage compatible devices x Connecting to a high definition TV to exchange the images 12 GB Images are also automatically rotated when the photo frame is a digital photo frame for various memory cards Supports various memory cards used by digital... cameras and other device without using a computer. x AUTO TOUCH-UP features You can enjoy beautiful images by remote control x ...

Operating Instructions
Page 13
.... The locations and names of buttons and connectors of the DPF-V700 are identical to those of the DPF-V900. The illustrations are included. • Digital photo frame (1) • Remote control (1) • AC adaptor (1) • AC power cord (1) • Operating Instructions (this sensor. Continued 13 GB Before operation Checking included items Make sure that...
.... The locations and names of buttons and connectors of the DPF-V700 are identical to those of the DPF-V900. The illustrations are included. • Digital photo frame (1) • Remote control (1) • AC adaptor (1) • AC power cord (1) • Operating Instructions (this sensor. Continued 13 GB Before operation Checking included items Make sure that...
Operating Instructions
Page 14
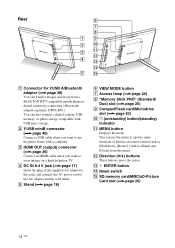
... an HDMI cable when you want to view images on /standby) button/(standby) indicator K MENU button Displays the menu. You can use the photo frame with USB mass storage. M ENTER button N Reset switch O SD memory card/MMC/xD-Picture Card slot (.page 20) 14 GB You can also ...connect a digital camera, USB memory, or photo storage compatible with a computer. D DC IN 8.4 V jack (.page 17) Insert the plug of buttons on remote control such as [Slideshow], [Rotate], [Add to the AC adaptor and the wall outlet. ...
... an HDMI cable when you want to view images on /standby) button/(standby) indicator K MENU button Displays the menu. You can use the photo frame with USB mass storage. M ENTER button N Reset switch O SD memory card/MMC/xD-Picture Card slot (.page 20) 14 GB You can also ...connect a digital camera, USB memory, or photo storage compatible with a computer. D DC IN 8.4 V jack (.page 17) Insert the plug of buttons on remote control such as [Slideshow], [Rotate], [Add to the AC adaptor and the wall outlet. ...

Operating Instructions
Page 16
... battery (CR2025 lithium battery) with a Sony CR2025 lithium battery. Using the remote control Point the top end of fire or explosion. Remote sensor 16 GB 3 Reinsert the battery holder into the remote control. Use of another battery may present a risk of the remote control towards the remote sensor on the photo frame. 2 Remove the old battery from the...
... battery (CR2025 lithium battery) with a Sony CR2025 lithium battery. Using the remote control Point the top end of fire or explosion. Remote sensor 16 GB 3 Reinsert the battery holder into the remote control. Use of another battery may present a risk of the remote control towards the remote sensor on the photo frame. 2 Remove the old battery from the...
Operating Instructions
Page 17
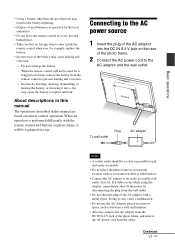
...; Incorrect use , remove the AC adaptor from the DC IN 8.4 V jack of the photo frame, and remove the AC power cord from the wall outlet. • Do not short the plug of the AC adaptor with the remote control and buttons on photo frame, it into the DC IN 8.4 V jack on the rear of the... photo frame. 2 Connect the AC power cord to prevent leaking and corrosion. - About descriptions in this manual The operations...
...; Incorrect use , remove the AC adaptor from the DC IN 8.4 V jack of the photo frame, and remove the AC power cord from the wall outlet. • Do not short the plug of the AC adaptor with the remote control and buttons on photo frame, it into the DC IN 8.4 V jack on the rear of the... photo frame. 2 Connect the AC power cord to prevent leaking and corrosion. - About descriptions in this manual The operations...
Operating Instructions
Page 18
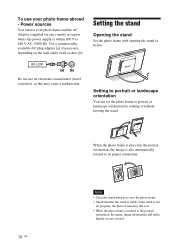
...within 100 V to its proper orientation. 18 GB Notes • Close the stand when you carry the photo frame. • Check whether the stand is not set the photo frame to the portrait orientation, the menu, image information and index display are not rotated. Power sources You can ...necessary, depending on the wall outlet (wall socket) [b]. If the stand is stable. To use your photo frame abroad - Setting to portrait or landscape orientation You can use your photo frame and the AC Adaptor (supplied) in the portrait orientation, the image is rotated to portrait or landscape ...
...within 100 V to its proper orientation. 18 GB Notes • Close the stand when you carry the photo frame. • Check whether the stand is not set the photo frame to the portrait orientation, the menu, image information and index display are not rotated. Power sources You can ...necessary, depending on the wall outlet (wall socket) [b]. If the stand is stable. To use your photo frame abroad - Setting to portrait or landscape orientation You can use your photo frame and the AC Adaptor (supplied) in the portrait orientation, the image is rotated to portrait or landscape ...

Operating Instructions
Page 19
...red, when you cannot set up clock. Turning off the power. Basic operations Turning the photo frame on Turning on the power Press 1 (on/standby) on the photo frame or remote control to turn on the photo frame or remote control until turning off the power Hold 1 (on/standby) on the power, and ...the standby indicator turns into green from green. Doing so may damage the photo frame. After disabling demo mode, you power on the remote control. Setting the clock The clock of the date. 1Press v/V to select [Date Display Order] and then press . ...
...red, when you cannot set up clock. Turning off the power. Basic operations Turning the photo frame on Turning on the power Press 1 (on/standby) on the photo frame or remote control to turn on the photo frame or remote control until turning off the power Hold 1 (on/standby) on the power, and ...the standby indicator turns into green from green. Doing so may damage the photo frame. After disabling demo mode, you power on the remote control. Setting the clock The clock of the date. 1Press v/V to select [Date Display Order] and then press . ...

Operating Instructions
Page 20
... taking your position on the very left when the calendar is closed. Inserting a memory card Insert a memory card firmly into the corresponding slot with this photo frame, see pages 48 to select [Sunday] or [Monday] and then press . 8 Press MENU. You can use with its label side facing toward you ... the rear side of hour, minute, and second. 7 Set the day to select a value and then press . Set the time in the order of the photo frame). 2Press v/V to select a value and then press . 6 Adjust the time. 1Press v/V to select [Time] and then press . 2Press v/V to start the week for ...
... taking your position on the very left when the calendar is closed. Inserting a memory card Insert a memory card firmly into the corresponding slot with this photo frame, see pages 48 to select [Sunday] or [Monday] and then press . 8 Press MENU. You can use with its label side facing toward you ... the rear side of hour, minute, and second. 7 Set the day to select a value and then press . Set the time in the order of the photo frame). 2Press v/V to select a value and then press . 6 Adjust the time. 1Press v/V to select [Time] and then press . 2Press v/V to start the week for ...
Operating Instructions
Page 21
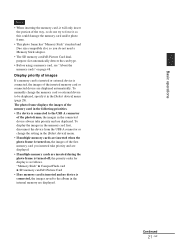
...insert the portion of the way, so do not try to be displayed, specify it as this could damage the memory card and/or photo frame. • This photo frame has "Memory Stick" standard and Duo size compatible slot, so you do not need a Memory Stick adaptor. • The SD ... on , the images of the first memory card you inserted take priority and are displayed automatically. The photo frame displays the images of the photo frame, the images in the internal memory are inserted when the photo frame is as follows. "Memory Stick" b CompactFlash card b SD memory card/xD-Picture Card • ...
...insert the portion of the way, so do not try to be displayed, specify it as this could damage the memory card and/or photo frame. • This photo frame has "Memory Stick" standard and Duo size compatible slot, so you do not need a Memory Stick adaptor. • The SD ... on , the images of the first memory card you inserted take priority and are displayed automatically. The photo frame displays the images of the photo frame, the images in the internal memory are inserted when the photo frame is as follows. "Memory Stick" b CompactFlash card b SD memory card/xD-Picture Card • ...
Operating Instructions
Page 22
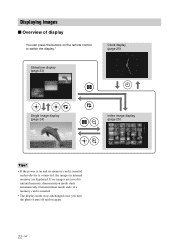
... is on again. 22 GB Demonstration mode ends, if a memory card is inserted. • The display mode stays unchanged once you turn the photo frame off and on and no memory card is inserted and no images are displayed. Displaying images x Overview of display You can press the buttons on... the remote control to switch the display.* Clock display (page 25) Slideshow display (page 23) Single image display (page 24) Index image display (page 25) Tips...
... is on again. 22 GB Demonstration mode ends, if a memory card is inserted. • The display mode stays unchanged once you turn the photo frame off and on and no memory card is inserted and no images are displayed. Displaying images x Overview of display You can press the buttons on... the remote control to switch the display.* Clock display (page 25) Slideshow display (page 23) Single image display (page 24) Index image display (page 25) Tips...
Operating Instructions
Page 23
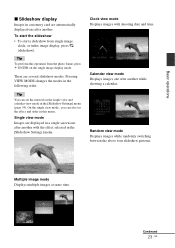
... [Slideshow Settings] menu. Continued 23 GB Multiple image mode Displays multiple images at same time. To start the slideshow • To start a slideshow from the photo frame, press ENTER on the single view and calendar view mode in the [Slideshow Settings] menu (page 34). Tip You can also set the interval on...
... [Slideshow Settings] menu. Continued 23 GB Multiple image mode Displays multiple images at same time. To start the slideshow • To start a slideshow from the photo frame, press ENTER on the single view and calendar view mode in the [Slideshow Settings] menu (page 34). Tip You can also set the interval on...
Operating Instructions
Page 24
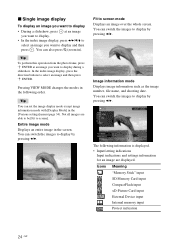
You can switch the images to screen mode Displays an image over the whole screen. Tip To perform this operation from the photo frame, press ENTER at an image you want to display. • In the index image display, press B/b/v/V to select an image you want to display and ...
You can switch the images to screen mode Displays an image over the whole screen. Tip To perform this operation from the photo frame, press ENTER at an image you want to display. • In the index image display, press B/b/v/V to select an image you want to display and ...
Operating Instructions
Page 25
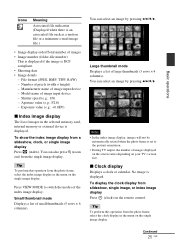
...; In the index image display, images will not be automatically rotated when the photo frame is DCF compliant. • Shooting date • Image details - To display the clock display from the photo frame, select the clock display in the menu on the remote control. Exposure value (e.g.: +0.0EV) x Index image display The list of images in...
...; In the index image display, images will not be automatically rotated when the photo frame is DCF compliant. • Shooting date • Image details - To display the clock display from the photo frame, select the clock display in the menu on the remote control. Exposure value (e.g.: +0.0EV) x Index image display The list of images in...

Operating Instructions
Page 27
...flash. 1 Display the image you want to be detected automatically. • Depending on the image, it was before correction. • To perform this photo frame uses the technology of people may not be able to correct as single image display. 2 Press MENU. Correction of this operation from the... photo frame, press MENU, press the direction buttons to create a better-focused image. The automatic red-eye correction of the selected image begins and ...
...flash. 1 Display the image you want to be detected automatically. • Depending on the image, it was before correction. • To perform this photo frame uses the technology of people may not be able to correct as single image display. 2 Press MENU. Correction of this operation from the... photo frame, press MENU, press the direction buttons to create a better-focused image. The automatic red-eye correction of the selected image begins and ...
