
Child Safety: It Makes A Difference Where Your TV Stands
Page 1
... Industry Cares! Sometimes televisions are not always supported on this hidden hazard of the home with furniture and television sets. 5 Avoid placing any items on top of TVs such as VCRs and remotes that may pique the children's curiosity. 6 Remember that is committed to advocate children's safety and educate customers and... message on the proper TV stands. As a result, TV sets may cause unnecessary injury. Tune Into Safety 1 One size does NOT fit all. The home theater entertainment experience is a Sector of television and consumer electronics furniture manufacturers to making...
... Industry Cares! Sometimes televisions are not always supported on this hidden hazard of the home with furniture and television sets. 5 Avoid placing any items on top of TVs such as VCRs and remotes that may pique the children's curiosity. 6 Remember that is committed to advocate children's safety and educate customers and... message on the proper TV stands. As a result, TV sets may cause unnecessary injury. Tune Into Safety 1 One size does NOT fit all. The home theater entertainment experience is a Sector of television and consumer electronics furniture manufacturers to making...
HDMI Control Guide
Page 2
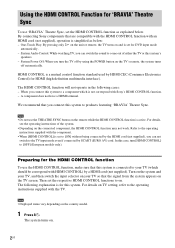
... with an HDMI cord (not supplied), operation is active. One-Touch Play: By pressing only H on the unit or remote, the TV turns on the remote while the HDMI CONTROL function is simplified as explained below : - HDMI CONTROL is a mutual control function standard used by ...the country model. 1 Press "/1. Preparing for HDMI (high-definition multimedia interface). By connecting Sony components that this system. In this system to [OFF] (European models only). When you can switch the sound to the TV input mode even if connected by the HDMI cord (not supplied), you connect...
... with an HDMI cord (not supplied), operation is active. One-Touch Play: By pressing only H on the unit or remote, the TV turns on the remote while the HDMI CONTROL function is simplified as explained below : - HDMI CONTROL is a mutual control function standard used by ...the country model. 1 Press "/1. Preparing for HDMI (high-definition multimedia interface). By connecting Sony components that this system. In this system to [OFF] (European models only). When you can switch the sound to the TV input mode even if connected by the HDMI cord (not supplied), you connect...
HDMI Control Guide
Page 4
... SKIP on the remote or DISC 1-5 on the system. Enjoying the TV sound from the system speakers. Note • When the TV is turned on before turning on the system, the TV sound will stop. • To output the sound from the TV menu. However, when you insert a disc in the system whose power is ... case, set the function to "TV" (depending on the model, "TV/VIDEO" appears), TV sound is operated with System Audio Control at the same time. You place a DVD disc on the unit or remote. While watching the TV and the function is automatically switched to load a disc (disc changer models ...
... SKIP on the remote or DISC 1-5 on the system. Enjoying the TV sound from the system speakers. Note • When the TV is turned on before turning on the system, the TV sound will stop. • To output the sound from the TV menu. However, when you insert a disc in the system whose power is ... case, set the function to "TV" (depending on the model, "TV/VIDEO" appears), TV sound is operated with System Audio Control at the same time. You place a DVD disc on the unit or remote. While watching the TV and the function is automatically switched to load a disc (disc changer models ...
HDMI Control Guide
Page 4
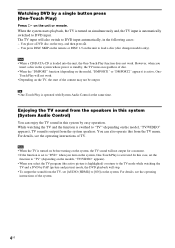
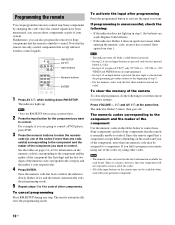
... want to use the HDMI CONTROL function, be sure you use the HDMI CONTROL function. 3 Press menu. See "To set HDMI CONTROL 1 (For remote RM-AAP016/ RM-AAP017 only) Press RECEIVER, then press MENU. "HDMI" flashes on . The RECEIVER indicator lights up and receiver operation is activated.... that the receiver is connected to the TV and components (compatible with HDMI CONTROL function) via HDMI connection. 2 Turn on the display. (For remote RM-AAU014/ RM-AAU015/RM-AAU017 only) Press AMP MENU. "1-LEVEL" appears on the receiver, TV and connected components. 3 Set the respective ...
... want to use the HDMI CONTROL function, be sure you use the HDMI CONTROL function. 3 Press menu. See "To set HDMI CONTROL 1 (For remote RM-AAP016/ RM-AAP017 only) Press RECEIVER, then press MENU. "HDMI" flashes on . The RECEIVER indicator lights up and receiver operation is activated.... that the receiver is connected to the TV and components (compatible with HDMI CONTROL function) via HDMI connection. 2 Turn on the display. (For remote RM-AAU014/ RM-AAU015/RM-AAU017 only) Press AMP MENU. "1-LEVEL" appears on the receiver, TV and connected components. 3 Set the respective ...
HDMI Control Guide
Page 6
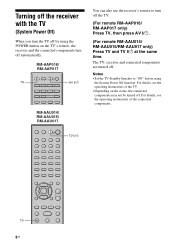
... TV and TV ?/1 at the same time. RM-AAP016/ RM-AAP017 TV AV ?/1 RM-AAU014/ RM-AAU015/ RM-AAU017 You can also use the receiver's remote to "ON" before using the POWER button on the status, the connected components may not be turned off. Turning off the receiver with the TV... (System Power Off) When you turn the TV off by using the System Power Off function. For details, see the operating instructions of the connected components. TV ?/1 TV 6GB
... TV and TV ?/1 at the same time. RM-AAP016/ RM-AAP017 TV AV ?/1 RM-AAU014/ RM-AAU015/ RM-AAU017 You can also use the receiver's remote to "ON" before using the POWER button on the status, the connected components may not be turned off. Turning off the receiver with the TV... (System Power Off) When you turn the TV off by using the System Power Off function. For details, see the operating instructions of the connected components. TV ?/1 TV 6GB
Operating Insructions
Page 6
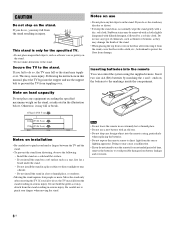
... floor from the stand resulting in the illustration below. Do not hold the grille as indicated in serious injury. Note • Do not leave the remote in a place subject to the stand. Secure the TV to direct sunlight or near a heater. - Do not use a new battery with a cloth, etc., ...the stand on the stand, as it may cause injury. Note on load capacity Do not place any foreign object into the remote You can control the system using the supplied remote. Do not install the stand in an extremely hot or humid place. • Do not use any hot objects on ...
... floor from the stand resulting in the illustration below. Do not hold the grille as indicated in serious injury. Note • Do not leave the remote in a place subject to the stand. Secure the TV to direct sunlight or near a heater. - Do not use a new battery with a cloth, etc., ...the stand on the stand, as it may cause injury. Note on load capacity Do not place any foreign object into the remote You can control the system using the supplied remote. Do not install the stand in an extremely hot or humid place. • Do not use any hot objects on ...
Operating Insructions
Page 8
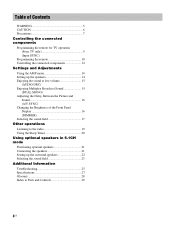
Table of Contents WARNING 5 CAUTION 6 Precautions 7 Controlling the connected components Programming the remote for TV operation (Sony TV only 9 (Input SYNC) Programming the remote 10 Controlling the connected components 12 Settings and Adjustments Using the AMP menu 14 Setting up the speakers 14 Enjoying the sound at low volume 15 (AUDIO DRC) Enjoying Multiplex Broadcast...
Table of Contents WARNING 5 CAUTION 6 Precautions 7 Controlling the connected components Programming the remote for TV operation (Sony TV only 9 (Input SYNC) Programming the remote 10 Controlling the connected components 12 Settings and Adjustments Using the AMP menu 14 Setting up the speakers 14 Enjoying the sound at low volume 15 (AUDIO DRC) Enjoying Multiplex Broadcast...

Operating Insructions
Page 9
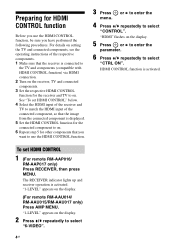
... the supplied "Quick Setup Guide"), follow the steps below for the remote button corresponding to the TV input jack you want to program the remote. Controlling the connected components Programming the remote for TV operation (Sony TV only) (Input SYNC) If you press the input buttons. ...The indicator lights up. The indicator slowly flashes twice and the remote automatically exits the programming mode. ...
... the supplied "Quick Setup Guide"), follow the steps below for the remote button corresponding to the TV input jack you want to program the remote. Controlling the connected components Programming the remote for TV operation (Sony TV only) (Input SYNC) If you press the input buttons. ...The indicator lights up. The indicator slowly flashes twice and the remote automatically exits the programming mode. ...
Operating Insructions
Page 10
...Replace both batteries. • If the indicator flashes 4 times in the tables below to control nonSony components and also Sony components that the remote is selected and the programming procedure returns to control. To clear the memory of the component you can use those components...; If the indicator does not light up . Note that your system. Once the numeric code has been verified, the indicator slowly flashes twice and the remote automatically exits the programming mode. 5 Repeat steps 1 to 4 to control non-Sony components by changing the code. There is a chance, however, ...
...Replace both batteries. • If the indicator flashes 4 times in the tables below to control nonSony components and also Sony components that the remote is selected and the programming procedure returns to control. To clear the memory of the component you can use those components...; If the indicator does not light up . Note that your system. Once the numeric code has been verified, the indicator slowly flashes twice and the remote automatically exits the programming mode. 5 Repeat steps 1 to 4 to control non-Sony components by changing the code. There is a chance, however, ...

Operating Insructions
Page 12
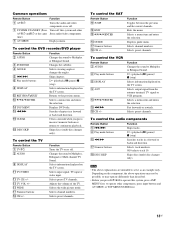
... 005 To control a hard disc recorder Maker SONY Code(s) 307, 308, 309 To control a blu-ray disc recorder Maker SONY Code(s) 310, 311, 312 Controlling the connected components You can control connected components with the remote of this system. 1 qk qj qh qg - Use the... tactile dot as a reference when operating the system and other audio/video components. 12US CLEAR ENTER ...
... 005 To control a hard disc recorder Maker SONY Code(s) 307, 308, 309 To control a blu-ray disc recorder Maker SONY Code(s) 310, 311, 312 Controlling the connected components You can control connected components with the remote of this system. 1 qk qj qh qg - Use the... tactile dot as a reference when operating the system and other audio/video components. 12US CLEAR ENTER ...
Operating Insructions
Page 13
... changer only). qa TV VOL +/- qa WIDE qj Numeric buttons qk CH +/- Selects preset channels. Function Changes the sound to the previous menu. Selects output signal from the antenna terminal: TV signal or VCR program. Note • The...system, press AMP MENU first; Exits the menu. Displays DVD title. Clears a mistake when you press C/X/x/c to continuous playback. Depending on the component, the above explanations are intended to operate other AV \/1 and \/1 at the same Sony audio/video components. Selects the wide picture mode. To control the TV Remote...
... changer only). qa TV VOL +/- qa WIDE qj Numeric buttons qk CH +/- Selects preset channels. Function Changes the sound to the previous menu. Selects output signal from the antenna terminal: TV signal or VCR program. Note • The...system, press AMP MENU first; Exits the menu. Displays DVD title. Clears a mistake when you press C/X/x/c to continuous playback. Depending on the component, the above explanations are intended to operate other AV \/1 and \/1 at the same Sony audio/video components. Selects the wide picture mode. To control the TV Remote...

Operating Insructions
Page 14
... until "LEVEL" appears, then press ENTER or c. 4 Press x/X repeatedly to select "CEN LEVEL" or "SW LEVEL", then press ENTER or c. 5 While monitoring the sound, press x/X repeatedly to select the setting you can set the following pages show details for each setting. Setting up the speakers You can adjust the...source encoded with AMP MENU on the AMP menu. 2 Press C/X/x/c repeatedly to select the item and the setting. 3 Press AMP MENU to turn on the remote. This setting is applied to +6 dB in 1 dB steps. 6 Press ENTER or AMP MENU. AMP MENU X/x/c ENTER - The default settings are underlined....
... until "LEVEL" appears, then press ENTER or c. 4 Press x/X repeatedly to select "CEN LEVEL" or "SW LEVEL", then press ENTER or c. 5 While monitoring the sound, press x/X repeatedly to select the setting you can set the following pages show details for each setting. Setting up the speakers You can adjust the...source encoded with AMP MENU on the AMP menu. 2 Press C/X/x/c repeatedly to select the item and the setting. 3 Press AMP MENU to turn on the remote. This setting is applied to +6 dB in 1 dB steps. 6 Press ENTER or AMP MENU. AMP MENU X/x/c ENTER - The default settings are underlined....

Operating Insructions
Page 26
...DVD player. For details, refer to turn on the power. 2 Press INPUT SELECTOR, VOLUME -, ?/1 at the remote sensor on the system. • Remove any obstacles in the path between the remote and the system. • Replace both batteries in . • Check that the antennas are not inputting PCM 96 kHz audio ... when you set progressive format on your DVD player but your TV cannot accept the signal in progressive format. ANTENNA AM COAXIAL FM 75 26US Sound is interrupted or there is noise. • Check that you are connected securely. • Adjust the angles of the antennas. • Connect...
...DVD player. For details, refer to turn on the power. 2 Press INPUT SELECTOR, VOLUME -, ?/1 at the remote sensor on the system. • Remove any obstacles in the path between the remote and the system. • Replace both batteries in . • Check that the antennas are not inputting PCM 96 kHz audio ... when you set progressive format on your DVD player but your TV cannot accept the signal in progressive format. ANTENNA AM COAXIAL FM 75 26US Sound is interrupted or there is noise. • Check that you are connected securely. • Adjust the angles of the antennas. • Connect...

Operating Insructions
Page 28
... development of all -digital amplifier technology developed by Digital Theater Systems, Inc. DTS Digital audio compression technology developed by Sony, which effectively minimizes the occurrence of sound fragmentation and jitter, delivering superb dialog clarity and faithful ...(174 lb 3 oz) Supplied accessories AM loop antenna (1) FM wire antenna (1) Input Box (4) System cable (4) Optical cable (1) Video cord (blue/green/red) (1) Video cord (yellow) (1) Remote commander (remote) (1) Size AA (R6) batteries (2) Operating Instructions (1) Quick Setup Guide (card) (1) Optional ...
... development of all -digital amplifier technology developed by Digital Theater Systems, Inc. DTS Digital audio compression technology developed by Sony, which effectively minimizes the occurrence of sound fragmentation and jitter, delivering superb dialog clarity and faithful ...(174 lb 3 oz) Supplied accessories AM loop antenna (1) FM wire antenna (1) Input Box (4) System cable (4) Optical cable (1) Video cord (blue/green/red) (1) Video cord (yellow) (1) Remote commander (remote) (1) Size AA (R6) batteries (2) Operating Instructions (1) Quick Setup Guide (card) (1) Optional ...

Operating Insructions
Page 29
Front panel 1 2 ?/1 6 A Front panel display (30) B Sound field indicator (17) C VOLUME +/- (26) 54 3 D INPUT SELECTOR (20, 26) E (remote sensor) (26) F "/1 (on/standby) (20, 26) continued 29US Index to Parts and Controls For more information, refer to the pages indicated in parentheses.
Front panel 1 2 ?/1 6 A Front panel display (30) B Sound field indicator (17) C VOLUME +/- (26) 54 3 D INPUT SELECTOR (20, 26) E (remote sensor) (26) F "/1 (on/standby) (20, 26) continued 29US Index to Parts and Controls For more information, refer to the pages indicated in parentheses.

Operating Insructions
Page 32
... + button has a tactile dot.* H DISPLAY (19) I C/X/x/c/ENTER (14, 15, 16, 19, 22) J TUNING +/- (19) K SOUND FIELD +/- (17, 23) * Use the tactile dot as a reference when operating the system. 9 8 H TOP MENU/ GUIDE X x MUTING AV MENU VOLUME O RETURN/EXIT DISPLAY TV/ TV VOL TV CH VIDEO ANT WIDE JUMP... 6 7 32US Remote control Here describes the buttons for operation of the connected components. See ...
... + button has a tactile dot.* H DISPLAY (19) I C/X/x/c/ENTER (14, 15, 16, 19, 22) J TUNING +/- (19) K SOUND FIELD +/- (17, 23) * Use the tactile dot as a reference when operating the system. 9 8 H TOP MENU/ GUIDE X x MUTING AV MENU VOLUME O RETURN/EXIT DISPLAY TV/ TV VOL TV CH VIDEO ANT WIDE JUMP... 6 7 32US Remote control Here describes the buttons for operation of the connected components. See ...
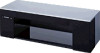
Marketing Specifications
Page 2
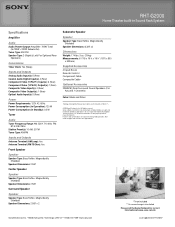
...Diego, CA 92127 • 1-800-222-7669 • www.sony.com *TV not included **On screen image is a registered trademark of Dolby Laboratories. All Rights reserved. RHT-G2000 Home Theater built-in Sound Rack System Specifications Amplifier Audio Audio Power Output: Amplifier: 700W Total (5x100W ...7/8 x 19 ¾ x 19 ¾" (1570 x 500 x 500mm) Supplied Accessories 4 Input Boxes Remote Control Component Cable Composite Cable Optional Accessories SS-MB150 Rear Surround Sound Speakers (For Actual 5.1 Channels) Color: Black and Silver Wattage for current information at 3 ohms and 1 ...
...Diego, CA 92127 • 1-800-222-7669 • www.sony.com *TV not included **On screen image is a registered trademark of Dolby Laboratories. All Rights reserved. RHT-G2000 Home Theater built-in Sound Rack System Specifications Amplifier Audio Audio Power Output: Amplifier: 700W Total (5x100W ...7/8 x 19 ¾ x 19 ¾" (1570 x 500 x 500mm) Supplied Accessories 4 Input Boxes Remote Control Component Cable Composite Cable Optional Accessories SS-MB150 Rear Surround Sound Speakers (For Actual 5.1 Channels) Color: Black and Silver Wattage for current information at 3 ohms and 1 ...


