Operating Instructions
Page 2
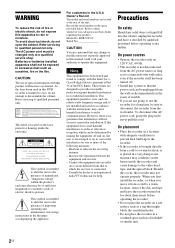
... not expressly approved in this manual could void your Sony dealer regarding this product. CAUTION The use the recorder for a long time, be unplugged from the wall outlet. ... laser protective housing inside the recorder and cause damage to which can radiate radio frequency energy and, if not installed and used in this DVD recorder is encouraged to try to provide...8226; Place the recorder in the space provided below. VÄLTÄ SUORAA ALTISTUMISTA SÄTEELLE. SYNLIG OG USYNLIG LASERSTRÅLING AF KLASSE 3B VED ÅBNING. RDR-VX535 Serial No CAUTION...
... not expressly approved in this manual could void your Sony dealer regarding this product. CAUTION The use the recorder for a long time, be unplugged from the wall outlet. ... laser protective housing inside the recorder and cause damage to which can radiate radio frequency energy and, if not installed and used in this DVD recorder is encouraged to try to provide...8226; Place the recorder in the space provided below. VÄLTÄ SUORAA ALTISTUMISTA SÄTEELLE. SYNLIG OG USYNLIG LASERSTRÅLING AF KLASSE 3B VED ÅBNING. RDR-VX535 Serial No CAUTION...

Operating Instructions
Page 4
... Types" on the remote. About this manual • Instructions in this manual refer to discs that are created on other recorders and played back on this recorder. • Icons, such as DVD or , listed at the top of each explanation indicate what kind of media can also use the controls on the... recorder if they have the same or similar names as those on the remote. • The on-screen display illustrations used with...
... Types" on the remote. About this manual • Instructions in this manual refer to discs that are created on other recorders and played back on this recorder. • Icons, such as DVD or , listed at the top of each explanation indicate what kind of media can also use the controls on the... recorder if they have the same or similar names as those on the remote. • The on-screen display illustrations used with...
Operating Instructions
Page 5
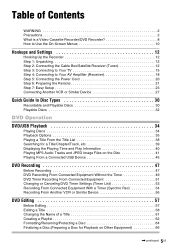
... Preparing the Remote 21 Step 7: Easy Setup 23 Connecting Another VCR or Similar Device 27 Quick Guide to Disc Types 30 Recordable and Playable Discs 30 Playable Discs 32 DVD Operation DVD/USB Playback 34 Playing Discs 34 Playback Options 35 Playing a ... 45 DVD Recording 47 Before Recording 47 DVD Recording From Connected Equipment Without the Timer 49 DVD Timer Recording From Connected Equipment 51 Changing or Canceling DVD Timer Settings (Timer List 53 Recording From Connected Equipment With a Timer (Synchro Rec 54 Recording From Another VCR or Similar Device 56 DVD Editing...
... Preparing the Remote 21 Step 7: Easy Setup 23 Connecting Another VCR or Similar Device 27 Quick Guide to Disc Types 30 Recordable and Playable Discs 30 Playable Discs 32 DVD Operation DVD/USB Playback 34 Playing Discs 34 Playback Options 35 Playing a ... 45 DVD Recording 47 Before Recording 47 DVD Recording From Connected Equipment Without the Timer 49 DVD Timer Recording From Connected Equipment 51 Changing or Canceling DVD Timer Settings (Timer List 53 Recording From Connected Equipment With a Timer (Synchro Rec 54 Recording From Another VCR or Similar Device 56 DVD Editing...
Operating Instructions
Page 6
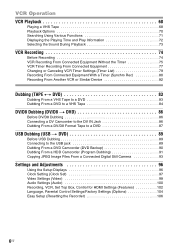
... Selecting the Sound During Playback 73 VCR Recording 74 Before Recording 74 VCR Recording From Connected Equipment Without the Timer 75 VCR Timer Recording From Connected Equipment 77 Changing or Canceling VCR Timer Settings (Timer List 79 Recording From Connected Equipment With a Timer (Synchro Rec 80 Recording From Another VCR or Similar Device 82 Dubbing (TAPE y DVD 83 Dubbing From a VHS Tape...
... Selecting the Sound During Playback 73 VCR Recording 74 Before Recording 74 VCR Recording From Connected Equipment Without the Timer 75 VCR Timer Recording From Connected Equipment 77 Changing or Canceling VCR Timer Settings (Timer List 79 Recording From Connected Equipment With a Timer (Synchro Rec 80 Recording From Another VCR or Similar Device 82 Dubbing (TAPE y DVD 83 Dubbing From a VHS Tape...
Operating Instructions
Page 7
Additional Information 107 Troubleshooting 107 Notes About This Recorder 112 Specifications 113 About i.LINK 115 Guide to Parts and Controls 116 DVD Audio/Subtitle Language 120 Cable Box/Satellite Receiver Brand Code 121 Index 126 7US
Additional Information 107 Troubleshooting 107 Notes About This Recorder 112 Specifications 113 About i.LINK 115 Guide to Parts and Controls 116 DVD Audio/Subtitle Language 120 Cable Box/Satellite Receiver Brand Code 121 Index 126 7US
Operating Instructions
Page 8
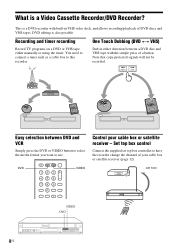
... manually or using the timer. Set top box control Connect the supplied set top box controller to this recorder. Recording and timer recording Record TV programs on a DVD or VHS tape, either direction between DVD and VCR Simply press the DVD or VIDEO button to select the media format you want to use. Control your cable box or...
... manually or using the timer. Set top box control Connect the supplied set top box controller to this recorder. Recording and timer recording Record TV programs on a DVD or VHS tape, either direction between DVD and VCR Simply press the DVD or VIDEO button to select the media format you want to use. Control your cable box or...
Operating Instructions
Page 9
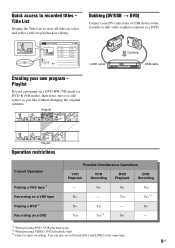
... for playback or editing. Title List (Original) 1/4 No. Title List Display the Title List to recorded titles - Quick access to view all titles on a DVD Possible Simultaneous Operations VCR Playback VCR Recording DVD Playback DVD Recording - Playlist Record a program on a DVD-RW (VR mode) or DVD-R (VR mode), then erase, move or add scenes as you like without changing the original...
... for playback or editing. Title List (Original) 1/4 No. Title List Display the Title List to recorded titles - Quick access to view all titles on a DVD Possible Simultaneous Operations VCR Playback VCR Recording DVD Playback DVD Recording - Playlist Record a program on a DVD-RW (VR mode) or DVD-R (VR mode), then erase, move or add scenes as you like without changing the original...
Operating Instructions
Page 10
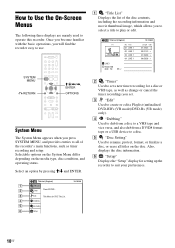
SYSTEM MENU 123 456 789 0 O RETURN M/m/ Once you become familiar with the basic operations, you will find the recorder easy to operate this recorder. How to Use the On-Screen Menus The following three displays are mainly used to use.
SYSTEM MENU 123 456 789 0 O RETURN M/m/ Once you become familiar with the basic operations, you will find the recorder easy to operate this recorder. How to Use the On-Screen Menus The following three displays are mainly used to use.
Operating Instructions
Page 11
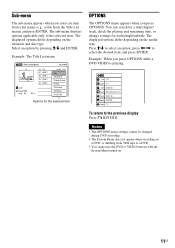
The sub-menu displays options applicable only to select an option, press Example: The Title List menu Title List (Original) 1/4 No. Press M/m to the selected item. The displayed options differ depending on the media type. Select an option by pressing M/m and ENTER. The displayed options differ depending on the situation and disc type. Title 01 LINE 1 02 LINE 1 03 LINE 1 04 LINE 1 T LINE 1 May/02/2008 08:00 PM 10:10 AM Length Edit Pla0y1:29:03 > Tit0le0:E3r1a:s2e3 > Ch0a1p:5te9r:0E0ras>e Pr0o0te:5ct8:56 > Title Name A·B Erase Divide Title Options for audio/...
The sub-menu displays options applicable only to select an option, press Example: The Title List menu Title List (Original) 1/4 No. Press M/m to the selected item. The displayed options differ depending on the media type. Select an option by pressing M/m and ENTER. The displayed options differ depending on the situation and disc type. Title 01 LINE 1 02 LINE 1 03 LINE 1 04 LINE 1 T LINE 1 May/02/2008 08:00 PM 10:10 AM Length Edit Pla0y1:29:03 > Tit0le0:E3r1a:s2e3 > Ch0a1p:5te9r:0E0ras>e Pr0o0te:5ct8:56 > Title Name A·B Erase Divide Title Options for audio/...
Operating Instructions
Page 13
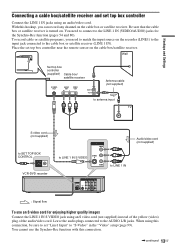
... ANT IN TO TV Antenna cable (not supplied) to antenna input TV S video cord (not supplied) to SET TOP BOX CONTROL SET TOP BOX CONTROL VCR-DVD recorder LINE 1 IN VIDEO S VIDEO to LINE 1 IN S VIDEO AUDIO to set top box controller Connect the LINE 1 IN jacks using an S video cord (not supplied... quality images Connect the LINE 1 IN S VIDEO jack using an audio/video cord. Place the set top box controller near the remote sensor on . To record cable or satellite programs, you can record any channel on the recorder (LINE1) to the input jack connected to the AUDIO L/R jacks.
... ANT IN TO TV Antenna cable (not supplied) to antenna input TV S video cord (not supplied) to SET TOP BOX CONTROL SET TOP BOX CONTROL VCR-DVD recorder LINE 1 IN VIDEO S VIDEO to LINE 1 IN S VIDEO AUDIO to set top box controller Connect the LINE 1 IN jacks using an S video cord (not supplied... quality images Connect the LINE 1 IN S VIDEO jack using an audio/video cord. Place the set top box controller near the remote sensor on . To record cable or satellite programs, you can record any channel on the recorder (LINE1) to the input jack connected to the AUDIO L/R jacks.
Operating Instructions
Page 15
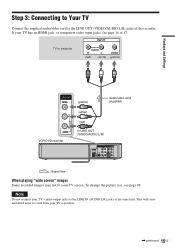
...AUDIO R L (red) (white) VIDEO (yellow) Hookups and Settings LINE OUT VIDEO (yellow) Audio/video cord (supplied) L R AUDIO VCR-DVD recorder (white) (red) to the LINE OUT (VIDEO/AUDIO L/R) jacks of the recorder. If your TV screen. Step 3: Connecting to Your TV Connect the supplied audio/video cord to LINE OUT (VIDEO/AUDIO... OUT COMPONENT VIDEO OUT VIDEO L Y S VIDEO L PB R R PR AUDIO AUDIO COAXIAL DIGITAL AUDIO OUT : Signal flow When playing "wide screen" images Some recorded images may not fit your TV has an HDMI jack, or component video input jacks, see page 98.
...AUDIO R L (red) (white) VIDEO (yellow) Hookups and Settings LINE OUT VIDEO (yellow) Audio/video cord (supplied) L R AUDIO VCR-DVD recorder (white) (red) to the LINE OUT (VIDEO/AUDIO L/R) jacks of the recorder. If your TV screen. Step 3: Connecting to Your TV Connect the supplied audio/video cord to LINE OUT (VIDEO/AUDIO... OUT COMPONENT VIDEO OUT VIDEO L Y S VIDEO L PB R R PR AUDIO AUDIO COAXIAL DIGITAL AUDIO OUT : Signal flow When playing "wide screen" images Some recorded images may not fit your TV has an HDMI jack, or component video input jacks, see page 98.
Operating Instructions
Page 16
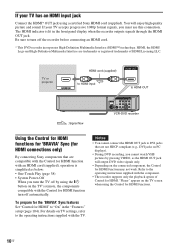
... OUT VIDEO L Y S VIDEO L PB R R PR AUDIO AUDIO COAXIAL DIGITAL AUDIO OUT VCR-DVD recorder Using the Control for HDMI functions for 'BRAVIA' Sync (for HDMI connections only) By connecting Sony components that are not HDCP compliant (e.g., DVI jacks on the TV screen when using the Control ... connect the HDMI OUT jack to turn off by using a certified Sony HDMI cord (supplied). To prepare for the 'BRAVIA' Sync features Set "Control for HDMI functions. 16US "Player" appears on PC displays). • During DVD recording, you cannot watch VHS pictures by pressing VIDEO, as below: &#...
... OUT VIDEO L Y S VIDEO L PB R R PR AUDIO AUDIO COAXIAL DIGITAL AUDIO OUT VCR-DVD recorder Using the Control for HDMI functions for 'BRAVIA' Sync (for HDMI connections only) By connecting Sony components that are not HDCP compliant (e.g., DVI jacks on the TV screen when using the Control ... connect the HDMI OUT jack to turn off by using a certified Sony HDMI cord (supplied). To prepare for the 'BRAVIA' Sync features Set "Control for HDMI functions. 16US "Player" appears on PC displays). • During DVD recording, you cannot watch VHS pictures by pressing VIDEO, as below: &#...
Operating Instructions
Page 17
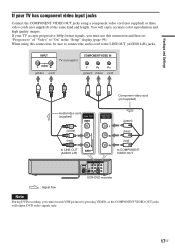
... TOP BOX CONTROL LINE 1 IN VIDEO LINE OUT AUDIO OUT COMPONENT VIDEO OUT VIDEO L Y S VIDEO L PB R R PR AUDIO AUDIO COAXIAL DIGITAL AUDIO OUT VCR-DVD recorder : Signal flow Note During DVD recording, you cannot watch VHS pictures by pressing VIDEO, as the COMPONENT VIDEO OUT jacks will enjoy accurate color reproduction and high quality images... VIDEO (white) (red) to LINE OUT (AUDIO L/R) L R AUDIO COMPONENT VIDEO OUT Y PB PR (green) (blue) (red) to the LINE OUT (AUDIO L/R) jacks. You will output DVD video signals only. 17US
... TOP BOX CONTROL LINE 1 IN VIDEO LINE OUT AUDIO OUT COMPONENT VIDEO OUT VIDEO L Y S VIDEO L PB R R PR AUDIO AUDIO COAXIAL DIGITAL AUDIO OUT VCR-DVD recorder : Signal flow Note During DVD recording, you cannot watch VHS pictures by pressing VIDEO, as the COMPONENT VIDEO OUT jacks will enjoy accurate color reproduction and high quality images... VIDEO (white) (red) to LINE OUT (AUDIO L/R) L R AUDIO COMPONENT VIDEO OUT Y PB PR (green) (blue) (red) to the LINE OUT (AUDIO L/R) jacks. You will output DVD video signals only. 17US
Operating Instructions
Page 18
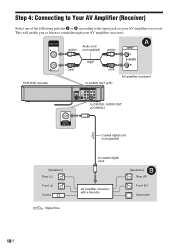
... B, according to sound through your AV amplifier (receiver). This will enable you to listen to the input jack on your AV amplifier (receiver). AUDIO OUT L R VCR-DVD recorder Audio cord (white) (not supplied) (white) (red) (red) A INPUT L AUDIO R to AUDIO OUT (L/R) AV amplifier (receiver) HDMI OUT SET TOP BOX CONTROL LINE 1 IN VIDEO...
... B, according to sound through your AV amplifier (receiver). This will enable you to listen to the input jack on your AV amplifier (receiver). AUDIO OUT L R VCR-DVD recorder Audio cord (white) (not supplied) (white) (red) (red) A INPUT L AUDIO R to AUDIO OUT (L/R) AV amplifier (receiver) HDMI OUT SET TOP BOX CONTROL LINE 1 IN VIDEO...
Operating Instructions
Page 19
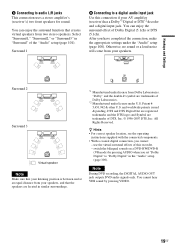
... are registered trademarks and the DTS logos and Symbol are trademarks of the "Audio" setup (page 101). Note During DVD recording, the DIGITAL AUDIO OUT jack outputs DVD audio signals only. Patent #: 5,451,942 & other U.S. z Hints • For correct speaker location, see the...you cannot: - All Rights Reserved. Otherwise, no sound or a loud noise will come from two stereo speakers. switch the bilingual sounds on a DVD-RW/DVD-R (VR mode) by pressing VIDEO. 19US Surround 1 B Connecting to audio L/R jacks This connection uses a stereo amplifier's (receiver's) two front speakers...
... are registered trademarks and the DTS logos and Symbol are trademarks of the "Audio" setup (page 101). Note During DVD recording, the DIGITAL AUDIO OUT jack outputs DVD audio signals only. Patent #: 5,451,942 & other U.S. z Hints • For correct speaker location, see the...you cannot: - All Rights Reserved. Otherwise, no sound or a loud noise will come from two stereo speakers. switch the bilingual sounds on a DVD-RW/DVD-R (VR mode) by pressing VIDEO. 19US Surround 1 B Connecting to audio L/R jacks This connection uses a stereo amplifier's (receiver's) two front speakers...
Operating Instructions
Page 21
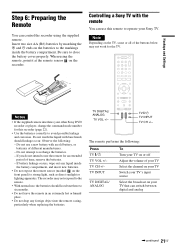
... the battery cover properly. The remote performs the following : - When using the supplied remote. Controlling a Sony TV with the remote You can switch between digital and analog ,continued 21US The recorder may not respond to the remote. • With normal use, the batteries should leakage occur. Insert two...all of the buttons below may not work for the TV. 123 456 789 0 Notes • If the supplied remote interferes your other Sony DVD recorder or player, change the command mode number for an extended period of time, remove the batteries. - If you do not intend to use the ...
... the battery cover properly. The remote performs the following : - When using the supplied remote. Controlling a Sony TV with the remote You can switch between digital and analog ,continued 21US The recorder may not respond to the remote. • With normal use, the batteries should leakage occur. Insert two...all of the buttons below may not work for the TV. 123 456 789 0 Notes • If the supplied remote interferes your other Sony DVD recorder or player, change the command mode number for an extended period of time, remove the batteries. - If you do not intend to use the ...
Operating Instructions
Page 22
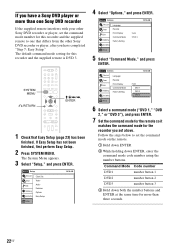
The default command mode setting for this recorder and the supplied remote is DVD 3. SYSTEM MENU 123 456 789 0 O RETURN M/m/ If you have a Sony DVD player or more than one Sony DVD recorder If the supplied remote interferes with your other Sony DVD recorder or player, set the command mode number for this recorder and the supplied remote to one that differs from the other Sony DVD recorder or player, after you have completed "Step 7: Easy Setup."
The default command mode setting for this recorder and the supplied remote is DVD 3. SYSTEM MENU 123 456 789 0 O RETURN M/m/ If you have a Sony DVD player or more than one Sony DVD recorder If the supplied remote interferes with your other Sony DVD recorder or player, set the command mode number for this recorder and the supplied remote to one that differs from the other Sony DVD recorder or player, after you have completed "Step 7: Easy Setup."
Operating Instructions
Page 24
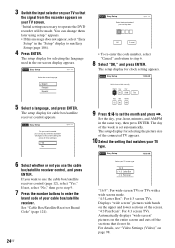
... box/satellite receiver control, and press ENTER. OK Cancel • To re-enter the code number, select "Cancel" and return to operate the DVD recorder will erase all timer settings.) Yes No 6 Select whether or not you want to run Easy Setup (page 106). 4 Press ENTER. Month Day...Box": For 4:3 screen TVs. The setup display for cable box/satellite receiver control appears. "4:3 Pan Scan": For 4:3 screen TVs. appears. • If this recorder? (Changes to set automatically. No Disc Easy Setup Select the screen language. No Disc Easy Setup 12:00 AM Set the time and date manually...
... box/satellite receiver control, and press ENTER. OK Cancel • To re-enter the code number, select "Cancel" and return to operate the DVD recorder will erase all timer settings.) Yes No 6 Select whether or not you want to run Easy Setup (page 106). 4 Press ENTER. Month Day...Box": For 4:3 screen TVs. The setup display for cable box/satellite receiver control appears. "4:3 Pan Scan": For 4:3 screen TVs. appears. • If this recorder? (Changes to set automatically. No Disc Easy Setup Select the screen language. No Disc Easy Setup 12:00 AM Set the time and date manually...
Operating Instructions
Page 27
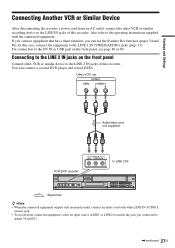
... has a timer function, you connected to (pages 56 and 82). ,continued 27US OUTPUT VIDEO AUDIO L R Audio/video cord (not supplied) VCR-DVD recorder LINE 2 IN VIDEO L (MONO) AUDIO R to LINE 2 IN : Signal flow z Hints • When the connected equipment outputs only ...VCR or similar recording device to the LINE IN jacks of this recorder. Hookups and Settings Connecting Another VCR or Similar Device After disconnecting the recorder's power cord from connected equipment, select an input source (LINE1 or LINE2) to match the jack you can connect a second DVD player and record DVDs...
... has a timer function, you connected to (pages 56 and 82). ,continued 27US OUTPUT VIDEO AUDIO L R Audio/video cord (not supplied) VCR-DVD recorder LINE 2 IN VIDEO L (MONO) AUDIO R to LINE 2 IN : Signal flow z Hints • When the connected equipment outputs only ...VCR or similar recording device to the LINE IN jacks of this recorder. Hookups and Settings Connecting Another VCR or Similar Device After disconnecting the recorder's power cord from connected equipment, select an input source (LINE1 or LINE2) to match the jack you can connect a second DVD player and record DVDs...
Operating Instructions
Page 28
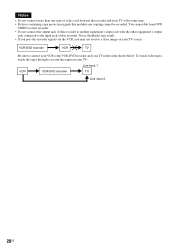
..., watch the tapes through a second line input on your TV. Notes • Do not connect more than one type of this recorder. VCR-DVD recorder VCR TV Be sure to connect your VCR to the input jack of video cord between the recorder and your TV in the order shown below. Line input 1 VCR VCR-DVD recorder TV Line input 2 28US
..., watch the tapes through a second line input on your TV. Notes • Do not connect more than one type of this recorder. VCR-DVD recorder VCR TV Be sure to connect your VCR to the input jack of video cord between the recorder and your TV in the order shown below. Line input 1 VCR VCR-DVD recorder TV Line input 2 28US


