Operating Instructions
Page 2
...the wall outlet, even if the recorder itself ; Reorient or relocate the receiving antenna. - Increase the separation between the equipment and receiver. - Should this DVD recorder is located on , the user is... this manual could void your Sony dealer regarding this apparatus to prevent heat build-up in a particular installation. When you first install the recorder, or when you move it...the recorder. • Do not place the recorder on 120 V AC, 60 Hz. • The recorder is not disconnected from the AC power source as long as a bookshelf or similar unit. 2 RDR-VX525 Serial...
...the wall outlet, even if the recorder itself ; Reorient or relocate the receiving antenna. - Increase the separation between the equipment and receiver. - Should this DVD recorder is located on , the user is... this manual could void your Sony dealer regarding this apparatus to prevent heat build-up in a particular installation. When you first install the recorder, or when you move it...the recorder. • Do not place the recorder on 120 V AC, 60 Hz. • The recorder is not disconnected from the AC power source as long as a bookshelf or similar unit. 2 RDR-VX525 Serial...
Operating Instructions
Page 6
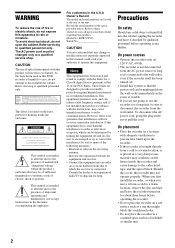
... 6: Preparing the Remote 21 Step 7: Easy Setup 23 Connecting Another VCR or Similar Device 27 Quick Guide to Disc Types 30 Recordable and Playable Discs 30 Playable Discs 33 DVD Operation DVD Playback 35 Playing Discs 35 Playback Options 36 Playing a Title From...44 DVD Recording 46 Before Recording 46 DVD Recording From Connected Equipment Without the Timer 47 DVD Timer Recording From Connected Equipment 49 Recording From Connected Equipment With a Timer (Synchro Rec 51 Changing or Canceling DVD Timer Settings (Timer List 53 Recording From Another VCR or Similar Device 54 DVD ...
... 6: Preparing the Remote 21 Step 7: Easy Setup 23 Connecting Another VCR or Similar Device 27 Quick Guide to Disc Types 30 Recordable and Playable Discs 30 Playable Discs 33 DVD Operation DVD Playback 35 Playing Discs 35 Playback Options 36 Playing a Title From...44 DVD Recording 46 Before Recording 46 DVD Recording From Connected Equipment Without the Timer 47 DVD Timer Recording From Connected Equipment 49 Recording From Connected Equipment With a Timer (Synchro Rec 51 Changing or Canceling DVD Timer Settings (Timer List 53 Recording From Another VCR or Similar Device 54 DVD ...
Operating Instructions
Page 8
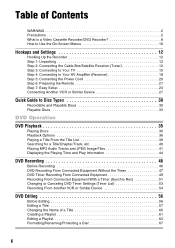
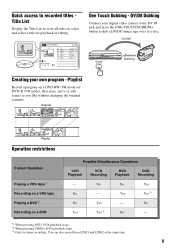
Note that copy-protected signals will not be recorded. Recording and timer recording Record TV programs on a DVD or VHS tape, either direction between DVD and VCR Simply press the DVD or VIDEO button to select the media format you want to this recorder. VIDEO DVD Easy selection between a DVD disc and VHS tape with built-in either manually or using the...
Note that copy-protected signals will not be recorded. Recording and timer recording Record TV programs on a DVD or VHS tape, either direction between DVD and VCR Simply press the DVD or VIDEO button to select the media format you want to this recorder. VIDEO DVD Easy selection between a DVD disc and VHS tape with built-in either manually or using the...
Operating Instructions
Page 9
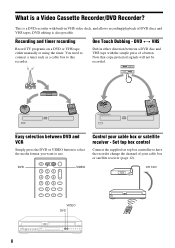
... Edit 01:29:03 > 00:31:23 > 01:59:00 > 00:58:56 > One Touch Dubbing - DV/D8 Dubbing Connect your own program - Playlist Record a program on a DVD Possible Simultaneous Operations VCR Playback VCR Recording DVD Playback DVD Recording - You can also record from LINE1 and LINE2 at the same time. 9 Title List (Original) 1/4 No. Yes Yes*3 No Yes -
... Edit 01:29:03 > 00:31:23 > 01:59:00 > 00:58:56 > One Touch Dubbing - DV/D8 Dubbing Connect your own program - Playlist Record a program on a DVD Possible Simultaneous Operations VCR Playback VCR Recording DVD Playback DVD Recording - You can also record from LINE1 and LINE2 at the same time. 9 Title List (Original) 1/4 No. Yes Yes*3 No Yes -
Operating Instructions
Page 11
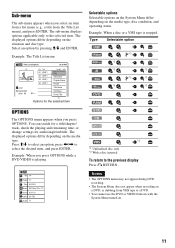
The sub-menu displays options applicable only to select an option, press Title 01 LINE 1 02 LINE 1 03 LINE 1 04 LINE 1 T LINE 1 May/02/2007 08:00 PM 10:10 AM Length Edit Pla0y1:29:03 > Tit0le0:E3r1a:s2e3 > Ch0a1p:5te9r:0E0ras>e Pr0o0te:5ct8:56 > Title Name A·B Erase Divide Title Options for audio/angle/subtitle. You can search for a title/chapter/ track, check the playing and remaining time, or change settings for the selected item OPTIONS The OPTIONS menu appears when you select an item from a list menu (e.g., a title from the Title List menu), and press ENTER. Press M/m ...
The sub-menu displays options applicable only to select an option, press Title 01 LINE 1 02 LINE 1 03 LINE 1 04 LINE 1 T LINE 1 May/02/2007 08:00 PM 10:10 AM Length Edit Pla0y1:29:03 > Tit0le0:E3r1a:s2e3 > Ch0a1p:5te9r:0E0ras>e Pr0o0te:5ct8:56 > Title Name A·B Erase Divide Title Options for audio/angle/subtitle. You can search for a title/chapter/ track, check the playing and remaining time, or change settings for the selected item OPTIONS The OPTIONS menu appears when you select an item from a list menu (e.g., a title from the Title List menu), and press ENTER. Press M/m ...
Operating Instructions
Page 13
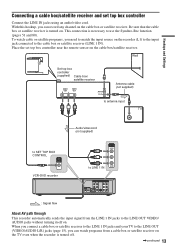
... channel on . To watch programs from the LINE 1 IN jacks to the LINE OUT VIDEO/ AUDIO jacks without turning itself on the recorder (L1) to the input jack connected to LINE 1 IN AUDIO AUDIO OUT COMPONENT VIDEO OUT S VIDEO OUT LINE 1 IN LINE OUT VIDEO VIDEO L Y R PB SETTOP ... ANT IN TO TV Antenna cable (not supplied) to antenna input TV Audio/video cord (not supplied) to SET TOP BOX CONTROL SETTOP BOX CONTROL VCR-DVD recorder LINE 1 IN VIDEO to the cable box or satellite receiver (LINE 1 IN). Be sure that the cable box or satellite receiver is turned off. ,continued...
... channel on . To watch programs from the LINE 1 IN jacks to the LINE OUT VIDEO/ AUDIO jacks without turning itself on the recorder (L1) to the input jack connected to LINE 1 IN AUDIO AUDIO OUT COMPONENT VIDEO OUT S VIDEO OUT LINE 1 IN LINE OUT VIDEO VIDEO L Y R PB SETTOP ... ANT IN TO TV Antenna cable (not supplied) to antenna input TV Audio/video cord (not supplied) to SET TOP BOX CONTROL SETTOP BOX CONTROL VCR-DVD recorder LINE 1 IN VIDEO to the cable box or satellite receiver (LINE 1 IN). Be sure that the cable box or satellite receiver is turned off. ,continued...
Operating Instructions
Page 15
... size, see page 96. Notes • Do not connect to the S VIDEO OUT and yellow LINE OUT (VIDEO) jacks at the same time. • During DVD recording, you cannot watch VHS pictures by pressing VIDEO, as the S VIDEO OUT jack will cause unwanted noise to the LINE OUT (AUDIO L/R) jacks. INPUT S VIDEO... TV or projector INPUT AUDIO R L (red) (white) VIDEO (yellow) S video cord (not supplied) S VIDEO OUT LINE 1 IN LINE OUT VIDEO VIDEO (yellow) to S VIDEO OUT VCR-DVD recorder L R AUDIO AUDIO (white) (red) to the LINE IN (AUDIO L/R) jacks at the same time.
... size, see page 96. Notes • Do not connect to the S VIDEO OUT and yellow LINE OUT (VIDEO) jacks at the same time. • During DVD recording, you cannot watch VHS pictures by pressing VIDEO, as the S VIDEO OUT jack will cause unwanted noise to the LINE OUT (AUDIO L/R) jacks. INPUT S VIDEO... TV or projector INPUT AUDIO R L (red) (white) VIDEO (yellow) S video cord (not supplied) S VIDEO OUT LINE 1 IN LINE OUT VIDEO VIDEO (yellow) to S VIDEO OUT VCR-DVD recorder L R AUDIO AUDIO (white) (red) to the LINE IN (AUDIO L/R) jacks at the same time.
Operating Instructions
Page 16
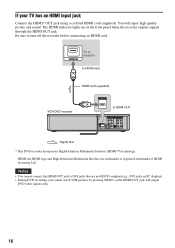
...Multimedia Interface are not HDCP compliant (e.g., DVI jacks on the front panel when the recorder outputs signals through the HDMI OUT jack. If your TV has an HDMI input...SETTOP HDMI OUT BOX CONTROL PR OPTICAL COAXIAL DIGITAL AUDIO OUT L R AUDIO AUDIO : Signal flow * This DVD recorder incorporates High-Definition Multimedia Interface (HDMI™) technology. Notes • You cannot connect the HDMI OUT jack to...Licensing LLC. The HDMI indicator lights up on PC displays). • During DVD recording, you cannot watch VHS pictures by pressing VIDEO, as the HDMI OUT jack will enjoy...
...Multimedia Interface are not HDCP compliant (e.g., DVI jacks on the front panel when the recorder outputs signals through the HDMI OUT jack. If your TV has an HDMI input...SETTOP HDMI OUT BOX CONTROL PR OPTICAL COAXIAL DIGITAL AUDIO OUT L R AUDIO AUDIO : Signal flow * This DVD recorder incorporates High-Definition Multimedia Interface (HDMI™) technology. Notes • You cannot connect the HDMI OUT jack to...Licensing LLC. The HDMI indicator lights up on PC displays). • During DVD recording, you cannot watch VHS pictures by pressing VIDEO, as the HDMI OUT jack will enjoy...

Operating Instructions
Page 17
... OUT S VIDEO OUT LINE 1 IN LINE OUT VIDEO VIDEO L Y R PB SETTOP HDMI OUT BOX CONTROL PR OPTICAL COAXIAL DIGITAL AUDIO OUT L R AUDIO AUDIO VCR-DVD recorder : Signal flow Note During DVD recording, you must use this connection, be sure to connect the audio cord to "On" in the "Setup" display (page 97). When using a component...
... OUT S VIDEO OUT LINE 1 IN LINE OUT VIDEO VIDEO L Y R PB SETTOP HDMI OUT BOX CONTROL PR OPTICAL COAXIAL DIGITAL AUDIO OUT L R AUDIO AUDIO VCR-DVD recorder : Signal flow Note During DVD recording, you must use this connection, be sure to connect the audio cord to "On" in the "Setup" display (page 97). When using a component...
Operating Instructions
Page 18
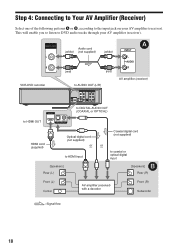
AUDIO OUT L R VCR-DVD recorder HDMI OUT Audio cord (white) (not supplied) (white) (red) (red) to AUDIO OUT (L/R) AUDIO OUT COMPONENT VIDEO OUT S VIDEO OUT LINE 1 IN LINE OUT VIDEO ... or optical digital input B [Speakers] Rear (R) Front (L) Center AV amplifier (receiver) with a decoder Front (R) Subwoofer : Signal flow 18 This will enable you to listen to DVD audio tracks through your AV amplifier (receiver).
AUDIO OUT L R VCR-DVD recorder HDMI OUT Audio cord (white) (not supplied) (white) (red) (red) to AUDIO OUT (L/R) AUDIO OUT COMPONENT VIDEO OUT S VIDEO OUT LINE 1 IN LINE OUT VIDEO ... or optical digital input B [Speakers] Rear (R) Front (L) Center AV amplifier (receiver) with a decoder Front (R) Subwoofer : Signal flow 18 This will enable you to listen to DVD audio tracks through your AV amplifier (receiver).
Operating Instructions
Page 19
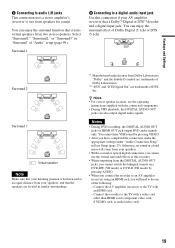
...TV with a video cord other than HDMI cord (component video cord, S VIDEO cord, or audio/video cord). 19 Notes • During DVD recording, the DIGITAL AUDIO OUT jacks or HDMI OUT jack output DVD audio signals only. Connect the AV amplifier (receiver) to a digital audio input jack Use this... recorder. • When outputting from Dolby Laboratories. Select "Surround1," "Surround2," or "Surround3" in Easy Setup (page 23). z Hints • ...
...TV with a video cord other than HDMI cord (component video cord, S VIDEO cord, or audio/video cord). 19 Notes • During DVD recording, the DIGITAL AUDIO OUT jacks or HDMI OUT jack output DVD audio signals only. Connect the AV amplifier (receiver) to a digital audio input jack Use this... recorder. • When outputting from Dolby Laboratories. Select "Surround1," "Surround2," or "Surround3" in Easy Setup (page 23). z Hints • ...
Operating Instructions
Page 21
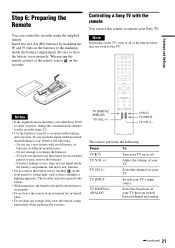
...the remote casing, particularly when replacing the batteries. The remote performs the following : - Observe the following : Press TV "/1 To Turn your other Sony DVD recorder or player, change the command mode number for this remote to six months. • Do not leave the remote in an extremely hot or ...the buttons below may not respond to avoid possible leakage and corrosion. Do not use , the batteries should leakage occur. The recorder may not work for an extended period of your Sony TV. Adjust the volume of time, remove the batteries. - If you do not intend to use this...
...the remote casing, particularly when replacing the batteries. The remote performs the following : - Observe the following : Press TV "/1 To Turn your other Sony DVD recorder or player, change the command mode number for this remote to six months. • Do not leave the remote in an extremely hot or ...the buttons below may not respond to avoid possible leakage and corrosion. Do not use , the batteries should leakage occur. The recorder may not work for an extended period of your Sony TV. Adjust the volume of time, remove the batteries. - If you do not intend to use this...

Operating Instructions
Page 22
If you have a Sony DVD player or more than one that differs from the other Sony DVD recorder or player, set the command mode number for this recorder and the supplied remote to one Sony DVD recorder If the supplied remote interferes with your other Sony DVD recorder or player, after you have completed "Step 7: Easy Setup." SYSTEM MENU 123 456 789 0 O RETURN M/m/ The default command mode setting for this recorder and the supplied remote is DVD 3.
If you have a Sony DVD player or more than one that differs from the other Sony DVD recorder or player, set the command mode number for this recorder and the supplied remote to one Sony DVD recorder If the supplied remote interferes with your other Sony DVD recorder or player, after you have completed "Step 7: Easy Setup." SYSTEM MENU 123 456 789 0 O RETURN M/m/ The default command mode setting for this recorder and the supplied remote is DVD 3.
Operating Instructions
Page 24
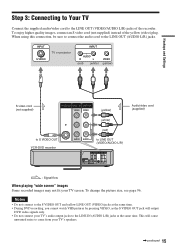
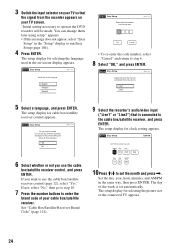
..., select "Cancel" and return to the cable box/satellite receiver, and press ENTER. See "Cable Box/Satellite Receiver Brand Code" (page 121). 9 Select the recorder's audio/video input ("Line1" or "Line2") that is set the month and press ,. Month Day Year 01 01 2007 Mon Hour Min 12 : 00 AM.../PM AM 10Press M/m to run Easy Setup (page 104). 4 Press ENTER. "Initial setting necessary to operate the DVD recorder will erase all timer settings.) Yes No 6 Select whether or not you want to the current setting will be made. You can change them later...
..., select "Cancel" and return to the cable box/satellite receiver, and press ENTER. See "Cable Box/Satellite Receiver Brand Code" (page 121). 9 Select the recorder's audio/video input ("Line1" or "Line2") that is set the month and press ,. Month Day Year 01 01 2007 Mon Hour Min 12 : 00 AM.../PM AM 10Press M/m to run Easy Setup (page 104). 4 Press ENTER. "Initial setting necessary to operate the DVD recorder will erase all timer settings.) Yes No 6 Select whether or not you want to the current setting will be made. You can change them later...
Operating Instructions
Page 27
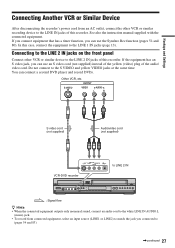
... R S video cord (not supplied) Audio/video cord (not supplied) S VIDEO LINE 2 IN VIDEO L AUDIO R (MONO) DV IN to LINE 2 IN VCR-DVD recorder : Signal flow z Hints • When the connected equipment outputs only monaural sound, connect an audio cord to the white LINE IN AUDIO L (mono) jack. ...• To record from an AC outlet, connect the other VCR or similar device to the LINE 2 IN jacks of this recorder. Hookups and Settings Connecting Another VCR or Similar Device After disconnecting the recorder's power cord from connected equipment, select an input...
... R S video cord (not supplied) Audio/video cord (not supplied) S VIDEO LINE 2 IN VIDEO L AUDIO R (MONO) DV IN to LINE 2 IN VCR-DVD recorder : Signal flow z Hints • When the connected equipment outputs only monaural sound, connect an audio cord to the white LINE IN AUDIO L (mono) jack. ...• To record from an AC outlet, connect the other VCR or similar device to the LINE 2 IN jacks of this recorder. Hookups and Settings Connecting Another VCR or Similar Device After disconnecting the recorder's power cord from connected equipment, select an input...

Operating Instructions
Page 28
... image on your TV. Line input 1 VCR VCR-DVD recorder TV Line input 2 28 To watch video tapes, watch the tapes through a second line input on your VCR to the input jack of this recorder. VCR-DVD recorder VCR TV Be sure to connect your TV screen. You cannot dub from DVD VIDEOs to this recorder. • Do not connect the output...
... image on your TV. Line input 1 VCR VCR-DVD recorder TV Line input 2 28 To watch video tapes, watch the tapes through a second line input on your VCR to the input jack of this recorder. VCR-DVD recorder VCR TV Be sure to connect your TV screen. You cannot dub from DVD VIDEOs to this recorder. • Do not connect the output...
Operating Instructions
Page 34
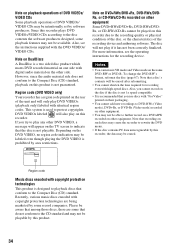
... on DVD+RWs/DVD+Rs, DVD-RWs/DVDRs, or CD-RWs/CD-Rs recorded on other equipment Some DVD+RWs/DVD+Rs, DVD-RWs/DVDRs, or CD-RWs/CD-Rs cannot be played on this recorder, the data may be intentionally set by this recorder due to further record on a DVD+RW recorded on other side. RDR-VX525 NO. Note that recording on the rear of DVD VIDEOs...
... on DVD+RWs/DVD+Rs, DVD-RWs/DVDRs, or CD-RWs/CD-Rs recorded on other equipment Some DVD+RWs/DVD+Rs, DVD-RWs/DVDRs, or CD-RWs/CD-Rs cannot be played on this recorder, the data may be intentionally set by this recorder due to further record on a DVD+RW recorded on other side. RDR-VX525 NO. Note that recording on the rear of DVD VIDEOs...

Operating Instructions
Page 35
...; When playing a DVD+RW, DVD-RW, DVD+R, DVD-R, and DVD-RAM, you can display the disc's menu by pressing TOP MENU or MENU. 1 Press DVD to close the disc tray. To stop playback Press x STOP. 35 Playback side facing down 3 Press Z OPEN/CLOSE to operate the DVD recorder. 2 Press Z OPEN.../CLOSE, and place a disc on the recording equipment first. • For simultaneous VHS and DVD operation, see page 9. Wait until "LOAD" disappears from the cartridge. Using the DVD's Menu +RW -RWVideo +R -RVideo DVD When you can select the...
...; When playing a DVD+RW, DVD-RW, DVD+R, DVD-R, and DVD-RAM, you can display the disc's menu by pressing TOP MENU or MENU. 1 Press DVD to close the disc tray. To stop playback Press x STOP. 35 Playback side facing down 3 Press Z OPEN/CLOSE to operate the DVD recorder. 2 Press Z OPEN.../CLOSE, and place a disc on the recording equipment first. • For simultaneous VHS and DVD operation, see page 9. Wait until "LOAD" disappears from the cartridge. Using the DVD's Menu +RW -RWVideo +R -RVideo DVD When you can select the...
Operating Instructions
Page 39
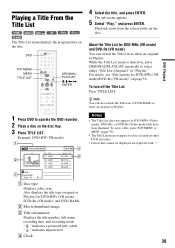
... to show an original or Playlist. Also displays the title type (original or Playlist) for discs created on other DVD recorders. • Letters that have been finalized. To turn off the Title List Press TITLE LIST. D Clock 4 Select the title,... thumbnail image C Title information: Displays the title number, title name, recording date, and recording mode. For details, see "Edit options for DVD-RWs (Video mode), DVD+Rs, or DVD-Rs (Video mode) that cannot be displayed are replaced with "*." 39 DVD Playback DVD TOP MENU MENU TITLE LIST 123 456 789 0 ORIGINAL/ PLAYLIST M/m/ ...
... to show an original or Playlist. Also displays the title type (original or Playlist) for discs created on other DVD recorders. • Letters that have been finalized. To turn off the Title List Press TITLE LIST. D Clock 4 Select the title,... thumbnail image C Title information: Displays the title number, title name, recording date, and recording mode. For details, see "Edit options for DVD-RWs (Video mode), DVD+Rs, or DVD-Rs (Video mode) that cannot be displayed are replaced with "*." 39 DVD Playback DVD TOP MENU MENU TITLE LIST 123 456 789 0 ORIGINAL/ PLAYLIST M/m/ ...

Operating Instructions
Page 41
...," and press ENTER. Playback starts from the selected track. DVD TOP MENU 123 456 789 0 O RETURN H PLAY M/m/ x STOP X PAUSE Playing MP3 audio tracks You can play MP3 audio tracks on DATA CDs or DATA DVDs. 1 Press DVD to operate the DVD recorder. 2 Place a DATA CD/DATA DVD on the disc tray. When a track or album is...
...," and press ENTER. Playback starts from the selected track. DVD TOP MENU 123 456 789 0 O RETURN H PLAY M/m/ x STOP X PAUSE Playing MP3 audio tracks You can play MP3 audio tracks on DATA CDs or DATA DVDs. 1 Press DVD to operate the DVD recorder. 2 Place a DATA CD/DATA DVD on the disc tray. When a track or album is...


