Operating Instructions
Page 7
...Displaying the Playing Time and Play Information 73 Selecting the Sound During Playback 74 VCR Recording 75 Before Recording 75 VCR Recording From Connected Equipment Without the Timer 76 VCR Timer Recording From Connected Equipment 78 Recording From Connected Equipment With a Timer ... (Video 96 Audio Settings (Audio 98 Recording, Set Top Box Control, and VCR Settings (Features 100 Language, Parental Control Settings/Factory Settings (Options 102 Easy Setup (Resetting the Recorder 104 Additional Information 105 Troubleshooting 105 Notes About This Recorder 110 Specifications ...
...Displaying the Playing Time and Play Information 73 Selecting the Sound During Playback 74 VCR Recording 75 Before Recording 75 VCR Recording From Connected Equipment Without the Timer 76 VCR Timer Recording From Connected Equipment 78 Recording From Connected Equipment With a Timer ... (Video 96 Audio Settings (Audio 98 Recording, Set Top Box Control, and VCR Settings (Features 100 Language, Parental Control Settings/Factory Settings (Options 102 Easy Setup (Resetting the Recorder 104 Additional Information 105 Troubleshooting 105 Notes About This Recorder 110 Specifications ...

Operating Instructions
Page 59
... continue, repeat from step 4 or 5. 6 Press ENTER. DVD Editing 1 Press TITLE LIST. The display for setting the dividing point appears. "Erase" is also erased. To reset the start point of the section (point B). The chapter mark divides the title into two. A-B Erase 10:10 AM Title No.01 Start 00:00...
... continue, repeat from step 4 or 5. 6 Press ENTER. DVD Editing 1 Press TITLE LIST. The display for setting the dividing point appears. "Erase" is also erased. To reset the start point of the section (point B). The chapter mark divides the title into two. A-B Erase 10:10 AM Title No.01 Start 00:00...

Operating Instructions
Page 60
..., select "No" and press ENTER to find the point. You can also divide a Playlist title (page 63). • If the dividing point is selected. To reset the dividing point, select "No" and press ENTER, then repeat from step 4. 6 Select "Yes," and press ENTER. Since the displayed number of characters is limited...
..., select "No" and press ENTER to find the point. You can also divide a Playlist title (page 63). • If the dividing point is selected. To reset the dividing point, select "No" and press ENTER, then repeat from step 4. 6 Select "Yes," and press ENTER. Since the displayed number of characters is limited...

Operating Instructions
Page 62
To reset the start point. To continue, repeat from what you finish capturing scenes, select "Finish" and press ENTER. The display for creating a Playlist appears. "End" is ...
To reset the start point. To continue, repeat from what you finish capturing scenes, select "Finish" and press ENTER. The display for creating a Playlist appears. "End" is ...

Operating Instructions
Page 65
... The display returns to the "Edit Scene" display. Note The start or end point, select "Start" or "End" and repeat step 4 or 5. 6 Press ENTER. To reset the start and end point of "Editing a Playlist" (page 63). DVD Editing 1 Follow steps 1 to 7 of a scene may be different from step 2. The "Edit Scene...
... The display returns to the "Edit Scene" display. Note The start or end point, select "Start" or "End" and repeat step 4 or 5. 6 Press ENTER. To reset the start and end point of "Editing a Playlist" (page 63). DVD Editing 1 Follow steps 1 to 7 of a scene may be different from step 2. The "Edit Scene...

Operating Instructions
Page 66
... selected. The display returns to using "Add" is selected. You can copy and add a selected scene. 1 Follow steps 1 to 7 of "Editing a Playlist" (page 63). To reset the start point. To add other scenes, repeat from step 2. "Start" is added before the scene selected in step 2. Add 10:10 AM Scene No...
... selected. The display returns to using "Add" is selected. You can copy and add a selected scene. 1 Follow steps 1 to 7 of "Editing a Playlist" (page 63). To reset the start point. To add other scenes, repeat from step 2. "Start" is added before the scene selected in step 2. Add 10:10 AM Scene No...

Operating Instructions
Page 69
...automatically if you switch to the VCR while playing a disc, DVD playback stops. • The VCR does not record in the front panel display resets to "0:00:00." The counter in S-VHS format, but will play , but picture quality is not guaranteed. • The counter resets to find later. To turn...Off) Press "/1 while the tape is reinserted. • The counter stops counting when it comes to a portion with no recording. • The counter resets to "0:00:00" after ten hours, and starts recounting. • When playback does not start even if you want to "0:00:00" whenever a ...
...automatically if you switch to the VCR while playing a disc, DVD playback stops. • The VCR does not record in the front panel display resets to "0:00:00." The counter in S-VHS format, but will play , but picture quality is not guaranteed. • The counter resets to find later. To turn...Off) Press "/1 while the tape is reinserted. • The counter stops counting when it comes to a portion with no recording. • The counter resets to "0:00:00" after ten hours, and starts recounting. • When playback does not start even if you want to "0:00:00" whenever a ...
Operating Instructions
Page 72
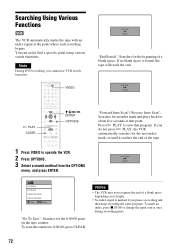
Note During DVD recording, you cannot use VCR search functions. 123 456 789 0 H PLAY CLEAR VIDEO M/m/ You can easily find a specific point using various search functions. Searching Using Various Functions The VCR automatically marks the tape with an index signal at the point where each recording begins.
Note During DVD recording, you cannot use VCR search functions. 123 456 789 0 H PLAY CLEAR VIDEO M/m/ You can easily find a specific point using various search functions. Searching Using Various Functions The VCR automatically marks the tape with an index signal at the point where each recording begins.

Operating Instructions
Page 87
... the entire title, select "Title Dubbing" and press ENTER. Go to find the point. You can use H PLAY, , ./>, x STOP, and X PAUSE to step 13. To reset the start point. To cancel the selected title or scene, select "Erase" and press ENTER. Create Dubbing List 1/2 No. The Program Dubbing List appears with...
... the entire title, select "Title Dubbing" and press ENTER. Go to find the point. You can use H PLAY, , ./>, x STOP, and X PAUSE to step 13. To reset the start point. To cancel the selected title or scene, select "Erase" and press ENTER. Create Dubbing List 1/2 No. The Program Dubbing List appears with...
Operating Instructions
Page 104
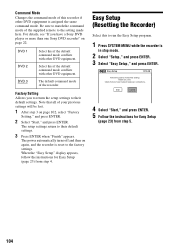
...Factory Setting," and press ENTER. 2 Select "Start," and press ENTER. Before you have a Sony DVD player or more than one Sony DVD recorder" on again, and the recorder is reset to their default settings. Factory Setting Allows you have made here. When the "Easy Setup" display... that you start, Check that all necessary connections. Select this if the default command mode conflicts with other DVD equipment. Easy Setup (Resetting the Recorder) Select this recorder if other DVD equipment. Start Cancel 4 Select "Start," and press ENTER. 5 Follow the instructions for...
...Factory Setting," and press ENTER. 2 Select "Start," and press ENTER. Before you have a Sony DVD player or more than one Sony DVD recorder" on again, and the recorder is reset to their default settings. Factory Setting Allows you have made here. When the "Easy Setup" display... that you start, Check that all necessary connections. Select this if the default command mode conflicts with other DVD equipment. Easy Setup (Resetting the Recorder) Select this recorder if other DVD equipment. Start Cancel 4 Select "Start," and press ENTER. 5 Follow the instructions for...

Operating Instructions
Page 108
...recording. , The disc is protected (page 67). If a monitor is used , set it to the channel for the VCR. Clean the video heads using a Sony video head cleaning cassette. If a Sony cleaning cassette is not available in the tape compartment. The c indicator flashes after Synchro-Recording is set to video input... (page 101). If a monitor is used , set it to input disc data before recording can stop immediately after the first program has finished. Reset the clock (page 95). , The channel or input changed from the one you are dirty (see page 111). If the programs start from the...
...recording. , The disc is protected (page 67). If a monitor is used , set it to the channel for the VCR. Clean the video heads using a Sony video head cleaning cassette. If a Sony cleaning cassette is not available in the tape compartment. The c indicator flashes after Synchro-Recording is set to video input... (page 101). If a monitor is used , set it to input disc data before recording can stop immediately after the first program has finished. Reset the clock (page 95). , The channel or input changed from the one you are dirty (see page 111). If the programs start from the...
Operating Instructions
Page 109
... recording mode indication is incorrect. , Since the recording mode for both the Sony DVD equipment. Other Sony equipment responds to operate abnormally, turn off the recorder and wait until the clock appears in again. VCR Timer recording The timer does not operate. , Check that the clock is correctly...recorded or edited a disc. The c indicator flashes after the first program has finished. Set a different command mode for more than 30 minutes. Reset the clock and timer. , Turn the power off for a future time. , Check that starts first has priority and the second program starts ...
... recording mode indication is incorrect. , Since the recording mode for both the Sony DVD equipment. Other Sony equipment responds to operate abnormally, turn off the recorder and wait until the clock appears in again. VCR Timer recording The timer does not operate. , Check that the clock is correctly...recorded or edited a disc. The c indicator flashes after the first program has finished. Set a different command mode for more than 30 minutes. Reset the clock and timer. , Turn the power off for a future time. , Check that starts first has priority and the second program starts ...
Operating Instructions
Page 127
... 46 tape speed 75 Recording mode 46, 75 Recording time 46, 49 Region code 34 Remaining time 44, 77 Remote 21, 115 REPLAY 36, 71 Resetting 104 Resume Play 38 Rotate 42 S Safety tab 75 Satellite receiver 13 Satellite receiver brand code 124 "Scan Audio" 38, 99 "Scene Dubbing" 87 Searching... 39 "Title Name" 58, 63 TOP MENU 35 Track 119 TRACKING 70 Tracking adjustment 70 Troubleshooting 105 "TV Type" 96 U "Unfinalize" 89 Unrecordable pictures 47 V "VCR Function" 101 "Video (HDMI)" 96 VIDEO CD 33 Video mode 30 Video settings 96 VR mode 30 Z Zoom 42 127
... 46 tape speed 75 Recording mode 46, 75 Recording time 46, 49 Region code 34 Remaining time 44, 77 Remote 21, 115 REPLAY 36, 71 Resetting 104 Resume Play 38 Rotate 42 S Safety tab 75 Satellite receiver 13 Satellite receiver brand code 124 "Scan Audio" 38, 99 "Scene Dubbing" 87 Searching... 39 "Title Name" 58, 63 TOP MENU 35 Track 119 TRACKING 70 Tracking adjustment 70 Troubleshooting 105 "TV Type" 96 U "Unfinalize" 89 Unrecordable pictures 47 V "VCR Function" 101 "Video (HDMI)" 96 VIDEO CD 33 Video mode 30 Video settings 96 VR mode 30 Z Zoom 42 127


