

Operating Instructions
Page 7
... Editing 72 Edit options for the HDD and DVD-RWs (VR mode 72 Edit options for DVD+RWs/DVD-RWs (Video mode)/DVD+Rs/DVD-Rs 73 Erasing and Editing a Title 73 ...titles (Combine Titles 78 Dividing a Playlist title (Divide Title 78 Dubbing (HDD y DVD 79 Before Dubbing 79 About "Dub Mode 79 Dubbing 81 Dubbing a single title ...84 Before DV/Digital8 Dubbing 84 Preparing for DV/Digital8 dubbing 84 Recording an Entire DV/Digital8 Format Tape (One Touch Dubbing 85 Program Edit...Audio Settings (Audio 93 Recording and Parental Control Settings (Features 96 Disc and Remote Control Settings/...
... Editing 72 Edit options for the HDD and DVD-RWs (VR mode 72 Edit options for DVD+RWs/DVD-RWs (Video mode)/DVD+Rs/DVD-Rs 73 Erasing and Editing a Title 73 ...titles (Combine Titles 78 Dividing a Playlist title (Divide Title 78 Dubbing (HDD y DVD 79 Before Dubbing 79 About "Dub Mode 79 Dubbing 81 Dubbing a single title ...84 Before DV/Digital8 Dubbing 84 Preparing for DV/Digital8 dubbing 84 Recording an Entire DV/Digital8 Format Tape (One Touch Dubbing 85 Program Edit...Audio Settings (Audio 93 Recording and Parental Control Settings (Features 96 Disc and Remote Control Settings/...

Operating Instructions
Page 22
... b Notes • Depending on the batteries to the default setting. TV/VIDEO WIDE MODE 1 Slide the TV/DVD switch to TV. 2 Hold down [/1. 3 Enter your other Sony DVD recorder or player, change the command mode number for an extended period of different manufacturers. - Do not attempt to the... front panel) to control the AV amplifier's (receiver's) volume. TV/DVD switch [/1 Number buttons, SET 123 456 789 0 CH +/- If you connected the recorder to an AV amplifier (receiver), you may be reset to the markings inside the battery compartment, and insert new batteries. •...
... b Notes • Depending on the batteries to the default setting. TV/VIDEO WIDE MODE 1 Slide the TV/DVD switch to TV. 2 Hold down [/1. 3 Enter your other Sony DVD recorder or player, change the command mode number for an extended period of different manufacturers. - Do not attempt to the... front panel) to control the AV amplifier's (receiver's) volume. TV/DVD switch [/1 Number buttons, SET 123 456 789 0 CH +/- If you connected the recorder to an AV amplifier (receiver), you may be reset to the markings inside the battery compartment, and insert new batteries. •...
Operating Instructions
Page 57
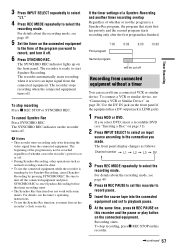
...tape into the connected equipment and set the recorder's clock correctly. To connect a VCR or similar device, see "Inserting a Disc" on the recorder turns off the connected equipment and press SYNCHRO REC to reset Synchro-Recording before the timer recording starts. • The Synchro Rec function ... on the connected equipment to the time of the program you select DVD, insert a recordable DVD (see "Connecting a VCR or Similar Device" on the connected equipment. The front panel display changes as normal recording cannot be cut off . The SYNCHRO REC indicator lights up on ...
...tape into the connected equipment and set the recorder's clock correctly. To connect a VCR or similar device, see "Inserting a Disc" on the recorder turns off the connected equipment and press SYNCHRO REC to reset Synchro-Recording before the timer recording starts. • The Synchro Rec function ... on the connected equipment to the time of the program you select DVD, insert a recordable DVD (see "Connecting a VCR or Similar Device" on the connected equipment. The front panel display changes as normal recording cannot be cut off . The SYNCHRO REC indicator lights up on ...

Operating Instructions
Page 74
... at one time (page 75), or erase all of the titles on the disc at once (page 76). • You can label or re-label DVDs (page 39). Note that have already played (page 97). • You can automatically erase titles that erasing a chapter cannot be undone. 1 After step 2.... "Delete Chapter": Erases chapter units of the title (page 74). You can select a section (scene) in a title. The display for each chapter. b Note DVD-RW (VR mode) playlist titles cannot be undone. 1 After step 2 of the chapter using PREV. Erasing a section of the title, press X PAUSE and then ...
... at one time (page 75), or erase all of the titles on the disc at once (page 76). • You can label or re-label DVDs (page 39). Note that have already played (page 97). • You can automatically erase titles that erasing a chapter cannot be undone. 1 After step 2.... "Delete Chapter": Erases chapter units of the title (page 74). You can select a section (scene) in a title. The display for each chapter. b Note DVD-RW (VR mode) playlist titles cannot be undone. 1 After step 2 of the chapter using PREV. Erasing a section of the title, press X PAUSE and then ...

Operating Instructions
Page 75
...to select all of check marks, select "Reset All." The display for selecting titles to select "Erase Titles," and press ENTER. PREV. The display for confirmation. • To change the selection, select "Change," and repeat from the TOOLS menu to be erased appears for DVD-RW (VR mode). 1 Press TITLE LIST.... one title at the point where you erase a section of a title. • Sections shorter than five seconds may not be erased. • For DVD+RWs, the erased section may be slightly different from the points you enter a new name, the title is divided in two. ,continued 75 A check...
...to select all of check marks, select "Reset All." The display for selecting titles to select "Erase Titles," and press ENTER. PREV. The display for confirmation. • To change the selection, select "Change," and repeat from the TOOLS menu to be erased appears for DVD-RW (VR mode). 1 Press TITLE LIST.... one title at the point where you erase a section of a title. • Sections shorter than five seconds may not be erased. • For DVD+RWs, the erased section may be slightly different from the points you enter a new name, the title is divided in two. ,continued 75 A check...

Operating Instructions
Page 77
... press ENTER. "Change IN": Allows you to change the OUT point, and repeat from step 6. 9 When you want to re-edit, and press ENTER. To reset the IN or OUT point, select "Change IN" or "Change OUT" and repeat step 5 or 6. "Preview": Displays thumbnail pictures of the selected scenes. ORIGINAL 12.... "Change OUT": Allows you want to change the IN point, and repeat from original titles, you to edit or re-edit without changing the actual recordings.
... press ENTER. "Change IN": Allows you to change the OUT point, and repeat from step 6. 9 When you want to re-edit, and press ENTER. To reset the IN or OUT point, select "Change IN" or "Change OUT" and repeat step 5 or 6. "Preview": Displays thumbnail pictures of the selected scenes. ORIGINAL 12.... "Change OUT": Allows you want to change the IN point, and repeat from original titles, you to edit or re-edit without changing the actual recordings.

Operating Instructions
Page 78
... location. 4 Repeat step 3 to select all of titles to turn on the Title List (Playlist) menu. The list of the selections, select "Reset All." 5 Select "OK," and press ENTER. The display for selecting titles appears. 3 Select a title, and press ENTER. Dividing a Playlist title... "Combine Titles," and press ENTER. Combine Select the titles to combine. 14 3 2 1 Yacht Cruising Journey Vacation OK 9/25 Cancel 9/25 9/17 Reset All 9/15 Moving a Playlist title (Change Order) -RWVR You can divide a Playlist title. The titles are combined into a single chapter. If the...
... location. 4 Repeat step 3 to select all of titles to turn on the Title List (Playlist) menu. The list of the selections, select "Reset All." 5 Select "OK," and press ENTER. The display for selecting titles appears. 3 Select a title, and press ENTER. Dividing a Playlist title... "Combine Titles," and press ENTER. Combine Select the titles to combine. 14 3 2 1 Yacht Cruising Journey Vacation OK 9/25 Cancel 9/25 9/17 Reset All 9/15 Moving a Playlist title (Change Order) -RWVR You can divide a Playlist title. The titles are combined into a single chapter. If the...

Operating Instructions
Page 82
...dubbing indication appears in the selected dubbing mode, the following display appears after being turned off the recorder during dubbing. Title Dub There is still insufficient for each title. 1 Insert the DVD that you want to select all of the title, or free up disc space by pressing M/m. ... * Appears when High-speed Dubbing is not enough available space on the Title List menu. 4 Press TOOLS to start dubbing. Auto Dub Mode Reset Cancel Select "Auto Dub Mode" and press ENTER to select "Dub Selected Titles," and press ENTER. Dubbing multiple titles (Dub Selected Titles) A...
...dubbing indication appears in the selected dubbing mode, the following display appears after being turned off the recorder during dubbing. Title Dub There is still insufficient for each title. 1 Insert the DVD that you want to select all of the title, or free up disc space by pressing M/m. ... * Appears when High-speed Dubbing is not enough available space on the Title List menu. 4 Press TOOLS to start dubbing. Auto Dub Mode Reset Cancel Select "Auto Dub Mode" and press ENTER to select "Dub Selected Titles," and press ENTER. Dubbing multiple titles (Dub Selected Titles) A...

Operating Instructions
Page 86
... play in the background from a DV/Digital8 format tape, and then automatically record selected scenes to 5 of "Features" setup is divided into chapters at approximately 6 minute intervals. 1 Follow steps 1 to the HDD or a DVD. To reset either the IN or OUT point, select "Change IN" or "Change OUT...," and repeat the steps above. Scenes Selection Do you will fast forward and rewind the tape automatically and record the scenes to play in the background.
... play in the background from a DV/Digital8 format tape, and then automatically record selected scenes to 5 of "Features" setup is divided into chapters at approximately 6 minute intervals. 1 Follow steps 1 to the HDD or a DVD. To reset either the IN or OUT point, select "Change IN" or "Change OUT...," and repeat the steps above. Scenes Selection Do you will fast forward and rewind the tape automatically and record the scenes to play in the background.

Operating Instructions
Page 87
...• If the recording does not fit due to the dubbing mode you selected, the display asks if you want to the HDD or a DVD may take a few seconds for the dubbing 10 Select "Start," and press ENTER. To have set a scene to change the dubbing mode, select "Reset" and repeat from... step 4. To stop recording. The display for confirmation, select "OK." To enter a new...
...• If the recording does not fit due to the dubbing mode you selected, the display asks if you want to the HDD or a DVD may take a few seconds for the dubbing 10 Select "Start," and press ENTER. To have set a scene to change the dubbing mode, select "Reset" and repeat from... step 4. To stop recording. The display for confirmation, select "OK." To enter a new...

Operating Instructions
Page 97
... not to change the password, select "Password" in step 6. In this recorder. • Depending on -screen display, such as the System Menu, is complete. Finalize Disc (for the disc, set "Level" to DVDs. Settings and Adjustments 97 b Notes • If you forget your TV... Automatically finalizes the disc following One Touch Dubbing. Record to Records to be restricted. 6 Select the level, and press ENTER. DVD HQ Setting (HDD only) Selects the HQ mode used for more than the selected level will have to reset it by selecting "Parental Control" of "Factory Setup...
... not to change the password, select "Password" in step 6. In this recorder. • Depending on -screen display, such as the System Menu, is complete. Finalize Disc (for the disc, set "Level" to DVDs. Settings and Adjustments 97 b Notes • If you forget your TV... Automatically finalizes the disc following One Touch Dubbing. Record to Records to be restricted. 6 Select the level, and press ENTER. DVD HQ Setting (HDD only) Selects the HQ mode used for more than the selected level will have to reset it by selecting "Parental Control" of "Factory Setup...

Operating Instructions
Page 99
... mode. 2 Select "SETUP," and press ENTER. 3 Select "Easy Setup," and press ENTER. Factory Setup Allows you want to return to default from step 2. Easy Setup (Resetting the Recorder) Select this to their default settings. Settings and Adjustments 99 The display for "Easy Setup" (page 25) from "Settings," "Video," "Audio," "Features," "Options," "Parental... "All," and press , or ENTER. 3 Select "Start," and press ENTER. The selected settings return to run the "Easy Setup" program. 1 Press SYSTEM MENU while the recorder is in "Options," and press , or ENTER.
... mode. 2 Select "SETUP," and press ENTER. 3 Select "Easy Setup," and press ENTER. Factory Setup Allows you want to return to default from step 2. Easy Setup (Resetting the Recorder) Select this to their default settings. Settings and Adjustments 99 The display for "Easy Setup" (page 25) from "Settings," "Video," "Audio," "Features," "Options," "Parental... "All," and press , or ENTER. 3 Select "Start," and press ENTER. The selected settings return to run the "Easy Setup" program. 1 Press SYSTEM MENU while the recorder is in "Options," and press , or ENTER.

Operating Instructions
Page 101
... (page 93). Then run "Easy Setup" from "SETUP" in "Options" setup and reset all channels. To change the channel lineup, select "Change channel lineup" from the equipment connected through the recorder is connected to the recorder's LINE IN 1 or 3 jack, set "Line1 Input" or "Line3 Input" in "...receiver has been changed the channels. If the equipment is fixed. or INPUT SELECT. The picture from a DVD player, VCR, or tuner goes through your recorder before reaching your cable box is activated. TV channels cannot be available in some programs could affect picture quality....
... (page 93). Then run "Easy Setup" from "SETUP" in "Options" setup and reset all channels. To change the channel lineup, select "Change channel lineup" from the equipment connected through the recorder is connected to the recorder's LINE IN 1 or 3 jack, set "Line1 Input" or "Line3 Input" in "...receiver has been changed the channels. If the equipment is fixed. or INPUT SELECT. The picture from a DVD player, VCR, or tuner goes through your recorder before reaching your cable box is activated. TV channels cannot be available in some programs could affect picture quality....
Operating Instructions
Page 103
Reset the clock (page 89). , The channel was hidden after the timer recording was set. (See "Customizing the TV Guide On Screen ... channel you set later. , There is no DVD inside the recorder. , There is full. Nothing was a power failure during recording. , The recorder's internal clock stopped due to input disc data before recording can stop. The language for more than 1 hour... changed or turned off . , The set top box was turned off . , Multilingual subtitles are not recorded in the process of the operations above. The JPEG image files do some of DV/Digital8 Dubbing. The ...
Reset the clock (page 89). , The channel was hidden after the timer recording was set. (See "Customizing the TV Guide On Screen ... channel you set later. , There is no DVD inside the recorder. , There is full. Nothing was a power failure during recording. , The recorder's internal clock stopped due to input disc data before recording can stop. The language for more than 1 hour... changed or turned off . , The set top box was turned off . , Multilingual subtitles are not recorded in the process of the operations above. The JPEG image files do some of DV/Digital8 Dubbing. The ...

Operating Instructions
Page 104
... a DVD with a timer Nothing was activated. The recording mode indication is incorrect. , When the recording or dubbing is less than three minutes, the recording mode indication may change depending on the recorder. , Different command modes are weak. , The remote is too far from the equipment with a PC will be displayed incorrectly. Reset the code (page 22...
... a DVD with a timer Nothing was activated. The recording mode indication is incorrect. , When the recording or dubbing is less than three minutes, the recording mode indication may change depending on the recorder. , Different command modes are weak. , The remote is too far from the equipment with a PC will be displayed incorrectly. Reset the code (page 22...

Operating Instructions
Page 124
Sony Corporation Printed in Malaysia Remaining time 37 Remote 22, 110 REPLAY 35, 68 Resetting 99 Resume Play 62 S S VIDEO 18 SAP (Second Audio Program) 50 Satellite receiver 15 Scan...61 SYNCHRO REC 57 System menu 88 T Thumbnail picture 36 "Time Search" 67 TIME/TEXT 37 TIMER 52 Timer recording check/change/cancel 55 manual setting 52 Rec Mode Adjust 53 Synchro Rec 56 TV GUIDE 50 Title 37, 115 ..." 26, 88 TV GUIDE 42 TV Guide On Screen system 42, 50 TV Pause 65 "TV Type" 26, 91 TV/DVD switch 22 TV/VIDEO 33 TVS (TV Virtual Surround) 61 U "Unfinalize" 41 Unfinalizing 41 Usable discs 10, 12 V VIDEO...
Sony Corporation Printed in Malaysia Remaining time 37 Remote 22, 110 REPLAY 35, 68 Resetting 99 Resume Play 62 S S VIDEO 18 SAP (Second Audio Program) 50 Satellite receiver 15 Scan...61 SYNCHRO REC 57 System menu 88 T Thumbnail picture 36 "Time Search" 67 TIME/TEXT 37 TIMER 52 Timer recording check/change/cancel 55 manual setting 52 Rec Mode Adjust 53 Synchro Rec 56 TV GUIDE 50 Title 37, 115 ..." 26, 88 TV GUIDE 42 TV Guide On Screen system 42, 50 TV Pause 65 "TV Type" 26, 91 TV/DVD switch 22 TV/VIDEO 33 TVS (TV Virtual Surround) 61 U "Unfinalize" 41 Unfinalizing 41 Usable discs 10, 12 V VIDEO...


