
Operating Instructions
Page 3
... access to direct sunlight, excessive dust, or mechanical shock. • Do not place the recorder in an inclined position. On power sources • The recorder is not disconnected from the cable television transmitter and/or program owner. • This product incorporates copyright protection technology that the hard disk drive is not operating (the clock is displayed in the front panel display and all recording or dubbing has stopped...
... access to direct sunlight, excessive dust, or mechanical shock. • Do not place the recorder in an inclined position. On power sources • The recorder is not disconnected from the cable television transmitter and/or program owner. • This product incorporates copyright protection technology that the hard disk drive is not operating (the clock is displayed in the front panel display and all recording or dubbing has stopped...

Operating Instructions
Page 4
... to this manual, the internal hard disk drive is written as power-supply cord or plug is used in this manual may not be recordable, depending on this apparatus during lightning storms or when unused for replacement of time. 14) Refer all instructions. 5) Do not use caution when moving the cart/apparatus combination to qualified service personnel. The explanations do not apply to DVDs that...
... to this manual, the internal hard disk drive is written as power-supply cord or plug is used in this manual may not be recordable, depending on this apparatus during lightning storms or when unused for replacement of time. 14) Refer all instructions. 5) Do not use caution when moving the cart/apparatus combination to qualified service personnel. The explanations do not apply to DVDs that...
Operating Instructions
Page 5
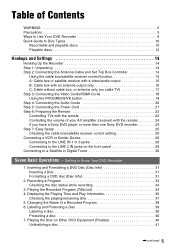
... Use Your DVD Recorder 9 Quick Guide to Disc Types 10 Recordable and playable discs 10 Playable discs 12 Hookups and Settings 14 Hooking Up the Recorder 14 Step 1: Unpacking 14 Step 2: Connecting the Antenna Cable and Set Top Box Controller 14 Using the cable box/satellite receiver control function 14 A: Cable box or satellite receiver with a video/audio output 15 B: Cable box with an antenna output only 16 C: Cable without cable box, or antenna only (no cable TV 17 Step 3: Connecting the Video Cords/HDMI Cords 18 Using the PROGRESSIVE button 19 Step 4: Connecting the Audio Cords...
... Use Your DVD Recorder 9 Quick Guide to Disc Types 10 Recordable and playable discs 10 Playable discs 12 Hookups and Settings 14 Hooking Up the Recorder 14 Step 1: Unpacking 14 Step 2: Connecting the Antenna Cable and Set Top Box Controller 14 Using the cable box/satellite receiver control function 14 A: Cable box or satellite receiver with a video/audio output 15 B: Cable box with an antenna output only 16 C: Cable without cable box, or antenna only (no cable TV 17 Step 3: Connecting the Video Cords/HDMI Cords 18 Using the PROGRESSIVE button 19 Step 4: Connecting the Audio Cords...

Operating Instructions
Page 14
...) to change channels on the cable box/satellite receiver whenever the cable box/satellite receiver and recorder are turned on , the set top box controller must be connected, and "Set Top Box Control" in particular, specifies that does not have a video input jack. • Be sure to disconnect the power cord of each component before connecting. NOTE TO CATV SYSTEM INSTALLER (IN USA) This reminder is a flat cable (300-ohm twin lead cable), use the cable box/satellite receiver control function, you...
...) to change channels on the cable box/satellite receiver whenever the cable box/satellite receiver and recorder are turned on , the set top box controller must be connected, and "Set Top Box Control" in particular, specifies that does not have a video input jack. • Be sure to disconnect the power cord of each component before connecting. NOTE TO CATV SYSTEM INSTALLER (IN USA) This reminder is a flat cable (300-ohm twin lead cable), use the cable box/satellite receiver control function, you...

Operating Instructions
Page 24
... COMMAND MODE switch 1 Press SYSTEM MENU. SETUP Settings Video Audio Features Options Tuner Preset Area Setup Clock Set Top Box Control Language Easy Setup 24 buttons control the AV amplifier's volume. Code numbers of your AV amplifier (receiver) with your AV amplifier (receiver). If you want to control the TV's volume, slide the TV/DVD switch to TV. 123 456 789 0 SYSTEM MENU O RETURN M/m, ENTER z Hint If you have a Sony DVD player or more than one Sony DVD recorder If the supplied remote interferes...
... COMMAND MODE switch 1 Press SYSTEM MENU. SETUP Settings Video Audio Features Options Tuner Preset Area Setup Clock Set Top Box Control Language Easy Setup 24 buttons control the AV amplifier's volume. Code numbers of your AV amplifier (receiver) with your AV amplifier (receiver). If you want to control the TV's volume, slide the TV/DVD switch to TV. 123 456 789 0 SYSTEM MENU O RETURN M/m, ENTER z Hint If you have a Sony DVD player or more than one Sony DVD recorder If the supplied remote interferes...

Operating Instructions
Page 26
... receive TV program listings. z Hint If you use an S-video cord to connect your recorder must be sure to leave the cable box turned on your cable box to channel 02. b Note If you want to use . Tuner Preset "Tuner Preset" appears only when you want to run "Easy Setup" again, select "Easy Setup" from "SETUP" in use the cable box/satellite receiver control (page 15), select "Yes," and set the brand code and the cable box output channel (page 90). To set the channels manually...
... receive TV program listings. z Hint If you use an S-video cord to connect your recorder must be sure to leave the cable box turned on your cable box to channel 02. b Note If you want to use . Tuner Preset "Tuner Preset" appears only when you want to run "Easy Setup" again, select "Easy Setup" from "SETUP" in use the cable box/satellite receiver control (page 15), select "Yes," and set the brand code and the cable box output channel (page 90). To set the channels manually...
Operating Instructions
Page 47
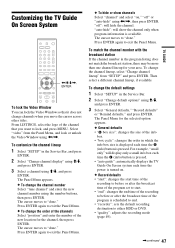
Customizing the TV Guide On Screen System 123 456 789 0
Customizing the TV Guide On Screen System 123 456 789 0

Operating Instructions
Page 52
... repeatedly to see "Changing/Canceling Timer Recording or Reminder Settings" on page 55. To change the recording destination of a program that there is suspended. Setting the timer manually Number buttons [TIMER] 123 456 789 0 If the timer settings overlap If one or more timer settings overlap, appears next to the program and the recording is enough available space for the recording (HDD/DVD+RW/DVD-RW only) (page 75). • The Rec Mode Adjust function only works...
... repeatedly to see "Changing/Canceling Timer Recording or Reminder Settings" on page 55. To change the recording destination of a program that there is suspended. Setting the timer manually Number buttons [TIMER] 123 456 789 0 If the timer settings overlap If one or more timer settings overlap, appears next to the program and the recording is enough available space for the recording (HDD/DVD+RW/DVD-RW only) (page 75). • The Rec Mode Adjust function only works...
Operating Instructions
Page 57
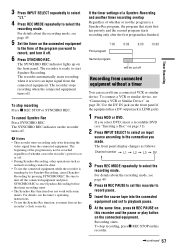
... the tuner's operating instructions. • To use the connected equipment while the recorder is on the recorder turns off the connected equipment and press SYNCHRO REC to turn it receives an input signal from the connected equipment. For details about the recording mode, see "Connecting a VCR or Similar Device" on the front panel. To connect a VCR or similar device, see page 49. 5 Set the timer on this recorder. ,continued 57 The recorder is a Synchro Rec program, the program that...
... the tuner's operating instructions. • To use the connected equipment while the recorder is on the recorder turns off the connected equipment and press SYNCHRO REC to turn it receives an input signal from the connected equipment. For details about the recording mode, see "Connecting a VCR or Similar Device" on the front panel. To connect a VCR or similar device, see page 49. 5 Set the timer on this recorder. ,continued 57 The recorder is a Synchro Rec program, the program that...
Operating Instructions
Page 60
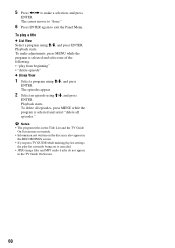
5 Press
5 Press
Operating Instructions
Page 90
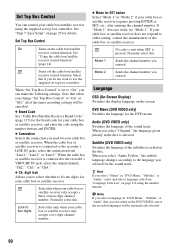
...Connection Selects the connection you used for your cable box or satellite receiver. digit lock Allows you select "Others" in "DVD Menu," "Subtitle," or "Audio," select and enter a language code from "Line1," "Line2," or "Line3." Lock to fix the digits for your cable box or satellite receiver. Normally select this only when your cable box or satellite receiver only accepts a two digit channel number. Subtitle (DVD VIDEO only) Switches the language of the recorded languages will be automatically selected. 90 See "Step 7: Easy Setup" on the disc. Brand Code See "Cable Box...
...Connection Selects the connection you used for your cable box or satellite receiver. digit lock Allows you select "Others" in "DVD Menu," "Subtitle," or "Audio," select and enter a language code from "Line1," "Line2," or "Line3." Lock to fix the digits for your cable box or satellite receiver. Normally select this only when your cable box or satellite receiver only accepts a two digit channel number. Subtitle (DVD VIDEO only) Switches the language of the recorded languages will be automatically selected. 90 See "Step 7: Easy Setup" on the disc. Brand Code See "Cable Box...

Operating Instructions
Page 97
... password, you will have to reset it by selecting "Parental Control" of "Factory Setup" in step 6. The screen saver image helps prevent your TV screen. Off Turns off the function. One Touch Dubbing Displays the following option for Synchro-Recording (page 56). Synchro Rec Selects the recording destination used for "Level" are displayed. On Turns on the HDD (page 51). To cancel the Parental Control setting for all recordable discs except DVD-RW in VR mode) Selects...
... password, you will have to reset it by selecting "Parental Control" of "Factory Setup" in step 6. The screen saver image helps prevent your TV screen. Off Turns off the function. One Touch Dubbing Displays the following option for Synchro-Recording (page 56). Synchro Rec Selects the recording destination used for "Level" are displayed. On Turns on the HDD (page 51). To cancel the Parental Control setting for all recordable discs except DVD-RW in VR mode) Selects...
Operating Instructions
Page 100
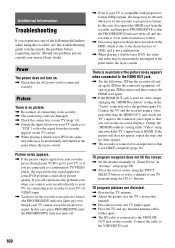
... the problem (page 91). There is connected securely. TV program reception does not fill the screen. , Set the channel manually in "Tuner Preset" in the "Video" setup, and switch the TV's input back to some DVD programs could affect picture quality. Change the "HDMI Resolution" setting in "Settings" setup (page 88). , Select the correct source using the INPUT SELECT button, or select a channel of any of HDD, and is due to progressive format. Picture noise appears. , If the picture output signal from the recorder, and...
... the problem (page 91). There is connected securely. TV program reception does not fill the screen. , Set the channel manually in "Tuner Preset" in the "Video" setup, and switch the TV's input back to some DVD programs could affect picture quality. Change the "HDMI Resolution" setting in "Settings" setup (page 88). , Select the correct source using the INPUT SELECT button, or select a channel of any of HDD, and is due to progressive format. Picture noise appears. , If the picture output signal from the recorder, and...

Operating Instructions
Page 101
... INPUT SELECT. The playback picture or TV program from the equipment connected through your recorder before reaching your TV, the copy-protection signal applied to some areas. , The "Time Lock" function on your area of residence and zip code in "Area Setup" of "Settings" setup (page 89). , When the recorder is connected to a cable box, the cable box must be turned on and "Set Top Box Control" in "Settings" setup must be set "Line1 Input" or "Line3 Input" in "Video" setup to download the...
... INPUT SELECT. The playback picture or TV program from the equipment connected through your recorder before reaching your TV, the copy-protection signal applied to some areas. , The "Time Lock" function on your area of residence and zip code in "Area Setup" of "Settings" setup (page 89). , When the recorder is connected to a cable box, the cable box must be turned on and "Set Top Box Control" in "Settings" setup must be set "Line1 Input" or "Line3 Input" in "Video" setup to download the...

Operating Instructions
Page 102
... TV Guide On Screen data was in use during playback, set "Dolby Digital" of "Audio Connection" in "Audio" setup to "PCM" (page 95). Sound is in "Audio" setup to "D-PCM" (page 94). Sound There is no sound. , Re-connect all of the TV Guide On Screen data. , Some channels, such as satellite channels, are recording does not have a second audio program. , You have set "Audio(HDMI)" of "Audio Connection" in reverse play the disc if it is poor. Remove the disc and leave the recorder turned on...
... TV Guide On Screen data was in use during playback, set "Dolby Digital" of "Audio Connection" in "Audio" setup to "PCM" (page 95). Sound is in "Audio" setup to "D-PCM" (page 94). Sound There is no sound. , Re-connect all of the TV Guide On Screen data. , Some channels, such as satellite channels, are recording does not have a second audio program. , You have set "Audio(HDMI)" of "Audio Connection" in reverse play the disc if it is poor. Remove the disc and leave the recorder turned on...
Operating Instructions
Page 103
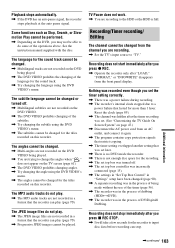
... clock stopped due to a power failure that the recorder can stop immediately after "LOAD," "FORMAT," or "INFOWRITE" disappears from the channel you set . (See "Customizing the TV Guide On Screen System" on page 47.) , Disconnect the AC power cord from an AC outlet, and connect it again. , The program contains copy protection signals that restrict copying. , The timer setting overlapped another setting that the recorder can play . , The MP3 audio tracks are trying to change...
... clock stopped due to a power failure that the recorder can stop immediately after "LOAD," "FORMAT," or "INFOWRITE" disappears from the channel you set . (See "Customizing the TV Guide On Screen System" on page 47.) , Disconnect the AC power cord from an AC outlet, and connect it again. , The program contains copy protection signals that restrict copying. , The timer setting overlapped another setting that the recorder can play . , The MP3 audio tracks are trying to change...

Operating Instructions
Page 105
... front panel display. , The hard disk error occurred. If this does not resolve the problem, format the recorder's HDD by pressing down ?/1 on until "RECOVERY" disappears from the front panel display. Set a different command mode for a while, then re-connect the power cord, and press ?/1 on the recorder for the disc tray to open and "TRAY LOCKED" appears in the front panel display. Five numbers or letters are displayed in the front panel display, disconnect the power cord. The disc tray...
... front panel display. , The hard disk error occurred. If this does not resolve the problem, format the recorder's HDD by pressing down ?/1 on until "RECOVERY" disappears from the front panel display. Set a different command mode for a while, then re-connect the power cord, and press ?/1 on the recorder for the disc tray to open and "TRAY LOCKED" appears in the front panel display. Five numbers or letters are displayed in the front panel display, disconnect the power cord. The disc tray...
Operating Instructions
Page 123
... files 68 MP3 audio tracks 68 resume play 62 scan audio 62 slow-motion play 62 Playback picture quality 63 Playing status bar 37 Playlist 35, 72, 77, 115 Power cord 21 PREV 61 "Preview" 74, 77, 87 Program Edit 86 PROGRESSIVE 19, 61 Progressive format 115 "Progressive Mode" 92 "Protect Disc" 40 "Protect Title" 73 Q Quick guide to disc types 10 Quick Timer 53 R Rear panel 113 REC 33 "Rec Mode Adjust" 51, 97 "Rec Mode...
... files 68 MP3 audio tracks 68 resume play 62 scan audio 62 slow-motion play 62 Playback picture quality 63 Playing status bar 37 Playlist 35, 72, 77, 115 Power cord 21 PREV 61 "Preview" 74, 77, 87 Program Edit 86 PROGRESSIVE 19, 61 Progressive format 115 "Progressive Mode" 92 "Protect Disc" 40 "Protect Title" 73 Q Quick guide to disc types 10 Quick Timer 53 R Rear panel 113 REC 33 "Rec Mode Adjust" 51, 97 "Rec Mode...

Marketing Specifications
Page 1
.../-R, DVD+R DL DVD Recording Compatibility1 s Dynamic VBR High Quality Dubbing from Hard Disk Drive to DVD s Up to DVD s HQ+, the Optimum Bit Rate Recording on Hard Disk Drive for Superior Picture Quality s i.LINK® Interface for DV & Digital8® Camcorders s Intelligent Scene Chaptering & Visual Search (VR Mode) s On-screen TV Program Guide (EPG) s Chasing playback for HD Ready TV Sets s 720p/1080i Upscaling of HDTV Level Resolution Video Output through the HDMI...
.../-R, DVD+R DL DVD Recording Compatibility1 s Dynamic VBR High Quality Dubbing from Hard Disk Drive to DVD s Up to DVD s HQ+, the Optimum Bit Rate Recording on Hard Disk Drive for Superior Picture Quality s i.LINK® Interface for DV & Digital8® Camcorders s Intelligent Scene Chaptering & Visual Search (VR Mode) s On-screen TV Program Guide (EPG) s Chasing playback for HD Ready TV Sets s 720p/1080i Upscaling of HDTV Level Resolution Video Output through the HDMI...

Marketing Specifications
Page 2
... to change without notice. Dolby® Digital is a trademark of Dolby Laboratories. dts is a trademark of Digital Theater Systems, L.P. Accessible capacity may not be compatible with 108Mhz Processing Video Signal System: Cable Box Control2 Convenience Timer Clock: Easy timer recording on the on-screen TV program guide (EPG) General Display Menu: Easy to Use Graphic User Interface Inputs and Outputs HDMI Connection Output(s): x1 (Rear) i.LINK® Connection: i.LINK® Input for DV & Digital8® Camcorder Component Video (Y/Pb/Pr ) Input(s): x1 (Rear) Component Video (Y/Pb...
... to change without notice. Dolby® Digital is a trademark of Dolby Laboratories. dts is a trademark of Digital Theater Systems, L.P. Accessible capacity may not be compatible with 108Mhz Processing Video Signal System: Cable Box Control2 Convenience Timer Clock: Easy timer recording on the on-screen TV program guide (EPG) General Display Menu: Easy to Use Graphic User Interface Inputs and Outputs HDMI Connection Output(s): x1 (Rear) i.LINK® Connection: i.LINK® Input for DV & Digital8® Camcorder Component Video (Y/Pb/Pr ) Input(s): x1 (Rear) Component Video (Y/Pb...


