
Operating Instructions
Page 6
Timer Recording 39 Before Recording 39 Recording mode 39 Recording a stereo/SAP program 40 Unrecordable pictures 40 Timer Recording 40 Using the Quick Timer function 42 Adjusting the recording picture quality and size 42 Creating chapters in a title 43 Checking/Changing/Canceling Timer Settings (Timer List 44 Changing the priority of overlapped settings 45 Recording From Connected Equipment 47 Recording from...
Timer Recording 39 Before Recording 39 Recording mode 39 Recording a stereo/SAP program 40 Unrecordable pictures 40 Timer Recording 40 Using the Quick Timer function 42 Adjusting the recording picture quality and size 42 Creating chapters in a title 43 Checking/Changing/Canceling Timer Settings (Timer List 44 Changing the priority of overlapped settings 45 Recording From Connected Equipment 47 Recording from...
Operating Instructions
Page 16
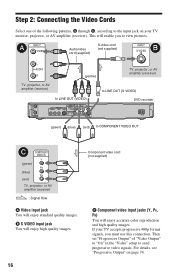
... PB, PR) You will enjoy standard quality images. For details, see "Progressive Output" on your TV accepts progressive 480p format signals, you to view pictures. If your TV monitor, projector, or AV amplifier (receiver). This will enable you must use this connection. Step ... cord (supplied) S-video cord (not supplied) INPUT B S VIDEO L AUDIO R (yellow) TV, projector, or AV amplifier (receiver) TV, projector, or AV amplifier (receiver) to LINE OUT (VIDEO) to LINE OUT (S VIDEO) DVD recorder (green) (blue) (red) to COMPONENT VIDEO OUT C COMPONENT VIDEO IN Y (green) PB...
... PB, PR) You will enjoy standard quality images. For details, see "Progressive Output" on your TV accepts progressive 480p format signals, you to view pictures. If your TV monitor, projector, or AV amplifier (receiver). This will enable you must use this connection. Step ... cord (supplied) S-video cord (not supplied) INPUT B S VIDEO L AUDIO R (yellow) TV, projector, or AV amplifier (receiver) TV, projector, or AV amplifier (receiver) to LINE OUT (VIDEO) to LINE OUT (S VIDEO) DVD recorder (green) (blue) (red) to COMPONENT VIDEO OUT C COMPONENT VIDEO IN Y (green) PB...

Operating Instructions
Page 17
b Note Do not connect more than one type of video cord between the recorder and your VCR to the LINE IN jack on the recorder (page 24). To change the picture size, see page 74. If you are connecting to a VCR Connect your TV at the same time. 17 Hookups and Settings When playing "wide screen" images Some recorded images may not fit your TV screen.
b Note Do not connect more than one type of video cord between the recorder and your VCR to the LINE IN jack on the recorder (page 24). To change the picture size, see page 74. If you are connecting to a VCR Connect your TV at the same time. 17 Hookups and Settings When playing "wide screen" images Some recorded images may not fit your TV screen.

Operating Instructions
Page 25
... • Pictures containing copy protection signals that prohibit any copying cannot be able to your TV at the same time. 25 To watch video tapes, watch the tapes through a VCR, you may cause noise (feedback). • Do not connect more than one type of this recorder. Connecting to... Do not connect the R input jack. This may not receive a clear image on your TV. S VIDEO OUTPUT VIDEO AUDIO L R VCR, etc. DVD recorder VCR TV Be sure to connect your VCR to the DVD recorder and to view the signals from the connected VCR. If the equipment has an S-video jack...
... • Pictures containing copy protection signals that prohibit any copying cannot be able to your TV at the same time. 25 To watch video tapes, watch the tapes through a VCR, you may cause noise (feedback). • Do not connect more than one type of this recorder. Connecting to... Do not connect the R input jack. This may not receive a clear image on your TV. S VIDEO OUTPUT VIDEO AUDIO L R VCR, etc. DVD recorder VCR TV Be sure to connect your VCR to the DVD recorder and to view the signals from the connected VCR. If the equipment has an S-video jack...

Operating Instructions
Page 29
... (VR mode) You can switch the Title List to show the extended Title List, press OPTIONS to Know Your DVD Recorder m Extended Title List Sub-menu 4 Select "Play," and press ENTER. z (red): Indicates that the title is shown in the Thumbnail title list. To stop playback .../DVD-Rs (VR mode). To show Original or Playlist titles. 2 Press TITLE LIST. The sub-menu displays options applicable only to the next/previous page of the titles do not fit on . E Title's thumbnail picture: The still images for each title are displayed. Each time you press REPLAY/ADVANCE , the entire Title...
... (VR mode) You can switch the Title List to show the extended Title List, press OPTIONS to Know Your DVD Recorder m Extended Title List Sub-menu 4 Select "Play," and press ENTER. z (red): Indicates that the title is shown in the Thumbnail title list. To stop playback .../DVD-Rs (VR mode). To show Original or Playlist titles. 2 Press TITLE LIST. The sub-menu displays options applicable only to the next/previous page of the titles do not fit on . E Title's thumbnail picture: The still images for each title are displayed. Each time you press REPLAY/ADVANCE , the entire Title...

Operating Instructions
Page 30
Press To change a title thumbnail picture (Thumbnail) (DVD-RW/DVD-R in VR mode only) You can select a favorite scene for the thumbnail picture shown in the Title List menu. 1 Press TITLE LIST.
Press To change a title thumbnail picture (Thumbnail) (DVD-RW/DVD-R in VR mode only) You can select a favorite scene for the thumbnail picture shown in the Title List menu. 1 Press TITLE LIST.

Operating Instructions
Page 39
...; The maximum continuous recording time for the recording (page 32). Timer Recording Timer Recording Before Recording Before you start recording... • Check that has already been edited - Conversely, a longer duration provides a longer recording time, but the large data volume also results in a coarser picture quality. SLP (Long duration) 8 14 hr. 28 min. Recording on other DVD equipment, finalize the disc...
...; The maximum continuous recording time for the recording (page 32). Timer Recording Timer Recording Before Recording Before you start recording... • Check that has already been edited - Conversely, a longer duration provides a longer recording time, but the large data volume also results in a coarser picture quality. SLP (Long duration) 8 14 hr. 28 min. Recording on other DVD equipment, finalize the disc...

Operating Instructions
Page 40
... "SAP" indicator lights up to "Off" (page 76). To record only SAP sound, set "Tuner Audio" in the "Audio" setup to record but with copy protection cannot be played only on this recorder. When the recorder receives a copy guard signal, the recorder continues to "SAP" (page 76). Unrecordable pictures Pictures with less noise. z REC x REC STOP 1 Press TIMER...
... "SAP" indicator lights up to "Off" (page 76). To record only SAP sound, set "Tuner Audio" in the "Audio" setup to record but with copy protection cannot be played only on this recorder. When the recorder receives a copy guard signal, the recorder continues to "SAP" (page 76). Unrecordable pictures Pictures with less noise. z REC x REC STOP 1 Press TIMER...

Operating Instructions
Page 42
... Synchro Rec. Leave the satellite tuner turned on the satellite tuner and select the satellite program you can use the Synchro Rec function (page 47). • Even if the timer is correctly set before setting the timer recording. Adjusting the recording picture quality and size You can set for the recording (DVD+RW/DVD-RW only) (page 60...
... Synchro Rec. Leave the satellite tuner turned on the satellite tuner and select the satellite program you can use the Synchro Rec function (page 47). • Even if the timer is correctly set before setting the timer recording. Adjusting the recording picture quality and size You can set for the recording (DVD+RW/DVD-RW only) (page 60...

Operating Instructions
Page 43
... erase chapter marks manually (page 62). b Notes • When playing a 16:9 size picture recorded as 16:9 even if "DVD Rec. Picture Size" works with DVD-RWs/DVD-Rs (Video mode) when the recording mode is fixed to 4:3 Letter Box regardless of the setting in "TV Type" of "Video" setup (page 74). • Remnants of images may appear on...
... erase chapter marks manually (page 62). b Notes • When playing a 16:9 size picture recorded as 16:9 even if "DVD Rec. Picture Size" works with DVD-RWs/DVD-Rs (Video mode) when the recording mode is fixed to 4:3 Letter Box regardless of the setting in "TV Type" of "Video" setup (page 74). • Remnants of images may appear on...

Operating Instructions
Page 48
...). 1 Insert a recordable DVD. To connect a VCR or similar device, see page 39. 4 Insert the source tape into the connected equipment and set to select the recording mode. The front panel display changes as follows: channel If you made. See "Adjusting the recording picture quality and size" on page 66 for the recording picture before recording. This recorder starts recording. 48...
...). 1 Insert a recordable DVD. To connect a VCR or similar device, see page 39. 4 Insert the source tape into the connected equipment and set to select the recording mode. The front panel display changes as follows: channel If you made. See "Adjusting the recording picture quality and size" on page 66 for the recording picture before recording. This recorder starts recording. 48...

Operating Instructions
Page 52
... system, the consumer should take proper precautions when the analog stereo jacks of the recorder are output only through the DIGITAL OUT (COAXIAL) jack. Adjusting the picture quality +RW -RWVR -RWVideo +R -RVR -RVideo DVD VCD 1 Press OPTIONS during playback to the video bit rate and other factors. ... luminance element of the recorder. • Set the sound to "Stereo" using the AUDIO button when you play DTS sound tracks on a CD (page 51). "PB Video Equalizer" (Playback video equalizer): Adjusts the picture in the picture. Notes on playing DVDs with a DVD camcorder can only be played...
... system, the consumer should take proper precautions when the analog stereo jacks of the recorder are output only through the DIGITAL OUT (COAXIAL) jack. Adjusting the picture quality +RW -RWVR -RWVideo +R -RVR -RVideo DVD VCD 1 Press OPTIONS during playback to the video bit rate and other factors. ... luminance element of the recorder. • Set the sound to "Stereo" using the AUDIO button when you play DTS sound tracks on a CD (page 51). "PB Video Equalizer" (Playback video equalizer): Adjusts the picture in the picture. Notes on playing DVDs with a DVD camcorder can only be played...

Operating Instructions
Page 53
...apparent. Larger numbers indicate a longer audio delay for synchronization with the video (0 to discern. When dubbing to a VCR or other video recording equipment, be hard to 120 milliseconds). "AV SYNC": When the video is recommended that you use the BNR function with the video. ...to select "Audio Settings," and press ENTER. 2 Select "AV SYNC", and press ENTER. Adjusting the delay between the picture and sound (AV SYNC) +RW -RWVR -RWVideo +R -RVR -RVideo DVD VCD 1 Press OPTIONS during playback to "Off." In this case, it is delayed, this setting to 0 ms (default...
...apparent. Larger numbers indicate a longer audio delay for synchronization with the video (0 to discern. When dubbing to a VCR or other video recording equipment, be hard to 120 milliseconds). "AV SYNC": When the video is recommended that you use the BNR function with the video. ...to select "Audio Settings," and press ENTER. 2 Select "AV SYNC", and press ENTER. Adjusting the delay between the picture and sound (AV SYNC) +RW -RWVR -RWVideo +R -RVR -RVideo DVD VCD 1 Press OPTIONS during playback to "Off." In this case, it is delayed, this setting to 0 ms (default...

Operating Instructions
Page 54
...Playback continues even if the recording is a timer recording. 1 While recording, press TITLE LIST. Searching for a Title/ Chapter/Track, etc. +RW -RWVR -RWVideo +R -RVR -RVideo DVD VCD CD DATA DVD DATA CD You can play ...recording mode. • When playing a title recorded in the HQ or HSP recording mode, picture noise may appear depending upon the condition of the recording. • Picture noise may appear depending upon the condition of the recording, or when playing a title recorded in the HQ or HSP recording mode. Playing a previous recording while making another on a 1x-speed DVD...
...Playback continues even if the recording is a timer recording. 1 While recording, press TITLE LIST. Searching for a Title/ Chapter/Track, etc. +RW -RWVR -RWVideo +R -RVR -RVideo DVD VCD CD DATA DVD DATA CD You can play ...recording mode. • When playing a title recorded in the HQ or HSP recording mode, picture noise may appear depending upon the condition of the recording. • Picture noise may appear depending upon the condition of the recording, or when playing a title recorded in the HQ or HSP recording mode. Playing a previous recording while making another on a 1x-speed DVD...

Operating Instructions
Page 55
...recorder starts playback from the first MP3 audio track on the disc begins. DATA DVD DATA CD You can play MP3 audio tracks and JPEG image files on DATA CDs (CD-ROMs/CDRs/CD-RWs) or JPEG image files on page 27. 2 Press H PLAY. Inserting a Disc" on DATA DVDs (DVD-ROMs/DVD+RWs/DVD+Rs/ DVD-RWs/DVD...JPEG Image Files The number in parentheses indicates the total number of titles, tracks, etc. 2 Press the number buttons to select the number of the pictures on the disc. AUDIO DISPLAY / . Playback The display for entering the number appears. PREV m H PLAY TIME/TEXT M x STOP X PAUSE...
...recorder starts playback from the first MP3 audio track on the disc begins. DATA DVD DATA CD You can play MP3 audio tracks and JPEG image files on DATA CDs (CD-ROMs/CDRs/CD-RWs) or JPEG image files on page 27. 2 Press H PLAY. Inserting a Disc" on DATA DVDs (DVD-ROMs/DVD+RWs/DVD+Rs/ DVD-RWs/DVD...JPEG Image Files The number in parentheses indicates the total number of titles, tracks, etc. 2 Press the number buttons to select the number of the pictures on the disc. AUDIO DISPLAY / . Playback The display for entering the number appears. PREV m H PLAY TIME/TEXT M x STOP X PAUSE...

Operating Instructions
Page 56
... image by using the To play the beginning of the track Press OPTIONS to select "Rotate Right" or "Rotate Left," and press ENTER. To rotate a picture Press OPTIONS while the JPEG image is displayed to select "Play Beginning," and press ENTER. PREV or NEXT > during playback. z Hints • Press the AUDIO...
... image by using the To play the beginning of the track Press OPTIONS to select "Rotate Right" or "Rotate Left," and press ENTER. To rotate a picture Press OPTIONS while the JPEG image is displayed to select "Play Beginning," and press ENTER. PREV or NEXT > during playback. z Hints • Press the AUDIO...

Operating Instructions
Page 60
... +R -RVideo -RVR This section explains the basic edit functions. To edit DVD-RWs/DVD-Rs (VR mode) without changing the original recordings, create a Playlist title (page 62). "Set Thumbnail": Changes the title's thumbnail picture that editing is irreversible. CHAPTER MARK O RETURN . For DVD-RWs/DVD-Rs in the Title List (page 30). "Make a Playlist": Adds the...
... +R -RVideo -RVR This section explains the basic edit functions. To edit DVD-RWs/DVD-Rs (VR mode) without changing the original recordings, create a Playlist title (page 62). "Set Thumbnail": Changes the title's thumbnail picture that editing is irreversible. CHAPTER MARK O RETURN . For DVD-RWs/DVD-Rs in the Title List (page 30). "Make a Playlist": Adds the...

Operating Instructions
Page 67
...Press REC MODE on the following conditions. The recorder completes dubbing even after being dubbed changes. If the picture size or the recording mode on the remote repeatedly to select the recording mode. "Stereo1" (default): Records original sound only. "Stereo2": Records additional audio only. Select "Mix" or "...Dubbing 3 Press INPUT SELECT on the tape being turned off the recorder during dubbing. The front panel display changes as a tape with your digital video camera before shooting. • The recorded picture may be different from what you have set if the source ...
...Press REC MODE on the following conditions. The recorder completes dubbing even after being dubbed changes. If the picture size or the recording mode on the remote repeatedly to select the recording mode. "Stereo1" (default): Records original sound only. "Stereo2": Records additional audio only. Select "Mix" or "...Dubbing 3 Press INPUT SELECT on the tape being turned off the recorder during dubbing. The front panel display changes as a tape with your digital video camera before shooting. • The recorded picture may be different from what you have set if the source ...

Operating Instructions
Page 70
... the program is displayed in red when the size exceeds the available space on the target disc, the recorder automatically selects a dubbing mode with lower picture quality according to start recording. This is finished. 70 11 Select "OK," and press ENTER. The title name is not enough ...available space on the dubbing target media. The recorder starts recording the tape contents as the OUT point, the IN and OUT ...
... the program is displayed in red when the size exceeds the available space on the target disc, the recorder automatically selects a dubbing mode with lower picture quality according to start recording. This is finished. 70 11 Select "OK," and press ENTER. The title name is not enough ...available space on the dubbing target media. The recorder starts recording the tape contents as the OUT point, the IN and OUT ...

Operating Instructions
Page 74
... the picture appears too dark. This setting is distorted, select "No," and press ENTER. 74 Normally, select this when connecting to a wide-screen TV or TV with the following options. The video switches to the DVD recorder. 4:3 Letter Box 1 Press SYSTEM MENU while the recorder is in...Note Depending on the upper and lower portions of TV, tuner, or decoder connected to a progressive signal for confirmation. 3 Select "Start," and press ENTER. On Raises the standard black level. If picture is not effective when the recorder outputs progressive signals. 16:9 Video Settings (Video)...
... the picture appears too dark. This setting is distorted, select "No," and press ENTER. 74 Normally, select this when connecting to a wide-screen TV or TV with the following options. The video switches to the DVD recorder. 4:3 Letter Box 1 Press SYSTEM MENU while the recorder is in...Note Depending on the upper and lower portions of TV, tuner, or decoder connected to a progressive signal for confirmation. 3 Select "Start," and press ENTER. On Raises the standard black level. If picture is not effective when the recorder outputs progressive signals. 16:9 Video Settings (Video)...


