
Operating Instructions
Page 1
2-672-839-11(1) DVD Recorder Operating Instructions RDR-GX330 © 2006 Sony Corporation
2-672-839-11(1) DVD Recorder Operating Instructions RDR-GX330 © 2006 Sony Corporation

Operating Instructions
Page 2
... or moisture. If this DVD recorder is intended to alert the user to comply with the limits for help. CAUTION The use of optical instruments with the instructions, may be determined by one or more of the following measures: - As the laser beam used in a residential installation. RDR-GX330 Serial No CAUTION You are...
... or moisture. If this DVD recorder is intended to alert the user to comply with the limits for help. CAUTION The use of optical instruments with the instructions, may be determined by one or more of the following measures: - As the laser beam used in a residential installation. RDR-GX330 Serial No CAUTION You are...

Operating Instructions
Page 3
...an external tuner (not supplied) may contain copy protection signals (copy guard function) and as vases, on the apparatus. never pull the cord. Sony will not compensate for any lost recordings or relevant losses, including when recordings are not made due to reasons including recorder failure, or...U.S. Plasma display panels and projection televisions are not going to use of recorder failure or repair undertaken to prevent heat build-up in the recorder. • Do not place the recorder on your TV for home and other intellectual property rights. On compensation for a long time...
...an external tuner (not supplied) may contain copy protection signals (copy guard function) and as vases, on the apparatus. never pull the cord. Sony will not compensate for any lost recordings or relevant losses, including when recordings are not made due to reasons including recorder failure, or...U.S. Plasma display panels and projection televisions are not going to use of recorder failure or repair undertaken to prevent heat build-up in the recorder. • Do not place the recorder on your TV for home and other intellectual property rights. On compensation for a long time...
Operating Instructions
Page 4
... has been damaged in accordance with the apparatus. You can be used with the function being walked on this recorder. 13) Unplug this manual refer to DVDs that are provided for your outlet, consult an electrician for replacement of the polarized or grounding-type plug. Important... the remote. • The on-screen display illustrations used in this manual may not match the graphics displayed on your TV screen. • The explanations regarding DVDs in this manual describe the controls on this manual, "disc" is used , use attachments/ accessories specified by the manufacturer...
... has been damaged in accordance with the apparatus. You can be used with the function being walked on this recorder. 13) Unplug this manual refer to DVDs that are provided for your outlet, consult an electrician for replacement of the polarized or grounding-type plug. Important... the remote. • The on-screen display illustrations used in this manual may not match the graphics displayed on your TV screen. • The explanations regarding DVDs in this manual describe the controls on this manual, "disc" is used , use attachments/ accessories specified by the manufacturer...
Operating Instructions
Page 5
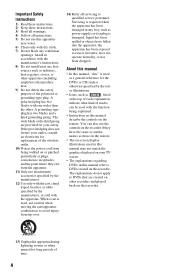
...the front panel 25 Connecting to Know Your DVD Recorder 1. Reformatting a disc 37 ,continued 5 Recording a Program 27 Checking the disc status while recording 28 3. Getting to a Satellite or Digital Tuner 26 Eight Basic Operations - Playing the Recorded Program (Title List 28 4. Table of ...TV 15 Step 2: Connecting the Video Cords 16 Step 3: Connecting the Audio Cords 18 Step 4: Connecting the AC Power Cord 19 Step 5: Preparing the Remote 20 Controlling TVs with the remote 20 If you have a Sony DVD player or more than one Sony DVD recorder 21 Changing channels of a Recorded...
...the front panel 25 Connecting to Know Your DVD Recorder 1. Reformatting a disc 37 ,continued 5 Recording a Program 27 Checking the disc status while recording 28 3. Getting to a Satellite or Digital Tuner 26 Eight Basic Operations - Playing the Recorded Program (Title List 28 4. Table of ...TV 15 Step 2: Connecting the Video Cords 16 Step 3: Connecting the Audio Cords 18 Step 4: Connecting the AC Power Cord 19 Step 5: Preparing the Remote 20 Controlling TVs with the remote 20 If you have a Sony DVD player or more than one Sony DVD recorder 21 Changing channels of a Recorded...

Operating Instructions
Page 6
...quality 52 Adjusting the delay between the picture and sound (AV SYNC 53 Playing from the beginning of the program you are recording (Chasing Playback 53 Playing a previous recording while making another (Simultaneous Rec and Play 54 Searching for a Title/Chapter/Track, etc 54 Playing MP3 Audio Tracks or JPEG... Image Files 55 About MP3 audio tracks and JPEG image files 56 MP3 audio tracks or JPEG image files that the recorder can play . . . . . 57 About playback order of albums, tracks, and files 57 Erasing and Editing 59 Before Editing 59 Erasing and Editing a ...
...quality 52 Adjusting the delay between the picture and sound (AV SYNC 53 Playing from the beginning of the program you are recording (Chasing Playback 53 Playing a previous recording while making another (Simultaneous Rec and Play 54 Searching for a Title/Chapter/Track, etc 54 Playing MP3 Audio Tracks or JPEG... Image Files 55 About MP3 audio tracks and JPEG image files 56 MP3 audio tracks or JPEG image files that the recorder can play . . . . . 57 About playback order of albums, tracks, and files 57 Erasing and Editing 59 Before Editing 59 Erasing and Editing a ...
Operating Instructions
Page 7
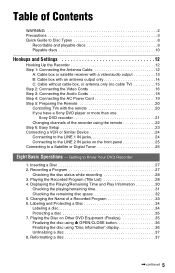
... 71 Antenna Reception and Language Settings (Basic 71 Tuner Preset 71 Clock 72 OSD (On-Screen Display 73 Video Settings (Video 74 Audio Settings (Audio 76 Recording Settings (Recording 78 Disc Settings (DVD 79 Remote Control Settings/Factory Settings (Others 81 Easy Setup (Resetting the Recorder 82 Additional Information 83 Troubleshooting 83 Self-diagnosis Function...
... 71 Antenna Reception and Language Settings (Basic 71 Tuner Preset 71 Clock 72 OSD (On-Screen Display 73 Video Settings (Video 74 Audio Settings (Audio 76 Recording Settings (Recording 78 Disc Settings (DVD 79 Remote Control Settings/Factory Settings (Others 81 Easy Setup (Resetting the Recorder 82 Additional Information 83 Troubleshooting 83 Self-diagnosis Function...

Operating Instructions
Page 8
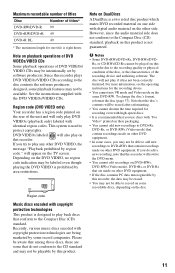
...Recordable and playable discs Type Disc Logo Icon used in Formatting this manual (new discs) Compatibility with other DVD players (finalizing) DVD+RW DVDRW VR mode Video mode DVD+R DVD+R DL VR mode DVD-R Video mode +RW Automatically formatted in +VR mode (DVD+RW VIDEO) Playable on DVD...players (finalization unnecessary) Format in Video mode (page 27) Playable on most DVD players (finalization necessary) (page 35) Automatically formatted in Playable on most DVD +R +VR mode players (finalization (DVD+R necessary) (page 35) VIDEO) -RVR -RVideo Format in players (...
...Recordable and playable discs Type Disc Logo Icon used in Formatting this manual (new discs) Compatibility with other DVD players (finalizing) DVD+RW DVDRW VR mode Video mode DVD+R DVD+R DL VR mode DVD-R Video mode +RW Automatically formatted in +VR mode (DVD+RW VIDEO) Playable on DVD...players (finalization unnecessary) Format in Video mode (page 27) Playable on most DVD players (finalization necessary) (page 35) Automatically formatted in Playable on most DVD +R +VR mode players (finalization (DVD+R necessary) (page 35) VIDEO) -RVR -RVideo Format in players (...

Operating Instructions
Page 9
....1.1, Ver.1.2 with CPRM*2) • 16x-speed or slower DVD+Rs • 16x-speed or slower DVD-Rs (Ver.2.0, Ver.2.1 with CPRM*2) • 8x-speed or slower DVD+R DL (Double Layer) discs "DVD+RW," "DVD-RW," "DVD+R," "DVD+R DL," and "DVD-R" are trademarks. *1 When an unformatted DVD-R is inserted into this recorder, it is automatically formatted in VR mode, format using...
....1.1, Ver.1.2 with CPRM*2) • 16x-speed or slower DVD+Rs • 16x-speed or slower DVD-Rs (Ver.2.0, Ver.2.1 with CPRM*2) • 8x-speed or slower DVD+R DL (Double Layer) discs "DVD+RW," "DVD-RW," "DVD+R," "DVD+R DL," and "DVD-R" are trademarks. *1 When an unformatted DVD-R is inserted into this recorder, it is automatically formatted in VR mode, format using...

Operating Instructions
Page 10
... part of CD-Extras • DVD-ROMs/DVD+RWs/DVD-RWs/ DVD+Rs/DVD-Rs that do not contain DVD Video or JPEG image files. • DVD Audio discs • DVD-RAMs • HD layer on a different recorder and not correctly finalized. • A disc recorded in CD music CD format DATA DVD - DVD+RWs/DVD+Rs/DVD-RWs/ DVD-Rs/DVD-ROMs containing JPEG image files...
... part of CD-Extras • DVD-ROMs/DVD+RWs/DVD-RWs/ DVD+Rs/DVD-Rs that do not contain DVD Video or JPEG image files. • DVD Audio discs • DVD-RAMs • HD layer on a different recorder and not correctly finalized. • A disc recorded in CD music CD format DATA DVD - DVD+RWs/DVD+Rs/DVD-RWs/ DVD-Rs/DVD-ROMs containing JPEG image files...
Operating Instructions
Page 11
... printed on their packaging. • You cannot add new recordings to DVD+Rs, DVD-Rs, or DVD-RWs (Video mode) that contain recordings made on other DVD equipment. • In some cases, you may not be able to add new recordings to DVD+RWs that contain recordings made on playback operations of DVD VIDEOs/VIDEO CDs Some playback operations of...37). If you do not conform to the CD standard and may be erased after reformatting. • You cannot shorten the time required for the recording device. • You cannot mix VR mode and Video mode on the TV screen. Note on other side.
... printed on their packaging. • You cannot add new recordings to DVD+Rs, DVD-Rs, or DVD-RWs (Video mode) that contain recordings made on other DVD equipment. • In some cases, you may not be able to add new recordings to DVD+RWs that contain recordings made on playback operations of DVD VIDEOs/VIDEO CDs Some playback operations of...37). If you do not conform to the CD standard and may be erased after reformatting. • You cannot shorten the time required for the recording device. • You cannot mix VR mode and Video mode on the TV screen. Note on other side.

Operating Instructions
Page 12
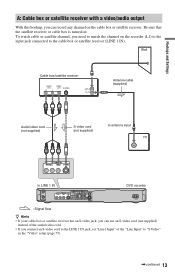
... cable box, or antenna only (no cable TV) Hookup A (page 13) B (page 14) C (page 15) NOTE TO CATV SYSTEM INSTALLER (IN USA) This reminder is a flat cable (300-ohm twin lead cable), use an external antenna connector (not supplied) to connect the antenna to the recorder. • If you have separate cables... does not have A: Cable box or satellite receiver with a video/audio output B: Cable box with the components to be connected. • You cannot connect this recorder to a TV that the cable ground shall be connected to the grounding system of the building, as close to the...
... cable box, or antenna only (no cable TV) Hookup A (page 13) B (page 14) C (page 15) NOTE TO CATV SYSTEM INSTALLER (IN USA) This reminder is a flat cable (300-ohm twin lead cable), use an external antenna connector (not supplied) to connect the antenna to the recorder. • If you have separate cables... does not have A: Cable box or satellite receiver with a video/audio output B: Cable box with the components to be connected. • You cannot connect this recorder to a TV that the cable ground shall be connected to the grounding system of the building, as close to the...
Operating Instructions
Page 13
...(supplied) Audio/video cord (not supplied) S-video cord (not supplied) to antenna input TV to LINE 1 IN DVD recorder : Signal flow z Hints • If your cable box or satellite receiver has an S-video jack, you can record any channel on . To watch cable or satellite channel, you connect an S-video cord to... the LINE 1 IN jack, set "Line1 Input" of the audio/video cord. • If you need to match the channel on the recorder (L1) to the input jack connected to the cable box or satellite receiver (LINE 1 IN). Hookups and Settings A: Cable box or satellite receiver with ...
...(supplied) Audio/video cord (not supplied) S-video cord (not supplied) to antenna input TV to LINE 1 IN DVD recorder : Signal flow z Hints • If your cable box or satellite receiver has an S-video jack, you can record any channel on . To watch cable or satellite channel, you connect an S-video cord to... the LINE 1 IN jack, set "Line1 Input" of the audio/video cord. • If you need to match the channel on the recorder (L1) to the input jack connected to the cable box or satellite receiver (LINE 1 IN). Hookups and Settings A: Cable box or satellite receiver with ...
Operating Instructions
Page 14
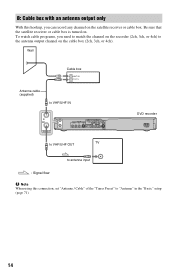
Wall Cable box ANT IN TO TV Antenna cable (supplied) to VHF/UHF IN DVD recorder to VHF/UHF OUT TV to antenna input : Signal flow b Note When using this hookup, you need to match the channel on the recorder (2ch, 3ch, or 4ch) to "Antenna" in the "Basic" setup (page 71). 14... B: Cable box with an antenna output only With this connection, set "Antenna / Cable" of the "Tuner...
Wall Cable box ANT IN TO TV Antenna cable (supplied) to VHF/UHF IN DVD recorder to VHF/UHF OUT TV to antenna input : Signal flow b Note When using this hookup, you need to match the channel on the recorder (2ch, 3ch, or 4ch) to "Antenna" in the "Basic" setup (page 71). 14... B: Cable box with an antenna output only With this connection, set "Antenna / Cable" of the "Tuner...
Operating Instructions
Page 15
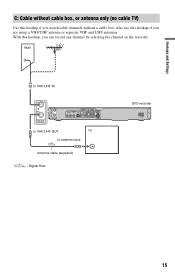
C: Cable without a cable box. Wall to VHF/UHF IN to VHF/UHF OUT TV to antenna input Antenna cable (supplied) : Signal flow DVD recorder 15 With this hookup, you watch cable channels without cable box, or antenna only (no cable TV) Use this hookup if you are using a VHF/UHF antenna or separate VHF and UHF antennas. Also use this hookup if you can record any channel by selecting the channel on the recorder. Hookups and Settings .
C: Cable without a cable box. Wall to VHF/UHF IN to VHF/UHF OUT TV to antenna input Antenna cable (supplied) : Signal flow DVD recorder 15 With this hookup, you watch cable channels without cable box, or antenna only (no cable TV) Use this hookup if you are using a VHF/UHF antenna or separate VHF and UHF antennas. Also use this hookup if you can record any channel by selecting the channel on the recorder. Hookups and Settings .
Operating Instructions
Page 16
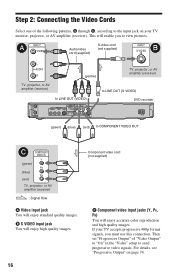
..." of the following patterns, A through C, according to the input jack on page 74. For details, see "Progressive Output" on your TV accepts progressive 480p format signals, you to view pictures. Step 2: Connecting the Video Cords Select one of "Video Output" to "On"...Audio/video cord (supplied) S-video cord (not supplied) INPUT B S VIDEO L AUDIO R (yellow) TV, projector, or AV amplifier (receiver) TV, projector, or AV amplifier (receiver) to LINE OUT (VIDEO) to LINE OUT (S VIDEO) DVD recorder (green) (blue) (red) to COMPONENT VIDEO OUT C COMPONENT VIDEO IN Y (green) PB (...
..." of the following patterns, A through C, according to the input jack on page 74. For details, see "Progressive Output" on your TV accepts progressive 480p format signals, you to view pictures. Step 2: Connecting the Video Cords Select one of "Video Output" to "On"...Audio/video cord (supplied) S-video cord (not supplied) INPUT B S VIDEO L AUDIO R (yellow) TV, projector, or AV amplifier (receiver) TV, projector, or AV amplifier (receiver) to LINE OUT (VIDEO) to LINE OUT (S VIDEO) DVD recorder (green) (blue) (red) to COMPONENT VIDEO OUT C COMPONENT VIDEO IN Y (green) PB (...

Operating Instructions
Page 17
b Note Do not connect more than one type of video cord between the recorder and your VCR to the LINE IN jack on the recorder (page 24). If you are connecting to a VCR Connect your TV at the same time. 17 To change the picture size, see page 74. Hookups and Settings When playing "wide screen" images Some recorded images may not fit your TV screen.
b Note Do not connect more than one type of video cord between the recorder and your VCR to the LINE IN jack on the recorder (page 24). If you are connecting to a VCR Connect your TV at the same time. 17 To change the picture size, see page 74. Hookups and Settings When playing "wide screen" images Some recorded images may not fit your TV screen.

Operating Instructions
Page 18
...Speakers] Rear (R) Front (R) Center to coaxial digital input Subwoofer Coaxial digital cord (not supplied) to DIGITAL OUT (COAXIAL) DVD recorder to the input jack on your TV's or stereo amplifier's (receiver's) two speakers for video signals (page 16). This will use this connection. A Digital audio ...input jack If your AV amplifier (receiver) has a Dolby*1 Digital or DTS*2 decoder and a digital input jack, use your TV monitor, projector, or AV amplifier (receiver). Step 3: Connecting the Audio Cords Select one of the following patterns, A or B, according to LINE...
...Speakers] Rear (R) Front (R) Center to coaxial digital input Subwoofer Coaxial digital cord (not supplied) to DIGITAL OUT (COAXIAL) DVD recorder to the input jack on your TV's or stereo amplifier's (receiver's) two speakers for video signals (page 16). This will use this connection. A Digital audio ...input jack If your AV amplifier (receiver) has a Dolby*1 Digital or DTS*2 decoder and a digital input jack, use your TV monitor, projector, or AV amplifier (receiver). Step 3: Connecting the Audio Cords Select one of the following patterns, A or B, according to LINE...

Operating Instructions
Page 19
... or a loud noise will cause unwanted noise to your TV's audio output jacks to AC outlet 19 You can operate the recorder once the front panel display lights up and the recorder enters standby mode. Then plug the recorder and TV power cords into the AC outlet. Hookups and Settings ... speaker location, see the operating instructions supplied with the connected components. b Notes • Do not connect your TV's audio output jacks at the same time. If you connect additional equipment to this recorder (page 24), be sure to the AC IN terminal of Digital Theater Systems, Inc.
... or a loud noise will cause unwanted noise to your TV's audio output jacks to AC outlet 19 You can operate the recorder once the front panel display lights up and the recorder enters standby mode. Then plug the recorder and TV power cords into the AC outlet. Hookups and Settings ... speaker location, see the operating instructions supplied with the connected components. b Notes • Do not connect your TV's audio output jacks at the same time. If you connect additional equipment to this recorder (page 24), be sure to the AC IN terminal of Digital Theater Systems, Inc.
Operating Instructions
Page 20
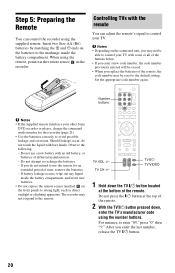
...to strong light, such as direct sunlight or a lighting apparatus. If battery leakage occurs, wipe out any liquid inside the battery compartment. TV VOL +/- TV CH +/- Observe the following: - Set the appropriate code number again. Should leakage occur, do not intend to use a new battery..., the code number may be reset to the default setting. Number buttons b Notes • If the supplied remote interferes your other Sony DVD recorder or player, change the command mode number for an extended period of the buttons below. • If you enter a new code number...
...to strong light, such as direct sunlight or a lighting apparatus. If battery leakage occurs, wipe out any liquid inside the battery compartment. TV VOL +/- TV CH +/- Observe the following: - Set the appropriate code number again. Should leakage occur, do not intend to use a new battery..., the code number may be reset to the default setting. Number buttons b Notes • If the supplied remote interferes your other Sony DVD recorder or player, change the command mode number for an extended period of the buttons below. • If you enter a new code number...


