Operating Instructions
Page 1
3-876-081-12(1) DVD Recorder Operating Instructions RDR-GX257 © 2008 Sony Corporation
3-876-081-12(1) DVD Recorder Operating Instructions RDR-GX257 © 2008 Sony Corporation
Operating Instructions
Page 2
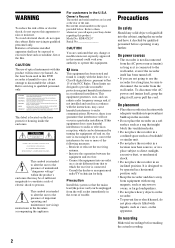
...DVD recorder is harmful to eyes, do not attempt to prevent heat build-up in the U.S.A Owner's Record The model and serial numbers are designed to radio communications. On placement • Place the recorder...harmful interference to provide reasonable protection against harmful interference in a particular installation. RDR-GX257 Serial No CAUTION You are not going to use of optical instruments with ...manual could void your Sony dealer regarding this apparatus to direct sunlight, excessive dust, or mechanical shock. • Do not place the recorder in this product ...
...DVD recorder is harmful to eyes, do not attempt to prevent heat build-up in the U.S.A Owner's Record The model and serial numbers are designed to radio communications. On placement • Place the recorder...harmful interference to provide reasonable protection against harmful interference in a particular installation. RDR-GX257 Serial No CAUTION You are not going to use of optical instruments with ...manual could void your Sony dealer regarding this apparatus to direct sunlight, excessive dust, or mechanical shock. • Do not place the recorder in this product ...
Operating Instructions
Page 3
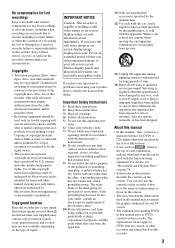
... is required when the apparatus has been damaged in this manual may not be contrary to your TV screen. • The explanations regarding DVDs in which you are created on other intellectual property rights. Install in accordance with the manufacturer's instructions. 8) Do not install near water....signal. The wide blade or the third prong are provided for lawful copying and you are lost recordings Sony is not liable and will not restore, recover, or replicate the recorded contents under any circumstances. If the provided plug does not fit into the apparatus, the apparatus has...
... is required when the apparatus has been damaged in this manual may not be contrary to your TV screen. • The explanations regarding DVDs in which you are created on other intellectual property rights. Install in accordance with the manufacturer's instructions. 8) Do not install near water....signal. The wide blade or the third prong are provided for lawful copying and you are lost recordings Sony is not liable and will not restore, recover, or replicate the recorded contents under any circumstances. If the provided plug does not fit into the apparatus, the apparatus has...
Operating Instructions
Page 4
... and Playing Time 30 Changing the Name of a Recorded Program (Title Input 31 Labeling and Protecting a Disc 32 Playing a DVD on Other Equipment (Finalize 33 Recording 35 Before Recording 35 Timer Recording From Connected Equipment 36 Checking/Changing/Canceling Timer Settings (Timer List 37 Recording Without the Timer 39 Recording From a VCR or Similar Device 41 Playback...
... and Playing Time 30 Changing the Name of a Recorded Program (Title Input 31 Labeling and Protecting a Disc 32 Playing a DVD on Other Equipment (Finalize 33 Recording 35 Before Recording 35 Timer Recording From Connected Equipment 36 Checking/Changing/Canceling Timer Settings (Timer List 37 Recording Without the Timer 39 Recording From a VCR or Similar Device 41 Playback...
Operating Instructions
Page 5
... IN Jack 59 Dubbing From a DV/Digital8 Format Tape to a DVD 60 Settings and Adjustments 62 Using the Setup Displays 62 Recorder Settings (General 63 Language Settings 64 Audio Settings 65 Parental Control Settings (Lock 66 Recording Settings (Video 67 Disc Settings 68 Resetting the Recorder (Factory Set 69 Additional Information 70 Troubleshooting 70...
... IN Jack 59 Dubbing From a DV/Digital8 Format Tape to a DVD 60 Settings and Adjustments 62 Using the Setup Displays 62 Recorder Settings (General 63 Language Settings 64 Audio Settings 65 Parental Control Settings (Lock 66 Recording Settings (Video 67 Disc Settings 68 Resetting the Recorder (Factory Set 69 Additional Information 70 Troubleshooting 70...
Operating Instructions
Page 11
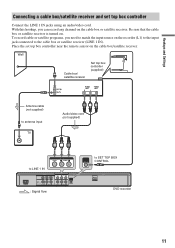
R to SET TOP BOX CONTROL HDMI OUT DVD recorder 11 R AUDIO OUT VIDEO LINE 1 IN L - Be sure that the cable box or satellite receiver is turned on the cable box/satellite receiver. AUDIO - R LINE .... AUDIO - Hookups and Settings Connecting a cable box/satellite receiver and set top box controller near the remote sensor on . To record cable or satellite programs, you can record any channel on the recorder (L1) to the input jack connected to antenna input TV Audio/video cord (not supplied) VIDEO LINE 1 IN L - AUDIO - AUDIO...
R to SET TOP BOX CONTROL HDMI OUT DVD recorder 11 R AUDIO OUT VIDEO LINE 1 IN L - Be sure that the cable box or satellite receiver is turned on the cable box/satellite receiver. AUDIO - R LINE .... AUDIO - Hookups and Settings Connecting a cable box/satellite receiver and set top box controller near the remote sensor on . To record cable or satellite programs, you can record any channel on the recorder (L1) to the input jack connected to antenna input TV Audio/video cord (not supplied) VIDEO LINE 1 IN L - AUDIO - AUDIO...

Operating Instructions
Page 12
AUDIO - R LINE OUT to COMPONENT VIDEO OUT (blue) (red) DVD recorder HDMI OUT to LINE OUT (VIDEO) ~AC IN COMPONENT Y VIDEO OUT PB PR PCM/DTS/ MPEG/ DOLBY DIGITAL COAXIAL DIGITAL OUT L - AUDIO - AUDIO - R AUDIO OUT ...
AUDIO - R LINE OUT to COMPONENT VIDEO OUT (blue) (red) DVD recorder HDMI OUT to LINE OUT (VIDEO) ~AC IN COMPONENT Y VIDEO OUT PB PR PCM/DTS/ MPEG/ DOLBY DIGITAL COAXIAL DIGITAL OUT L - AUDIO - AUDIO - R AUDIO OUT ...
Operating Instructions
Page 13
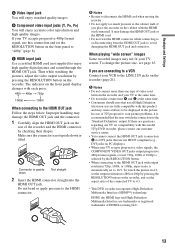
...Then while watching the pictures, adjust the video output resolution by pressing the RESOLUTION button on the recorder, and set the aspect ratio of the connected TV to 4:3. * This DVD recorder incorporates High-Definition Multimedia Interface (HDMI™) technology. Make sure the connector is recommended that the... user switch the connection to the HDMI OUT jack with this model 525p DVD recorder, please contact our customer service center. • You cannot connect the HDMI OUT jack (connection C) to 480i or 480p by ...
...Then while watching the pictures, adjust the video output resolution by pressing the RESOLUTION button on the recorder, and set the aspect ratio of the connected TV to 4:3. * This DVD recorder incorporates High-Definition Multimedia Interface (HDMI™) technology. Make sure the connector is recommended that the... user switch the connection to the HDMI OUT jack with this model 525p DVD recorder, please contact our customer service center. • You cannot connect the HDMI OUT jack (connection C) to 480i or 480p by ...
Operating Instructions
Page 14
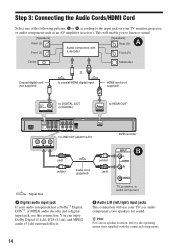
... L - You can enjoy Dolby Digital (5.1ch), DTS (5.1ch), and MPEG audio (5.1ch) surround effects. R AUDIO OUT VIDEO LINE 1 IN L - AUDIO - AUDIO - R LINE OUT (red) (white) DVD recorder B (white) Audio cord (supplied) (red) : Signal flow A Digital audio input jack If your audio component has a Dolby*1 Digital, DTS*2, or MPEG audio decoder and a digital...
... L - You can enjoy Dolby Digital (5.1ch), DTS (5.1ch), and MPEG audio (5.1ch) surround effects. R AUDIO OUT VIDEO LINE 1 IN L - AUDIO - AUDIO - R LINE OUT (red) (white) DVD recorder B (white) Audio cord (supplied) (red) : Signal flow A Digital audio input jack If your audio component has a Dolby*1 Digital, DTS*2, or MPEG audio decoder and a digital...
Operating Instructions
Page 16
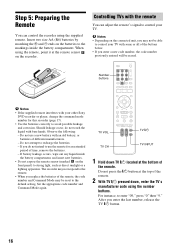
... you do not touch the liquid with bare hands. Step 5: Preparing the Remote You can adjust the remote's signal to control your other Sony DVD recorder or player, change the command mode number for an extended period of time, remove the batteries. - Do not use the remote for this...the batteries correctly to the markings inside the battery compartment, and insert new batteries. • Do not expose the remote sensor (marked on the recorder. If battery leakage occurs, wipe out any liquid inside the battery compartment. Do not press the [/1 button at the remote sensor on the front ...
... you do not touch the liquid with bare hands. Step 5: Preparing the Remote You can adjust the remote's signal to control your other Sony DVD recorder or player, change the command mode number for an extended period of time, remove the batteries. - Do not use the remote for this...the batteries correctly to the markings inside the battery compartment, and insert new batteries. • Do not expose the remote sensor (marked on the recorder. If battery leakage occurs, wipe out any liquid inside the battery compartment. Do not press the [/1 button at the remote sensor on the front ...
Operating Instructions
Page 17
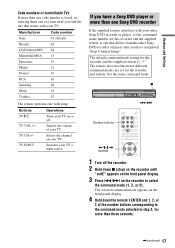
...If you have a Sony DVD player or more than one Sony DVD recorder If the supplied remote interferes with your other Sony DVD recorder or player after you find the one that works with your TV. The remote does not function if different command modes are set the command mode number for this recorder and the supplied remote...off. Hookups and Settings Code numbers of controllable TVs If more than one code number is "3." The selected command mode appears on the recorder to one that differs from the other Sony DVD recorder or player, set for more than three seconds. ,continued 17
...If you have a Sony DVD player or more than one Sony DVD recorder If the supplied remote interferes with your other Sony DVD recorder or player after you find the one that works with your TV. The remote does not function if different command modes are set the command mode number for this recorder and the supplied remote...off. Hookups and Settings Code numbers of controllable TVs If more than one code number is "3." The selected command mode appears on the recorder to one that differs from the other Sony DVD recorder or player, set for more than three seconds. ,continued 17

Operating Instructions
Page 21
...R Audio/video cord (not supplied) to LINE 2 IN : Signal flow DVD recorder z Hint When the connected equipment outputs only monaural sound, use audio cords that distribute monaural sounds to the LINE 2 IN jacks of this recorder. See also the operating instructions supplied with the connected equipment. Connecting to the ...LINE 2 IN jacks Connect a VCR or similar recording device to left/ right channels (not supplied). ,continued 21 Use the DV IN jack on the front panel if the equipment...
...R Audio/video cord (not supplied) to LINE 2 IN : Signal flow DVD recorder z Hint When the connected equipment outputs only monaural sound, use audio cords that distribute monaural sounds to the LINE 2 IN jacks of this recorder. See also the operating instructions supplied with the connected equipment. Connecting to the ...LINE 2 IN jacks Connect a VCR or similar recording device to left/ right channels (not supplied). ,continued 21 Use the DV IN jack on the front panel if the equipment...
Operating Instructions
Page 22
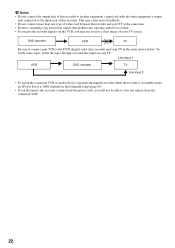
...'s input jack with the other equipment's output jack connected to the input jack of video cord between the recorder and your TV. DVD recorder VCR TV Be sure to connect your VCR to the DVD (digital video disc) recorder and your TV in the [General] setup (page 63). • If you disconnect the... VCR, you will not be able to [Off] (default) in the order shown below. Line input 1 VCR DVD recorder TV Line input 2 • To watch the tapes through the recorder while the recorder is in standby mode, set [Power Save] to view the signals from the connected VCR. 22 This may cause...
...'s input jack with the other equipment's output jack connected to the input jack of video cord between the recorder and your TV. DVD recorder VCR TV Be sure to connect your VCR to the DVD (digital video disc) recorder and your TV in the [General] setup (page 63). • If you disconnect the... VCR, you will not be able to [Off] (default) in the order shown below. Line input 1 VCR DVD recorder TV Line input 2 • To watch the tapes through the recorder while the recorder is in standby mode, set [Power Save] to view the signals from the connected VCR. 22 This may cause...
Operating Instructions
Page 23
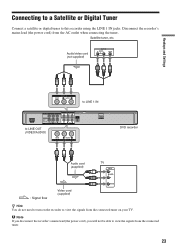
...BOX CONTROL VIDEO L - Audio/video cord (not supplied) OUTPUT R AUDIO L VIDEO Hookups and Settings VIDEO LINE 1 IN L - b Note If you disconnect the recorder's mains lead (the power cord), you will not be able to LINE OUT (VIDEO/AUDIO) VIDEO LINE 1 IN L - AUDIO - R AUDIO OUT to view the... signals from the connected tuner. 23 R LINE OUT VIDEO L - AUDIO - AUDIO - AUDIO - R LINE OUT HDMI OUT DVD recorder Audio cord (supplied) : Signal flow Video cord (supplied) TV INPUT L AUDIO R VIDEO z Hint You do not need to turn on the...
...BOX CONTROL VIDEO L - Audio/video cord (not supplied) OUTPUT R AUDIO L VIDEO Hookups and Settings VIDEO LINE 1 IN L - b Note If you disconnect the recorder's mains lead (the power cord), you will not be able to LINE OUT (VIDEO/AUDIO) VIDEO LINE 1 IN L - AUDIO - R AUDIO OUT to view the... signals from the connected tuner. 23 R LINE OUT VIDEO L - AUDIO - AUDIO - AUDIO - R LINE OUT HDMI OUT DVD recorder Audio cord (supplied) : Signal flow Video cord (supplied) TV INPUT L AUDIO R VIDEO z Hint You do not need to turn on the...
Operating Instructions
Page 24
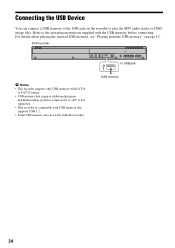
... USB jack on page 43. For details about playing the inserted USB memory, see "Playing from the USB memory" on the recorder to USB jack USB memory 24 DVD recorder b Notes • This recorder supports only USB memory with FAT16 or FAT32 format. • USB memory that supports USB 1.1. • Some USB memory may...
... USB jack on page 43. For details about playing the inserted USB memory, see "Playing from the USB memory" on the recorder to USB jack USB memory 24 DVD recorder b Notes • This recorder supports only USB memory with FAT16 or FAT32 format. • USB memory that supports USB 1.1. • Some USB memory may...
Operating Instructions
Page 25
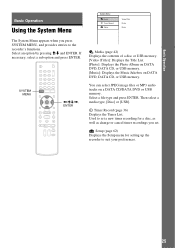
Select an option by pressing M/m and ENTER. SYSTEM MENU 123 456 789 0 Basic Operation Basic Operation Using the System Menu System Menu Media Timer Record Setup Video(Title) Photo Music The System Menu appears when you press SYSTEM MENU, and provides entries to the recorder's functions. If necessary, select a sub option and press ENTER.
Select an option by pressing M/m and ENTER. SYSTEM MENU 123 456 789 0 Basic Operation Basic Operation Using the System Menu System Menu Media Timer Record Setup Video(Title) Photo Music The System Menu appears when you press SYSTEM MENU, and provides entries to the recorder's functions. If necessary, select a sub option and press ENTER.

Operating Instructions
Page 26
Inserting and Formatting a Disc +RW -RWVR -RWVideo +R -R When you first insert a new disc, the recorder will ask you to format the disc. Follow the steps below to format the disc. You can also reformat a DVD+RW or DVD-RW to create a blank disc. Z OPEN/ CLOSE SYSTEM MENU 123 456 789 0 "/1
Inserting and Formatting a Disc +RW -RWVR -RWVideo +R -R When you first insert a new disc, the recorder will ask you to format the disc. Follow the steps below to format the disc. You can also reformat a DVD+RW or DVD-RW to create a blank disc. Z OPEN/ CLOSE SYSTEM MENU 123 456 789 0 "/1
Operating Instructions
Page 29
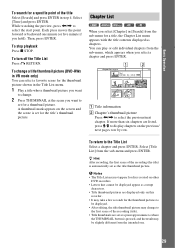
While watching the preview, press Select [Time] and press ENTER. Basic Operation To search for a specific point of the title Select [Search] and press ENTER in step 4.
While watching the preview, press Select [Time] and press ENTER. Basic Operation To search for a specific point of the title Select [Search] and press ENTER in step 4.
Operating Instructions
Page 59
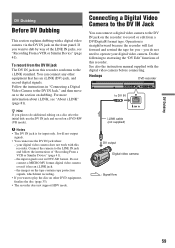
... on to the i.LINK standard. you - See also the instruction manual supplied with this recorder conforms to the section on a DVD-RW (VR mode). Do the following to the DV IN jack on this recorder. You can connect a digital video camera to start using the "DV Edit" functions of...Operation is for you do additional editing on a disc after the initial dub, use the DV IN jack when: - Hookups DVD recorder to the LINE IN jack and follow the instructions of "Recording From a VCR or Similar Device" (page 41). - Connect the camera to DV IN i.LINK cable (not supplied) DV ...
... on to the i.LINK standard. you - See also the instruction manual supplied with this recorder conforms to the section on a DVD-RW (VR mode). Do the following to the DV IN jack on this recorder. You can connect a digital video camera to start using the "DV Edit" functions of...Operation is for you do additional editing on a disc after the initial dub, use the DV IN jack when: - Hookups DVD recorder to the LINE IN jack and follow the instructions of "Recording From a VCR or Similar Device" (page 41). - Connect the camera to DV IN i.LINK cable (not supplied) DV ...
Operating Instructions
Page 77
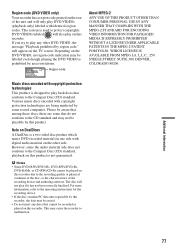
... any discs that cannot be labeled even though playing the DVD VIDEO is a two sided disc product which mates DVD recorded material on one side with copyright protection technologies are some record companies. This may cause the recorder to play if it has not been correctly finalised. If... you try to malfunction. The disc will only play DVD VIDEOs (playback only) labeled ...
... any discs that cannot be labeled even though playing the DVD VIDEO is a two sided disc product which mates DVD recorded material on one side with copyright protection technologies are some record companies. This may cause the recorder to play if it has not been correctly finalised. If... you try to malfunction. The disc will only play DVD VIDEOs (playback only) labeled ...


