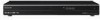
Operating Instructions
Page 2
...196;TÖNTÄ LASERSÄTEILYLLE VARO ALTISTUMISTA SÄTEELLE. This symbol is intended to alert the user to comply with this product will not occur in this manual could void your Sony dealer regarding this DVD recorder is harmful to eyes...recorder and have it any change or modifications not expressly approved in a particular installation. WARNING To reduce the risk of fire or electric shock, do not open the cabinet. UNNGÅ EKSPONERING FOR STRÅLEN. For customers in the U.S.A Owner's Record The model and serial numbers are cautioned that to use of trouble...
...196;TÖNTÄ LASERSÄTEILYLLE VARO ALTISTUMISTA SÄTEELLE. This symbol is intended to alert the user to comply with this product will not occur in this manual could void your Sony dealer regarding this DVD recorder is harmful to eyes...recorder and have it any change or modifications not expressly approved in a particular installation. WARNING To reduce the risk of fire or electric shock, do not open the cabinet. UNNGÅ EKSPONERING FOR STRÅLEN. For customers in the U.S.A Owner's Record The model and serial numbers are cautioned that to use of trouble...
Operating Instructions
Page 4
... Step 3: Connecting the Audio Cords/HDMI Cord 14 Step 4: Connecting the Mains Lead (Power Cord 15 Step 5: Preparing the Remote 16 Step 6: Initial Setup 18 Connecting a VCR or Similar Device 21 Connecting to a Satellite or Digital Tuner 23 Connecting the USB Device 24 Basic Operation 25 Using the System Menu 25 Inserting and Formatting a Disc 26 Recording a Program to a Disc 27 Viewing the Recorded Program (Title List 28 Checking the Playback Information and Playing Time 30 Changing the Name of a Recorded Program (Title Input 31 Labeling and Protecting a Disc 32 Playing a DVD on...
... Step 3: Connecting the Audio Cords/HDMI Cord 14 Step 4: Connecting the Mains Lead (Power Cord 15 Step 5: Preparing the Remote 16 Step 6: Initial Setup 18 Connecting a VCR or Similar Device 21 Connecting to a Satellite or Digital Tuner 23 Connecting the USB Device 24 Basic Operation 25 Using the System Menu 25 Inserting and Formatting a Disc 26 Recording a Program to a Disc 27 Viewing the Recorded Program (Title List 28 Checking the Playback Information and Playing Time 30 Changing the Name of a Recorded Program (Title Input 31 Labeling and Protecting a Disc 32 Playing a DVD on...
Operating Instructions
Page 5
... DV Dubbing 59 Connecting a Digital Video Camera to the DV IN Jack 59 Dubbing From a DV/Digital8 Format Tape to a DVD 60 Settings and Adjustments 62 Using the Setup Displays 62 Recorder Settings (General 63 Language Settings 64 Audio Settings 65 Parental Control Settings (Lock 66 Recording Settings (Video 67 Disc Settings 68 Resetting the Recorder (Factory Set 69 Additional Information 70 Troubleshooting 70 Recordable and Playable Discs 74 Playable Discs 76 Language Code List 78 Area Code List 78 Notes About This Recorder 79 Notes on MP3 Audio Tracks, JPEG Image Files, and...
... DV Dubbing 59 Connecting a Digital Video Camera to the DV IN Jack 59 Dubbing From a DV/Digital8 Format Tape to a DVD 60 Settings and Adjustments 62 Using the Setup Displays 62 Recorder Settings (General 63 Language Settings 64 Audio Settings 65 Parental Control Settings (Lock 66 Recording Settings (Video 67 Disc Settings 68 Resetting the Recorder (Factory Set 69 Additional Information 70 Troubleshooting 70 Recordable and Playable Discs 74 Playable Discs 76 Language Code List 78 Area Code List 78 Notes About This Recorder 79 Notes on MP3 Audio Tracks, JPEG Image Files, and...
Operating Instructions
Page 10
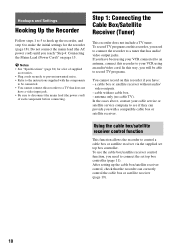
... instructions supplied with the components to be able to connect the set top box controller. a cable box or satellite receiver without audio/ video outputs. - Do not connect the mains lead (the AC power cord) until you need to connect the recorder to make the initial settings for a list of each component before connecting. b Notes • See "Specifications" (page 81) for the recorder (page 18). cable with a compatible cable box or satellite receiver. To use the cable box/satellite receiver control...
... instructions supplied with the components to be able to connect the set top box controller. a cable box or satellite receiver without audio/ video outputs. - Do not connect the mains lead (the AC power cord) until you need to connect the recorder to make the initial settings for a list of each component before connecting. b Notes • See "Specifications" (page 81) for the recorder (page 18). cable with a compatible cable box or satellite receiver. To use the cable box/satellite receiver control...
Operating Instructions
Page 11
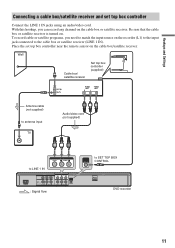
... BOX CONTROL HDMI OUT DVD recorder 11 R LINE OUT : Signal flow SET TOP BOX CONTROL to LINE 1 IN ~AC IN COMPONENT Y VIDEO OUT PB PR PCM/DTS/ MPEG/ DOLBY DIGITAL COAXIAL DIGITAL OUT L - Be sure that the cable box or satellite receiver is turned on the recorder (L1) to the input jack connected to the cable box or satellite receiver (LINE 1 IN). To record cable or satellite programs, you can record any channel on the cable box...
... BOX CONTROL HDMI OUT DVD recorder 11 R LINE OUT : Signal flow SET TOP BOX CONTROL to LINE 1 IN ~AC IN COMPONENT Y VIDEO OUT PB PR PCM/DTS/ MPEG/ DOLBY DIGITAL COAXIAL DIGITAL OUT L - Be sure that the cable box or satellite receiver is turned on the recorder (L1) to the input jack connected to the cable box or satellite receiver (LINE 1 IN). To record cable or satellite programs, you can record any channel on the cable box...
Operating Instructions
Page 13
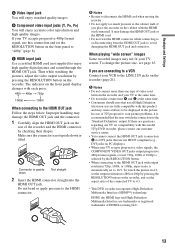
... video cord between the recorder and your TV screen. HDMI, the HDMI logo and High-Definition Multimedia Interface are connecting to a VCR Connect your TV accepts progressive video signals, the COMPONENT VIDEO OUT jacks output progressive 480p format signals, even if 720p, 1080i or 1080p is selected by pressing the RESOLUTION button on the front panel display changes with this connection and set the aspect ratio of the connected TV to 16:9. Then while watching the pictures, adjust the video output...
... video cord between the recorder and your TV screen. HDMI, the HDMI logo and High-Definition Multimedia Interface are connecting to a VCR Connect your TV accepts progressive video signals, the COMPONENT VIDEO OUT jacks output progressive 480p format signals, even if 720p, 1080i or 1080p is selected by pressing the RESOLUTION button on the front panel display changes with this connection and set the aspect ratio of the connected TV to 16:9. Then while watching the pictures, adjust the video output...
Operating Instructions
Page 16
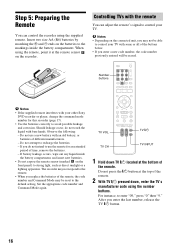
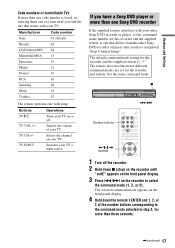
... battery, or batteries of time, remove the batteries. - When using the number buttons. Step 5: Preparing the Remote You can adjust the remote's signal to avoid possible leakage and corrosion. If you enter the last number, release the TV [/1 button. 16 Do not use the remote for this recorder (page 17). • Use the batteries correctly to control your other Sony DVD recorder or player, change the command mode number for an extended period...
... battery, or batteries of time, remove the batteries. - When using the number buttons. Step 5: Preparing the Remote You can adjust the remote's signal to avoid possible leakage and corrosion. If you enter the last number, release the TV [/1 button. 16 Do not use the remote for this recorder (page 17). • Use the batteries correctly to control your other Sony DVD recorder or player, change the command mode number for an extended period...
Operating Instructions
Page 17
x ./> Number buttons 123 456 789 0 on the front panel display. 4 Hold down the remote's ENTER and 1, 2, or 3 of the number buttons corresponding to the command mode selected in step 3, for more than one Sony DVD recorder If the supplied remote interferes with your other Sony DVD recorder or player after you have completed "Step 6: Initial Setup." TV CH +/- Switches your TV. The default command mode setting for this recorder and the supplied remote is listed, try entering...
x ./> Number buttons 123 456 789 0 on the front panel display. 4 Hold down the remote's ENTER and 1, 2, or 3 of the number buttons corresponding to the command mode selected in step 3, for more than one Sony DVD recorder If the supplied remote interferes with your other Sony DVD recorder or player after you have completed "Step 6: Initial Setup." TV CH +/- Switches your TV. The default command mode setting for this recorder and the supplied remote is listed, try entering...

Operating Instructions
Page 21
... Settings Connecting a VCR or Similar Device After disconnecting the recorder's mains lead (the power cord) from the AC outlet, connect a VCR or similar recording device to left/ right channels (not supplied). ,continued 21 OUTPUT VIDEO AUDIO L R Audio/video cord (not supplied) to LINE 2 IN : Signal flow DVD recorder z Hint When the connected equipment outputs only monaural sound, use audio cords that distribute monaural sounds to the LINE IN jacks of this recorder. Use the DV IN jack on the front panel...
... Settings Connecting a VCR or Similar Device After disconnecting the recorder's mains lead (the power cord) from the AC outlet, connect a VCR or similar recording device to left/ right channels (not supplied). ,continued 21 OUTPUT VIDEO AUDIO L R Audio/video cord (not supplied) to LINE 2 IN : Signal flow DVD recorder z Hint When the connected equipment outputs only monaural sound, use audio cords that distribute monaural sounds to the LINE IN jacks of this recorder. Use the DV IN jack on the front panel...
Operating Instructions
Page 29
Select [Time] and press ENTER. Basic Operation To search for a specific point of the title Select [Search] and press ENTER in step 4. While watching the preview, press
Select [Time] and press ENTER. Basic Operation To search for a specific point of the title Select [Search] and press ENTER in step 4. While watching the preview, press
Operating Instructions
Page 30
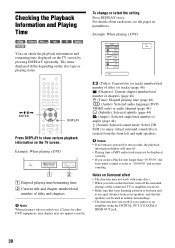
Example: When playing a DVD DVD 1/1 DVD 1/23 0:00:30 D5.1CH 1.ENG 1 ENG 1/1 Normal Titles 123 456 789 0 For details about each item, see the pages in parentheses. To change or select the setting Press DISPLAY twice. Checking the Playback Information and Playing Time +RW -RWVR -RWVideo +R VCD -R DVD You can check the playback information and remaining time displayed on the disc type or playing status. The items displayed differ depending on the TV screen by pressing DISPLAY repeatedly.
Example: When playing a DVD DVD 1/1 DVD 1/23 0:00:30 D5.1CH 1.ENG 1 ENG 1/1 Normal Titles 123 456 789 0 For details about each item, see the pages in parentheses. To change or select the setting Press DISPLAY twice. Checking the Playback Information and Playing Time +RW -RWVR -RWVideo +R VCD -R DVD You can check the playback information and remaining time displayed on the disc type or playing status. The items displayed differ depending on the TV screen by pressing DISPLAY repeatedly.
Operating Instructions
Page 31
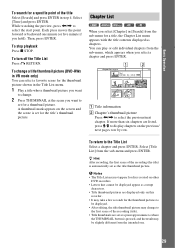
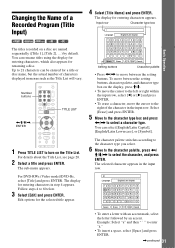
Up to 21 characters can rename titles using the display for entering characters, which also appears for a title or disc name, but the actual number of a Recorded Program (Title Input) +RW -RWVR -RWVideo +R -R The titles recorded on a disc are named sequentially ([Title 1], [Title 2], ...) by default. You can be entered for renaming a disc. Number buttons 123 456 789 0 Changing the Name of characters displayed in menus such as the Title List will vary.
Up to 21 characters can rename titles using the display for entering characters, which also appears for a title or disc name, but the actual number of a Recorded Program (Title Input) +RW -RWVR -RWVideo +R -R The titles recorded on a disc are named sequentially ([Title 1], [Title 2], ...) by default. You can be entered for renaming a disc. Number buttons 123 456 789 0 Changing the Name of characters displayed in menus such as the Title List will vary.
Operating Instructions
Page 37
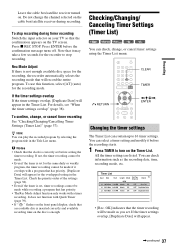
... recording, the recorder automatically selects the recording mode that it overlaps with a program that has priority. • The Rec Mode Adjust function only works with Quick Timer (page 39). • If " " flashes on the front panel display, check that a recordable disc is set before the confirmation message turns off. Note that will appear in the Title List menu. To confirm, change , or cancel timer settings using the Timer List menu. 123 456 789 0 O RETURN CLEAR TIMER Do not change the channel selected on the disc is set...
... recording, the recorder automatically selects the recording mode that it overlaps with a program that has priority. • The Rec Mode Adjust function only works with Quick Timer (page 39). • If " " flashes on the front panel display, check that a recordable disc is set before the confirmation message turns off. Note that will appear in the Title List menu. To confirm, change , or cancel timer settings using the Timer List menu. 123 456 789 0 O RETURN CLEAR TIMER Do not change the channel selected on the disc is set...
Operating Instructions
Page 40
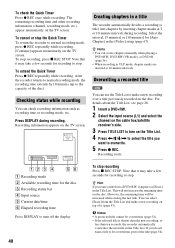
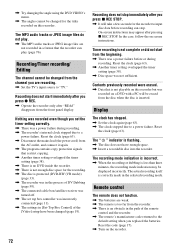
... Quick Timer To return the recorder to turn off the display. To extend the Quick Timer Press z REC repeatedly while recording. Checking status while recording You can create chapters manually when playing a DVD+RW, DVD-RW (VR mode), or DVD+R (page 56). • When recording in ULP mode, chapter marks are inserted at 5 or 10-minute intervals during recording. Creating chapters in the [Video] setup (page 67). Select the interval, [5 minutes] or [10 minutes] for [Auto Chapter] in a title The recorder automatically divides a recording (a title...
... Quick Timer To return the recorder to turn off the display. To extend the Quick Timer Press z REC repeatedly while recording. Checking status while recording You can create chapters manually when playing a DVD+RW, DVD-RW (VR mode), or DVD+R (page 56). • When recording in ULP mode, chapter marks are inserted at 5 or 10-minute intervals during recording. Creating chapters in the [Video] setup (page 67). Select the interval, [5 minutes] or [10 minutes] for [Auto Chapter] in a title The recorder automatically divides a recording (a title...
Operating Instructions
Page 43
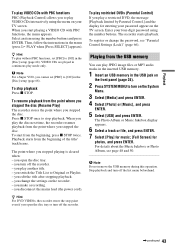
... screen. you switch the Title List to Original or Playlist. - Playing from the point where you disconnect the mains lead (the power cord). b Note Do not remove the USB memory during this operation. you open the disc tray or turn on the recorder. - Select an item using the number buttons. When you start from the beginning of the title/ track/scene. Playback To play VIDEO CDs with PBC functions, the menu appears. Enter your four-digit password using the number buttons...
... screen. you switch the Title List to Original or Playlist. - Playing from the point where you disconnect the mains lead (the power cord). b Note Do not remove the USB memory during this operation. you open the disc tray or turn on the recorder. - Select an item using the number buttons. When you start from the beginning of the title/ track/scene. Playback To play VIDEO CDs with PBC functions, the menu appears. Enter your four-digit password using the number buttons...
Operating Instructions
Page 68
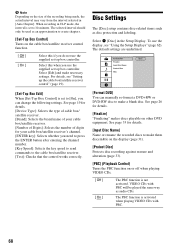
... selected in [Auto Chapter]. The PBC function is set to create chapters. [Set-Top Box Control] Turns on the cable box/satellite receiver control function. [ Off ] [ On ] Select this when you can manually re-format a DVD+RW or DVD-RW disc to the cable box/satellite receiver. [Test]: Checks that the control works correctly. The selected interval should only be played the same way as disc protection and labeling. To use the supplied set top box controller. Format DVD Finalize Input Disc Name Protect Disc PBC Start [Format DVD] You can change the following settings...
... selected in [Auto Chapter]. The PBC function is set to create chapters. [Set-Top Box Control] Turns on the cable box/satellite receiver control function. [ Off ] [ On ] Select this when you can manually re-format a DVD+RW or DVD-RW disc to the cable box/satellite receiver. [Test]: Checks that the control works correctly. The selected interval should only be played the same way as disc protection and labeling. To use the supplied set top box controller. Format DVD Finalize Input Disc Name Protect Disc PBC Start [Format DVD] You can change the following settings...
Operating Instructions
Page 70
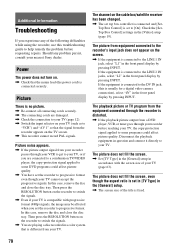
... recorder, use this case, remove the disc and close the disc tray. If the equipment is connected securely. Then press the RESOLUTION button on . , Check that the signal from your recorder passes through your nearest Sony dealer. Check the [SetTop Box Control] settings in the front panel display by pressing INPUT. Additional Information Troubleshooting If you set the recorder to progressive format. Power The power does not turn on the recorder to switch the signals. , You are playing a disc recorded in accordance with progressive format (480p) signals...
... recorder, use this case, remove the disc and close the disc tray. If the equipment is connected securely. Then press the RESOLUTION button on . , Check that the signal from your recorder passes through your nearest Sony dealer. Check the [SetTop Box Control] settings in the front panel display by pressing INPUT. Additional Information Troubleshooting If you set the recorder to progressive format. Power The power does not turn on the recorder to switch the signals. , You are playing a disc recorded in accordance with progressive format (480p) signals...
Operating Instructions
Page 72
... files do not play (page 76). Recording does not start from the beginning. , There was a power failure during recording. Reset the clock (page 63). , Disconnect the mains lead (the power cord) from the AC outlet, and connect it again. , The program contains copy protection signals that restrict copying. , Another timer setting overlapped the timer setting (page 38). , There is no DVD inside the recorder. , There is not enough disc space for the recorder to input disc data...
... files do not play (page 76). Recording does not start from the beginning. , There was a power failure during recording. Reset the clock (page 63). , Disconnect the mains lead (the power cord) from the AC outlet, and connect it again. , The program contains copy protection signals that restrict copying. , Another timer setting overlapped the timer setting (page 38). , There is no DVD inside the recorder. , There is not enough disc space for the recorder to input disc data...
Operating Instructions
Page 81
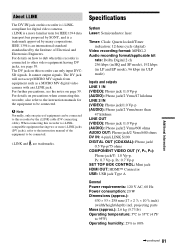
... equipment can only input DVCSD signals. For details on page 59. For further precautions, see page 59. i.LINK and are trademarks. About i.LINK The DV IN jack on this recorder, also refer to the instruction manuals for the equipment to be connected. Specifications System Laser: Semiconductor laser Timer: Clock: Quartz locked/Timer indication: 12-hour cycle (digital) Video recording format: MPEG-2 Audio recording format/applicable bit rate: Dolby Digital 2 ch 256...
... equipment can only input DVCSD signals. For details on page 59. For further precautions, see page 59. i.LINK and are trademarks. About i.LINK The DV IN jack on this recorder, also refer to the instruction manuals for the equipment to be connected. Specifications System Laser: Semiconductor laser Timer: Clock: Quartz locked/Timer indication: 12-hour cycle (digital) Video recording format: MPEG-2 Audio recording format/applicable bit rate: Dolby Digital 2 ch 256...
Operating Instructions
Page 84
... the title/chapter/ track 44 [Set Password] 66 Set top box controller 11, 20 [Set-Top Box Control] 19, 68 Setup Display 62 [Show] 55, 56 Slide show 50 [Stereo 1] 67 [Stereo 2] 67 Sub-menu 28 Subtitle 45, 64 Super VIDEO CD 76 Surround 30 System Menu 25 T Timer List 37 Timer recording check/change/cancel 37 Rec Mode Adjust 37 Timer List 37 Title 28, 42 Title List 28, 42, 52 [Title Name] 31, 53 Track 48 Troubleshooting 70 TV INPUT 16 [TV Type] 63...
... the title/chapter/ track 44 [Set Password] 66 Set top box controller 11, 20 [Set-Top Box Control] 19, 68 Setup Display 62 [Show] 55, 56 Slide show 50 [Stereo 1] 67 [Stereo 2] 67 Sub-menu 28 Subtitle 45, 64 Super VIDEO CD 76 Surround 30 System Menu 25 T Timer List 37 Timer recording check/change/cancel 37 Rec Mode Adjust 37 Timer List 37 Title 28, 42 Title List 28, 42, 52 [Title Name] 31, 53 Track 48 Troubleshooting 70 TV INPUT 16 [TV Type] 63...


