
Users Guide
Page 2
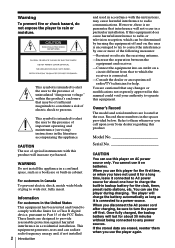
... operating and maintenance (servicing) instructions in backup battery for about one or more of electric shock to charge the built-in the literature accompanying the appliance. Record these numbers in cabinet. This symbol is encouraged to try to correct the interference by one hour to persons. Model No Serial No CAUTION You can use this product will last for the clock, timer, preset radio stations, etc. Owner's Record...
... operating and maintenance (servicing) instructions in backup battery for about one or more of electric shock to charge the built-in the literature accompanying the appliance. Record these numbers in cabinet. This symbol is encouraged to try to correct the interference by one hour to persons. Model No Serial No CAUTION You can use this product will last for the clock, timer, preset radio stations, etc. Owner's Record...
Users Guide
Page 3
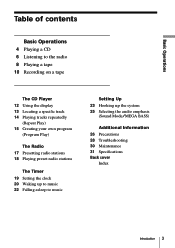
... of contents Basic Operations 4 Playing a CD 6 Listening to the radio 8 Playing a tape 10 Recording on a tape The CD Player 12 Using the display 13 Locating a specific track 14 Playing tracks repeatedly (Repeat Play) 15 Creating your own program (Program Play) The Radio 17 Presetting radio stations 18 Playing preset radio stations The Timer 19 Setting the clock 20 Waking up to music 22 Falling asleep to music Setting Up 23 Hooking up the system 25 Selecting the audio emphasis (Sound Mode/MEGA BASS) Additional Information 26...
... of contents Basic Operations 4 Playing a CD 6 Listening to the radio 8 Playing a tape 10 Recording on a tape The CD Player 12 Using the display 13 Locating a specific track 14 Playing tracks repeatedly (Repeat Play) 15 Creating your own program (Program Play) The Radio 17 Presetting radio stations 18 Playing preset radio stations The Timer 19 Setting the clock 20 Waking up to music 22 Falling asleep to music Setting Up 23 Hooking up the system 25 Selecting the audio emphasis (Sound Mode/MEGA BASS) Additional Information 26...

Users Guide
Page 5
Basic Operations Use these buttons for additional operations POWER 6 PUSH OPEN/CLOSE VOLUME +, - ^ p + = Tip Next time you want to listen to resume play after pause. + = 6 PUSH OPEN/CLOSE POWER Basic Operations 5 To adjust the volume stop playback pause playback go to the next track go back to the previous track remove the CD turn on automatically and starts playing the CD. The player turns on /off the player Press VOLUME +, - (VOL +, - on the remote) p ^ (P on the remote) Press the button again to a CD, just press ^ .
Basic Operations Use these buttons for additional operations POWER 6 PUSH OPEN/CLOSE VOLUME +, - ^ p + = Tip Next time you want to listen to resume play after pause. + = 6 PUSH OPEN/CLOSE POWER Basic Operations 5 To adjust the volume stop playback pause playback go to the next track go back to the previous track remove the CD turn on automatically and starts playing the CD. The player turns on /off the player Press VOLUME +, - (VOL +, - on the remote) p ^ (P on the remote) Press the button again to a CD, just press ^ .

Users Guide
Page 6
If you want appears in the display (direct power-on). Indicates an FM stereo broadcast. 6 BasicOperations The player automatically scans the radio frequencies and stops when it finds a clear station. Display 2 TUNING/TIME SET Hold down TUNING/TIME SET + or - Listening to change in the display. until the band you can't tune in a station, press the button repeatedly to the radio 21 2 1 PRESET BAND PRESET For hookup instructions, see pages 23 - 24. Press BAND until the frequency digits begin to change the frequency step by step.
If you want appears in the display (direct power-on). Indicates an FM stereo broadcast. 6 BasicOperations The player automatically scans the radio frequencies and stops when it finds a clear station. Display 2 TUNING/TIME SET Hold down TUNING/TIME SET + or - Listening to change in the display. until the band you can't tune in a station, press the button repeatedly to the radio 21 2 1 PRESET BAND PRESET For hookup instructions, see pages 23 - 24. Press BAND until the frequency digits begin to change the frequency step by step.

Users Guide
Page 7
Use these buttons for additional operations PLAY MODE MONO/ST ISS POWER VOLUME + , - To adjust the volume turn on automatically and starts playing the previous station. Basic Operations Tips • If the FM broadcast is noisy, press PLAY MODE•MONO/ST ISS until "Mono" appears in the display and the radio will play in monaural. • Next time you want to listen to the radio, just press BAND. AM Keep the...
Use these buttons for additional operations PLAY MODE MONO/ST ISS POWER VOLUME + , - To adjust the volume turn on automatically and starts playing the previous station. Basic Operations Tips • If the FM broadcast is noisy, press PLAY MODE•MONO/ST ISS until "Mono" appears in the display and the radio will play in monaural. • Next time you want to listen to the radio, just press BAND. AM Keep the...

Users Guide
Page 9
The player turns on the remote) p6 ) ,0 P Press the button again to a tape, just press ( . p6 POWER Basic Operations 9 Basic Operations Use these buttons for additional operations POWER VOLUME +, - on automatically and starts playing the tape. Tip Next time you want to listen to resume play after pause. To adjust the volume stop playback f ast-forwardorrewindthetape pause playback eject the cassette turn on/off the player p6 P 0 ,) Press VOLUME +, - (VOL +, -
The player turns on the remote) p6 ) ,0 P Press the button again to a tape, just press ( . p6 POWER Basic Operations 9 Basic Operations Use these buttons for additional operations POWER VOLUME +, - on automatically and starts playing the tape. Tip Next time you want to listen to resume play after pause. To adjust the volume stop playback f ast-forwardorrewindthetape pause playback eject the cassette turn on/off the player p6 P 0 ,) Press VOLUME +, - (VOL +, -

Users Guide
Page 10
PRESET BAND PRESET To record from the CD player, insert a CD (see page 6). 10 BasicOperations Recording on a tape 3 1 For hookup instructions, see pages 23 - 24. 1 Press p6 to open the tape With the side you want (see page 4) and press p on facing you want to record. Use TYPE I (normal) tape only. 2 Select the program source you tape. Display To record from the radio, press BAND and tune in the station you want to compartment and insert a blank record on the CD section.
PRESET BAND PRESET To record from the CD player, insert a CD (see page 6). 10 BasicOperations Recording on a tape 3 1 For hookup instructions, see pages 23 - 24. 1 Press p6 to open the tape With the side you want (see page 4) and press p on facing you want to record. Use TYPE I (normal) tape only. 2 Select the program source you tape. Display To record from the radio, press BAND and tune in the station you want to compartment and insert a blank record on the CD section.

Users Guide
Page 11
Basic Operations 3 Press r to start recording. (( is depressed automatically.) Use these buttons for additional operations PLAY MODE POWER MONO/ST ISS Tips • Adjusting the volume or the audio emphasis (see page 25) will not affect the recording level. • If the AM program makes a whistling sound after you've pressed r in step 3, press PLAY MODE• MONO/ST ISS repeatedly until the noise is at a minimum. • To erase a recording, proceed...
Basic Operations 3 Press r to start recording. (( is depressed automatically.) Use these buttons for additional operations PLAY MODE POWER MONO/ST ISS Tips • Adjusting the volume or the audio emphasis (see page 25) will not affect the recording level. • If the AM program makes a whistling sound after you've pressed r in step 3, press PLAY MODE• MONO/ST ISS repeatedly until the noise is at a minimum. • To erase a recording, proceed...

Users Guide
Page 13
...) or = (backward) in pause and hold down until you locate a track numbered over 10, press >10 first, then the corresponding number buttons. The CD Player Locating a specific track You can also find the point TheCDPlayer 13 You can quickly locate any track using the number buttons. Turn off the indication by pressing p . Number buttons = ,+ Note You cannot locate a specific track if "SHUF REP" or "PGM" is lit in...
...) or = (backward) in pause and hold down until you locate a track numbered over 10, press >10 first, then the corresponding number buttons. The CD Player Locating a specific track You can also find the point TheCDPlayer 13 You can quickly locate any track using the number buttons. Turn off the indication by pressing p . Number buttons = ,+ Note You cannot locate a specific track if "SHUF REP" or "PGM" is lit in...

Users Guide
Page 15
... music calender. 4 Press ( to program in the display. 3 Press = or + and then press DISPLAY•ENTER MEMORY for the tracks you want to start recording. 1 Press p . Tips • You can play the same program again, since the program is saved until "PGM" appears in the order you turn off the power or open the CD compartment. • You can program up to 20 tracks. Number buttons MODE p ( On the player...
... music calender. 4 Press ( to program in the display. 3 Press = or + and then press DISPLAY•ENTER MEMORY for the tracks you want to start recording. 1 Press p . Tips • You can play the same program again, since the program is saved until "PGM" appears in the order you turn off the power or open the CD compartment. • You can program up to 20 tracks. Number buttons MODE p ( On the player...

Users Guide
Page 18
BAND 1 Press BAND to select the band. 2 Press the number buttons to tune in the stored station. 18 TheRadio to tune in your favorite stations. Playing preset radio stations Once you've preset the stations, use the number buttons on the remote or the PRESET +/- to select the band. 2 Press PRESET + or - Number buttons On the player 1 Press BAND to tune in the stored station.
BAND 1 Press BAND to select the band. 2 Press the number buttons to tune in the stored station. 18 TheRadio to tune in your favorite stations. Playing preset radio stations Once you've preset the stations, use the number buttons on the remote or the PRESET +/- to select the band. 2 Press PRESET + or - Number buttons On the player 1 Press BAND to tune in the stored station.
Users Guide
Page 21
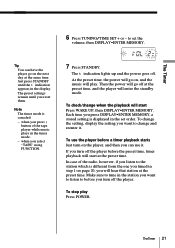
... check/change the setting, display the setting you select "TAPE" using FUNCTION. 7 Press STANDBY. To change when the playback will play Press POWER. The preset settings remain until the t indication appears in the timer mode. - In case of the tape player while music plays in the display. Tip You can use the player before a timer playback starts Just turn on page 20, you want to tune in the set the volume, then DISPLAY•ENTER MEMORY. Each time you turn off the player. The t indication lights...
... check/change the setting, display the setting you select "TAPE" using FUNCTION. 7 Press STANDBY. To change when the playback will play Press POWER. The preset settings remain until the t indication appears in the timer mode. - In case of the tape player while music plays in the display. Tip You can use the player before a timer playback starts Just turn on page 20, you want to tune in the set the volume, then DISPLAY•ENTER MEMORY. Each time you turn off the player. The t indication lights...
Users Guide
Page 22
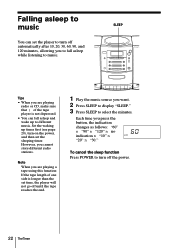
... page 20), turn off the power. 22 TheTimer However, you press the button, the indication changes as follows: "60" n "90" n "120" n no indication n "10" n "20" n "30." SLEEP Tips • When you are playing a tape using this function: If the tape length of the tape player is longer than the set the player to turn off until the tape reaches the end. 1 Play the music source you want. 2 Press SLEEP to display "SLEEP...
... page 20), turn off the power. 22 TheTimer However, you press the button, the indication changes as follows: "60" n "90" n "120" n no indication n "10" n "20" n "30." SLEEP Tips • When you are playing a tape using this function: If the tape length of the tape player is longer than the set the player to turn off until the tape reaches the end. 1 Play the music source you want. 2 Press SLEEP to display "SLEEP...
Users Guide
Page 23
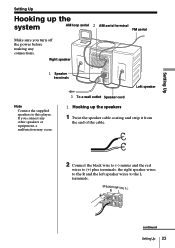
SPEAKER IMP USE 3 continued SettingUp 23 If you connect any other speakers or equipment, a malfunction may occur. 3 To a wall outlet Speaker cord 1 Hooking up the system AM loop aerial 2 AM aerial terminal FM aerial Make sure you turn off the power before making any connections. Right speaker 1 Speaker terminals Left speaker Note Connect the supplied speakers to the L terminals. Setting Up Setting Up Hooking up the speakers 1 Twist the speaker cable coating and strip...
SPEAKER IMP USE 3 continued SettingUp 23 If you connect any other speakers or equipment, a malfunction may occur. 3 To a wall outlet Speaker cord 1 Hooking up the system AM loop aerial 2 AM aerial terminal FM aerial Make sure you turn off the power before making any connections. Right speaker 1 Speaker terminals Left speaker Note Connect the supplied speakers to the L terminals. Setting Up Setting Up Hooking up the speakers 1 Twist the speaker cable coating and strip...
Users Guide
Page 26
... player is used for the speakers, keep personal credit cards using magnetic coding or springwound watches away from the player to direct sunlight, excessive dust or mechanical shock. • Do not place the player on the lens inside the CD player section. Refer servicing to avoid damage that can be used for an extended period of time. • The nameplate indicating operating voltage, power consumption, etc. On power...
... player is used for the speakers, keep personal credit cards using magnetic coding or springwound watches away from the player to direct sunlight, excessive dust or mechanical shock. • Do not place the player on the lens inside the CD player section. Refer servicing to avoid damage that can be used for an extended period of time. • The nameplate indicating operating voltage, power consumption, etc. On power...

Users Guide
Page 28
.... Remedy • Connect the AC power cord to a wall outlet securely. • Make sure that emits radio waves near the TV with an indoor antenna, move the player away from the TV. • If you want to use appears in a location free from vibration. • The sound may drop out or noise may be heard. This is recorded using the remote while listening...
.... Remedy • Connect the AC power cord to a wall outlet securely. • Make sure that emits radio waves near the TV with an indoor antenna, move the player away from the TV. • If you want to use appears in a location free from vibration. • The sound may drop out or noise may be heard. This is recorded using the remote while listening...
Users Guide
Page 29
... the display disappear, plug the power cord. If the problem persists, please consult your nearest Sony dealer. The sound is poor. The timer does not operate. The remote does not function. Additional Information 29 The r button does not function/ The tape does not play. The tape does not erase completely. Timer Remote After trying the above remedies, if you press an operation button. The tape does not record. Tape Player Symptom The tape does...
... the display disappear, plug the power cord. If the problem persists, please consult your nearest Sony dealer. The sound is poor. The timer does not operate. The remote does not function. Additional Information 29 The r button does not function/ The tape does not play. The tape does not erase completely. Timer Remote After trying the above remedies, if you press an operation button. The tape does not record. Tape Player Symptom The tape does...

Users Guide
Page 30
... optimum playback and recording quality. Cleaning the tape heads and tape path Wipe the heads, the pinch roller and the capstan with a cleaning swab slightly moistened with a commercially available tape head demagnetizer. At this time, you clean all metal parts in the tape path with cleaning fluid or alcohol after every 10 hours of sound during CD operation. Do not use...
... optimum playback and recording quality. Cleaning the tape heads and tape path Wipe the heads, the pinch roller and the capstan with a cleaning swab slightly moistened with a commercially available tape head demagnetizer. At this time, you clean all metal parts in the tape path with cleaning fluid or alcohol after every 10 hours of sound during CD operation. Do not use...
Users Guide
Page 31
...: 450 kHz Aerials FM: Wire aerial AM: External aerial Cassette-corder section Recording system 4-track 2 channel stereo Fast winding time Approx. 120 s (sec.) with Sony cassette C-60 Frequency response TYPE I (normal): 70 - 10,000 Hz General Speaker Full range: 10 cm (4 in AC operation. rated 4.2 W per channelminimum RMS power, with no more than 44.6 µW (This output is the value measured at a distance of about...
...: 450 kHz Aerials FM: Wire aerial AM: External aerial Cassette-corder section Recording system 4-track 2 channel stereo Fast winding time Approx. 120 s (sec.) with Sony cassette C-60 Frequency response TYPE I (normal): 70 - 10,000 Hz General Speaker Full range: 10 cm (4 in AC operation. rated 4.2 W per channelminimum RMS power, with no more than 44.6 µW (This output is the value measured at a distance of about...
Users Guide
Page 32
... the tape heads 30 Display 12 H Hooking up 23 I, J, K Improving broadcast reception 7 L Listening to the radio 6 Locating a specific track 13 LOOP 14 M, N, O MEGA BASS 25 P, Q Playing a CD 4 a tape 8 preset radio stations 18 tracks repeatedly 14 Presetting radio stations 17 Program Play 15 R Radio stations playing 18 presetting 17 Recording on a tape 10 Repeat Play 14 S Selecting audio emphasis 25 tracks 5 Setting the clock 19 Setting up 23 SOUND 25 T Timer Falling asleep to music 22 Waking up to music 20 Troubleshooting 28 U, V, W, X, Y, Z Using the display 12 Sony...
... the tape heads 30 Display 12 H Hooking up 23 I, J, K Improving broadcast reception 7 L Listening to the radio 6 Locating a specific track 13 LOOP 14 M, N, O MEGA BASS 25 P, Q Playing a CD 4 a tape 8 preset radio stations 18 tracks repeatedly 14 Presetting radio stations 17 Program Play 15 R Radio stations playing 18 presetting 17 Recording on a tape 10 Repeat Play 14 S Selecting audio emphasis 25 tracks 5 Setting the clock 19 Setting up 23 SOUND 25 T Timer Falling asleep to music 22 Waking up to music 20 Troubleshooting 28 U, V, W, X, Y, Z Using the display 12 Sony...


