Intellisync Lite Quick Start Guide
Page 13
... PC application you to synchronize. Checking the Apply to open the Choose Translator dialog box: Figure 2. Intellisync Choose Translator dialog box 3. If this is the case, the "active" or last-used file is used by default, and the File Name text box is present, use the Browse capability to select the...
... PC application you to synchronize. Checking the Apply to open the Choose Translator dialog box: Figure 2. Intellisync Choose Translator dialog box 3. If this is the case, the "active" or last-used file is used by default, and the File Name text box is present, use the Browse capability to select the...

Limited Warranty Statement
Page 3
...of God, accident, misuse, abuse, negligence, commercial use of America. Some states do not allow limitations on the LCD touchscreen or outside casing. This Limited Warranty is the exclusive remedy of this Product; (2) improper operation or maintenance of the consumer. This warranty does not cover...not apply when the malfunction results from the use or modifications of this Product; (3) connection to you many have other than a SONY authorized service facility. This Limited Warranty is valid only in the United States of the Product in conjunction with accessories, products or ...
...of God, accident, misuse, abuse, negligence, commercial use of America. Some states do not allow limitations on the LCD touchscreen or outside casing. This Limited Warranty is the exclusive remedy of this Product; (2) improper operation or maintenance of the consumer. This warranty does not cover...not apply when the malfunction results from the use or modifications of this Product; (3) connection to you many have other than a SONY authorized service facility. This Limited Warranty is valid only in the United States of the Product in conjunction with accessories, products or ...

CLIE Handbook (primary manual)
Page 36
......] from the Palm OS Standard screen to the CLIE Launcher. CLIÉ™ handheld basic operations 36 Tip The check boxes are , in the following cases: • Pressing an application button to start an application or category. • Switching the screen from [Options]. 5 Tap / (check boxes) next to [Remember Last Category...
......] from the Palm OS Standard screen to the CLIE Launcher. CLIÉ™ handheld basic operations 36 Tip The check boxes are , in the following cases: • Pressing an application button to start an application or category. • Switching the screen from [Options]. 5 Tap / (check boxes) next to [Remember Last Category...

CLIE Handbook (primary manual)
Page 45
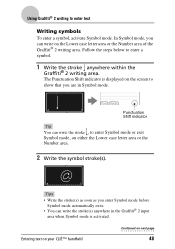
... area Division Number area marks Writing upper case letters To enter an upper case letter, write the stroke(s) across the division line Writing lower case letters To enter a lower case letter, write the stroke(s) on next page 45 Using Graffiti® 2 writing to enter text Using the Graffiti® 2 ...174; 2 writing area is divided into two halves: one for writing numbers. Entering text on your CLIÉ™ handheld Continued on the Lower case letter area of the Graffiti® 2 writing area*. * Memo Pad is used as an example application in this manual. • Write the stroke...
... area Division Number area marks Writing upper case letters To enter an upper case letter, write the stroke(s) across the division line Writing lower case letters To enter a lower case letter, write the stroke(s) on next page 45 Using Graffiti® 2 writing to enter text Using the Graffiti® 2 ...174; 2 writing area is divided into two halves: one for writing numbers. Entering text on your CLIÉ™ handheld Continued on the Lower case letter area of the Graffiti® 2 writing area*. * Memo Pad is used as an example application in this manual. • Write the stroke...
CLIE Handbook (primary manual)
Page 48
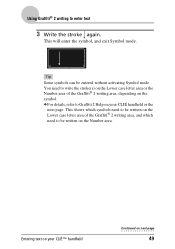
... in Symbol mode. • Punctuation Shift indicator Tip You can write the stroke , to enter Symbol mode or exit Symbol mode, on either the Lower case letter area or the Number area. 2 Write the symbol stroke(s). • Tips • Write the stroke(s) as soon as you can write on next page... 48 Entering text on your CLIÉ™ handheld Continued on the Lower case letter area or the Number area of the Graffiti® 2 writing area. The Punctuation Shift indicator is activated. Follow the steps below to enter text...
... in Symbol mode. • Punctuation Shift indicator Tip You can write the stroke , to enter Symbol mode or exit Symbol mode, on either the Lower case letter area or the Number area. 2 Write the symbol stroke(s). • Tips • Write the stroke(s) as soon as you can write on next page... 48 Entering text on your CLIÉ™ handheld Continued on the Lower case letter area or the Number area of the Graffiti® 2 writing area. The Punctuation Shift indicator is activated. Follow the steps below to enter text...
CLIE Handbook (primary manual)
Page 49
This shows which symbols need to be written on the Lower case letter area of the Graffiti® 2 writing area, depending on the symbol. bFor details, refer to be entered without activating Symbol mode. This will enter ... to Graffiti 2 Help on your CLIÉ™ handheld Continued on next page 49 Using Graffiti® 2 writing to write the stroke(s) on the Lower case letter area or the Number area of the Graffiti® 2 writing area, and which need to enter text 3 Write the stroke again.
This shows which symbols need to be written on the Lower case letter area of the Graffiti® 2 writing area, depending on the symbol. bFor details, refer to be entered without activating Symbol mode. This will enter ... to Graffiti 2 Help on your CLIÉ™ handheld Continued on next page 49 Using Graffiti® 2 writing to write the stroke(s) on the Lower case letter area or the Number area of the Graffiti® 2 writing area, and which need to enter text 3 Write the stroke again.
CLIE Handbook (primary manual)
Page 50
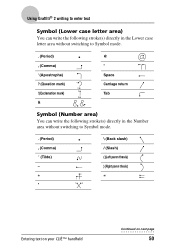
... area) You can write the following stroke(s) directly in the Lower case letter area without switching to Symbol mode. . (Period) , (Comma) ' (Apostrophe) ? (Question mark) ! (Exclamation mark) & @ '' Space Carriage return Tab Symbol (Number area) You can write the ...
... area) You can write the following stroke(s) directly in the Lower case letter area without switching to Symbol mode. . (Period) , (Comma) ' (Apostrophe) ? (Question mark) ! (Exclamation mark) & @ '' Space Carriage return Tab Symbol (Number area) You can write the ...

CLIE Handbook (primary manual)
Page 52
b For details, refer to enter text § ¿ • ° ¢ ß ¥ £ Ø ¡ ç Writing accented letters To enter an accented letter, first write the lower case letter or upper case letter, then write the accent stroke on the Number area of the Graffiti® 2 writing area. y ã õ ñ å Entering text on your CLIÉ™ handheld 52 Using Graffiti® 2 writing to the following and Graffiti 2 Help on your CLIÉ handheld.
b For details, refer to enter text § ¿ • ° ¢ ß ¥ £ Ø ¡ ç Writing accented letters To enter an accented letter, first write the lower case letter or upper case letter, then write the accent stroke on the Number area of the Graffiti® 2 writing area. y ã õ ñ å Entering text on your CLIÉ™ handheld 52 Using Graffiti® 2 writing to the following and Graffiti 2 Help on your CLIÉ handheld.
CLIE Handbook (primary manual)
Page 54
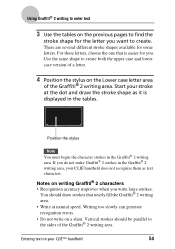
...® 2 writing area. • Write at the dot and draw the stroke shape as text characters. Use the same shape to create both the upper case and lower case version of a letter. 4 Position the stylus on your CLIÉ™ handheld 54 Entering text on the Lower... case letter area of the Graffiti® 2 writing area. Position the stylus Note You must begin the character strokes in the Graffiti® 2 writing area, your ...
...® 2 writing area. • Write at the dot and draw the stroke shape as text characters. Use the same shape to create both the upper case and lower case version of a letter. 4 Position the stylus on your CLIÉ™ handheld 54 Entering text on the Lower... case letter area of the Graffiti® 2 writing area. Position the stylus Note You must begin the character strokes in the Graffiti® 2 writing area, your ...

CLIE Handbook (primary manual)
Page 58
Entering text on your CLIÉ™ handheld Continued on the Graffiti 2 input area. The Decuma Latin screen is displayed. For details, refer to enter text (for writing letters and numbers are different" on page 60. Tip You can also display the Decuma Latin screen by tapping "1" on next page 58 In this case, the Decuma Latin screen for Numbers and Special characters is displayed. Using Decuma Input to "The areas for PEG-TJ35 only) 2 Tap the time line on the Date Book screen. 3 Tap "a" on the Graffiti 2 input area.
Entering text on your CLIÉ™ handheld Continued on the Graffiti 2 input area. The Decuma Latin screen is displayed. For details, refer to enter text (for writing letters and numbers are different" on page 60. Tip You can also display the Decuma Latin screen by tapping "1" on next page 58 In this case, the Decuma Latin screen for Numbers and Special characters is displayed. Using Decuma Input to "The areas for PEG-TJ35 only) 2 Tap the time line on the Date Book screen. 3 Tap "a" on the Graffiti 2 input area.
CLIE Handbook (primary manual)
Page 72
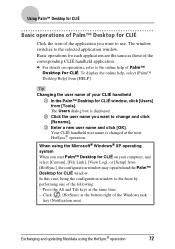
...™ Desktop for CLIÉ window. Press the Alt and Tab keys at the bottom right of the Windows task tray (Notification area). In this case, bring the configuration window to the selected application window. To display the online help of Palm™ Desktop for each application are the same as...
...™ Desktop for CLIÉ window. Press the Alt and Tab keys at the bottom right of the Windows task tray (Notification area). In this case, bring the configuration window to the selected application window. To display the online help of Palm™ Desktop for each application are the same as...
CLIE Handbook (primary manual)
Page 125
... to static electricity or electrical interference. excessive dust - direct sunlight - magnetic fields • When storing and carrying "Memory Stick" media, keep it in its original case to ensure protection of important files/data. • Make a backup of your CLIÉ handheld • Make sure you use a "Memory Stick Duo" adaptor. •...
... to static electricity or electrical interference. excessive dust - direct sunlight - magnetic fields • When storing and carrying "Memory Stick" media, keep it in its original case to ensure protection of important files/data. • Make a backup of your CLIÉ handheld • Make sure you use a "Memory Stick Duo" adaptor. •...
CLIE Handbook (primary manual)
Page 129
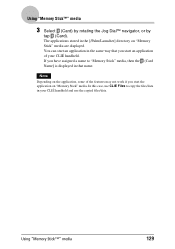
... of the features may not work if you start the application on "Memory Stick" media. Note Depending on "Memory Stick" media are displayed. In this case, use the copied files/data. Using "Memory Stick™" media 129 You can start an application in the [/Palm/Launcher] directory on the application, some...
... of the features may not work if you start the application on "Memory Stick" media. Note Depending on "Memory Stick" media are displayed. In this case, use the copied files/data. Using "Memory Stick™" media 129 You can start an application in the [/Palm/Launcher] directory on the application, some...
CLIE Handbook (primary manual)
Page 133
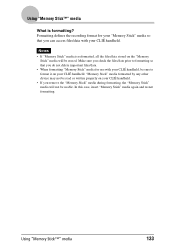
... Stick" media formatted by any other device may not be read or written properly on the "Memory Stick" media will not be erased. In this case, insert "Memory Stick" media again and restart formatting. Make sure you check the files/data prior to format it on your CLIÉ handheld. •...
... Stick" media formatted by any other device may not be read or written properly on the "Memory Stick" media will not be erased. In this case, insert "Memory Stick" media again and restart formatting. Make sure you check the files/data prior to format it on your CLIÉ handheld. •...
CLIE Handbook (primary manual)
Page 135
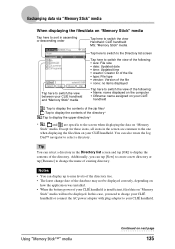
... Notes • You can tap [New] to create a new directory or tap [Rename] to change date of the database may not be displayed. In this case, you can display up to nine levels of the directory tree. • The latest change the name of existing directory. Except for these icons, all...
... Notes • You can tap [New] to create a new directory or tap [Rename] to change date of the database may not be displayed. In this case, you can display up to nine levels of the directory tree. • The latest change the name of existing directory. Except for these icons, all...
CLIE Handbook (primary manual)
Page 136
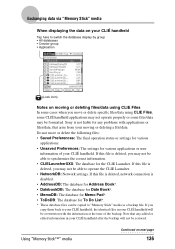
... applications or user information of the backup. Note that arise from your moving or deleting files/data using CLIE Files In some cases when you may not be restored. Sony is disabled. • AddressDB: The database for Address Book*. • DatebookDB: The database for Date Book*. • MemoDB: The database for Memo...
... applications or user information of the backup. Note that arise from your moving or deleting files/data using CLIE Files In some cases when you may not be restored. Sony is disabled. • AddressDB: The database for Address Book*. • DatebookDB: The database for Date Book*. • MemoDB: The database for Memo...
CLIE Handbook (primary manual)
Page 137
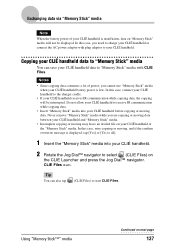
...CLIÉ handheld to start CLIE Files. Using "Memory Stick™" media Continued on "Memory Stick" media will be displayed. CLIE Files starts. In this case, connect your CLIÉ handheld to the charger cradle. • If your CLIÉ handheld data to "Memory Stick" media with plug adaptor to your...; navigator. Notes • Since copying data consumes a lot of your CLIÉ handheld battery power is low. Copying your CLIÉ handheld. In this case, you cannot use "Memory Stick" media when your CLIÉ handheld is insufficient, data on next page 137
...CLIÉ handheld to start CLIE Files. Using "Memory Stick™" media Continued on "Memory Stick" media will be displayed. CLIE Files starts. In this case, connect your CLIÉ handheld to the charger cradle. • If your CLIÉ handheld data to "Memory Stick" media with plug adaptor to your...; navigator. Notes • Since copying data consumes a lot of your CLIÉ handheld battery power is low. Copying your CLIÉ handheld. In this case, you cannot use "Memory Stick" media when your CLIÉ handheld is insufficient, data on next page 137
CLIE Handbook (primary manual)
Page 145
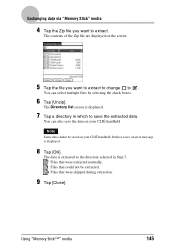
You can select multiple files by selecting the check boxes. 6 Tap [Unzip]. In these cases, an error message is displayed. 7 Tap a directory in Step 7. : Files that were extracted normally. : Files that could not be saved on your CLIÉ handheld. ...
You can select multiple files by selecting the check boxes. 6 Tap [Unzip]. In these cases, an error message is displayed. 7 Tap a directory in Step 7. : Files that were extracted normally. : Files that could not be saved on your CLIÉ handheld. ...

CLIE Handbook (primary manual)
Page 160
To resume the search, tap [Find More]. Tip If you want to tapping placed in the list of search results. To stop searching Tap [Stop] and [Exit]. Finding records 4 Tap the data you select text in an application prior to view in the Find dialog box. (Find), the text is not case sensitive; searching for "sony" also finds "Sony". Note The Find option is automatically Using the Calculator and finding records 160 The application associated with the data automatically starts and opens the data.
To resume the search, tap [Find More]. Tip If you want to tapping placed in the list of search results. To stop searching Tap [Stop] and [Exit]. Finding records 4 Tap the data you select text in an application prior to view in the Find dialog box. (Find), the text is not case sensitive; searching for "sony" also finds "Sony". Note The Find option is automatically Using the Calculator and finding records 160 The application associated with the data automatically starts and opens the data.
CLIE Handbook (primary manual)
Page 162
... lost at the data restoration. • If you customize settings in your CLIÉ handheld is created on applications that cannot be restored. If this case, backup them to "Memory Stick" media with the HotSync® operation. - Certain applications or driver files added later, or certain data in your computer, and...
... lost at the data restoration. • If you customize settings in your CLIÉ handheld is created on applications that cannot be restored. If this case, backup them to "Memory Stick" media with the HotSync® operation. - Certain applications or driver files added later, or certain data in your computer, and...