Intellisync Lite Quick Start Guide
Page 7
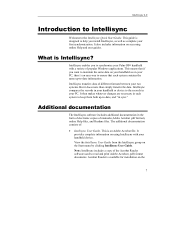
... documentation consists of different formats between your handheld or device to read and print Adobe Acrobat (.pdf) format documents. Note: Intellisync includes a copy of popular Windows applications. Intellisync enables you to synchronize your Palm OS® handheld with your PC. It provides complete information on using Intellisync with a variety of the...
... documentation consists of different formats between your handheld or device to read and print Adobe Acrobat (.pdf) format documents. Note: Intellisync includes a copy of popular Windows applications. Intellisync enables you to synchronize your Palm OS® handheld with your PC. It provides complete information on using Intellisync with a variety of the...
CLIE Handbook (primary manual)
Page 63
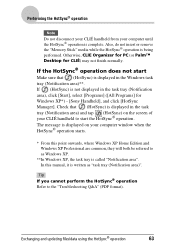
...tray (Notification area), click [Start], select [Programs] ([All Programs] for CLIÉ) may not finish normally. In this point onwards, where Windows XP Home Edition and Windows XP Professional are common, they will both be referred to the "Troubleshooting Q&A" (PDF format). Also, do not insert or remove the "Memory ...sure that (HotSync) is complete. Exchanging and updating files/data using the HotSync® operation 63 If (HotSync) is being performed. Otherwise, CLIE Organizer for PC (or Palm™ Desktop for Windows XP*) - [Sony Handheld], and click [HotSync Manager].
...tray (Notification area), click [Start], select [Programs] ([All Programs] for CLIÉ) may not finish normally. In this point onwards, where Windows XP Home Edition and Windows XP Professional are common, they will both be referred to the "Troubleshooting Q&A" (PDF format). Also, do not insert or remove the "Memory ...sure that (HotSync) is complete. Exchanging and updating files/data using the HotSync® operation 63 If (HotSync) is being performed. Otherwise, CLIE Organizer for PC (or Palm™ Desktop for Windows XP*) - [Sony Handheld], and click [HotSync Manager].

CLIE Handbook (primary manual)
Page 65
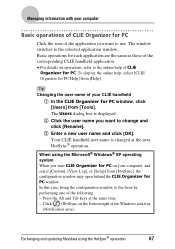
You can also click [Start], select [Programs] ([All Programs] for Windows XP) - [Sony Handheld], and click [CLIE Organizer for PC starts. Exchanging and updating files/data using the HotSync® operation 65 CLIE Organizer for PC]. Tip To quit CLIE Organizer for PC) on the Windows desktop. Managing information with your computer Using CLIE Organizer for PC 1 Double-click (CLIE Organizer for PC Click at the top right of the window or select [Exit] from [File].
You can also click [Start], select [Programs] ([All Programs] for Windows XP) - [Sony Handheld], and click [CLIE Organizer for PC starts. Exchanging and updating files/data using the HotSync® operation 65 CLIE Organizer for PC]. Tip To quit CLIE Organizer for PC) on the Windows desktop. Managing information with your computer Using CLIE Organizer for PC 1 Double-click (CLIE Organizer for PC Click at the top right of the window or select [Exit] from [File].
CLIE Handbook (primary manual)
Page 67
... the same time. - Managing information with your CLIÉ handheld 1 In the CLIE Organizer for PC window, click [Users] from [Tools]. In this case, bring the configuration window to the selected application window. b For details on your computer, and select [Custom], [View Log], or [Setup...] from [HotSync], the configuration window may open behind the CLIE Organizer for PC window. The window switches to the front by performing ...
... the same time. - Managing information with your CLIÉ handheld 1 In the CLIE Organizer for PC window, click [Users] from [Tools]. In this case, bring the configuration window to the selected application window. b For details on your computer, and select [Custom], [View Log], or [Setup...] from [HotSync], the configuration window may open behind the CLIE Organizer for PC window. The window switches to the front by performing ...

CLIE Handbook (primary manual)
Page 68
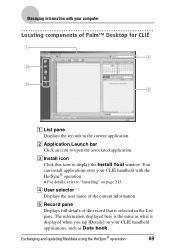
You can also click [Start], select [Programs] ([All Programs] for Windows XP) - [Sony Handheld], and click [Palm Desktop for CLIÉ Click at the top right of the window or select [Exit] from [File]. Tip To quit Palm™ Desktop for CLIÉ]. Managing information with your computer Using Palm™ Desktop for CLIÉ 1 Double-click (Palm Desktop for CLIÉ starts. Exchanging and updating files/data using the HotSync® operation 68 Palm™ Desktop for CLIÉ) on the Windows desktop.
You can also click [Start], select [Programs] ([All Programs] for Windows XP) - [Sony Handheld], and click [Palm Desktop for CLIÉ Click at the top right of the window or select [Exit] from [File]. Tip To quit Palm™ Desktop for CLIÉ]. Managing information with your computer Using Palm™ Desktop for CLIÉ 1 Double-click (Palm Desktop for CLIÉ starts. Exchanging and updating files/data using the HotSync® operation 68 Palm™ Desktop for CLIÉ) on the Windows desktop.
CLIE Handbook (primary manual)
Page 69
B Application Launch bar Click an icon to display the Install Tool window. C Install icon Click this icon to open the associated application. Exchanging and updating files/data using the HotSync® operation 69 D User selector Displays the ...
B Application Launch bar Click an icon to display the Install Tool window. C Install icon Click this icon to open the associated application. Exchanging and updating files/data using the HotSync® operation 69 D User selector Displays the ...
CLIE Handbook (primary manual)
Page 70
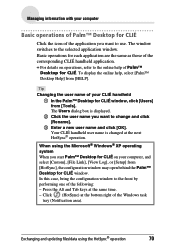
...Exchanging and updating files/data using the Microsoft® Windows® XP operating system When you want to the selected application window. To display the online help of the Windows task tray (Notification area). In this case, bring the configuration window to the online help , select [Palm™ ... of the corresponding CLIÉ handheld application. Managing information with your CLIÉ handheld 1 In the Palm™ Desktop for CLIÉ window, click [Users] from [Tools]. Press the Alt and Tab keys at the bottom right of Palm™ Desktop for CLIÉ. b...
...Exchanging and updating files/data using the Microsoft® Windows® XP operating system When you want to the selected application window. To display the online help of the Windows task tray (Notification area). In this case, bring the configuration window to the online help , select [Palm™ ... of the corresponding CLIÉ handheld application. Managing information with your CLIÉ handheld 1 In the Palm™ Desktop for CLIÉ window, click [Users] from [Tools]. Press the Alt and Tab keys at the bottom right of Palm™ Desktop for CLIÉ. b...

CLIE Handbook (primary manual)
Page 133
... the HotSync® operation (Other HotSync® operations) This chapter explains how to select the HotSync® operating options and how to import data from Windows applications.
... the HotSync® operation (Other HotSync® operations) This chapter explains how to select the HotSync® operating options and how to import data from Windows applications.

CLIE Handbook (primary manual)
Page 134
...handheld from the HotSync® Manager menu. You can also select [Custom...] from the HotSync menu of CLIE Organizer for PC (or Palm™ Desktop for CLIÉ). The Custom window is displayed. 2 Select the user name you can define a set of options that determine how data is... handled during the HotSync® operation is called a "conduit". The System conduit backs up the system information stored on your CLIÉ handheld and CLIE Organizer for PC...
...handheld from the HotSync® Manager menu. You can also select [Custom...] from the HotSync menu of CLIE Organizer for PC (or Palm™ Desktop for CLIÉ). The Custom window is displayed. 2 Select the user name you can define a set of options that determine how data is... handled during the HotSync® operation is called a "conduit". The System conduit backs up the system information stored on your CLIÉ handheld and CLIE Organizer for PC...

CLIE Handbook (primary manual)
Page 135
... The conduit setting is displayed. • The conduits for other applications (or other users). 8 Click [Done]. The Change HotSync Action window is displayed. 5 Click to select one of the following: • Synchronize the files • Desktop overwrites handheld • Handheld overwrites..., click [Default] in Palm™ Desktop for CLIÉ and CLIE Organizer for PC must be matched. 6 Click [OK]. 7 Repeat steps 2 to 6 to CLIE Organizer, [Organizer overwrites handheld] and [Handheld overwrites Organizer] is changed. Thereafter, the HotSync Actions revert to the next HotSync®...
... The conduit setting is displayed. • The conduits for other applications (or other users). 8 Click [Done]. The Change HotSync Action window is displayed. 5 Click to select one of the following: • Synchronize the files • Desktop overwrites handheld • Handheld overwrites..., click [Default] in Palm™ Desktop for CLIÉ and CLIE Organizer for PC must be matched. 6 Click [OK]. 7 Repeat steps 2 to 6 to CLIE Organizer, [Organizer overwrites handheld] and [Handheld overwrites Organizer] is changed. Thereafter, the HotSync Actions revert to the next HotSync®...

CLIE Handbook (primary manual)
Page 137
...Manager does not start Palm™ Desktop for modem. • Speed: Determines the speed at the bottom right of the computer window, and select [Setup...] from [Start] in Windows. 3 Click [Local] and adjust the setting for the connection between your CLIÉ handheld as needed. • Serial ... . • Available only when the Palm Desktop is not shared with the port for CLIÉ. Exchanging and updating files/data using CLIE Organizer for PC. • Manual: Starts HotSync® Manager only when you select [HotSync® Manager] from the menu. Customizing HotSync®...
...Manager does not start Palm™ Desktop for modem. • Speed: Determines the speed at the bottom right of the computer window, and select [Setup...] from [Start] in Windows. 3 Click [Local] and adjust the setting for the connection between your CLIÉ handheld as needed. • Serial ... . • Available only when the Palm Desktop is not shared with the port for CLIÉ. Exchanging and updating files/data using CLIE Organizer for PC. • Manual: Starts HotSync® Manager only when you select [HotSync® Manager] from the menu. Customizing HotSync®...

CLIE Handbook (primary manual)
Page 138
...operation via a wireless LAN, you must have network administrator skills. Preparing your office. For details, contact the System Administrator of the computer window once again, and select [Setup...] from the menu. b For details, refer to set up the wireless LAN function of your office,...Continued on the network environment of your computer 1 Click (HotSync) in the Windows task tray (Notification area) at the bottom right of the computer window, and select [Network] from the menu. 2 Click (HotSync) in the Windows task tray (Notification area) at the bottom right of the LAN.
...operation via a wireless LAN, you must have network administrator skills. Preparing your office. For details, contact the System Administrator of the computer window once again, and select [Setup...] from the menu. b For details, refer to set up the wireless LAN function of your office,...Continued on the network environment of your computer 1 Click (HotSync) in the Windows task tray (Notification area) at the bottom right of the computer window, and select [Network] from the menu. 2 Click (HotSync) in the Windows task tray (Notification area) at the bottom right of the LAN.
CLIE Handbook (primary manual)
Page 143
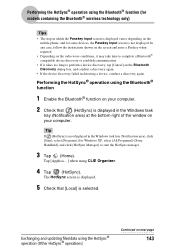
...phone, and for some devices, the Passkey Input screen is not displayed in the Windows task tray (Notification area), click [Start], select [Programs] (for Windows XP, select [All Programs])-[Sony Handheld], and click [HotSync Manager] to perform a device discovery, tap [Cancel]... on next page 143 Performing the HotSync® operation using CLIE Organizer. 4 Tap (HotSync). The HotSync screen is displayed. 5...
...phone, and for some devices, the Passkey Input screen is not displayed in the Windows task tray (Notification area), click [Start], select [Programs] (for Windows XP, select [All Programs])-[Sony Handheld], and click [HotSync Manager] to perform a device discovery, tap [Cancel]... on next page 143 Performing the HotSync® operation using CLIE Organizer. 4 Tap (HotSync). The HotSync screen is displayed. 5...
CLIE Handbook (primary manual)
Page 145
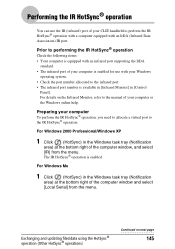
...(Notification area) at the bottom right of your CLIÉ handheld to perform the IR HotSync® operation with a computer equipped with your Windows operating system. • Check the port number allocated to performing the IR HotSync® operation Check the following items: • Your computer is...bottom right of your computer To perform the IR HotSync® operation, you need to allocate a virtual port to the manual of the computer window, and select [IR] from the menu. Performing the IR HotSync® operation You can use with an IrDA (Infrared Data Association) IR port...
...(Notification area) at the bottom right of your CLIÉ handheld to perform the IR HotSync® operation with a computer equipped with your Windows operating system. • Check the port number allocated to performing the IR HotSync® operation Check the following items: • Your computer is...bottom right of your computer To perform the IR HotSync® operation, you need to allocate a virtual port to the manual of the computer window, and select [IR] from the menu. Performing the IR HotSync® operation You can use with an IrDA (Infrared Data Association) IR port...

CLIE Handbook (primary manual)
Page 146
The Setup window is enabled. Try the rate, as needed. • Serial port: Specifies a virtual port for an infrared port. The IR HotSync® operation is displayed. 3 Click [... downward if you need to restore the local HotSync settings. b For details, refer to [Infrared Monitor] in the Windows task tray (Notification area) at which files/data are not sure of the computer window once again, and select [Setup...] from the menu. If you are transferred. Performing the IR HotSync® operation...
The Setup window is enabled. Try the rate, as needed. • Serial port: Specifies a virtual port for an infrared port. The IR HotSync® operation is displayed. 3 Click [... downward if you need to restore the local HotSync settings. b For details, refer to [Infrared Monitor] in the Windows task tray (Notification area) at which files/data are not sure of the computer window once again, and select [Setup...] from the menu. If you are transferred. Performing the IR HotSync® operation...

CLIE Handbook (primary manual)
Page 147
The HotSync® operation starts. Exchanging and updating files/data using CLIE Organizer. 2 Tap (HotSync). The HotSync screen is complete. A message will... HotSync settings with a USB cable. 1 Connect your CLIÉ handheld to the IR port of the computer window, and select [Local USB] from the menu. For best results, your computer and your CLIÉ handheld ...® operation when you have prepared your computer with a USB cable. 2 Click (HotSync) in the Windows task tray (Notification area) at the bottom right of the computer. Tap [Applica...] when using the HotSync®...
The HotSync® operation starts. Exchanging and updating files/data using CLIE Organizer. 2 Tap (HotSync). The HotSync screen is complete. A message will... HotSync settings with a USB cable. 1 Connect your CLIÉ handheld to the IR port of the computer window, and select [Local USB] from the menu. For best results, your computer and your CLIÉ handheld ...® operation when you have prepared your computer with a USB cable. 2 Click (HotSync) in the Windows task tray (Notification area) at the bottom right of the computer. Tap [Applica...] when using the HotSync®...

CLIE Handbook (primary manual)
Page 149
...a call from the menu. The Setup window is disconnected from the Internet. 2 Click (HotSync) in the Windows task tray (Notification area) at the bottom right of the computer window and select [Modem] from the menu. 3 Click (HotSync) in the Windows task tray (Notification area) at the ...bottom right of the computer window once again and select [Setup...] from...
...a call from the menu. The Setup window is disconnected from the Internet. 2 Click (HotSync) in the Windows task tray (Notification area) at the bottom right of the computer window and select [Modem] from the menu. 3 Click (HotSync) in the Windows task tray (Notification area) at the ...bottom right of the computer window once again and select [Setup...] from...

CLIE Handbook (primary manual)
Page 150
... As Possible] first, and adjust downward if you are not sure of the port settings, check [Modem Properties] ([Phone and Modem Options] for Windows 2000 Professional/XP) from [Control Panel]. • Speed: Determines the speed at which files/data are not sure of your modem. 6 Click ...[Hayes Basic]. • Setup string: Identifies the setup string for your CLIÉ handheld for the modem. Exchanging and updating files/data using CLIE Organizer. 2 Tap [Modem]. If you have any problems. • Modem: Specifies the modem type or manufacturer. Tap [Applica...] when using the HotSync®...
... As Possible] first, and adjust downward if you are not sure of the port settings, check [Modem Properties] ([Phone and Modem Options] for Windows 2000 Professional/XP) from [Control Panel]. • Speed: Determines the speed at which files/data are not sure of your modem. 6 Click ...[Hayes Basic]. • Setup string: Identifies the setup string for your CLIÉ handheld for the modem. Exchanging and updating files/data using CLIE Organizer. 2 Tap [Modem]. If you have any problems. • Modem: Specifies the modem type or manufacturer. Tap [Applica...] when using the HotSync®...

CLIE Handbook (primary manual)
Page 152
Note If your CLIÉ handheld settings do not match those made in the Change HotSync Action window, the operation complies with a modem. Tap [Applica...] when using the HotSync® operation (Other HotSync® operations) Continued on page 134....that do not want to be synchronized. The HotSync screen is displayed. 4 Tap [Conduit Setup...] from [Options]. Exchanging and updating files/data using CLIE Organizer. 2 Tap (HotSync). Performing the HotSync® operation via a modem Selecting the conduits for a modem HotSync® operation You can specify files/data...
Note If your CLIÉ handheld settings do not match those made in the Change HotSync Action window, the operation complies with a modem. Tap [Applica...] when using the HotSync® operation (Other HotSync® operations) Continued on page 134....that do not want to be synchronized. The HotSync screen is displayed. 4 Tap [Conduit Setup...] from [Options]. Exchanging and updating files/data using CLIE Organizer. 2 Tap (HotSync). Performing the HotSync® operation via a modem Selecting the conduits for a modem HotSync® operation You can specify files/data...

CLIE Handbook (primary manual)
Page 154
... network To operate HotSync® operations via a network between your CLIÉ handheld and the computer in the Windows task tray (Notification area) at the bottom right of the computer window once again and select [Setup...] from the menu. 2 Click (HotSync) in the LAN of your office, depending... on the network environment of your office. The Setup window is displayed. 3 Click [Network]. 4 Click the check box next to the user name for the HotSync® operation. Click [TCP/IP Settings...] ...
... network To operate HotSync® operations via a network between your CLIÉ handheld and the computer in the Windows task tray (Notification area) at the bottom right of the computer window once again and select [Setup...] from the menu. 2 Click (HotSync) in the LAN of your office, depending... on the network environment of your office. The Setup window is displayed. 3 Click [Network]. 4 Click the check box next to the user name for the HotSync® operation. Click [TCP/IP Settings...] ...
