
Intellisync Lite Quick Start Guide
Page 16
... dialog box Note: If you synchronize, Intellisync uses a history file to determine the changes that must be made in the cradle and the cradle connected to the appropriate COM port on the cradle. Therefore, a "first run " synchronizations simply merge your handheld displays the message HotSync complete. 16 With your handheld in each of...
... dialog box Note: If you synchronize, Intellisync uses a history file to determine the changes that must be made in the cradle and the cradle connected to the appropriate COM port on the cradle. Therefore, a "first run " synchronizations simply merge your handheld displays the message HotSync complete. 16 With your handheld in each of...
Intellisync User Guide
Page 5
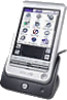
... disk space • 16 MB RAM • VGA monitor or better, 640 x 480 resolution • CD-ROM drive • One available serial port (requires serial cradle) • HotSync 3.0 installed Page 5 Before You Begin Chapter 1: Before You Begin Introduction to Intellisync Lite ntellisync Lite (Intellisync) software enables you to synchronize your Palm...
... disk space • 16 MB RAM • VGA monitor or better, 640 x 480 resolution • CD-ROM drive • One available serial port (requires serial cradle) • HotSync 3.0 installed Page 5 Before You Begin Chapter 1: Before You Begin Introduction to Intellisync Lite ntellisync Lite (Intellisync) software enables you to synchronize your Palm...
Intellisync User Guide
Page 6
Page 6 In addition, you will need a Palm OS® handheld and a docking cradle. Intellisync Lite Windows 2000 Professional Edition • 133 MHz Pentium-compatible processor or higher • 30 MB available hard disk space • 64 MB RAM &#...
Page 6 In addition, you will need a Palm OS® handheld and a docking cradle. Intellisync Lite Windows 2000 Professional Edition • 133 MHz Pentium-compatible processor or higher • 30 MB available hard disk space • 64 MB RAM &#...

Intellisync User Guide
Page 8
...174; Manager In order to use HotSync to use Intellisync Lite, you must select Palm Desktop in the Startup group on the handheld cradle. Installing Intellisync on your PC effectively takes over the HotSync Manager application. HotSync Notes: • Once you have Palm Desktop installed... time by selecting Palm Desktop in the Intellisync Configuration dialog. If you press the HotSync button on the handheld cradle-coordinates all communications between your handheld and your PC. Installing Palm Desktop installs HotSync manager in the Intellisync Choose Translator dialog.
...174; Manager In order to use HotSync to use Intellisync Lite, you must select Palm Desktop in the Startup group on the handheld cradle. Installing Intellisync on your PC effectively takes over the HotSync Manager application. HotSync Notes: • Once you have Palm Desktop installed... time by selecting Palm Desktop in the Intellisync Configuration dialog. If you press the HotSync button on the handheld cradle-coordinates all communications between your handheld and your PC. Installing Palm Desktop installs HotSync manager in the Intellisync Choose Translator dialog.

Intellisync User Guide
Page 9
... know what to "The Intellisync Dialogs," and "Special Topics" in Chapters 3 and 4. These dialogs specify the data you press the HotSync button on the handheld cradle, synchronization starts immediately. Synchronizing Data Synchronizing the data stored in your Palm OS® handheld with data on your desktop is for complete information on...
... know what to "The Intellisync Dialogs," and "Special Topics" in Chapters 3 and 4. These dialogs specify the data you press the HotSync button on the handheld cradle, synchronization starts immediately. Synchronizing Data Synchronizing the data stored in your Palm OS® handheld with data on your desktop is for complete information on...

Intellisync User Guide
Page 12
... of the handheld applications you want them, click OK to return to the Configuration dialog. 8. With your handheld in the handheld cradle and the cradle connected to synchronize. Note that the data is activated for synchronization. (If you want to the appropriate COM port on your PC...synchronized has been completed. By default, this box, the application data is checked, indicating that pressing the Cancel button on the handheld cradle. Then click the OK button to the handheld application name. Intellisync Lite Note the check box adjacent to save specifications and exit ...
... of the handheld applications you want them, click OK to return to the Configuration dialog. 8. With your handheld in the handheld cradle and the cradle connected to synchronize. Note that the data is activated for synchronization. (If you want to the appropriate COM port on your PC...synchronized has been completed. By default, this box, the application data is checked, indicating that pressing the Cancel button on the handheld cradle. Then click the OK button to the handheld application name. Intellisync Lite Note the check box adjacent to save specifications and exit ...

Intellisync User Guide
Page 14
...Lotus Organizer, handheld Date Book records are compatible with the handheld application. Refer to run an Intellisync synchronization, your handheld must be transferred between records in your PC. For complete details on your handheld and PC applications because fields in the cradle and the cradle ...flow of data during data transfers. For this to occur, your PC. Page 14 Supported Systems topics contain important information on the cradle (with each of the operation. Simply press the HotSync button on how Intellisync works with the handheld in the two systems are...
...Lotus Organizer, handheld Date Book records are compatible with the handheld application. Refer to run an Intellisync synchronization, your handheld must be transferred between records in your PC. For complete details on your handheld and PC applications because fields in the cradle and the cradle ...flow of data during data transfers. For this to occur, your PC. Page 14 Supported Systems topics contain important information on the cradle (with each of the operation. Simply press the HotSync button on how Intellisync works with the handheld in the two systems are...
Intellisync User Guide
Page 17
... Settings dialog box and The Field Mapping dialog box later in the operation. Once a synchronization is checked. Page 17 Note: For information on the handheld cradle starts the operation.
... Settings dialog box and The Field Mapping dialog box later in the operation. Once a synchronization is checked. Page 17 Note: For information on the handheld cradle starts the operation.
Intellisync User Guide
Page 30
... operation and, when prompted, select the User name you have configured an operation, place the handheld in its cradle and press the HotSync button. The HotSync® Manager recognizes the handheld in the cradle and automatically runs the operation currently configured for each time you to synchronize multiple handhelds. When the New...
... operation and, when prompted, select the User name you have configured an operation, place the handheld in its cradle and press the HotSync button. The HotSync® Manager recognizes the handheld in the cradle and automatically runs the operation currently configured for each time you to synchronize multiple handhelds. When the New...
Intellisync User Guide
Page 36
... add or change target records, but records are used for each type of data. Once things are set up , the HotSync button on the handheld cradle starts the operation. However, Conflict Resolution is applied if Intellisync discovers data conflicts between records in the Advanced Settings, Options, and Field Mapping dialogs.
... add or change target records, but records are used for each type of data. Once things are set up , the HotSync button on the handheld cradle starts the operation. However, Conflict Resolution is applied if Intellisync discovers data conflicts between records in the Advanced Settings, Options, and Field Mapping dialogs.

Intellisync User Guide
Page 43
Press OK. 6. However, since first run synchronizations take longer than subsequent synchronizations, it may need to start a synchronization. Press the HotSync button on the cradle to use this workaround each time you synchronize your handheld to hang, execute a soft-reset. Your handheld will remain in the "wait-forever" mode until ...
Press OK. 6. However, since first run synchronizations take longer than subsequent synchronizations, it may need to start a synchronization. Press the HotSync button on the cradle to use this workaround each time you synchronize your handheld to hang, execute a soft-reset. Your handheld will remain in the "wait-forever" mode until ...

Intellisync User Guide
Page 48
...conflicts during synchronizations. This application, which data to work, the HotSync Manager application must be loaded in memory, and the handheld cradle must be edited) in the Choose Translator dialog) imports records from a selected PC application to execute the operation. When you ...have configured an Intellisync synchronization, pressing the HotSync button on the HotSync® cradle, this button to use when there are discrepancies between the handheld and PC systems. See "Synchronization and History Files" in the ...
...conflicts during synchronizations. This application, which data to work, the HotSync Manager application must be loaded in memory, and the handheld cradle must be edited) in the Choose Translator dialog) imports records from a selected PC application to execute the operation. When you ...have configured an Intellisync synchronization, pressing the HotSync button on the HotSync® cradle, this button to use when there are discrepancies between the handheld and PC systems. See "Synchronization and History Files" in the ...

Intellisync User Guide
Page 51
... synchronization, 15 H handhelds losing connection, 44 timing out, 44 Help button, 20 Help Icon, 8 history file, 50 history files, 34 HotSync button, 16, 50 HotSync cradle, 16 HotSync Manager, 9 and Palm Desktop, 9 I importing data to your handheld, 38 Installing Intellisync, 7 Intellisync
... synchronization, 15 H handhelds losing connection, 44 timing out, 44 Help button, 20 Help Icon, 8 history file, 50 history files, 34 HotSync button, 16, 50 HotSync cradle, 16 HotSync Manager, 9 and Palm Desktop, 9 I importing data to your handheld, 38 Installing Intellisync, 7 Intellisync
Add-on Application Guide
Page 12
... image file you want to send and the user name are registered in PictureGear software. 6 Place your CLIÉ handheld on the cradle, then press the HotSync button on the cradle. You can transfer image files taken by a digital still camera or downloaded from the Internet, etc. If necessary, click "Still settings...
... image file you want to send and the user name are registered in PictureGear software. 6 Place your CLIÉ handheld on the cradle, then press the HotSync button on the cradle. You can transfer image files taken by a digital still camera or downloaded from the Internet, etc. If necessary, click "Still settings...
Add-on Application Guide
Page 13
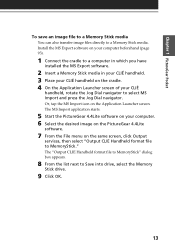
... list next to select MS Import and press the Jog Dial navigator. Install the MS Export software on your computer beforehand (page 93). 1 Connect the cradle to a computer in which you have installed the MS Export software. 2 Insert a Memory Stick media in your CLIÉ handheld. 3 Place your ...CLIÉ handheld on the cradle. 4 On the Application Launcher screen of your computer. 6 Select the desired image on the PictureGear 4.4Lite software. 7 From the File menu on the ...
... list next to select MS Import and press the Jog Dial navigator. Install the MS Export software on your computer beforehand (page 93). 1 Connect the cradle to a computer in which you have installed the MS Export software. 2 Insert a Memory Stick media in your CLIÉ handheld. 3 Place your ...CLIÉ handheld on the cradle. 4 On the Application Launcher screen of your computer. 6 Select the desired image on the PictureGear 4.4Lite software. 7 From the File menu on the ...

Add-on Application Guide
Page 23
...: Select the order in which you place your CLIÉ handheld as a clock by displaying the current time using the PhotoStand application. Continued on the cradle (PhotoStand function).
...: Select the order in which you place your CLIÉ handheld as a clock by displaying the current time using the PhotoStand application. Continued on the cradle (PhotoStand function).

Add-on Application Guide
Page 25
... page 14. 25 The Palm Desktop for CLIÉ icon on the Windows desktop. Make sure that the Add-on folder is stored in the Sony Handheld folder of the Program Files folder. 5 Double-click the PGPocket Samples folder. 6 Double-click the sample image file you want to your hard ... PictureGear Pocket. If the Add-on folder is added to view other sample images, repeat this step. 7 Click Done. 8 Press the HotSync button on the cradle. 1 Double-click the Palm Desktop for CLIÉ software starts. 2 Click Install. If you want to the File Name list. Install the Palm Desktop for...
... page 14. 25 The Palm Desktop for CLIÉ icon on the Windows desktop. Make sure that the Add-on folder is stored in the Sony Handheld folder of the Program Files folder. 5 Double-click the PGPocket Samples folder. 6 Double-click the sample image file you want to your hard ... PictureGear Pocket. If the Add-on folder is added to view other sample images, repeat this step. 7 Click Done. 8 Press the HotSync button on the cradle. 1 Double-click the Palm Desktop for CLIÉ software starts. 2 Click Install. If you want to the File Name list. Install the Palm Desktop for...

Add-on Application Guide
Page 33
...201; Paint application via your computer from the user list. 4 Click Add. Make sure that the Add-on your CLIÉ handheld on the cradle, and install the Palm Desktop for CLIÉ software starts. 2 Click Install. CPStamp.pdb is added to the File Name list. 8 Repeat...specified in the Sony Handheld folder of the Program Files folder. 5 Double-click the CLIÉ Paint folder. 6 Double-click the following folder. • For PEG-T615C: Color folder • For PEG-T415: Mono folder 7 Double-click the following file. • For PEG-T615C: CLIÉPaint.prc • For PEG-T415: CLI...
...201; Paint application via your computer from the user list. 4 Click Add. Make sure that the Add-on your CLIÉ handheld on the cradle, and install the Palm Desktop for CLIÉ software starts. 2 Click Install. CPStamp.pdb is added to the File Name list. 8 Repeat...specified in the Sony Handheld folder of the Program Files folder. 5 Double-click the CLIÉ Paint folder. 6 Double-click the following folder. • For PEG-T615C: Color folder • For PEG-T415: Mono folder 7 Double-click the following file. • For PEG-T615C: CLIÉPaint.prc • For PEG-T415: CLI...

Add-on Application Guide
Page 44
... the right of the PictureGear 4.4Lite software. The registered images are registered in the PictureGear software. 6 Place your CLIÉ handheld on the cradle, and then press the HotSync button on how to save the movies in the "Settings for the image you want to send in the format... PictureGear 4.4Lite software, and then transfer them to your CLIÉ handheld. 1 Start PictureGear 4.4Lite software. For details on operations, or on the cradle. The images you want to send and the user name are automatically sent to your CLIÉ handheld during the next HotSync. You will need...
... the right of the PictureGear 4.4Lite software. The registered images are registered in the PictureGear software. 6 Place your CLIÉ handheld on the cradle, and then press the HotSync button on how to save the movies in the "Settings for the image you want to send in the format... PictureGear 4.4Lite software, and then transfer them to your CLIÉ handheld. 1 Start PictureGear 4.4Lite software. For details on operations, or on the cradle. The images you want to send and the user name are automatically sent to your CLIÉ handheld during the next HotSync. You will need...

Add-on Application Guide
Page 45
...dialog box appears. 8 From the list next to a Memory Stick media. Install the MS Export software on your computer beforehand (page 93). 1 Connect the cradle to a computer in which you have installed the MS Export software. 2 Insert a Memory Stick media in your CLIÉ handheld. 3 Place your CLIÉ...; handheld on the cradle. 4 On the Application Launcher screen of your computer. 6 Select the desired movie on the PictureGear 4.4Lite software. 7 From the File menu on the ...
...dialog box appears. 8 From the list next to a Memory Stick media. Install the MS Export software on your computer beforehand (page 93). 1 Connect the cradle to a computer in which you have installed the MS Export software. 2 Insert a Memory Stick media in your CLIÉ handheld. 3 Place your CLIÉ...; handheld on the cradle. 4 On the Application Launcher screen of your computer. 6 Select the desired movie on the PictureGear 4.4Lite software. 7 From the File menu on the ...