
Intellisync User Guide
Page 3
... MULTI-USER SUPPORT 30 Adding a User Name 30 SYNCHRONIZATION AND HISTORY FILES 32 THE SAME RECORD CHANGED AND DELETED DIALOG 33 REMOTE SYNCHRONIZATION 34 To Prepare Your PC 34 Remote vs. Local Synchronization 35 IMPORTING AND EXPORTING DATA 36 VIRTUAL FIELDS 37 Virtual Fields in the Date Book and To Do List...
... MULTI-USER SUPPORT 30 Adding a User Name 30 SYNCHRONIZATION AND HISTORY FILES 32 THE SAME RECORD CHANGED AND DELETED DIALOG 33 REMOTE SYNCHRONIZATION 34 To Prepare Your PC 34 Remote vs. Local Synchronization 35 IMPORTING AND EXPORTING DATA 36 VIRTUAL FIELDS 37 Virtual Fields in the Date Book and To Do List...

Intellisync User Guide
Page 23
... have updated Brian's home phone number in both records, but edited differently. (For example, if you decide which fields are as follows: • First run a remote synchronization with this option when you run synchronizations. • When new records have been added to each system since the last synchronization, but made a typographical...
... have updated Brian's home phone number in both records, but edited differently. (For example, if you decide which fields are as follows: • First run a remote synchronization with this option when you run synchronizations. • When new records have been added to each system since the last synchronization, but made a typographical...
Intellisync User Guide
Page 29
Topics include: • Multi-User Support • Synchronization and History Files • The Same Record Changed and Deleted dialog box • Remote Synchronization • Importing and Exporting Data • Virtual Fields Page 29 Special Topics Chapter 4: Special Topics This chapter is devoted to explaining in detail some aspects of Intellisync that have only been touched upon in previous chapters.
Topics include: • Multi-User Support • Synchronization and History Files • The Same Record Changed and Deleted dialog box • Remote Synchronization • Importing and Exporting Data • Virtual Fields Page 29 Special Topics Chapter 4: Special Topics This chapter is devoted to explaining in detail some aspects of Intellisync that have only been touched upon in previous chapters.
Intellisync User Guide
Page 34
...PC application you are using. Page 34 You can synchronize remotely, via modem. Intellisync Lite Remote Synchronization Once you have configured a synchronization, Intellisync can not change your Intellisync configuration settings remotely. Synchronize your handheld and PC application before leaving your ...CompuServe, etc.). Your PC should be done prior to run a remote synchronization, your office. In some cases, for instance, an application must be running a remote synchronization, and describes differences between remote and local operations. You must be turned on how to an...
...PC application you are using. Page 34 You can synchronize remotely, via modem. Intellisync Lite Remote Synchronization Once you have configured a synchronization, Intellisync can not change your Intellisync configuration settings remotely. Synchronize your handheld and PC application before leaving your ...CompuServe, etc.). Your PC should be done prior to run a remote synchronization, your office. In some cases, for instance, an application must be running a remote synchronization, and describes differences between remote and local operations. You must be turned on how to an...
Intellisync User Guide
Page 35
...synchronizations take place without confirmation. For example, if the "Notify" Conflict Resolution setting is selected, you synchronize via modem, remote synchronizations entail a number of limitations. (Under some circumstances, synchronization is not possible.) Limitations when synchronizing via modem are sometimes ...prompted for access cannot be prompted to resolve data conflicts. Special Topics Remote vs. Local Synchronization When you run a synchronization locally, you are as follows: • If "Notify" is the ...
...synchronizations take place without confirmation. For example, if the "Notify" Conflict Resolution setting is selected, you synchronize via modem, remote synchronizations entail a number of limitations. (Under some circumstances, synchronization is not possible.) Limitations when synchronizing via modem are sometimes ...prompted for access cannot be prompted to resolve data conflicts. Special Topics Remote vs. Local Synchronization When you run a synchronization locally, you are as follows: • If "Notify" is the ...

Intellisync User Guide
Page 51
... Palm Desktop, 20 Completed To Do Items, 23 Configuration Dialog, 12 Configuration dialog box Advanced button, 19 Configure Icon, 8 Configuring a Synchronization, 12 conflict resolution and remote synchronization, 25 and the Notify setting, 26 Conflict Resolution dialog box, 26 arrow controls in, 26 buttons in, 27 Item box in, 26 options in...
... Palm Desktop, 20 Completed To Do Items, 23 Configuration Dialog, 12 Configuration dialog box Advanced button, 19 Configure Icon, 8 Configuring a Synchronization, 12 conflict resolution and remote synchronization, 25 and the Notify setting, 26 Conflict Resolution dialog box, 26 arrow controls in, 26 buttons in, 27 Item box in, 26 options in...
Intellisync User Guide
Page 52
...Translator, 18 Intellisync Program Group, 7 Intellisync Support Tool, 8 K key field, 51 key fields, 25 L log files, 47 locating and viewing, 47 reading, 48 Lotus Organizer addresses not transferring, 46 unable to access data file, 46 M mapped fields, 51 mapping and un-mapping fields, 29 multiple configurations, 32, 33 multi-user... Desktop, 32, 50 synchronizing after installing Intellisync, 9 Palm Desktop operations compared to Intellisync operations, 20 Pending To Do Items, 23 R Readme File, 8 Readme Icon, 8 remote synchronization and Notify Conflict Resolution setting, 37 limitations, 37 vs.
...Translator, 18 Intellisync Program Group, 7 Intellisync Support Tool, 8 K key field, 51 key fields, 25 L log files, 47 locating and viewing, 47 reading, 48 Lotus Organizer addresses not transferring, 46 unable to access data file, 46 M mapped fields, 51 mapping and un-mapping fields, 29 multiple configurations, 32, 33 multi-user... Desktop, 32, 50 synchronizing after installing Intellisync, 9 Palm Desktop operations compared to Intellisync operations, 20 Pending To Do Items, 23 R Readme File, 8 Readme Icon, 8 remote synchronization and Notify Conflict Resolution setting, 37 limitations, 37 vs.
Add-on Application Guide
Page 4
... Using your CLIÉ handheld as a remote commander (CLIÉ Remote Commander) What you can do with CLIÉ Remote Commander 62 Installing 63 Preparing the CLIÉ Remote Commander for your use 64 Assigning devices to the CLIÉ Remote Commander 64 Assigning operations to the application buttons... and Jog Dial navigator ........ 67 Using the CLIÉ handheld as a remote commander 69 Remote-controlling a device 69 Viewing the device name assigned to each quick...
... Using your CLIÉ handheld as a remote commander (CLIÉ Remote Commander) What you can do with CLIÉ Remote Commander 62 Installing 63 Preparing the CLIÉ Remote Commander for your use 64 Assigning devices to the CLIÉ Remote Commander 64 Assigning operations to the application buttons... and Jog Dial navigator ........ 67 Using the CLIÉ handheld as a remote commander 69 Remote-controlling a device 69 Viewing the device name assigned to each quick...
Add-on Application Guide
Page 5
... to read the online manual ..... 97 MS Import menu items 98 Chapter 9 Additional information Index 100 Appendix 102 Manufacturing companies supported by the CLIÉ Remote Commander application 102 5
... to read the online manual ..... 97 MS Import menu items 98 Chapter 9 Additional information Index 100 Appendix 102 Manufacturing companies supported by the CLIÉ Remote Commander application 102 5
Add-on Application Guide
Page 7
Points of difference between the two models are of PEG-T415, unless specified otherwise. All illustrations of the CLIÉ handheld (PEG-T615C and PEG-T415). I PictureGear™ Pocket/PhotoStand/PictureGear 4.4Lite I CLIÉ Paint I gMovie™ I World Alarm Clock I CLIÉ Remote Commander I Sound Utility/Sound Converter I MS Autorun I MS Import/Export The three manuals...
Points of difference between the two models are of PEG-T415, unless specified otherwise. All illustrations of the CLIÉ handheld (PEG-T615C and PEG-T415). I PictureGear™ Pocket/PhotoStand/PictureGear 4.4Lite I CLIÉ Paint I gMovie™ I World Alarm Clock I CLIÉ Remote Commander I Sound Utility/Sound Converter I MS Autorun I MS Import/Export The three manuals...

Add-on Application Guide
Page 61
Chapter 5 Using your CLIÉ handheld as a remote commander (CLIÉ Remote Commander) This chapter describes how to use your CLIÉ handheld as a remote commander to control various devices. Chapter 5
Chapter 5 Using your CLIÉ handheld as a remote commander (CLIÉ Remote Commander) This chapter describes how to use your CLIÉ handheld as a remote commander to control various devices. Chapter 5
Add-on Application Guide
Page 62
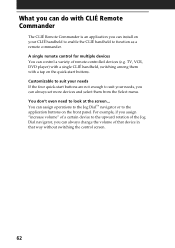
...DVD player) with a single CLIÉ handheld, switching among them with CLIÉ Remote Commander The CLIÉ Remote Commander is an application you can always change the volume of remote-controlled devices (e.g. A single remote control for multiple devices You can install on the front panel. What you can do with...on the quick-start buttons are not enough to suit your CLIÉ handheld to enable the CLIÉ handheld to function as a remote commander. You can assign operations to the Jog Dial™ navigator or to the application buttons on your needs, you can always set ...
...DVD player) with a single CLIÉ handheld, switching among them with CLIÉ Remote Commander The CLIÉ Remote Commander is an application you can always change the volume of remote-controlled devices (e.g. A single remote control for multiple devices You can install on the front panel. What you can do with...on the quick-start buttons are not enough to suit your CLIÉ handheld to enable the CLIÉ handheld to function as a remote commander. You can assign operations to the Jog Dial™ navigator or to the application buttons on your needs, you can always set ...
Add-on Application Guide
Page 63
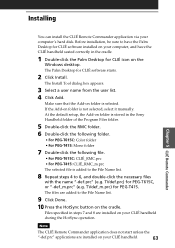
...installed on the cradle. If the Add-on folder is not selected, select it manually. Installing Chapter 5 CLIÉ Remote Commander You can install the CLIÉ Remote Commander application via your CLIÉ handheld. 63 Files specified in steps 7 and 8 are added to the File Name... in the Sony Handheld folder of the Program Files folder. 5 Double-click the RMC folder. 6 Double-click the following folder. • For PEG-T615C: Color folder • For PEG-T415: Mono folder 7 Double-click the following file. • For PEG-T615C: CLIÉ_RMC.prc • For PEG-T415: CLI...
...installed on the cradle. If the Add-on folder is not selected, select it manually. Installing Chapter 5 CLIÉ Remote Commander You can install the CLIÉ Remote Commander application via your CLIÉ handheld. 63 Files specified in steps 7 and 8 are added to the File Name... in the Sony Handheld folder of the Program Files folder. 5 Double-click the RMC folder. 6 Double-click the following folder. • For PEG-T615C: Color folder • For PEG-T415: Mono folder 7 Double-click the following file. • For PEG-T615C: CLIÉ_RMC.prc • For PEG-T415: CLI...
Add-on Application Guide
Page 64
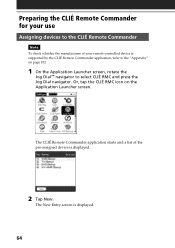
... application, refer to select CLIÉ RMC and press the Jog Dial navigator. Preparing the CLIÉ Remote Commander for your remote-controlled device is displayed. 64 Or, tap the CLIÉ RMC icon on page 102. 1 On the Application Launcher screen, rotate the Jog ...Dial™ navigator to the "Appendix" on the Application Launcher screen. The CLIÉ Remote Commander application starts and a list of your use Assigning devices to the CLIÉ Remote Commander Note To check whether the manufacturer of the pre-assigned device is displayed. 2 Tap New.
... application, refer to select CLIÉ RMC and press the Jog Dial navigator. Preparing the CLIÉ Remote Commander for your remote-controlled device is displayed. 64 Or, tap the CLIÉ RMC icon on page 102. 1 On the Application Launcher screen, rotate the Jog ...Dial™ navigator to the "Appendix" on the Application Launcher screen. The CLIÉ Remote Commander application starts and a list of your use Assigning devices to the CLIÉ Remote Commander Note To check whether the manufacturer of the pre-assigned device is displayed. 2 Tap New.

Add-on Application Guide
Page 65
...; Category: Select the device you wish to assign the device to 7. Chapter 5 CLIÉ Remote Commander Example of the remotecontrolled device from the drop-down list. • Mode: Select the remote control mode from the drop-down list (different models may require a different mode in the den).... quick-start buttons, tap Select on the control screen and repeat steps 2 to . The remote control setting is listed on the supported manufacturer list on page 102, some devices cannot be remote-controlled depending on /off). Choose the letter from the drop-down list, or select none....
...; Category: Select the device you wish to assign the device to 7. Chapter 5 CLIÉ Remote Commander Example of the remotecontrolled device from the drop-down list. • Mode: Select the remote control mode from the drop-down list (different models may require a different mode in the den).... quick-start buttons, tap Select on the control screen and repeat steps 2 to . The remote control setting is listed on the supported manufacturer list on page 102, some devices cannot be remote-controlled depending on /off). Choose the letter from the drop-down list, or select none....

Add-on Application Guide
Page 66
The Detail screen appears. 3 Make changes as necessary and tap OK. The CLIÉ RMC dialog box appears. 4 Tap OK. The new remote control setting is set, and the control screen for your use Changing the remote control setting 1 Tap Menu on the control screen of the device of "Changing the remote control setting" and tap OK. 66 Preparing the CLIÉ remote commander for the assigned device appears. Deleting a remote control setting Tap Delete in step 2 of which you want to change the remote control settings. 2 Tap Detail from the Options menu.
The Detail screen appears. 3 Make changes as necessary and tap OK. The CLIÉ RMC dialog box appears. 4 Tap OK. The new remote control setting is set, and the control screen for your use Changing the remote control setting 1 Tap Menu on the control screen of the device of "Changing the remote control setting" and tap OK. 66 Preparing the CLIÉ remote commander for the assigned device appears. Deleting a remote control setting Tap Delete in step 2 of which you want to change the remote control settings. 2 Tap Detail from the Options menu.
Add-on Application Guide
Page 67
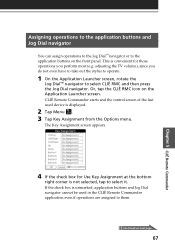
...the Jog Dial navigator. adjusting the TV volume), since you perform most (e.g. Or, tap the CLIÉ RMC icon on next page 67 CLIÉ Remote Commander starts and the control screen of the last used device is unmarked, application buttons and Jog Dial navigator cannot be used in the CLI...É Remote Commander application even if operations are assigned to the application buttons on the front panel. If the check box is displayed. 2 Tap Menu . 3 Tap Key...
...the Jog Dial navigator. adjusting the TV volume), since you perform most (e.g. Or, tap the CLIÉ RMC icon on next page 67 CLIÉ Remote Commander starts and the control screen of the last used device is unmarked, application buttons and Jog Dial navigator cannot be used in the CLI...É Remote Commander application even if operations are assigned to the application buttons on the front panel. If the check box is displayed. 2 Tap Menu . 3 Tap Key...
Add-on Application Guide
Page 68
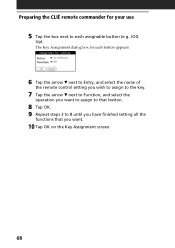
JOG Up). The Key Assignment dialog box for your use 5 Tap the box next to each button appears. 6 Tap the arrow V next to Entry, and select the name of the remote control setting you wish to assign to the key. 7 Tap the arrow V next to Function, and select the operation you want to assign to that button. 8 Tap OK. 9 Repeat steps 3 to 8 until you have finished setting all the functions that you want. 10 Tap OK on the Key Assignment screen. 68 Preparing the CLIÉ remote commander for each assignable button (e.g.
JOG Up). The Key Assignment dialog box for your use 5 Tap the box next to each button appears. 6 Tap the arrow V next to Entry, and select the name of the remote control setting you wish to assign to the key. 7 Tap the arrow V next to Function, and select the operation you want to assign to that button. 8 Tap OK. 9 Repeat steps 3 to 8 until you have finished setting all the functions that you want. 10 Tap OK on the Key Assignment screen. 68 Preparing the CLIÉ remote commander for each assignable button (e.g.

Add-on Application Guide
Page 69
... been deleted, the Select Control screen appears. 2 Perform either of the following to switch to the control screen of the device you are about to remote-control. • For devices assigned to a quick-start button: Tap the quick-start button to which it is approximately 5 meters, but it may ... setting from the control screen 1 On the Application Launcher screen, rotate the Jog Dial™ navigator to the application buttons, see page 67. Remote-controlling a device Operating a device from the list. Notes • Be sure to point the IR port of your CLIÉ handheld toward the device...
... been deleted, the Select Control screen appears. 2 Perform either of the following to switch to the control screen of the device you are about to remote-control. • For devices assigned to a quick-start button: Tap the quick-start button to which it is approximately 5 meters, but it may ... setting from the control screen 1 On the Application Launcher screen, rotate the Jog Dial™ navigator to the application buttons, see page 67. Remote-controlling a device Operating a device from the list. Notes • Be sure to point the IR port of your CLIÉ handheld toward the device...
Add-on Application Guide
Page 70
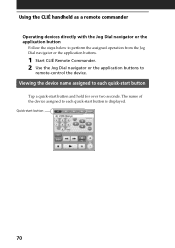
Using the CLIÉ handheld as a remote commander Operating devices directly with the Jog Dial navigator or the application button Follow the steps below to perform the assigned operation from the Jog Dial navigator or the application buttons. 1 Start CLIÉ Remote Commander. 2 Use the Jog Dial navigator or the application buttons to each quick-start button 70 Quick-start button is displayed. The name of the device assigned to each quick-start button Tap a quick-start button and hold for over two seconds. Viewing the device name assigned to remote-control the device.
Using the CLIÉ handheld as a remote commander Operating devices directly with the Jog Dial navigator or the application button Follow the steps below to perform the assigned operation from the Jog Dial navigator or the application buttons. 1 Start CLIÉ Remote Commander. 2 Use the Jog Dial navigator or the application buttons to each quick-start button 70 Quick-start button is displayed. The name of the device assigned to each quick-start button Tap a quick-start button and hold for over two seconds. Viewing the device name assigned to remote-control the device.