Limited Warranty Statement
Page 1
... replacement parts will supply, at no charge, new or rebuilt, at no charge, or pay for Products purchased in Read This First. You can extend the warranty period for a period of purchase. Limited Warranty Statement Sony Personal Entertainment Organizer Warranty The limited warranty on your hardware covers ...(12) months from date of purchase when the Product is registered prior to the expiry of ninety (90) days from SONY or a SONY authorized reseller, SONY will become the property of purchase when the Product is extendible only to the original purchaser, for an additional period of ...
... replacement parts will supply, at no charge, new or rebuilt, at no charge, or pay for Products purchased in Read This First. You can extend the warranty period for a period of purchase. Limited Warranty Statement Sony Personal Entertainment Organizer Warranty The limited warranty on your hardware covers ...(12) months from date of purchase when the Product is registered prior to the expiry of ninety (90) days from SONY or a SONY authorized reseller, SONY will become the property of purchase when the Product is extendible only to the original purchaser, for an additional period of ...

Intellisync User Guide
Page 23
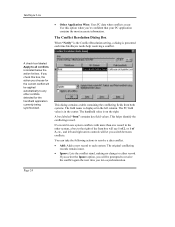
... conflict occurs, letting you decide which fields are as follows: • First run a remote synchronization with this option when you run synchronizations. • When new records have been added to each system since the last synchronization, but edited differently. (For example, if you have added an address record for Diana...an address record for Diana VanWinkle in your handheld, Intellisync does not recognize the names as follows: • Add All Conflicting Items: Creates a new record in each system containing mapped values from the record in key fields. should also match.
... conflict occurs, letting you decide which fields are as follows: • First run a remote synchronization with this option when you run synchronizations. • When new records have been added to each system since the last synchronization, but edited differently. (For example, if you have added an address record for Diana...an address record for Diana VanWinkle in your handheld, Intellisync does not recognize the names as follows: • Add All Conflicting Items: Creates a new record in each system containing mapped values from the record in key fields. should also match.
Intellisync User Guide
Page 24
... when you switch between conflicts. A box labeled "Item" contains key field values. You can take the following actions to resolve a data conflict. • Add: Adds a new record to either record. Page 24 A check box labeled Apply to the right of the Item box will say 1 of 2, or 1 of 3, etc., and left...
... when you switch between conflicts. A box labeled "Item" contains key field values. You can take the following actions to resolve a data conflict. • Add: Adds a new record to either record. Page 24 A check box labeled Apply to the right of the Item box will say 1 of 2, or 1 of 3, etc., and left...
Intellisync User Guide
Page 30
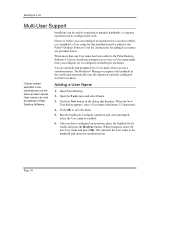
... Tools menu and select Users. 3. After you configure (or re-configure) an Intellisync operation. You are not the same as User names. When the New User dialog appears, enter a User name (maximum, 15 characters). 4. However, before you can only be used to select a User name each ....cradle and automatically runs the operation currently configured for that handheld must be configured for adding User names are provided below. Click the New button in its cradle and press the HotSync button. Instructions for each time you have configured an operation, place the handheld in ...
... Tools menu and select Users. 3. After you configure (or re-configure) an Intellisync operation. You are not the same as User names. When the New User dialog appears, enter a User name (maximum, 15 characters). 4. However, before you can only be used to select a User name each ....cradle and automatically runs the operation currently configured for that handheld must be configured for adding User names are provided below. Click the New button in its cradle and press the HotSync button. Instructions for each time you have configured an operation, place the handheld in ...
Intellisync User Guide
Page 39
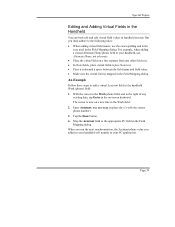
... virtual field names, use Alternate Home, not alternate. • Place the virtual field on a line separate from any existing data, tap Enter in the on a new line in the Work field. 2. Special Topics Editing and Adding Virtual Fields in the Handheld You can both edit and add virtual field values in...
... virtual field names, use Alternate Home, not alternate. • Place the virtual field on a line separate from any existing data, tap Enter in the on a new line in the Work field. 2. Special Topics Editing and Adding Virtual Fields in the Handheld You can both edit and add virtual field values in...

Intellisync User Guide
Page 42
... data is complete? During synchronization, I run a synchronization? If your handheld and PC are hooked up and down , and the COM port setting is to create a new file in your PC application and run another way to restore corrupted data, refer to "Full ReSynchronization" in Palm Desktop. (This can do to run...
... data is complete? During synchronization, I run a synchronization? If your handheld and PC are hooked up and down , and the COM port setting is to create a new file in your PC application and run another way to restore corrupted data, refer to "Full ReSynchronization" in Palm Desktop. (This can do to run...

Add-on Application Guide
Page 35
Chapter 2 CLIÉ Paint Drawing with CLIÉ Paint Elements of the edit screen 1 Menu Button Displays the menu screen. • New Image: Displays a new white background to draw on. • Load Image: Imports a PGP formatted image stored on next page 35 Continued on the CLIÉ ...Over-write: Over-writes the former image with the edited one (the former image will not remain). • Save As: Saves the edited image under a new name (the image before editing will remain). • : Shows the version information of the CLIÉ Paint application. 2 UNDO/REDO Cancels the last operation...
Chapter 2 CLIÉ Paint Drawing with CLIÉ Paint Elements of the edit screen 1 Menu Button Displays the menu screen. • New Image: Displays a new white background to draw on. • Load Image: Imports a PGP formatted image stored on next page 35 Continued on the CLIÉ ...Over-write: Over-writes the former image with the edited one (the former image will not remain). • Save As: Saves the edited image under a new name (the image before editing will remain). • : Shows the version information of the CLIÉ Paint application. 2 UNDO/REDO Cancels the last operation...
Add-on Application Guide
Page 39
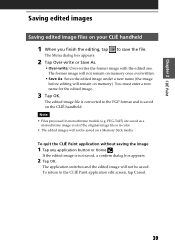
...quit the CLIÉ Paint application without saving the image 1 Tap any application button or Home . The edited image file is in monochrome models (e.g. PEG-T415) are saved as a monochrome image even if the original image file is converted to the CLIÉ Paint application edit screen, tap Cancel. ...image is saved on memory). To return to the PGP format and is not saved, a confirm dialog box appears. 2 Tap OK. You must enter a new name for the edited image. 3 Tap OK. Chapter 2 CLIÉ Paint Saving edited images Saving edited image files on a Memory Stick media. The application...
...quit the CLIÉ Paint application without saving the image 1 Tap any application button or Home . The edited image file is in monochrome models (e.g. PEG-T415) are saved as a monochrome image even if the original image file is converted to the CLIÉ Paint application edit screen, tap Cancel. ...image is saved on memory). To return to the PGP format and is not saved, a confirm dialog box appears. 2 Tap OK. You must enter a new name for the edited image. 3 Tap OK. Chapter 2 CLIÉ Paint Saving edited images Saving edited image files on a Memory Stick media. The application...
Add-on Application Guide
Page 64
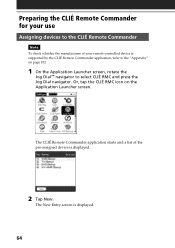
... the Jog Dial™ navigator to the CLIÉ Remote Commander Note To check whether the manufacturer of the pre-assigned device is displayed. 2 Tap New. The New Entry screen is supported by the CLIÉ Remote Commander application, refer to the "Appendix" on the Application Launcher screen. The CLIÉ Remote...
... the Jog Dial™ navigator to the CLIÉ Remote Commander Note To check whether the manufacturer of the pre-assigned device is displayed. 2 Tap New. The New Entry screen is supported by the CLIÉ Remote Commander application, refer to the "Appendix" on the Application Launcher screen. The CLIÉ Remote...

Add-on Application Guide
Page 66
The Detail screen appears. 3 Make changes as necessary and tap OK. The CLIÉ RMC dialog box appears. 4 Tap OK. The new remote control setting is set, and the control screen for your use Changing the remote control setting 1 Tap Menu on the control screen of the device of "Changing the remote control setting" and tap OK. 66 Preparing the CLIÉ remote commander for the assigned device appears. Deleting a remote control setting Tap Delete in step 2 of which you want to change the remote control settings. 2 Tap Detail from the Options menu.
The Detail screen appears. 3 Make changes as necessary and tap OK. The CLIÉ RMC dialog box appears. 4 Tap OK. The new remote control setting is set, and the control screen for your use Changing the remote control setting 1 Tap Menu on the control screen of the device of "Changing the remote control setting" and tap OK. 66 Preparing the CLIÉ remote commander for the assigned device appears. Deleting a remote control setting Tap Delete in step 2 of which you want to change the remote control settings. 2 Tap Detail from the Options menu.
CLIE Paint v1.0 Operating Instructions
Page 7
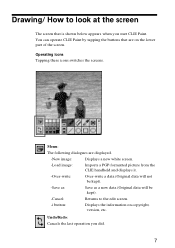
...screens. Undo/Redo: Cancels the last operation you start CLIE Paint. Drawing/ How to look at the screen The screen that are displayed. -New image: Displays a new white screen. -Load image: Imports a PGP-formatted picture from the CLIE handheld and displays it. -Over-write: Over-write a data (...Original data will not be kept). -Save as: Save as a new data (Original data will be kept). -Cancel: Returns to the edit screen. -i button: Displays the information on the lower part of the screen. ...
...screens. Undo/Redo: Cancels the last operation you start CLIE Paint. Drawing/ How to look at the screen The screen that are displayed. -New image: Displays a new white screen. -Load image: Imports a PGP-formatted picture from the CLIE handheld and displays it. -Over-write: Over-write a data (...Original data will not be kept). -Save as: Save as a new data (Original data will be kept). -Cancel: Returns to the edit screen. -i button: Displays the information on the lower part of the screen. ...

CLIE Paint v1.0 Operating Instructions
Page 11
... a picture, the dialogue box appears. When you edit and save the picture by writing it will not be saved in monochrome. Enter a name for the new data. 3 Tap [OK].
... a picture, the dialogue box appears. When you edit and save the picture by writing it will not be saved in monochrome. Enter a name for the new data. 3 Tap [OK].

PictureGear Pocket v2.1 Operating Instructions
Page 17
... a category name, tap Rename and enter a new category name. 4. If there are pictures in the selection mode. 2. Tap at the bottom of these pictures are organized by categories. 2 Viewing and Organizing Pictures PictureGear Pocket Organizing Pictures Sorting Pictures The stored pictures in the dialog...bottom of a picture 1. Select Edit categories ... To delete a category, select a category name and tap Delete. Select a new category from the category list in the selection modes. 2. Select a picture in the selection mode, then the Edit Categories dialog box is appeares...
... a category name, tap Rename and enter a new category name. 4. If there are pictures in the selection mode. 2. Tap at the bottom of these pictures are organized by categories. 2 Viewing and Organizing Pictures PictureGear Pocket Organizing Pictures Sorting Pictures The stored pictures in the dialog...bottom of a picture 1. Select Edit categories ... To delete a category, select a category name and tap Delete. Select a new category from the category list in the selection modes. 2. Select a picture in the selection mode, then the Edit Categories dialog box is appeares...
PictureGear Pocket v2.1 Operating Instructions
Page 29
... 0.5 , 0.6 , 2.2 , 2.3 , 2.4 Launch List Mode .......... Category (-list) .......... DSC 1.3 , 2.3 3.3 , 3.4 1.3 2.10 0.5 0.5 3.3 Enlarge/Reduce .......... 2.4 Full Screen Mode ....... 1.4 , 2.4 Home icon 0.5 Icon Beam Full Screen Mode ........ Trash Zoom Mode ........... Delete New Category Select Check Box CLIE Paint Comment .......... Display Mode DPOF format .......... Cursor 3.3 2.7 2.7 2.7 2.2 0.5 3.4 1.3 , 2.7 2.2 , 2.3 Date DCF Format ......... Preview Mode ........ 3.3 3.3 2.5 3.2 2.4 2.7 2.10 2.9 2.3 2.8 1.3 2.3 4.2 1.3 , 2.2 5.1 Zoom Mode...
... 0.5 , 0.6 , 2.2 , 2.3 , 2.4 Launch List Mode .......... Category (-list) .......... DSC 1.3 , 2.3 3.3 , 3.4 1.3 2.10 0.5 0.5 3.3 Enlarge/Reduce .......... 2.4 Full Screen Mode ....... 1.4 , 2.4 Home icon 0.5 Icon Beam Full Screen Mode ........ Trash Zoom Mode ........... Delete New Category Select Check Box CLIE Paint Comment .......... Display Mode DPOF format .......... Cursor 3.3 2.7 2.7 2.7 2.2 0.5 3.4 1.3 , 2.7 2.2 , 2.3 Date DCF Format ......... Preview Mode ........ 3.3 3.3 2.5 3.2 2.4 2.7 2.10 2.9 2.3 2.8 1.3 2.3 4.2 1.3 , 2.2 5.1 Zoom Mode...
Read This First Operating Instructions
Page 31
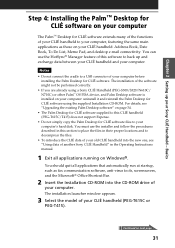
...Palm™ Desktop for CLIÉ software. For details, see "Using data of another Sony CLIÉ Handheld" in this software to a USB connector of your CLIÉ handheld to your CLIÉ handheld (PEG-T615C or PEG-T415). Notes • Do not connect the cradle to back up your CLIÉ ... the CLIÉ data of your old CLIÉ handheld into the new one, see "Upgrading the existing Palm Desktop software" on page 34. • The Palm Desktop for CLIÉ software supplied to this CLIÉ handheld (PEG-T615C/T415) does not support Expense. • Do not simply copy the...
...Palm™ Desktop for CLIÉ software. For details, see "Using data of another Sony CLIÉ Handheld" in this software to a USB connector of your CLIÉ handheld to your CLIÉ handheld (PEG-T615C or PEG-T415). Notes • Do not connect the cradle to back up your CLIÉ ... the CLIÉ data of your old CLIÉ handheld into the new one, see "Upgrading the existing Palm Desktop software" on page 34. • The Palm Desktop for CLIÉ software supplied to this CLIÉ handheld (PEG-T615C/T415) does not support Expense. • Do not simply copy the...

Read This First Operating Instructions
Page 34
...synchronize your CLIÉ handheld. 13 Click Finish. You can take advantage of Sony's commitment to make sure that you uninstall it is preserved when upgrading the Palm ...Book, Address Book, To Do List, and Memo Pad data in the PIM (Personal Information Management) applications, and then makes necessary changes to both contain the same data....Windows® applications including: - Lotus Organizer 5.0/6.0 During a HotSync operation, the Intellisync Lite software compares each record of information in your CLIÉ handheld to the new installation. Step 4: Installing the Palm&#...
...synchronize your CLIÉ handheld. 13 Click Finish. You can take advantage of Sony's commitment to make sure that you uninstall it is preserved when upgrading the Palm ...Book, Address Book, To Do List, and Memo Pad data in the PIM (Personal Information Management) applications, and then makes necessary changes to both contain the same data....Windows® applications including: - Lotus Organizer 5.0/6.0 During a HotSync operation, the Intellisync Lite software compares each record of information in your CLIÉ handheld to the new installation. Step 4: Installing the Palm&#...

Read This First Operating Instructions
Page 36
... the HotSync button on your computer, and back up the CLIÉ data on page 33. The USB Driver Installation Wizard starts automatically. 2 When the New User dialog box is a HotSync operation? Note Every handheld should have to synchronize data between your CLIÉ handheld and your computer screen, select the...
... the HotSync button on your computer, and back up the CLIÉ data on page 33. The USB Driver Installation Wizard starts automatically. 2 When the New User dialog box is a HotSync operation? Note Every handheld should have to synchronize data between your CLIÉ handheld and your computer screen, select the...

Memory Stick Autorun v1.3 Operating Instructions
Page 12
... the Auto-run Settings If you can change the setting to delete specific data, or to the existing auto-run settings, you need to add new database files to start the application in Memory Stick media by using the CLIE handheld. 1 From the Home screen, start MS Autorun. 2 Insert the Memory...
... the Auto-run Settings If you can change the setting to delete specific data, or to the existing auto-run settings, you need to add new database files to start the application in Memory Stick media by using the CLIE handheld. 1 From the Home screen, start MS Autorun. 2 Insert the Memory...

CLIE Remote Commander v1.0 Operating Instructions
Page 6
Or, tap the CLIÉ RMC icon on next page 6 Continued on the Application Launcher screen. The New Entry screen is displayed. 2 Tap New. Chapter 4 The CLIÉ Remote Commander application starts and a list of your remote-controlled device is supported by the CLIÉ Remote Commander application, refer ...
Or, tap the CLIÉ RMC icon on next page 6 Continued on the Application Launcher screen. The New Entry screen is displayed. 2 Tap New. Chapter 4 The CLIÉ Remote Commander application starts and a list of your remote-controlled device is supported by the CLIÉ Remote Commander application, refer ...

CLIE Remote Commander v1.0 Operating Instructions
Page 8
The CLIÉ RMC dialog box appears. 4 Tap OK. Deleting a remote control setting Tap Delete in step 2 of which you want to change the remote control settings. 2 Tap Detail from the Options menu. The new remote control setting is set, and the control screen for your use Changing the remote control setting 1 Tap Menu on the control screen of the device of "Changing the remote control setting" and tap OK. 8 Chapter 4 Preparing the CLIÉ Remote Commander for the assigned device appears. The Detail screen appears. 3 Make changes as necessary and tap OK.
The CLIÉ RMC dialog box appears. 4 Tap OK. Deleting a remote control setting Tap Delete in step 2 of which you want to change the remote control settings. 2 Tap Detail from the Options menu. The new remote control setting is set, and the control screen for your use Changing the remote control setting 1 Tap Menu on the control screen of the device of "Changing the remote control setting" and tap OK. 8 Chapter 4 Preparing the CLIÉ Remote Commander for the assigned device appears. The Detail screen appears. 3 Make changes as necessary and tap OK.

