Intellisync User Guide
Page 6
... hard disk space • 64 MB RAM • VGA monitor or better, 640 x 480 resolution • CD-ROM drive • One available USB or serial port • HotSync 3.0 installed System Requirements for Windows Me • 150-MHz Pentium-compatible processor or higher • 480 MB to 645...MB free hard-disk space • 32 MB of RAM or better • VGA or higher resolution monitor • CD-ROM drive • One available USB or serial port • HotSync 3.0 installed All systems Internet access with Internet Explorer 4.x or Netscape 3.x and higher (suggested). Page 6 In addition, you ...
... hard disk space • 64 MB RAM • VGA monitor or better, 640 x 480 resolution • CD-ROM drive • One available USB or serial port • HotSync 3.0 installed System Requirements for Windows Me • 150-MHz Pentium-compatible processor or higher • 480 MB to 645...MB free hard-disk space • 32 MB of RAM or better • VGA or higher resolution monitor • CD-ROM drive • One available USB or serial port • HotSync 3.0 installed All systems Internet access with Internet Explorer 4.x or Netscape 3.x and higher (suggested). Page 6 In addition, you ...

CLIE Handbook (primary manual)
Page 5
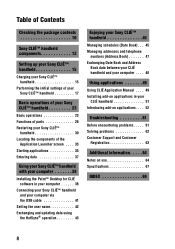
Exchanging and updating data using the HotSync® operation What is the HotSync® operation 45 Performing the HotSync® operation 47 Performing the HotSync® operation with the USB cable (Local HotSync 47 Using the Palm™ Desktop for CLIÉ software 49 Starting the Palm™ Desktop for CLIÉ software 49 Locating the Palm™ Desktop for CLIÉ software components 50 Basic operations of the Palm™ Desktop for CLIÉ software 51 Continued on next page 5
Exchanging and updating data using the HotSync® operation What is the HotSync® operation 45 Performing the HotSync® operation 47 Performing the HotSync® operation with the USB cable (Local HotSync 47 Using the Palm™ Desktop for CLIÉ software 49 Starting the Palm™ Desktop for CLIÉ software 49 Locating the Palm™ Desktop for CLIÉ software components 50 Basic operations of the Palm™ Desktop for CLIÉ software 51 Continued on next page 5

CLIE Handbook (primary manual)
Page 47
... (Local HotSync®) Performing the HotSync® operation with the USB cable. 2 Rotate the Jog Dial™ navigator to select [HotSync] icon on your CLIÉ ...the HotSync® completion is called a Local HotSync®. 1 Connect your CLIÉ handheld to your computer with the USB cable and plug adapter is displayed on the Application Launcher screen and press the Jog Dial™ navigator. The HotSync® ... and installations for the HotSync® operation, follow the procedure in "Setting up your Sony CLIÉ™ handheld" in "Read This First (Operating Instructions)."
... (Local HotSync®) Performing the HotSync® operation with the USB cable. 2 Rotate the Jog Dial™ navigator to select [HotSync] icon on your CLIÉ ...the HotSync® completion is called a Local HotSync®. 1 Connect your CLIÉ handheld to your computer with the USB cable and plug adapter is displayed on the Application Launcher screen and press the Jog Dial™ navigator. The HotSync® ... and installations for the HotSync® operation, follow the procedure in "Setting up your Sony CLIÉ™ handheld" in "Read This First (Operating Instructions)."

CLIE Handbook (primary manual)
Page 48
... Windows XP. If the HotSync® operation does not start the HotSync® operation. Check that the HotSync icon is displayed in Windows® XP), Sony Handheld and HotSync Manager. If your CLIÉ handheld until the HotSync® operation is complete as it may cause errors and the operation may... not close normally. Performing the HotSync® operation Note Do not remove the USB cable from your computer is turned to the power saving mode during the HotSync® operation.
... Windows XP. If the HotSync® operation does not start the HotSync® operation. Check that the HotSync icon is displayed in Windows® XP), Sony Handheld and HotSync Manager. If your CLIÉ handheld until the HotSync® operation is complete as it may cause errors and the operation may... not close normally. Performing the HotSync® operation Note Do not remove the USB cable from your computer is turned to the power saving mode during the HotSync® operation.
CLIE Handbook (primary manual)
Page 67
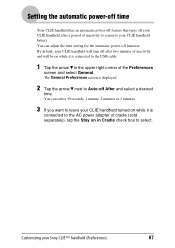
... select a desired time. You can select 30 seconds, 1 minute, 2 minutes or 3 minutes. 3 If you want to leave your Sony CLIÉ™ handheld (Preferences) 67 The General Preferences screen is connected to the USB cable. 1 Tap the arrow V in the upper right corner of inactivity and will be on in Cradle check...
... select a desired time. You can select 30 seconds, 1 minute, 2 minutes or 3 minutes. 3 If you want to leave your Sony CLIÉ™ handheld (Preferences) 67 The General Preferences screen is connected to the USB cable. 1 Tap the arrow V in the upper right corner of inactivity and will be on in Cradle check...

CLIE Handbook (primary manual)
Page 85
...® operations) This chapter explains how to perform the different methods of the HotSync® operations other than the local HotSync® operation using the USB cable and plug adapter, giving you broader usage of the HotSync® operations such as performing the HotSync® operation via LAN (LANSync 104
...® operations) This chapter explains how to perform the different methods of the HotSync® operations other than the local HotSync® operation using the USB cable and plug adapter, giving you broader usage of the HotSync® operations such as performing the HotSync® operation via LAN (LANSync 104

CLIE Handbook (primary manual)
Page 89
... computer as needed. • Serial port: Specifies the computer port that the serial port for the HotSync® operation cannot be shared with the supplied USB cable and plug adapter. 4 Click the Modem tab and select the setting for the network as needed. 6 Click OK to use, select Always available. •...
... computer as needed. • Serial port: Specifies the computer port that the serial port for the HotSync® operation cannot be shared with the supplied USB cable and plug adapter. 4 Click the Modem tab and select the setting for the network as needed. 6 Click OK to use, select Always available. •...

CLIE Handbook (primary manual)
Page 90
... the HotSync® operation without using the HotSync® operation (Other 90 HotSync® operations) Continued on next page Exchanging and updating data using the USB cable and plug adapter. For Windows 2000 Professional/Windows XP 1 Click the HotSync icon in the Control Panel. The IR HotSync® operation is available...
... the HotSync® operation without using the HotSync® operation (Other 90 HotSync® operations) Continued on next page Exchanging and updating data using the USB cable and plug adapter. For Windows 2000 Professional/Windows XP 1 Click the HotSync icon in the Control Panel. The IR HotSync® operation is available...

CLIE Handbook (primary manual)
Page 91
... Setup window is transferred. The IR HotSync® operation is enabled. Continued on page 92. Note When performing the local HotSync® operation with the USB cable and plug adapter after you set for an infrared port. Performing the IR HotSync® operation 2 Click the HotSync icon in the Windows Control...
... Setup window is transferred. The IR HotSync® operation is enabled. Continued on page 92. Note When performing the local HotSync® operation with the USB cable and plug adapter after you set for an infrared port. Performing the IR HotSync® operation 2 Click the HotSync icon in the Windows Control...

CLIE Handbook (primary manual)
Page 92
...will be unobstructed. 5 Tap the HotSync icon. To restore the local HotSync settings When performing the local HotSync® operation with the USB cable and plug adapter after you set for the IR HotSync® operation, you have prepared your computer setting, CLIÉ handheld ...HotSync settings. 1 Connect your CLIÉ handheld and your computer. 2 Click the HotSync icon in the Windows task tray and select Local USB from the HotSync Manager shortcut menu. Exchanging and updating data using the HotSync® operation (Other 92 HotSync® operations) The HotSync®...
...will be unobstructed. 5 Tap the HotSync icon. To restore the local HotSync settings When performing the local HotSync® operation with the USB cable and plug adapter after you set for the IR HotSync® operation, you have prepared your computer setting, CLIÉ handheld ...HotSync settings. 1 Connect your CLIÉ handheld and your computer. 2 Click the HotSync icon in the Windows task tray and select Local USB from the HotSync Manager shortcut menu. Exchanging and updating data using the HotSync® operation (Other 92 HotSync® operations) The HotSync®...

CLIE Handbook (primary manual)
Page 93
.../ or applications you need to "Customizing HotSync® Manager start-up and HotSync® setup options" on page 97. Exchanging and updating data using the USB cable and plug adapter (page 47). • It may take some time to synchronize data with the modem.
.../ or applications you need to "Customizing HotSync® Manager start-up and HotSync® setup options" on page 97. Exchanging and updating data using the USB cable and plug adapter (page 47). • It may take some time to synchronize data with the modem.

CLIE Handbook (primary manual)
Page 104
You can perform the HotSync® operation via LAN between your computer and another computer connected to the USB cable and plug adapter. LANSync via LAN (LANSync) To perform the LANSync, you must have network administrator skills. The Setup dialog box is properly connected ...
You can perform the HotSync® operation via LAN between your computer and another computer connected to the USB cable and plug adapter. LANSync via LAN (LANSync) To perform the LANSync, you must have network administrator skills. The Setup dialog box is properly connected ...

CLIE Handbook (primary manual)
Page 167
... a modem 93 Performing the HotSync® operation via a network 99 Performing the HotSync® operation via LAN 104 Performing the HotSync® operation with the USB cable (Local HotSync 47 Performing the IR HotSync® operation 90 Synchronizing with external data (File Link 88 What is the HotSync® operation? . . . .45...
... a modem 93 Performing the HotSync® operation via a network 99 Performing the HotSync® operation via LAN 104 Performing the HotSync® operation with the USB cable (Local HotSync 47 Performing the IR HotSync® operation 90 Synchronizing with external data (File Link 88 What is the HotSync® operation? . . . .45...
Read This First Operating Instructions
Page 8
...with your computer 38 Installing the Palm™ Desktop for CLIÉ software in your computer 38 Connecting your Sony CLIÉ™ handheld and your computer via the USB cable 41 Setting the user name 42 Exchanging and updating data using the HotSync® operation 43 Enjoying your... Sony CLIÉ™ handheld 45 Managing schedules (Date Book). . . 45 Managing addresses and telephone numbers (Address Book 47 ...
...with your computer 38 Installing the Palm™ Desktop for CLIÉ software in your computer 38 Connecting your Sony CLIÉ™ handheld and your computer via the USB cable 41 Setting the user name 42 Exchanging and updating data using the HotSync® operation 43 Enjoying your... Sony CLIÉ™ handheld 45 Managing schedules (Date Book). . . 45 Managing addresses and telephone numbers (Address Book 47 ...

Read This First Operating Instructions
Page 10
Checking the package contents Check the accessories in your CLIÉ handheld at the factory. 10 CLIÉ handheld (1) AC power adapter (1 : including AC cord) USB cable (1) Protective soft cover (1)* Plug adapter (1) Stylus (1)* Installation CD-ROM (1) * These are stored in the package first.
Checking the package contents Check the accessories in your CLIÉ handheld at the factory. 10 CLIÉ handheld (1) AC power adapter (1 : including AC cord) USB cable (1) Protective soft cover (1)* Plug adapter (1) Stylus (1)* Installation CD-ROM (1) * These are stored in the package first.

Read This First Operating Instructions
Page 38
... 3 Setting the user name Step 1: Installing the Palm™ Desktop for CLIÉ software in your computer Do not connect the USB cable to the USB port of your computer before installing the software. • If you are already using your CLIÉ handheld with a User Name in the ...Windows 2000 Professional or Windows XP, log on a computer, refer to your computer's hard disk. Using your Sony CLIÉ™ handheld with your computer Follow the steps below before using a Sony CLIÉ handheld, follow the procedures described in this section to upgrade to the new version of Palm&#...
... 3 Setting the user name Step 1: Installing the Palm™ Desktop for CLIÉ software in your computer Do not connect the USB cable to the USB port of your computer before installing the software. • If you are already using your CLIÉ handheld with a User Name in the ...Windows 2000 Professional or Windows XP, log on a computer, refer to your computer's hard disk. Using your Sony CLIÉ™ handheld with your computer Follow the steps below before using a Sony CLIÉ handheld, follow the procedures described in this section to upgrade to the new version of Palm&#...

Read This First Operating Instructions
Page 39
...É software. The Setup Type window is displayed. 5 Select the software you will use PEG-N710C or PEG-S300, refer to the official Sony CLIÉ™ website. (Refer to the back cover of your computer. Using your Sony CLIÉ™ handheld with your computer • If you use to synchronize your CLI... page 39 Continued on Windows®. The Connections window is displayed. The Ready to Install the Program window is displayed. 10 Select the connection type (USB), then click Next.
...É software. The Setup Type window is displayed. 5 Select the software you will use PEG-N710C or PEG-S300, refer to the official Sony CLIÉ™ website. (Refer to the back cover of your computer. Using your Sony CLIÉ™ handheld with your computer • If you use to synchronize your CLI... page 39 Continued on Windows®. The Connections window is displayed. The Ready to Install the Program window is displayed. 10 Select the connection type (USB), then click Next.

Read This First Operating Instructions
Page 41
...the mini "B" plug of the USB cable to the plug adapter 1, then connect the plug adapter to the USB port of your CLIÉ handheld 2. About the USB cable The supplied USB cable has two connectors. To the USB port of your CLIÉ handheld. Using your Sony CLIÉ™ handheld with ...your computer 2 Connect the "A" plug of the USB cable to the interface connector...
...the mini "B" plug of the USB cable to the plug adapter 1, then connect the plug adapter to the USB port of your CLIÉ handheld 2. About the USB cable The supplied USB cable has two connectors. To the USB port of your CLIÉ handheld. Using your Sony CLIÉ™ handheld with ...your computer 2 Connect the "A" plug of the USB cable to the interface connector...
Read This First Operating Instructions
Page 42
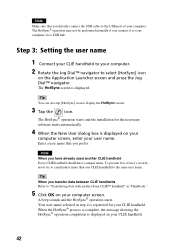
...data between CLIÉ handhelds Refer to "Transferring data with another CLIÉ handheld Every CLIÉ handheld should have already used another Sony CLIÉ™ handheld" in step 4 is registered for the necessary software starts automatically. 4 When the New User dialog box is ...displayed on your computer via a USB hub. When the HotSync® process is complete, the message showing the HotSync® operation completion is displayed. Tip You can also tap ...
...data between CLIÉ handhelds Refer to "Transferring data with another CLIÉ handheld Every CLIÉ handheld should have already used another Sony CLIÉ™ handheld" in step 4 is registered for the necessary software starts automatically. 4 When the New User dialog box is ...displayed on your computer via a USB hub. When the HotSync® process is complete, the message showing the HotSync® operation completion is displayed. Tip You can also tap ...

Read This First Operating Instructions
Page 66
...devices with your CLIÉ handheld, quit operating them immediately and charge your CLIÉ handheld. Then charge your CLIÉ handheld using the USB cable to make a backup of low remaining battery power is not a malfunction. 66 However, this occurs, perform the HotSync® operation to ...Remain icon reading at zero, connect your CLIÉ handheld in an uncharged state for "Memory Stick" media or backlight adjustment become unavailable. Sony recommends that warns of all of the stored data will be lost. Others Your CLIÉ handheld may be displayed on the screen, and...
...devices with your CLIÉ handheld, quit operating them immediately and charge your CLIÉ handheld. Then charge your CLIÉ handheld using the USB cable to make a backup of low remaining battery power is not a malfunction. 66 However, this occurs, perform the HotSync® operation to ...Remain icon reading at zero, connect your CLIÉ handheld in an uncharged state for "Memory Stick" media or backlight adjustment become unavailable. Sony recommends that warns of all of the stored data will be lost. Others Your CLIÉ handheld may be displayed on the screen, and...
