
Quick Start Guide
Page 24
... KEY Stand by mode. Press to place the computer into Stand by S keys Brightness DESCRIPTION Press to activate specific applications. Press again to increase (+) or decrease (-) the brightness of the LCD screen. 24 VAIO Computer Quick Start About the Keyboard Your VAIO® computer is supplied with your computer, see the section, "Connecting the Wireless Keyboard" on...
... KEY Stand by mode. Press to place the computer into Stand by S keys Brightness DESCRIPTION Press to activate specific applications. Press again to increase (+) or decrease (-) the brightness of the LCD screen. 24 VAIO Computer Quick Start About the Keyboard Your VAIO® computer is supplied with your computer, see the section, "Connecting the Wireless Keyboard" on...

Quick Start Guide
Page 25
... Press to resume normal operation. 25 Pressing other keys or using the mouse may not enable your computer to increase (+) or decrease (-) the speakers' volume. Pressing this key is equivalent to clicking Start on the computer screen. Direction arrows The Up, Down, Left, and Right arrow keys move the pointer on the taskbar...
... Press to resume normal operation. 25 Pressing other keys or using the mouse may not enable your computer to increase (+) or decrease (-) the speakers' volume. Pressing this key is equivalent to clicking Start on the computer screen. Direction arrows The Up, Down, Left, and Right arrow keys move the pointer on the taskbar...
Quick Start Guide
Page 31
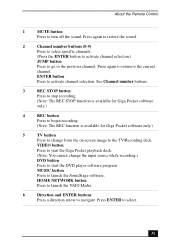
...input source while recording.) DVD button Press to the previous channel. ENTER button Press to navigate. HOME NETWORK button Press to launch the VAIO Media. 6 Direction and ENTER buttons Press a direction arrow to activate channel selection. Press again to restore the sound. 2 Channel number... DVD player software program. VIDEO button Press to start the Giga Pocket playback deck. (Note: You cannot change from the on-screen image to the current channel. Press ENTER to launch the SonicStage software. MUSIC button Press to select. 31 About the Remote Control...
...input source while recording.) DVD button Press to the previous channel. ENTER button Press to navigate. HOME NETWORK button Press to launch the VAIO Media. 6 Direction and ENTER buttons Press a direction arrow to activate channel selection. Press again to restore the sound. 2 Channel number... DVD player software program. VIDEO button Press to start the Giga Pocket playback deck. (Note: You cannot change from the on-screen image to the current channel. Press ENTER to launch the SonicStage software. MUSIC button Press to select. 31 About the Remote Control...
Quick Start Guide
Page 32
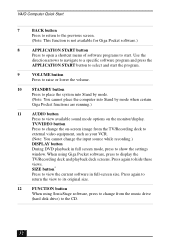
... navigate to a specific software program and press the APPLICATION START button to select and start . TV/VIDEO button Press to change the on-screen image from the TV/Recording deck to external video equipment, such as your VCR. (Note: You cannot change from the music drive (hard... disk drive) to view the current software in full screen mode, press to view available sound mode options on the monitor/display. VAIO Computer Quick Start 7 BACK button Press to return to the previous screen. (Note: This function is not available for Giga Pocket software.) 8 APPLICATION...
... navigate to a specific software program and press the APPLICATION START button to select and start . TV/VIDEO button Press to change the on-screen image from the TV/Recording deck to external video equipment, such as your VCR. (Note: You cannot change from the music drive (hard... disk drive) to view the current software in full screen mode, press to view available sound mode options on the monitor/display. VAIO Computer Quick Start 7 BACK button Press to return to the previous screen. (Note: This function is not available for Giga Pocket software.) 8 APPLICATION...

Quick Start Guide
Page 33
... selected models. ✍ For more than one software program is available for a software program. PREV and NEXT buttons Press to move back to the previous screen or forward to rewind or fast-forward. About the Remote Control 13 REW and FF buttons Press to the next... screen. STOP button Press to begin playback. Press the button again to hide this window.) 15 TOOLS button The function of software programs to close the ...
... selected models. ✍ For more than one software program is available for a software program. PREV and NEXT buttons Press to move back to the previous screen or forward to rewind or fast-forward. About the Remote Control 13 REW and FF buttons Press to the next... screen. STOP button Press to begin playback. Press the button again to hide this window.) 15 TOOLS button The function of software programs to close the ...

Quick Start Guide
Page 43
...benefits by registering your investment. Communicate with a Support Representative to troubleshoot problems you turn the computer on -screen instructions to register your computer the first time you may detect new hardware and prompt you are prompted to complete the .... Follow the on . Protect your computer: ❑ Sony Customer Support - When you start your computer. Respond to this direction Registering Your Computer Take advantage of Sony's commitment to the computer. Turning On Your Computer Turning On Your Computer Press the power button in this prompt...
...benefits by registering your investment. Communicate with a Support Representative to troubleshoot problems you turn the computer on -screen instructions to register your computer the first time you may detect new hardware and prompt you are prompted to complete the .... Follow the on . Protect your computer: ❑ Sony Customer Support - When you start your computer. Respond to this direction Registering Your Computer Take advantage of Sony's commitment to the computer. Turning On Your Computer Turning On Your Computer Press the power button in this prompt...

VAIO User Guide (primary manual)
Page 13
...you , with your feet are using the keyboard - Hold the mouse with the Giga Pocket® remote control. Position the unit so that your computer and at or a little below eye level. Keep your work surface large enough to 26 inches directly in a relaxed, comfortable position. Leave at least... should be visible in order to avoid bright spots on both sides of your arms and hands are in front of the screen at least 5 inches of clearance for your computer, communicates with a relaxed hand, and use of the mouse, keyboard, or joystick may make you arrange your work space: ...
...you , with your feet are using the keyboard - Hold the mouse with the Giga Pocket® remote control. Position the unit so that your computer and at or a little below eye level. Keep your work surface large enough to 26 inches directly in a relaxed, comfortable position. Leave at least... should be visible in order to avoid bright spots on both sides of your arms and hands are in front of the screen at least 5 inches of clearance for your computer, communicates with a relaxed hand, and use of the mouse, keyboard, or joystick may make you arrange your work space: ...

VAIO User Guide (primary manual)
Page 23
... the Wireless Keyboard. Brightness Press increase (+) or decrease (-) the brightness of the LCD screen. Direction arrows The Up, Down, Left, and Right arrow keys move the pointer on the computer screen. About the Keyboard Your VAIO® computer is supplied with each function key varies between software programs. Numeric keypad Use the numeric...again to perform basic math calculations. Wireless keyboard (top) KEY DESCRIPTION Stand by Press to activate specific applications. S keys Press to place the computer into Stand by mode. Mute Press to turn off speaker sound.
... the Wireless Keyboard. Brightness Press increase (+) or decrease (-) the brightness of the LCD screen. Direction arrows The Up, Down, Left, and Right arrow keys move the pointer on the computer screen. About the Keyboard Your VAIO® computer is supplied with each function key varies between software programs. Numeric keypad Use the numeric...again to perform basic math calculations. Wireless keyboard (top) KEY DESCRIPTION Stand by Press to activate specific applications. S keys Press to place the computer into Stand by mode. Mute Press to turn off speaker sound.

VAIO User Guide (primary manual)
Page 26
...again to enable the numeric keypad function. Press the Num Lock key to resume normal operation1. About the Keyboard Your VAIO® computer is supplied with your computer, see the section, Connecting the Wireless Keyboard. The task associated with each function key varies between software programs. ...Applications Page 26 Function The 12 function keys are used to place the computer into Stand by mode. Direction arrows The Up, Down, Left, and Right arrow keys move the pointer on the computer screen. Wireless keyboard (top) KEY DESCRIPTION Stand by Press to perform certain ...
...again to enable the numeric keypad function. Press the Num Lock key to resume normal operation1. About the Keyboard Your VAIO® computer is supplied with your computer, see the section, Connecting the Wireless Keyboard. The task associated with each function key varies between software programs. ...Applications Page 26 Function The 12 function keys are used to place the computer into Stand by mode. Direction arrows The Up, Down, Left, and Right arrow keys move the pointer on the computer screen. Wireless keyboard (top) KEY DESCRIPTION Stand by Press to perform certain ...

VAIO User Guide (primary manual)
Page 29
...CONNECT button Press to scroll up the wireless mouse Page 29 About the Mouse Your VAIO® computer is supplied with your VAIO® computer and the wireless mouse. Wireless m ouse (top) 1 Left mouse button Press to... perform specific mouse functions. 2 Wheel button Rotate the wheel to enable communication between your computer, see the section, Connecting the Wireless Mouse. Wireless m ouse (bottom ) 1 Power switch Slide power switch to turn the mouse on the LCD screen...
...CONNECT button Press to scroll up the wireless mouse Page 29 About the Mouse Your VAIO® computer is supplied with your VAIO® computer and the wireless mouse. Wireless m ouse (top) 1 Left mouse button Press to... perform specific mouse functions. 2 Wheel button Rotate the wheel to enable communication between your computer, see the section, Connecting the Wireless Mouse. Wireless m ouse (bottom ) 1 Power switch Slide power switch to turn the mouse on the LCD screen...

VAIO User Guide (primary manual)
Page 31
...screen. 3 Right mouse button Press to use the wireless optical mouse with a wireless optical mouse. To set up or down on or off. 2 CONNECT button Press to scroll up the wireless mouse Page 31 About the Mouse Your VAIO® computer is supplied with your VAIO® computer... and the wireless mouse. Wireless m ouse (top) 1 Left mouse button Press to perform specific mouse functions. 2 Wheel button Rotate the wheel to enable communication between your computer, see the section, ...
...screen. 3 Right mouse button Press to use the wireless optical mouse with a wireless optical mouse. To set up or down on or off. 2 CONNECT button Press to scroll up the wireless mouse Page 31 About the Mouse Your VAIO® computer is supplied with your VAIO® computer... and the wireless mouse. Wireless m ouse (top) 1 Left mouse button Press to perform specific mouse functions. 2 Wheel button Rotate the wheel to enable communication between your computer, see the section, ...

VAIO User Guide (primary manual)
Page 34
HOME NETWORK button Press to launch the VAIO Media. 6 Direction and ENTER buttons Press a direction arrow to select and start the program. Press ENTER to select. 7 BACK button Press to return to the previous screen. (Note: This function is available for Giga Pocket software.) 8 APPLICATION START ...APPLICATION START button to navigate. VIDEO button Press to start the Giga Pocket playback deck. (Note: You cannot change from the on-screen image to the TV/Recording deck. Page 34 MUSIC button Press to launch the SonicStage software. 3 REC STOP button Press to stop ...
HOME NETWORK button Press to launch the VAIO Media. 6 Direction and ENTER buttons Press a direction arrow to select and start the program. Press ENTER to select. 7 BACK button Press to return to the previous screen. (Note: This function is available for Giga Pocket software.) 8 APPLICATION START ...APPLICATION START button to navigate. VIDEO button Press to start the Giga Pocket playback deck. (Note: You cannot change from the on-screen image to the TV/Recording deck. Page 34 MUSIC button Press to launch the SonicStage software. 3 REC STOP button Press to stop ...

VAIO User Guide (primary manual)
Page 35
... to change the input source while recording.) DISPLAY button During DVD playback in full-screen size. PREV and NEXT buttons Press to move back to the previous screen or forward to begin playback. PLAY button Press to the next screen. Page 35 SIZE button1 Press to view the current software in full... Press to raise or lower the volume. 10 STANDBY button Press to place the system into Stand by mode. (Note: You cannot place the computer into Stand by mode when certain Giga Pocket functions are running.) 11 AUDIO button Press to display the TV/Recording deck and playback deck...
... to change the input source while recording.) DISPLAY button During DVD playback in full-screen size. PREV and NEXT buttons Press to move back to the previous screen or forward to begin playback. PLAY button Press to the next screen. Page 35 SIZE button1 Press to view the current software in full... Press to raise or lower the volume. 10 STANDBY button Press to place the system into Stand by mode. (Note: You cannot place the computer into Stand by mode when certain Giga Pocket functions are running.) 11 AUDIO button Press to display the TV/Recording deck and playback deck...

VAIO User Guide (primary manual)
Page 38
HOME NETWORK button Press to launch the VAIO Media. 6 Direction and ENTER buttons Press a direction arrow to start. Press ENTER to select. 7 BACK button Press to return to the previous screen. (Note: This function is available for Giga Pocket software.) 8 APPLICATION START button Press to open a shortcut ...the DVD player software program. VIDEO button Press to start the Giga Pocket playback deck. (Note: You cannot change from the on-screen image to select and start the program. Page 38 Use the direction arrows to navigate to a specific software program and press the ...
HOME NETWORK button Press to launch the VAIO Media. 6 Direction and ENTER buttons Press a direction arrow to start. Press ENTER to select. 7 BACK button Press to return to the previous screen. (Note: This function is available for Giga Pocket software.) 8 APPLICATION START button Press to open a shortcut ...the DVD player software program. VIDEO button Press to start the Giga Pocket playback deck. (Note: You cannot change from the on-screen image to select and start the program. Page 38 Use the direction arrows to navigate to a specific software program and press the ...

VAIO User Guide (primary manual)
Page 39
... again to return the view to its original size. 12 FUNCTION button When using Giga Pocket software, press to view the current software in full screen mode, press to show the settings window. 9 VOLUME button Press to raise or lower the volume. 10 STANDBY button Press to place the system... into Stand by mode. (Note: You cannot place the computer into Stand by mode when certain Giga Pocket functions are running.) 11 AUDIO button Press to view available sound mode options on -screen image from the TV/Recording deck to external video equipment, such as your VCR...
... again to return the view to its original size. 12 FUNCTION button When using Giga Pocket software, press to view the current software in full screen mode, press to show the settings window. 9 VOLUME button Press to raise or lower the volume. 10 STANDBY button Press to place the system... into Stand by mode. (Note: You cannot place the computer into Stand by mode when certain Giga Pocket functions are running.) 11 AUDIO button Press to view available sound mode options on -screen image from the TV/Recording deck to external video equipment, such as your VCR...

VAIO User Guide (primary manual)
Page 50
... and receive these benefits by registering your computer: Sony Customer Support - Page 50 You are not able to troubleshoot problems you may be having with additional registration opportunities later. Registering Your Computer Take advantage of Sony's commitment to register your computer the first time you turn on -screen instructions to complete the registration process. Protect...
... and receive these benefits by registering your computer: Sony Customer Support - Page 50 You are not able to troubleshoot problems you may be having with additional registration opportunities later. Registering Your Computer Take advantage of Sony's commitment to register your computer the first time you turn on -screen instructions to complete the registration process. Protect...

VAIO User Guide (primary manual)
Page 68
... at any other user account. For more information, see Giga Pocket Help. Use the default video resolution. Use the default factory settings (32-bit). Screen area - Setting up your display (monitor) When using the fast switch feature, Giga Pocket is not available to any given time.
... at any other user account. For more information, see Giga Pocket Help. Use the default video resolution. Use the default factory settings (32-bit). Screen area - Setting up your display (monitor) When using the fast switch feature, Giga Pocket is not available to any given time.

VAIO User Guide (primary manual)
Page 74
...due to an "Event buffer of the film roll using the scroll bar, you may not be able to see a displayed image. The computer's response may shift and split under the following circumstances: The input cable (coaxial or video cable) is connected to your...does not operate properly if used for external video recording. Giga Pocket may not record or display: The still images of a paused playback screen. A screen without images, such as DVgate Plus or Click to play a Video Capsule for the timer recording event, if there are other video applications, such...
...due to an "Event buffer of the film roll using the scroll bar, you may not be able to see a displayed image. The computer's response may shift and split under the following circumstances: The input cable (coaxial or video cable) is connected to your...does not operate properly if used for external video recording. Giga Pocket may not record or display: The still images of a paused playback screen. A screen without images, such as DVgate Plus or Click to play a Video Capsule for the timer recording event, if there are other video applications, such...

VAIO User Guide (primary manual)
Page 77
... select Giga Pocket. 2. Recording Mode Description Page 77 Select the desired option from the Select Timer Recording Settings menu and click Next. Follow the on-screen instructions. Click Help if you need more information about selecting timer recording settings. Set Channel, Start Date and Tim e 4. You can set the stop time...
... select Giga Pocket. 2. Recording Mode Description Page 77 Select the desired option from the Select Timer Recording Settings menu and click Next. Follow the on-screen instructions. Click Help if you need more information about selecting timer recording settings. Set Channel, Start Date and Tim e 4. You can set the stop time...

VAIO User Guide (primary manual)
Page 89
The Click to recordable DVD media. 1. Follow the on-screen instructions. The Click to DVD software must be installed in order to burn Video Capsules to DVD software program starts. On the Giga Pocket Explorer Toolbar, click . 3. From the Giga Pocket Explorer main window, select the Video Capsules you want to recordable DVD media with the Make DVD feature. Page 89 Recording Video Capsules onto recordable DVD media You can record Video Capsules to burn onto a recordable DVD. 2.
The Click to recordable DVD media. 1. Follow the on-screen instructions. The Click to DVD software must be installed in order to burn Video Capsules to DVD software program starts. On the Giga Pocket Explorer Toolbar, click . 3. From the Giga Pocket Explorer main window, select the Video Capsules you want to recordable DVD media with the Make DVD feature. Page 89 Recording Video Capsules onto recordable DVD media You can record Video Capsules to burn onto a recordable DVD. 2.


