PCV-RZ Series Hard Disk Drive Replacement Instructions
Page 1
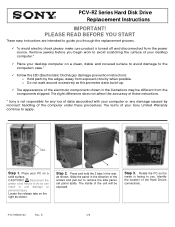
...to guide you . B 1/2 This slight difference does not affect the accuracy of these procedures. PCV-RZ Series Hard Disk Drive Replacement Instructions IMPORTANT! Place your desktop computer on a clean, stable and covered surface to avoid damage to apply. Remove jewelry before you ... of data associated with your Sony Limited Warranty continue to the computer's case.* 9 Follow the ESD (Electrostatic Discharge) damage prevention instructions: o Hold parts by incorrect handling of the computer under these instructions. * Sony is not responsible for any damage...
...to guide you . B 1/2 This slight difference does not affect the accuracy of these procedures. PCV-RZ Series Hard Disk Drive Replacement Instructions IMPORTANT! Place your desktop computer on a clean, stable and covered surface to avoid damage to apply. Remove jewelry before you ... of data associated with your Sony Limited Warranty continue to the computer's case.* 9 Follow the ESD (Electrostatic Discharge) damage prevention instructions: o Hold parts by incorrect handling of the computer under these instructions. * Sony is not responsible for any damage...
PCV-RZ Series Hard Disk Drive Replacement Instructions
Page 2
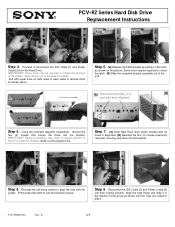
...being careful to align the rails with all 4 holes ( 2 on [B] each cable to disconnect the IDE Cable [1] and Power Cable [2] from the Hard Drive. Reconnect the IDE Cable [1] and Power Cable [2] into the bracket. Using the enclosed magnetic screwdriver, remove the four (4) screws that all holes in...Align the Side Panel and slide it in place. Proceed to remove them as shown on both sides of the Drive inside bracket with the guides. PCV-RZ Series Hard Disk Drive Replacement Instructions 1 [A] [B] 2 Step 4. P/N T99860132 Rev. Pull with equal force on the picture.
...being careful to align the rails with all 4 holes ( 2 on [B] each cable to disconnect the IDE Cable [1] and Power Cable [2] from the Hard Drive. Reconnect the IDE Cable [1] and Power Cable [2] into the bracket. Using the enclosed magnetic screwdriver, remove the four (4) screws that all holes in...Align the Side Panel and slide it in place. Proceed to remove them as shown on both sides of the Drive inside bracket with the guides. PCV-RZ Series Hard Disk Drive Replacement Instructions 1 [A] [B] 2 Step 4. P/N T99860132 Rev. Pull with equal force on the picture.

VAIO User Guide
Page 42
... the proper safety precautions when you replace the original hard disk drive, the preinstalled VAIO Recovery Wizard utility program cannot restore the drive partitions, operating system, or original software programs. Before replacing the hard disk drive, create a VAIO Recovery Media Kit or purchase a kit from Sony. See Before upgrading your Sony computer. Installing an additional hard disk drive 1. See Removing the side panel. 4. Click...
... the proper safety precautions when you replace the original hard disk drive, the preinstalled VAIO Recovery Wizard utility program cannot restore the drive partitions, operating system, or original software programs. Before replacing the hard disk drive, create a VAIO Recovery Media Kit or purchase a kit from Sony. See Before upgrading your Sony computer. Installing an additional hard disk drive 1. See Removing the side panel. 4. Click...

VAIO User Guide
Page 43
... the chassis. Slide the drive holder in your computer. 6. Connect the second drive connector to the drive holder. 10. Unlock the drive holder from the original hard disk drive that is supplied with the drive. Do not overtighten these screws when securing the drive to the new drive. Secure the drive to lock the drive into the drive holder and align the holes...
... the chassis. Slide the drive holder in your computer. 6. Connect the second drive connector to the drive holder. 10. Unlock the drive holder from the original hard disk drive that is supplied with the drive. Do not overtighten these screws when securing the drive to the new drive. Secure the drive to lock the drive into the drive holder and align the holes...

VAIO User Guide
Page 44
... s lot. 14. Replace the side panel. See Replacing the side panel. 15. Reconnect the power cord to display a shortcut menu. 7. A shortcut menu appears. 3. Right-click on the newly installed, unformatted hard disk (Disk label identified with removable media drives , s uc h as an extended partition in the Windows taskbar, then right-click My Computer. From the...
... s lot. 14. Replace the side panel. See Replacing the side panel. 15. Reconnect the power cord to display a shortcut menu. 7. A shortcut menu appears. 3. Right-click on the newly installed, unformatted hard disk (Disk label identified with removable media drives , s uc h as an extended partition in the Windows taskbar, then right-click My Computer. From the...


