System Reference Manual
Page 12
Upgrading and Maintaining Components 23 Removing the Side Panel 24 To remove the side panel (PCV-RZ series model 24 To remove the side panel (PCV-RX series model 25 Replacing the Side Panel 26 To replace the side panel (PCV-RZ series model 26 To replace the side panel (PCV-...Modules 39 Removing a Slot Cover 42 Covering an Open I/O Slot 43 Installing an Additional Hard Disk Drive 44 To identify additional hard disk space 48 Removing the Power Supply (PCV-RX series models 49 Replacing the Power Supply (PCV-RX series model 50 Chapter 4 - System Board 51 Memory Module (DDR-DIMM) ...
Upgrading and Maintaining Components 23 Removing the Side Panel 24 To remove the side panel (PCV-RZ series model 24 To remove the side panel (PCV-RX series model 25 Replacing the Side Panel 26 To replace the side panel (PCV-RZ series model 26 To replace the side panel (PCV-...Modules 39 Removing a Slot Cover 42 Covering an Open I/O Slot 43 Installing an Additional Hard Disk Drive 44 To identify additional hard disk space 48 Removing the Power Supply (PCV-RX series models 49 Replacing the Power Supply (PCV-RX series model 50 Chapter 4 - System Board 51 Memory Module (DDR-DIMM) ...

System Reference Manual
Page 61
... Connect the inner drive cable connector (B) to the first drive. 12 Connect the outer drive cable connector (C) to the second drive. 13 Connect the first power connector (D) to the first drive. 14 Connect the second power connector (E) to the second drive. 15 Replace the side panel (see "Replacing the Side Panel" on your computer. Upgrading and Maintaining Components...
... Connect the inner drive cable connector (B) to the first drive. 12 Connect the outer drive cable connector (C) to the second drive. 13 Connect the first power connector (D) to the first drive. 14 Connect the second power connector (E) to the second drive. 15 Replace the side panel (see "Replacing the Side Panel" on your computer. Upgrading and Maintaining Components...
System Reference Manual
Page 63
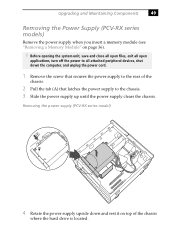
...Upgrading and Maintaining Components 49 Removing the Power Supply (PCV-RX series models) Remove the power supply when you insert a memory module (see "Removing a Memory Module" on top of the chassis. 2 Pull the tab (A) that latches the power supply to the rear of the chassis where the hard drive ...is located. Removing the power supply (PCV-RX series model) A 4 Rotate the power supply upside down the computer, and unplug the power cord. 1 Remove the screw that secures the power supply to the...
...Upgrading and Maintaining Components 49 Removing the Power Supply (PCV-RX series models) Remove the power supply when you insert a memory module (see "Removing a Memory Module" on top of the chassis. 2 Pull the tab (A) that latches the power supply to the rear of the chassis where the hard drive ...is located. Removing the power supply (PCV-RX series model) A 4 Rotate the power supply upside down the computer, and unplug the power cord. 1 Remove the screw that secures the power supply to the...

Online Help Center (VAIO User Guide)
Page 42
... the System Reference Manual from the Sony Web site at http://www.sony.com/pcsupport. Overview About the Side Panel About Add-on upgrading your computer, see your VAIO computer. For more information on Card Installation About Installing Memory About the Lithium Battery About Hard Disk Drive Installation Page 42 This section...
... the System Reference Manual from the Sony Web site at http://www.sony.com/pcsupport. Overview About the Side Panel About Add-on upgrading your computer, see your VAIO computer. For more information on Card Installation About Installing Memory About the Lithium Battery About Hard Disk Drive Installation Page 42 This section...
Online Help Center (VAIO User Guide)
Page 52
.... 4. The hard disk drive access light blinks when either internal hard disk drive is preinstalled in your computer. From the Sony support Web site: 1. Click the link for PCV-RX series models only) Unlock the drive holder from the submenu. 2. Observe the proper safety precautions when you upgrade your computer and any peripheral devices. 3. RZ series m odel) Page 52 Desktops and...
.... 4. The hard disk drive access light blinks when either internal hard disk drive is preinstalled in your computer. From the Sony support Web site: 1. Click the link for PCV-RX series models only) Unlock the drive holder from the submenu. 2. Observe the proper safety precautions when you upgrade your computer and any peripheral devices. 3. RZ series m odel) Page 52 Desktops and...
Marketing Specifications
Page 1
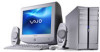
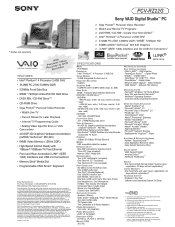
... titles pre-installed on the Sony Desktop Computer are trademarks of the International Energy...sony.com/vaio Computer Interface: The computer industry lacks standards, and therefore, there are trademarks of the hardware and software in U.S.A. 1/03 PCV-RZ22G Sony VAIO...Hard Drive capacity. Printed in each other factors may require additional upgrade. 3 Certain Features are approximate. RW / CD-RW - to DVDTM - write / 2X max. rewrite / 2X max. read ) CD-RW (16X max. read ) +RW (4X max. read) CD-ROM 40X max. CD-ROM Read FLOPPY DISK DRIVE 3.5" 1.44MB Floppy Disk Drive...
... titles pre-installed on the Sony Desktop Computer are trademarks of the International Energy...sony.com/vaio Computer Interface: The computer industry lacks standards, and therefore, there are trademarks of the hardware and software in U.S.A. 1/03 PCV-RZ22G Sony VAIO...Hard Drive capacity. Printed in each other factors may require additional upgrade. 3 Certain Features are approximate. RW / CD-RW - to DVDTM - write / 2X max. rewrite / 2X max. read ) CD-RW (16X max. read ) +RW (4X max. read) CD-ROM 40X max. CD-ROM Read FLOPPY DISK DRIVE 3.5" 1.44MB Floppy Disk Drive...


