System Reference Manual
Page 11
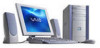
... Identifying Components 1 Front View...2 Drives ...3 Buttons and Switches 6 Indicators 7 Connectors 8 Rear View 10 Icons ...11 I/O Connectors 13 Expansion Slots 18 Remote Control 19 PCV-RX490TV 19 Chapter 2 - Contents Notice to Users ii Owner's Record ii Safety Information and Caution iii Regulatory Information v FCC Part 68 vi Telephone Consumer Protection... Act of Lithium Battery vii Industry Canada Notice ix Avis de L'industrie Canada ix Chapter 1 - Configuring Your System 21 Accessing the BIOS Setup Utility 22 Changing the Display's Power Management Settings 23 xi
... Identifying Components 1 Front View...2 Drives ...3 Buttons and Switches 6 Indicators 7 Connectors 8 Rear View 10 Icons ...11 I/O Connectors 13 Expansion Slots 18 Remote Control 19 PCV-RX490TV 19 Chapter 2 - Contents Notice to Users ii Owner's Record ii Safety Information and Caution iii Regulatory Information v FCC Part 68 vi Telephone Consumer Protection... Act of Lithium Battery vii Industry Canada Notice ix Avis de L'industrie Canada ix Chapter 1 - Configuring Your System 21 Accessing the BIOS Setup Utility 22 Changing the Display's Power Management Settings 23 xi

System Reference Manual
Page 14
xiv VAIO Digital Studio™ System Reference Manual Audio ...111 Communications 112 Giga Pocket I/O (PCV-RX490TV only 112 I/O and Expansion Slots 112 Floppy Disk Drive and Controller 113 Hard Drives and Controllers 113 Optical Drives 114 System BIOS 116 Index 117
xiv VAIO Digital Studio™ System Reference Manual Audio ...111 Communications 112 Giga Pocket I/O (PCV-RX490TV only 112 I/O and Expansion Slots 112 Floppy Disk Drive and Controller 113 Hard Drives and Controllers 113 Optical Drives 114 System BIOS 116 Index 117
System Reference Manual
Page 35
Chapter 2 Configuring Your System This chapter contains information on configuring your system can consist of the following: ❑ Making changes to the BIOS settings. ❑ Making changes to the display's power management settings. 21 Configuring your system.
Chapter 2 Configuring Your System This chapter contains information on configuring your system can consist of the following: ❑ Making changes to the BIOS settings. ❑ Making changes to the display's power management settings. 21 Configuring your system.

System Reference Manual
Page 36
... rebooting the system, save and close all open files, and exit open applications. 1 Reboot your computer by selecting Shut Down... Press ENTER to modify a setting. The following message appears at the bottom...a sub-menu of options is available. 22 VAIO Digital Studio™ System Reference Manual Accessing the BIOS Setup Utility You must access the BIOS Setup Utility to make changes to its left ... Restart. 2 When the Sony logo appears, press F3. If an item has a triangle ( ) to the BIOS settings (see "CMOS Setup Options" on page 85 for information on BIOS settings). ! Use the up...
... rebooting the system, save and close all open files, and exit open applications. 1 Reboot your computer by selecting Shut Down... Press ENTER to modify a setting. The following message appears at the bottom...a sub-menu of options is available. 22 VAIO Digital Studio™ System Reference Manual Accessing the BIOS Setup Utility You must access the BIOS Setup Utility to make changes to its left ... Restart. 2 When the Sony logo appears, press F3. If an item has a triangle ( ) to the BIOS settings (see "CMOS Setup Options" on page 85 for information on BIOS settings). ! Use the up...
System Reference Manual
Page 48
...not disassemble it or dispose of all the BIOS options to access the BIOS Setup Utility. Make a list of it off the computer and unplug the power cord. 7 Remove the side cover (see "Removing the Side Cover" on page 28). 34 VAIO Digital Studio™ System Reference Manual Replacing the Lithium... Battery ! You may be lost. Although the computer can skip all remaining steps. 3 Compare all the BIOS options that the settings will refer to this time, and you can...
...not disassemble it or dispose of all the BIOS options to access the BIOS Setup Utility. Make a list of it off the computer and unplug the power cord. 7 Remove the side cover (see "Removing the Side Cover" on page 28). 34 VAIO Digital Studio™ System Reference Manual Replacing the Lithium... Battery ! You may be lost. Although the computer can skip all remaining steps. 3 Compare all the BIOS options that the settings will refer to this time, and you can...
System Reference Manual
Page 50
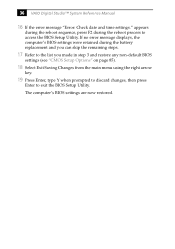
If no error message displays, the computer's BIOS settings were retained during the reboot process to exit the BIOS Setup Utility. 36 VAIO Digital Studio™ System Reference Manual 16 If the error message "Error: Check date and time settings." The computer's BIOS settings are now restored. appears during the reboot sequence, press F2 during the battery replacement and...
If no error message displays, the computer's BIOS settings were retained during the reboot process to exit the BIOS Setup Utility. 36 VAIO Digital Studio™ System Reference Manual 16 If the error message "Error: Check date and time settings." The computer's BIOS settings are now restored. appears during the reboot sequence, press F2 during the battery replacement and...

System Reference Manual
Page 51
..." on the handle at least 128 MB of the chassis to 512 MB. Hold the memory module only by its anti-static package. The BIOS automatically detects the type, size and speed of either RIMM or CRIMM modules. 2 If necessary, remove the memory module you purchased it through the... VAIO Direct Web site. ✍ Use only PC-800 Rambus RIMM memory modules. Direct Rambus RIMMS must be upgraded in card to the chassis. 7 Press down the computer, and unplug the power cord. 1 Choose the size of the AGP slot...
..." on the handle at least 128 MB of the chassis to 512 MB. Hold the memory module only by its anti-static package. The BIOS automatically detects the type, size and speed of either RIMM or CRIMM modules. 2 If necessary, remove the memory module you purchased it through the... VAIO Direct Web site. ✍ Use only PC-800 Rambus RIMM memory modules. Direct Rambus RIMMS must be upgraded in card to the chassis. 7 Press down the computer, and unplug the power cord. 1 Choose the size of the AGP slot...
System Reference Manual
Page 90
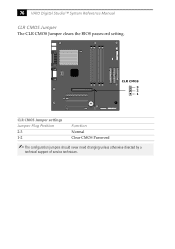
CLR CMOS 3 2 1 CLR CMOS Jumper settings Jumper Plug Position 2-3 1-2 Function Normal Clear CMOS Password ✍ The configuration jumpers should never need changing unless otherwise directed by a technical support of service technician. 76 VAIO Digital Studio™ System Reference Manual CLR CMOS Jumper The CLR CMOS Jumper clears the BIOS password setting.
CLR CMOS 3 2 1 CLR CMOS Jumper settings Jumper Plug Position 2-3 1-2 Function Normal Clear CMOS Password ✍ The configuration jumpers should never need changing unless otherwise directed by a technical support of service technician. 76 VAIO Digital Studio™ System Reference Manual CLR CMOS Jumper The CLR CMOS Jumper clears the BIOS password setting.
System Reference Manual
Page 99
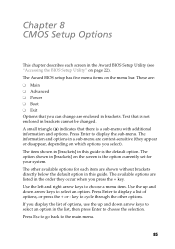
...options, or press the + or - The available options are listed in the order they appear or disappear, depending on page 22). The Award BIOS setup has five menu items on the screen is not enclosed in brackets cannot be changed. A small triangle ( ) indicates that is the ...option currently set for each screen in the Award BIOS Setup Utility (see "Accessing the BIOS Setup Utility" on which options you select). Chapter 8 CMOS Setup Options This chapter describes each item are shown without brackets directly...
...options, or press the + or - The available options are listed in the order they appear or disappear, depending on page 22). The Award BIOS setup has five menu items on the screen is not enclosed in brackets cannot be changed. A small triangle ( ) indicates that is the ...option currently set for each screen in the Award BIOS Setup Utility (see "Accessing the BIOS Setup Utility" on which options you select). Chapter 8 CMOS Setup Options This chapter describes each item are shown without brackets directly...

System Reference Manual
Page 101
CMOS Setup Options 87 Main Screen System Time [00:00:00] System Date [01/01/2001] Primary Master (see "IDE Sub-Menus" on page 88) Primary Slave (see "IDE Sub-Menus" on page 88) Secondary Master (see "IDE Sub-Menus" on page 88) Secondary Slave (see "IDE Sub-Menus" on page 88) Supervisor Password [Disabled] User Password [Disabled] Installed Memory 128 MB BIOS Revision/Version 1002 (depends on model)
CMOS Setup Options 87 Main Screen System Time [00:00:00] System Date [01/01/2001] Primary Master (see "IDE Sub-Menus" on page 88) Primary Slave (see "IDE Sub-Menus" on page 88) Secondary Master (see "IDE Sub-Menus" on page 88) Secondary Slave (see "IDE Sub-Menus" on page 88) Supervisor Password [Disabled] User Password [Disabled] Installed Memory 128 MB BIOS Revision/Version 1002 (depends on model)
System Reference Manual
Page 105
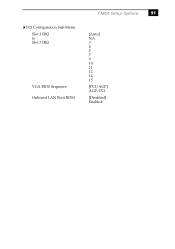
PCI Configuration Sub-Menu Slot 1 IRQ to Slot 3 IRQ VGA BIOS Sequence Onboard LAN Boot ROM CMOS Setup Options 91 [Auto] NA 3 4 5 7 9 10 11 12 14 15 [PCI/AGP] AGP/PCI [Disabled] Enabled
PCI Configuration Sub-Menu Slot 1 IRQ to Slot 3 IRQ VGA BIOS Sequence Onboard LAN Boot ROM CMOS Setup Options 91 [Auto] NA 3 4 5 7 9 10 11 12 14 15 [PCI/AGP] AGP/PCI [Disabled] Enabled
System Reference Manual
Page 120
...VAIO Digital Studio™ System Reference Manual PCV-RX490TV Address range 0xF0000000-0xF7FFFFFF 0xEF000000-0xEF00FFFF 0xEB800000-0xEDFFFFFF 0xEB800000-0xEDFFFFFF 0xED800000-0xED8000FF 0xEB800800-0xEB800FFF 0xEB804000-0xEB807FFF 0xEC000000-0xEC00FFFF 0xA0000-0xAFFFF 0xB0000-0xBFFFF 0xC0000-0xCBFFF 0xF0000-0xFFFFF 0x100000-0x7FFFFFF Default configuration NVIDIA GeForce2 MX (Sony) NVIDIA GeForce2 MX (Sony... Sony MPEG2 Encoder Board (WDM) NVIDIA GeForce2 MX (Sony) NVIDIA GeForce2 MX (Sony) NVIDIA GeForce2 MX (Sony) System board extension for ACPI BIOS System board extension for ACPI BIOS ...
...VAIO Digital Studio™ System Reference Manual PCV-RX490TV Address range 0xF0000000-0xF7FFFFFF 0xEF000000-0xEF00FFFF 0xEB800000-0xEDFFFFFF 0xEB800000-0xEDFFFFFF 0xED800000-0xED8000FF 0xEB800800-0xEB800FFF 0xEB804000-0xEB807FFF 0xEC000000-0xEC00FFFF 0xA0000-0xAFFFF 0xB0000-0xBFFFF 0xC0000-0xCBFFF 0xF0000-0xFFFFF 0x100000-0x7FFFFFF Default configuration NVIDIA GeForce2 MX (Sony) NVIDIA GeForce2 MX (Sony... Sony MPEG2 Encoder Board (WDM) NVIDIA GeForce2 MX (Sony) NVIDIA GeForce2 MX (Sony) NVIDIA GeForce2 MX (Sony) System board extension for ACPI BIOS System board extension for ACPI BIOS ...

System Reference Manual
Page 130
116 VAIO Digital Studio™ System Reference Manual System BIOS Make and model ROM Passwords Power management Advanced features Plug and Play devices Special features Award-based 2Mbit flash-ROM* User and supervisor passwords supported APM 1.2 ACPI-1.0 compliant hardware for use with APM and PNP BIOS APIs Supported with steerable DMA channels and interrupts PC-99 compliant, multi-boot, PCI add-in card auto-configure * Flash-ROM update utility is available from Sony's web site at http://www.sony.com/pcsupport.
116 VAIO Digital Studio™ System Reference Manual System BIOS Make and model ROM Passwords Power management Advanced features Plug and Play devices Special features Award-based 2Mbit flash-ROM* User and supervisor passwords supported APM 1.2 ACPI-1.0 compliant hardware for use with APM and PNP BIOS APIs Supported with steerable DMA channels and interrupts PC-99 compliant, multi-boot, PCI add-in card auto-configure * Flash-ROM update utility is available from Sony's web site at http://www.sony.com/pcsupport.

System Reference Manual
Page 131
..., power management 23 disposal of discs 3, 4, 114, 115 chipset specifications 109 CLR CMOS Jumper 76 CMOS - See Serial communications, specifications 112 computer lithium ion battery vii computer safety information ii configuring power management 23 connectors 4-pin on modem card 78, 79 AUX-IN 74 CD-IN 73 fan 69 game... USB 8, 63, 65 cover 29 removing 28 cover, slot 43 covering I/O slot 44 CPU - See lithium battery beep codes 97 BIOS Setup Utility See CMOS Setup Utility BIOS setup utility advanced screen 89 boot screen 93 exit screen 94 main screen 87 options 85 power screen 92 screens 85...
..., power management 23 disposal of discs 3, 4, 114, 115 chipset specifications 109 CLR CMOS Jumper 76 CMOS - See Serial communications, specifications 112 computer lithium ion battery vii computer safety information ii configuring power management 23 connectors 4-pin on modem card 78, 79 AUX-IN 74 CD-IN 73 fan 69 game... USB 8, 63, 65 cover 29 removing 28 cover, slot 43 covering I/O slot 44 CPU - See lithium battery beep codes 97 BIOS Setup Utility See CMOS Setup Utility BIOS setup utility advanced screen 89 boot screen 93 exit screen 94 main screen 87 options 85 power screen 92 screens 85...
System Reference Manual
Page 133
... 29 replacing lithium battery 34 resolution - See Serial slot - See graphics 119 RIMM - See I/O slot slot cover, removing 43 specifications AGP bus 109 audio 111 BIOS 116 chipset 109 communications 112 floppy disk drive and controller 113 Giga Pocket 112 graphics 110 hard drives and controllers 113 I /O connectors 13 icons 11...
... 29 replacing lithium battery 34 resolution - See Serial slot - See graphics 119 RIMM - See I/O slot slot cover, removing 43 specifications AGP bus 109 audio 111 BIOS 116 chipset 109 communications 112 floppy disk drive and controller 113 Giga Pocket 112 graphics 110 hard drives and controllers 113 I /O connectors 13 icons 11...


