PCV-RS Series Hard Disk Drive Replacement Instructions
Page 1
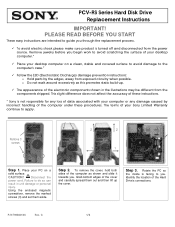
...the components shipped. To remove the cover, hold both sides of your desktop computer.* 9 Place your Sony Limited Warranty continue to guide you begin work to avoid scratching the surface of the computer as this promotes static build-up the cover. Remove jewelry before you ... to avoid damage to you . Step 2. Grab bottom edges of the cover and carefully spread them aside. Disconnect the power cord. C 1/2 PCV-RS Series Hard Disk Drive Replacement Instructions IMPORTANT! Remove 3 screws 2 2 1 1 Step 1. CAUTION! o Do not walk around excessively as shown and slide it...
...the components shipped. To remove the cover, hold both sides of your desktop computer.* 9 Place your Sony Limited Warranty continue to guide you begin work to avoid scratching the surface of the computer as this promotes static build-up the cover. Remove jewelry before you ... to avoid damage to you . Step 2. Grab bottom edges of the cover and carefully spread them aside. Disconnect the power cord. C 1/2 PCV-RS Series Hard Disk Drive Replacement Instructions IMPORTANT! Remove 3 screws 2 2 1 1 Step 1. CAUTION! o Do not walk around excessively as shown and slide it...
PCV-RS Series Hard Disk Drive Replacement Instructions
Page 2
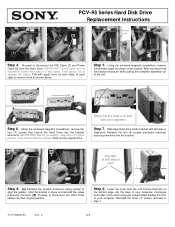
...5. With one hand hold the bracket enclosure while pulling the complete assembly out of the cables. Step 9. Compress both sides of your computer. Ensure that secure the Hard Drive into their original position. Reinstall the four (4) screws previously removed, securing new drive into the base... three (3) screws removed in place and reinstall the screw previously removed. [B] Proceed to initiate the removal of the unit. PCV-RS Series Hard Disk Drive Replacement Instructions Remove screw [2] [1] Step 4. Some force may be required to Reconnect the Hard Drive cables into the...
...5. With one hand hold the bracket enclosure while pulling the complete assembly out of the cables. Step 9. Compress both sides of your computer. Ensure that secure the Hard Drive into their original position. Reinstall the four (4) screws previously removed, securing new drive into the base... three (3) screws removed in place and reinstall the screw previously removed. [B] Proceed to initiate the removal of the unit. PCV-RS Series Hard Disk Drive Replacement Instructions Remove screw [2] [1] Step 4. Some force may be required to Reconnect the Hard Drive cables into the...

Quick Start Guide
Page 16
... Start in the Windows® taskbar. 2 Click Welcome to VAIO life. Other A software library, containing the Microsoft® software and Sony® end-user license agreements. 16 Hard Disk Drive Recovery Your computer is equipped with the VAIO Recovery Wizard, a utility program that recovers your computer. To access this online software information: 1 Click Start in the...
... Start in the Windows® taskbar. 2 Click Welcome to VAIO life. Other A software library, containing the Microsoft® software and Sony® end-user license agreements. 16 Hard Disk Drive Recovery Your computer is equipped with the VAIO Recovery Wizard, a utility program that recovers your computer. To access this online software information: 1 Click Start in the...
Quick Start Guide
Page 18
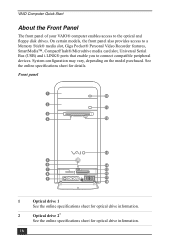
... drive 1 See the online specifications sheet for optical drive information. 2 Optical drive 2* See the online specifications sheet for details. VAIO Computer Quick Start About the Front Panel The front panel of your VAIO® computer enables access to connect compatible peripheral devices. On certain models, the front panel also provides access to a Memory Stick... features, SmartMedia™, CompactFlash®/Microdrive media card slot, Universal Serial Bus (USB) and i.LINK® ports that enable you to the optical and floppy disk drives.
... drive 1 See the online specifications sheet for optical drive information. 2 Optical drive 2* See the online specifications sheet for details. VAIO Computer Quick Start About the Front Panel The front panel of your VAIO® computer enables access to connect compatible peripheral devices. On certain models, the front panel also provides access to a Memory Stick... features, SmartMedia™, CompactFlash®/Microdrive media card slot, Universal Serial Bus (USB) and i.LINK® ports that enable you to the optical and floppy disk drives.

Quick Start Guide
Page 19
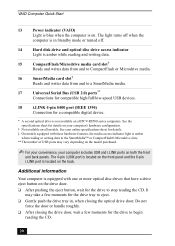
...Stand by mode. 7 Memory Stick media slot and access indicator† Reads and writes data from Optical drive 2. 12 Floppy disk eject button Ejects a floppy disk. 19 Composite audio L In jack† Connection for an S-video cable (optional). Composite video In jack† Connection ...Optical drive 1. 11 Optical drive 2 eject button Ejects a disc from and to a floppy disk. 5 Power button The power button turns the computer on/off. 6 Standby indicator Light is amber when the computer is amber when reading or writing data. 9 S-video In jack† Connection for an ...
...Stand by mode. 7 Memory Stick media slot and access indicator† Reads and writes data from Optical drive 2. 12 Floppy disk eject button Ejects a floppy disk. 19 Composite audio L In jack† Connection for an S-video cable (optional). Composite video In jack† Connection ...Optical drive 1. 11 Optical drive 2 eject button Ejects a disc from and to a floppy disk. 5 Power button The power button turns the computer on/off. 6 Standby indicator Light is amber when the computer is amber when reading or writing data. 9 S-video In jack† Connection for an ...
Quick Start Guide
Page 20
...computer includes USB and i.LINK ports on all PCV-RS500 series computers. Do not force the door or handle roughly. ❑ After closing the optical drive door. It may vary depending on the model purchased. ✍ For your convenience, your computer...for the drive to begin reading the CD. 20 VAIO Computer Quick Start 13 Power indicator (VAIO) Light is blue when the computer is on the drive door. ❑ After pushing...Gently push the drive tray in Standby mode or turned off. 14 Hard disk drive and optical disc drive access indicator Light is amber while reading and writing...
...computer includes USB and i.LINK ports on all PCV-RS500 series computers. Do not force the door or handle roughly. ❑ After closing the optical drive door. It may vary depending on the model purchased. ✍ For your convenience, your computer...for the drive to begin reading the CD. 20 VAIO Computer Quick Start 13 Power indicator (VAIO) Light is blue when the computer is on the drive door. ❑ After pushing...Gently push the drive tray in Standby mode or turned off. 14 Hard disk drive and optical disc drive access indicator Light is amber while reading and writing...
Quick Start Guide
Page 23
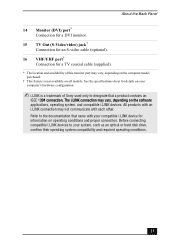
... (supplied). * The location and availability of this monitor port may vary, depending on the computer model purchased. † This feature is not available on your computer's hardware configuration. ✍ i.LINK is a trademark of Sony used only to designate that came with each other. See the specifications sheet for details on ...the software applications, operating system, and compatible i.LINK devices. Before connecting compatible i.LINK devices to your system, such as an optical or hard disk drive, confirm their operating system compatibility and required operating conditions. 23
... (supplied). * The location and availability of this monitor port may vary, depending on the computer model purchased. † This feature is not available on your computer's hardware configuration. ✍ i.LINK is a trademark of Sony used only to designate that came with each other. See the specifications sheet for details on ...the software applications, operating system, and compatible i.LINK devices. Before connecting compatible i.LINK devices to your system, such as an optical or hard disk drive, confirm their operating system compatibility and required operating conditions. 23
Quick Start Guide
Page 28
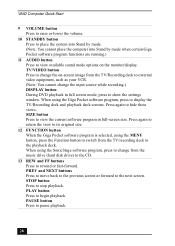
...as your VCR. (Note: You cannot change from the TV/recording deck to rewind or fast-forward. VAIO Computer Quick Start 9 VOLUME button Press to raise or lower the volume. 10 STANDBY button Press to place ...the system into Stand by mode. (Note: You cannot place the computer into Stand by mode when certain Giga Pocket software program functions are running.) 11 AUDIO button Press.... When using the MENU button, press the Function button to switch from the music drive (hard disk drive) to the CD. 13 REW and FF buttons Press to the playback deck. Press again ...
...as your VCR. (Note: You cannot change from the TV/recording deck to rewind or fast-forward. VAIO Computer Quick Start 9 VOLUME button Press to raise or lower the volume. 10 STANDBY button Press to place ...the system into Stand by mode. (Note: You cannot place the computer into Stand by mode when certain Giga Pocket software program functions are running.) 11 AUDIO button Press.... When using the MENU button, press the Function button to switch from the music drive (hard disk drive) to the CD. 13 REW and FF buttons Press to the playback deck. Press again ...

Quick Start Guide
Page 39
...in Stand by mode by pressing any key on other troubleshooting topics, see the online VAIO® Computer User Guide. You can purchase this equipment separately. 39 My computer does not start. ❑ Verify that the computer is plugged into a power source and that it is plugged into an appropriate power ... the monitor is turned on . Check that the power indicator is lit on the front panel of the computer. ❑ Confirm that a disk is not in the floppy disk drive* (unless you are using a bootable floppy disk). ❑ Confirm that a CD is not in an optical drive (unless you plugged the...
...in Stand by mode by pressing any key on other troubleshooting topics, see the online VAIO® Computer User Guide. You can purchase this equipment separately. 39 My computer does not start. ❑ Verify that the computer is plugged into a power source and that it is plugged into an appropriate power ... the monitor is turned on . Check that the power indicator is lit on the front panel of the computer. ❑ Confirm that a disk is not in the floppy disk drive* (unless you are using a bootable floppy disk). ❑ Confirm that a CD is not in an optical drive (unless you plugged the...

VAIO User Guide (primary manual)
Page 4
... software on your computer's operating system and preinstalled software. 1. Hard Disk Drive Recovery Your computer is equipped with the VAIO Recovery Wizard, a utility program that recovers your computer. Other A software library, containing the Microsoft® software and Sony® end-user... sheet describes the hardware and software configuration of your VAIO computer.To access this online software information: 1. For more information about hard disk recovery 1. From the VAIO Help And Support Center menu, click VAIO User Guide. Specifications - Page 4 To...
... software on your computer's operating system and preinstalled software. 1. Hard Disk Drive Recovery Your computer is equipped with the VAIO Recovery Wizard, a utility program that recovers your computer. Other A software library, containing the Microsoft® software and Sony® end-user... sheet describes the hardware and software configuration of your VAIO computer.To access this online software information: 1. For more information about hard disk recovery 1. From the VAIO Help And Support Center menu, click VAIO User Guide. Specifications - Page 4 To...

VAIO User Guide (primary manual)
Page 7
... access indicator Light is green while reading and writing data from and to a floppy disk. 5 Power button The power button turns the computer on the model purchased. About the Front Panel The front panel of your VAIO® computer enables access to connect compatible peripheral devices. Front panel 1 Optical drive 1 See the online specifications...
... access indicator Light is green while reading and writing data from and to a floppy disk. 5 Power button The power button turns the computer on the model purchased. About the Front Panel The front panel of your VAIO® computer enables access to connect compatible peripheral devices. Front panel 1 Optical drive 1 See the online specifications...

VAIO User Guide (primary manual)
Page 8
...The light turns off . 14 Hard disk drive and optical disc drive access indicator Light is amber while reading and writing data. Page 8 6 Standby indicator Light is amber when the computer is in Standby mode or turned off when the computer is in Stand by mode. 7 Memory... Stick media slot and access indicator2 Reads and writes data from Optical drive 2. 12 Floppy disk eject button Ejects a floppy disk. 13 Power indicator (VAIO) Light is blue when the computer is amber when reading or writing data. 9 S-video In jack1 Connection for a video cable (optional). ...
...The light turns off . 14 Hard disk drive and optical disc drive access indicator Light is amber while reading and writing data. Page 8 6 Standby indicator Light is amber when the computer is in Standby mode or turned off when the computer is in Stand by mode. 7 Memory... Stick media slot and access indicator2 Reads and writes data from Optical drive 2. 12 Floppy disk eject button Ejects a floppy disk. 13 Power indicator (VAIO) Light is blue when the computer is amber when reading or writing data. 9 S-video In jack1 Connection for a video cable (optional). ...

VAIO User Guide (primary manual)
Page 12
... devices to your compatible i.LINK device for a TV coaxial cable (supplied). 1 T his monitor port is a trademark of Sony used only to the documentation that came with your system, such as an optical or hard disk drive, confirm their operating system compatibility and required operating conditions. All products with an i.LINK connection may...
... devices to your compatible i.LINK device for a TV coaxial cable (supplied). 1 T his monitor port is a trademark of Sony used only to the documentation that came with your system, such as an optical or hard disk drive, confirm their operating system compatibility and required operating conditions. All products with an i.LINK connection may...

VAIO User Guide (primary manual)
Page 17
...FUNCTION button When the Giga Pocket software program is selected, using the MENU button, press the Function button to switch from the music drive (hard disk drive) to the CD. 13 REW and FF buttons Press to rewind or fast-forward. When using the Giga Pocket software program, press to ...button Press to raise or lower the volume. 10 STANDBY button Press to place the system into Stand by mode. (Note: You cannot place the computer into Stand by mode when certain Giga Pocket software program functions are running.) 11 AUDIO button Press to view available sound mode options on -screen...
...FUNCTION button When the Giga Pocket software program is selected, using the MENU button, press the Function button to switch from the music drive (hard disk drive) to the CD. 13 REW and FF buttons Press to rewind or fast-forward. When using the Giga Pocket software program, press to ...button Press to raise or lower the volume. 10 STANDBY button Press to place the system into Stand by mode. (Note: You cannot place the computer into Stand by mode when certain Giga Pocket software program functions are running.) 11 AUDIO button Press to view available sound mode options on -screen...

VAIO User Guide (primary manual)
Page 31
...designed for viewing with your Giga Pocket® contents and transfer them onto the hard disk drive as modified Playlists. Page 31 You can change the format your Sony CLIÉ Handheld. Accessing the Giga Pocket Help For more information about the software and... network to modify timer recordings. Timer Recording Wizard - The Giga Pocket Server enables multiple computers on your computer's display and record them onto a Memory Stick® media for your computer's drive D, in a folder named D:\Giga Pocket V5. The Timer Recording Manager keeps track of...
...designed for viewing with your Giga Pocket® contents and transfer them onto the hard disk drive as modified Playlists. Page 31 You can change the format your Sony CLIÉ Handheld. Accessing the Giga Pocket Help For more information about the software and... network to modify timer recordings. Timer Recording Wizard - The Giga Pocket Server enables multiple computers on your computer's display and record them onto a Memory Stick® media for your computer's drive D, in a folder named D:\Giga Pocket V5. The Timer Recording Manager keeps track of...

VAIO User Guide (primary manual)
Page 43
Giga Pocket Giga Pocket® enables you can view a program from the beginning even while it onto your hard disk drive. Using the Giga Pocket Slip Play feature, you to watch a TV program on your computer display while recording it is being recorded. Page 43
Giga Pocket Giga Pocket® enables you can view a program from the beginning even while it onto your hard disk drive. Using the Giga Pocket Slip Play feature, you to watch a TV program on your computer display while recording it is being recorded. Page 43

VAIO User Guide (primary manual)
Page 51
...New Tim er Recording - Set Details Page 51 High Quality (HQ) Image quality is reduced, but recording requires more space on the hard disk drive as compared to using SP or LP recording modes (MPEG-2). automatically programmed into the Timer Recording Wizard. Verify the stop time is automatically...into the appropriate Timer Recording Wizard fields. 5. Long Play (LP) Image quality is improved, but recording requires less space on the hard disk drive as compared to using HQ recording mode (MPEG-1). Select how often you can set the stop time for your timer recording and ...
...New Tim er Recording - Set Details Page 51 High Quality (HQ) Image quality is reduced, but recording requires more space on the hard disk drive as compared to using SP or LP recording modes (MPEG-2). automatically programmed into the Timer Recording Wizard. Verify the stop time is automatically...into the appropriate Timer Recording Wizard fields. 5. Long Play (LP) Image quality is improved, but recording requires less space on the hard disk drive as compared to using HQ recording mode (MPEG-1). Select how often you can set the stop time for your timer recording and ...

VAIO User Guide (primary manual)
Page 52
... for your Video Capsules to review your setting preferences. New Tim er Recording - Confirm dialog box appears. Confirm 9. To maintain adequate space on your hard disk drive, using the Expiration date of Video Capsule drop-down list. Click Finish. Click Decide to be automatically deleted from your hard...
... for your Video Capsules to review your setting preferences. New Tim er Recording - Confirm dialog box appears. Confirm 9. To maintain adequate space on your hard disk drive, using the Expiration date of Video Capsule drop-down list. Click Finish. Click Decide to be automatically deleted from your hard...

VAIO User Guide (primary manual)
Page 53
...actual time set. Click Start in mind when setting up , changing, or deleting timer recordings. All activities that may access the hard disk drive, such as a daily or weekly recorded event. Please keep this in the Windows® taskbar and select All Programs. 2. Giga Pocket ...as 60 seconds sooner than the set start time. Select Giga Pocket, Help, and click Giga Pocket Help. You may end as early as hard disk drive space becomes available. Approximately three minutes before Giga Pocket begins a timer recording and during a timer recording, you must avoid: ...
...actual time set. Click Start in mind when setting up , changing, or deleting timer recordings. All activities that may access the hard disk drive, such as a daily or weekly recorded event. Please keep this in the Windows® taskbar and select All Programs. 2. Giga Pocket ...as 60 seconds sooner than the set start time. Select Giga Pocket, Help, and click Giga Pocket Help. You may end as early as hard disk drive space becomes available. Approximately three minutes before Giga Pocket begins a timer recording and during a timer recording, you must avoid: ...

VAIO User Guide (primary manual)
Page 56
...you set to begin. The Timer Recording Manager icon appears in the Windows® taskbar. Before changing the computer's clock setting, verify that may access your computer's hard disk drive during the timer recording. If you are no timer recordings set the timer recording settings with... not in the Windows® taskbar and select All Programs. 2. Restart Timer Recording Manager after you have changed right before changing the computer's clock setting. Click Start in active use. Disable screensavers and any desired changes or cancellations. 2. Double-click on and...
...you set to begin. The Timer Recording Manager icon appears in the Windows® taskbar. Before changing the computer's clock setting, verify that may access your computer's hard disk drive during the timer recording. If you are no timer recordings set the timer recording settings with... not in the Windows® taskbar and select All Programs. 2. Restart Timer Recording Manager after you have changed right before changing the computer's clock setting. Click Start in active use. Disable screensavers and any desired changes or cancellations. 2. Double-click on and...


