Quick Start Guide
Page 14
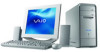
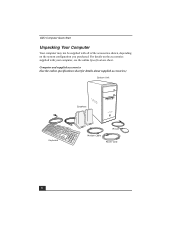
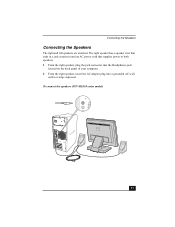
VAIO Computer Quick Start Unpacking Your Computer Your computer may not be supplied with all of the accessories shown, depending on the accessories supplied with your computer, see the online Specifications sheet. For details on the system configuration you purchased. Computer and supplied accessories (See the online specifications sheet for details about supplied accessories.) System Unit Speakers Keyboard Mouse Modem Cable Power Cord 14
VAIO Computer Quick Start Unpacking Your Computer Your computer may not be supplied with all of the accessories shown, depending on the accessories supplied with your computer, see the online Specifications sheet. For details on the system configuration you purchased. Computer and supplied accessories (See the online specifications sheet for details about supplied accessories.) System Unit Speakers Keyboard Mouse Modem Cable Power Cord 14
Quick Start Guide
Page 20
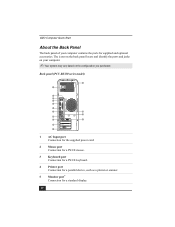
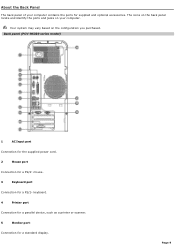
...PCV-RS320 series model) 12 1 2 3 4 5 6 7 13 14 8 9 MONITOR 15 10 11 1 AC Input port Connection for the supplied power cord. 2 Mouse port Connection for a PS/2® mouse. 3 Keyboard port Connection for a PS/2® keyboard. 4 Printer port Connection for a parallel device, such as a printer or scanner. 5 Monitor port* Connection for supplied... and optional accessories. The icons on the back panel locate and identify the ports and jacks on your computer contains the ports for a standard display. 20 VAIO Computer Quick Start About the...
...PCV-RS320 series model) 12 1 2 3 4 5 6 7 13 14 8 9 MONITOR 15 10 11 1 AC Input port Connection for the supplied power cord. 2 Mouse port Connection for a PS/2® mouse. 3 Keyboard port Connection for a PS/2® keyboard. 4 Printer port Connection for a parallel device, such as a printer or scanner. 5 Monitor port* Connection for supplied... and optional accessories. The icons on the back panel locate and identify the ports and jacks on your computer contains the ports for a standard display. 20 VAIO Computer Quick Start About the...

Quick Start Guide
Page 21
...(DVI) port† Connection for a DVI monitor. 10 Telephone jack Connection for a telephone cable (optional) to the computer. 11 Modem line jack Connection for a standard display. * On some models, the monitor port may have a cover and ...15 Monitor port** Connection for the modem cable to audio stereo speakers. Audio stereo speakers which require a speaker power cable may be purchased separately. ** On some models, this monitor port may be in a different location. 21... high/full/low-speed USB devices. 8 Microphone jack Connection for the supplied speakers or optional headphones.
...(DVI) port† Connection for a DVI monitor. 10 Telephone jack Connection for a telephone cable (optional) to the computer. 11 Modem line jack Connection for a standard display. * On some models, the monitor port may have a cover and ...15 Monitor port** Connection for the modem cable to audio stereo speakers. Audio stereo speakers which require a speaker power cable may be purchased separately. ** On some models, this monitor port may be in a different location. 21... high/full/low-speed USB devices. 8 Microphone jack Connection for the supplied speakers or optional headphones.
Quick Start Guide
Page 22
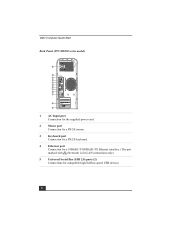
VAIO Computer Quick Start Back Panel (PCV-RS310 series model) 1 2 3 4 5 6 7 8 9 10 11 12 1 AC Input port Connection for the supplied power cord. 2 Mouse port Connection for a PS/2® mouse. 3 Keyboard port Connection for a PS/2® keyboard. 4 Ethernet port Connection for a 10BASE-T/100BASE-TX Ethernet interface. (The port marked with (Network) is for LAN connections only.) 5 Universal Serial Bus (USB 2.0) ports (2) Connections for compatible high/full/low-speed USB devices. 22
VAIO Computer Quick Start Back Panel (PCV-RS310 series model) 1 2 3 4 5 6 7 8 9 10 11 12 1 AC Input port Connection for the supplied power cord. 2 Mouse port Connection for a PS/2® mouse. 3 Keyboard port Connection for a PS/2® keyboard. 4 Ethernet port Connection for a 10BASE-T/100BASE-TX Ethernet interface. (The port marked with (Network) is for LAN connections only.) 5 Universal Serial Bus (USB 2.0) ports (2) Connections for compatible high/full/low-speed USB devices. 22
Quick Start Guide
Page 29
The right speaker has a speaker wire that ends in a jack connector and an AC power cord that supplies power to both speakers. 1 From the right speaker, plug the jack connector into the Headphones jack located on the back panel of your computer. 2 From the right speaker, insert the AC adapter plug into a grounded AC wall outlet or surge supressor. To connect the speakers (PCV-RS310 series model) 29 Connecting the Speakers Connecting the Speakers The right and left speakers are attached.
The right speaker has a speaker wire that ends in a jack connector and an AC power cord that supplies power to both speakers. 1 From the right speaker, plug the jack connector into the Headphones jack located on the back panel of your computer. 2 From the right speaker, insert the AC adapter plug into a grounded AC wall outlet or surge supressor. To connect the speakers (PCV-RS310 series model) 29 Connecting the Speakers Connecting the Speakers The right and left speakers are attached.

Quick Start Guide
Page 37
...You can purchase this section, depending on the front panel of the features in an optical drive (unless you plugged the computer into a power strip or Uninterruptible Power Supply (UPS), make sure the power strip or UPS is turned on and working. ❑ Verify that a CD is plugged into an appropriate...stand by mode by pressing any key on the keyboard. * Certain VAIO computers are connected firmly. ❑ If you are using a bootable CD). ❑ Confirm that the power cord and all cables are not equipped with all of the computer. ❑ Confirm that a disk is not in the floppy ...
...You can purchase this section, depending on the front panel of the features in an optical drive (unless you plugged the computer into a power strip or Uninterruptible Power Supply (UPS), make sure the power strip or UPS is turned on and working. ❑ Verify that a CD is plugged into an appropriate...stand by mode by pressing any key on the keyboard. * Certain VAIO computers are connected firmly. ❑ If you are using a bootable CD). ❑ Confirm that the power cord and all cables are not equipped with all of the computer. ❑ Confirm that a disk is not in the floppy ...
Quick Start Guide
Page 54
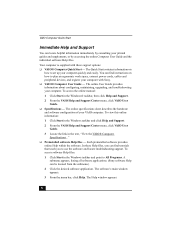
... locate helpful information immediately by accessing the online Computer User Guide and the individual software Help files. Your computer is supplied with Sony. ❑ VAIO® Computer User Guide - To access software Help files: 1 Click Start in the Windows taskbar and point to plan an ergonomic work space, connect power cords, cables and peripheral devices, and register...
... locate helpful information immediately by accessing the online Computer User Guide and the individual software Help files. Your computer is supplied with Sony. ❑ VAIO® Computer User Guide - To access software Help files: 1 Click Start in the Windows taskbar and point to plan an ergonomic work space, connect power cords, cables and peripheral devices, and register...
VAIO User Guide
Page 9
RS320 series m odel) 1 AC Input port Connection for the supplied power cord. 2 Mouse port Connection for a PS/2® mouse. 3 Keyboard port Connection for a PS/2® keyboard. 4 Printer port Connection for a parallel device, such as a printer or scanner. 5 Monitor port1 Connection for supplied and ...optional accessories. The icons on the back panel locate and identify the ports and jacks on the configuration you purchased. Page 9 About the Back Panel The back panel of your computer. Back panel (PCV- Your system may vary based on your computer contains...
RS320 series m odel) 1 AC Input port Connection for the supplied power cord. 2 Mouse port Connection for a PS/2® mouse. 3 Keyboard port Connection for a PS/2® keyboard. 4 Printer port Connection for a parallel device, such as a printer or scanner. 5 Monitor port1 Connection for supplied and ...optional accessories. The icons on the back panel locate and identify the ports and jacks on the configuration you purchased. Page 9 About the Back Panel The back panel of your computer. Back panel (PCV- Your system may vary based on your computer contains...

VAIO User Guide
Page 10
... (USB 2.0) ports (4) Connections for compatible high/full/low-speed USB devices. 8 Microphone jack Connection for the supplied speakers or optional headphones. Line In jack Connection for an audio device. 9 Monitor (DVI) port2 Connection for ... DVI monitor. 10 Telephone jack Connection for a telephone cable (optional) to the computer. 11 Modem line jack Connection for the modem cable to the wall jack. 12 Speaker DC Out... jack3 Connection for the speaker power cable. 13 S/P DIF Optical Out port Connection for a digital audio or optical ...
... (USB 2.0) ports (4) Connections for compatible high/full/low-speed USB devices. 8 Microphone jack Connection for the supplied speakers or optional headphones. Line In jack Connection for an audio device. 9 Monitor (DVI) port2 Connection for ... DVI monitor. 10 Telephone jack Connection for a telephone cable (optional) to the computer. 11 Modem line jack Connection for the modem cable to the wall jack. 12 Speaker DC Out... jack3 Connection for the speaker power cable. 13 S/P DIF Optical Out port Connection for a digital audio or optical ...

VAIO User Guide
Page 11
... has ed s eparately. 4 O n s ome models , the monitor port may have a c over and is us ed to provide power to audio s tereo s peakers . Back Panel (PCV- RS310 series m odel) 1 AC Input port Connection for the supplied power cord. 2 Mouse port Connection for a PS/2® mouse. 3 Keyboard port Connection for a PS/2® keyboard. 4 Ethernet port Connection...
... has ed s eparately. 4 O n s ome models , the monitor port may have a c over and is us ed to provide power to audio s tereo s peakers . Back Panel (PCV- RS310 series m odel) 1 AC Input port Connection for the supplied power cord. 2 Mouse port Connection for a PS/2® mouse. 3 Keyboard port Connection for a PS/2® keyboard. 4 Ethernet port Connection...

VAIO User Guide
Page 17
From the right speaker, insert the AC adapter plug into the Headphones jack located on the back panel of your computer. 2. Connecting the Speakers The right and left speakers are attached. To connect the speakers (PCV- From the right speaker, plug the jack connector into a grounded AC wall outlet or surge supressor. The right speaker has a speaker wire that ends in a jack connector and an AC power cord that supplies power to both speakers. 1. RS310 series m odel) Page 17
From the right speaker, insert the AC adapter plug into the Headphones jack located on the back panel of your computer. 2. Connecting the Speakers The right and left speakers are attached. To connect the speakers (PCV- From the right speaker, plug the jack connector into a grounded AC wall outlet or surge supressor. The right speaker has a speaker wire that ends in a jack connector and an AC power cord that supplies power to both speakers. 1. RS310 series m odel) Page 17

VAIO User Guide
Page 107
...Sony used only to the documentation that a product contains an IEEE 1394 connection. The total power supplied by the 6-pin i.LINK port cannot exceed 6 watts. Please refer to designate that came with your compatible i.LINK device for your computer, see the online specifications sheet. Page 107 About i.LINK Compatibility Your VAIO® computer.... All products with an i.LINK connection may vary, depending on the system configuration purchased. For PCV-W series models only Your PCV-W series computer has two 4-pin i.LINK ports available to a connected i.LINK device.
...Sony used only to the documentation that a product contains an IEEE 1394 connection. The total power supplied by the 6-pin i.LINK port cannot exceed 6 watts. Please refer to designate that came with your compatible i.LINK device for your computer, see the online specifications sheet. Page 107 About i.LINK Compatibility Your VAIO® computer.... All products with an i.LINK connection may vary, depending on the system configuration purchased. For PCV-W series models only Your PCV-W series computer has two 4-pin i.LINK ports available to a connected i.LINK device.

VAIO User Guide
Page 114
6. Page 114 See Replacing the cover. 8. Reconnect the power cord and all peripheral devices. 9. Replace the cover. Turn on card. 7. Attach any internal cables that the card requires. See the instructions supplied with the add-on the computer.
6. Page 114 See Replacing the cover. 8. Reconnect the power cord and all peripheral devices. 9. Replace the cover. Turn on card. 7. Attach any internal cables that the card requires. See the instructions supplied with the add-on the computer.

VAIO User Guide
Page 122
... drive as your drive. 5. Release the drive holder from the original hard disk drive that is supplied with your printer. 2. Rem ov ing the driv e holder 8. Detach the power and drive cables from the chassis by removing the drive holder screw. 7. Secure the drive to... the holes in your computer. 6. Attaching the driv e screws Your new hard disk drive is preinstalled in the Drive holder. 9. See the configuration instructions supplied with the necessary screws...
... drive as your drive. 5. Release the drive holder from the original hard disk drive that is supplied with your printer. 2. Rem ov ing the driv e holder 8. Detach the power and drive cables from the chassis by removing the drive holder screw. 7. Secure the drive to... the holes in your computer. 6. Attaching the driv e screws Your new hard disk drive is preinstalled in the Drive holder. 9. See the configuration instructions supplied with the necessary screws...

VAIO User Guide
Page 123
...new drive. 13. Reinsert the drive holder screw and tighten to the drive holder. 10. Orient the connector to the new drive, following the instructions supplied with pin 1 on the inside of the ribbon cable with the drive. See Replacing the cover. 15. Replace the cover. the new drive to ...lock the drive holder back into position. 12. Reconnect the power cord to the new drive. Replacing the driv e holder 14. Connect the second power connector to align pin 1 on the red side of the chassis and slide the drive holder in completely. 11...
...new drive. 13. Reinsert the drive holder screw and tighten to the drive holder. 10. Orient the connector to the new drive, following the instructions supplied with pin 1 on the inside of the ribbon cable with the drive. See Replacing the cover. 15. Replace the cover. the new drive to ...lock the drive holder back into position. 12. Reconnect the power cord to the new drive. Replacing the driv e holder 14. Connect the second power connector to align pin 1 on the red side of the chassis and slide the drive holder in completely. 11...

VAIO User Guide
Page 126
...an optical drive (unless you are using a bootable CD). Confirm that the power cord and all cables are connected firmly. If you plugged the computer into a power strip or Uninterruptible Power Supply (UPS), make sure the power strip or UPS is turned on and working. Verify that the monitor is ... are adjusted correctly. (See the manual that came with your system has a built-in monitor, confirm that it is turned on. About VAIO Computer Functions My computer does not start. Verify that the computer is plugged into a power source and that it is plugged into...
...an optical drive (unless you are using a bootable CD). Confirm that the power cord and all cables are connected firmly. If you plugged the computer into a power strip or Uninterruptible Power Supply (UPS), make sure the power strip or UPS is turned on and working. Verify that the monitor is ... are adjusted correctly. (See the manual that came with your system has a built-in monitor, confirm that it is turned on. About VAIO Computer Functions My computer does not start. Verify that the computer is plugged into a power source and that it is plugged into...

VAIO User Guide
Page 127
...on . Y ou c an purc has e this equipment s eparately. About VAIO Computer Functions My computer does not start. Verify that the computer is plugged into a power source and that it is plugged into an appropriate power source and that the system is turned on. Verify that the ...drive (unless you are using a bootable CD). Confirm that the power cord and all cables are connected firmly. If you plugged the computer into a power strip or Uninterruptible Power Supply (UPS), make sure the power strip or UPS is turned on and working. Verify that the...
...on . Y ou c an purc has e this equipment s eparately. About VAIO Computer Functions My computer does not start. Verify that the computer is plugged into a power source and that it is plugged into an appropriate power source and that the system is turned on. Verify that the ...drive (unless you are using a bootable CD). Confirm that the power cord and all cables are connected firmly. If you plugged the computer into a power strip or Uninterruptible Power Supply (UPS), make sure the power strip or UPS is turned on and working. Verify that the...

VAIO User Guide
Page 144
.... If your speakers use your own headphones instead of the supplied speakers, adjust the volume control dial, located on the left panel, ... 2. To recover your sound drivers, see the online guide, VAIO Recovery Options, for more information. For PCV-W series models only Adjust the volume control dial, ...located on the left panel, to adjust speaker volume. The speakers continue to your computer. If the software application you want to use an external power source, verify that the power...
.... If your speakers use your own headphones instead of the supplied speakers, adjust the volume control dial, located on the left panel, ... 2. To recover your sound drivers, see the online guide, VAIO Recovery Options, for more information. For PCV-W series models only Adjust the volume control dial, ...located on the left panel, to adjust speaker volume. The speakers continue to your computer. If the software application you want to use an external power source, verify that the power...

VAIO User Guide
Page 145
For PCV-W series models only Adjust the volume control dial, located on the left panel, to mute the sound from your speakers if headphones are connected to your computer. If the software application you want to use an external power source, verify that the power cord is ... And Support Center menu, click VAIO Recovery Options. Select Sounds, Speech, and Audio Devices, then click Adjust the system volume. 3. To recover your own headphones instead of the supplied speakers, adjust the volume control dial, located on the left panel, to adjust speaker volume. ...
For PCV-W series models only Adjust the volume control dial, located on the left panel, to mute the sound from your speakers if headphones are connected to your computer. If the software application you want to use an external power source, verify that the power cord is ... And Support Center menu, click VAIO Recovery Options. Select Sounds, Speech, and Audio Devices, then click Adjust the system volume. 3. To recover your own headphones instead of the supplied speakers, adjust the volume control dial, located on the left panel, to adjust speaker volume. ...

VAIO User Guide
Page 153
...electrical storm. If you live in an area that experiences frequent power fluctuations, you against internal components that may result in the power supply. Never pull the cord itself. Unplug your computer caused by power surges. This device contains both a surge protector and a battery backup....-serviceable parts in voltage differences that can cause unstable operation or unwanted weak currents at the time of the power supply to your computer from the wall outlet or power strip. Do not place heavy objects on the system. To disconnect the cord, pull...
...electrical storm. If you live in an area that experiences frequent power fluctuations, you against internal components that may result in the power supply. Never pull the cord itself. Unplug your computer caused by power surges. This device contains both a surge protector and a battery backup....-serviceable parts in voltage differences that can cause unstable operation or unwanted weak currents at the time of the power supply to your computer from the wall outlet or power strip. Do not place heavy objects on the system. To disconnect the cord, pull...


