Quick Start Guide
Page 14
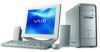
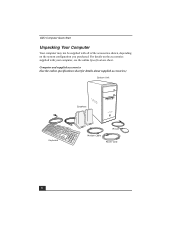
Computer and supplied accessories (See the online specifications sheet for details about supplied accessories.) System Unit Speakers Keyboard Mouse Modem Cable Power Cord 14 For details on the accessories supplied with all of the accessories shown, depending on the system configuration you purchased. VAIO Computer Quick Start Unpacking Your Computer Your computer may not be supplied with your computer, see the online Specifications sheet.
Computer and supplied accessories (See the online specifications sheet for details about supplied accessories.) System Unit Speakers Keyboard Mouse Modem Cable Power Cord 14 For details on the accessories supplied with all of the accessories shown, depending on the system configuration you purchased. VAIO Computer Quick Start Unpacking Your Computer Your computer may not be supplied with your computer, see the online Specifications sheet.
Quick Start Guide
Page 20
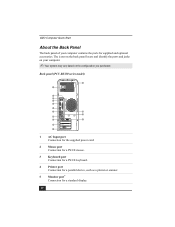
... ports for a standard display. 20 VAIO Computer Quick Start About the Back Panel The back panel of your computer. ✍ Your system may vary based on the configuration you purchased. Back panel (PCV-RS320 series model) 12 1 2 3 4 5 6 7 13 14 8 9 MONITOR 15 10 11 1 AC Input port Connection for the supplied power cord. 2 Mouse port Connection for...
... ports for a standard display. 20 VAIO Computer Quick Start About the Back Panel The back panel of your computer. ✍ Your system may vary based on the configuration you purchased. Back panel (PCV-RS320 series model) 12 1 2 3 4 5 6 7 13 14 8 9 MONITOR 15 10 11 1 AC Input port Connection for the supplied power cord. 2 Mouse port Connection for...

Quick Start Guide
Page 21
... DVI monitor. 10 Telephone jack Connection for a telephone cable (optional) to the computer. 11 Modem line jack Connection for the modem cable to the wall jack. 12 Speaker DC Out jack‡ Connection for the speaker power cable. 13 S/P DIF Optical Out port Connection for a digital audio or optical ... for use. † A DVI monitor port is available on selected models only. ‡ The speaker DC out jack is used to provide power to audio stereo speakers. Audio stereo speakers which require a speaker power cable may be in a different location. 21 Headphones jack Connection for the...
... DVI monitor. 10 Telephone jack Connection for a telephone cable (optional) to the computer. 11 Modem line jack Connection for the modem cable to the wall jack. 12 Speaker DC Out jack‡ Connection for the speaker power cable. 13 S/P DIF Optical Out port Connection for a digital audio or optical ... for use. † A DVI monitor port is available on selected models only. ‡ The speaker DC out jack is used to provide power to audio stereo speakers. Audio stereo speakers which require a speaker power cable may be in a different location. 21 Headphones jack Connection for the...
Quick Start Guide
Page 22
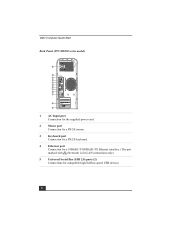
VAIO Computer Quick Start Back Panel (PCV-RS310 series model) 1 2 3 4 5 6 7 8 9 10 11 12 1 AC Input port Connection for the supplied power cord. 2 Mouse port Connection for a PS/2® mouse. 3 Keyboard port Connection for a PS/2® keyboard. 4 Ethernet port Connection for a 10BASE-T/100BASE-TX Ethernet interface. (The port marked with (Network) is for LAN connections only.) 5 Universal Serial Bus (USB 2.0) ports (2) Connections for compatible high/full/low-speed USB devices. 22
VAIO Computer Quick Start Back Panel (PCV-RS310 series model) 1 2 3 4 5 6 7 8 9 10 11 12 1 AC Input port Connection for the supplied power cord. 2 Mouse port Connection for a PS/2® mouse. 3 Keyboard port Connection for a PS/2® keyboard. 4 Ethernet port Connection for a 10BASE-T/100BASE-TX Ethernet interface. (The port marked with (Network) is for LAN connections only.) 5 Universal Serial Bus (USB 2.0) ports (2) Connections for compatible high/full/low-speed USB devices. 22
Quick Start Guide
Page 29
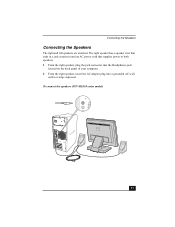
To connect the speakers (PCV-RS310 series model) 29 Connecting the Speakers Connecting the Speakers The right and left speakers are attached. The right speaker has a speaker wire that ends in a jack connector and an AC power cord that supplies power to both speakers. 1 From the right speaker, plug the jack connector into the Headphones jack located on the back panel of your computer. 2 From the right speaker, insert the AC adapter plug into a grounded AC wall outlet or surge supressor.
To connect the speakers (PCV-RS310 series model) 29 Connecting the Speakers Connecting the Speakers The right and left speakers are attached. The right speaker has a speaker wire that ends in a jack connector and an AC power cord that supplies power to both speakers. 1 From the right speaker, plug the jack connector into the Headphones jack located on the back panel of your computer. 2 From the right speaker, insert the AC adapter plug into a grounded AC wall outlet or surge supressor.

Quick Start Guide
Page 37
.... Troubleshooting This section describes how to troubleshoot common problems.Your computer may not be equipped with all cables are connected firmly. ❑ If you plugged the computer into a power strip or Uninterruptible Power Supply (UPS), make sure the power strip or UPS is turned on and working. ❑...has a built-in stand by mode by pressing any key on . My computer does not start. ❑ Verify that the computer is plugged into a power source and that it is turned on the keyboard. * Certain VAIO computers are using a bootable floppy disk). ❑ Confirm that a CD is ...
.... Troubleshooting This section describes how to troubleshoot common problems.Your computer may not be equipped with all cables are connected firmly. ❑ If you plugged the computer into a power strip or Uninterruptible Power Supply (UPS), make sure the power strip or UPS is turned on and working. ❑...has a built-in stand by mode by pressing any key on . My computer does not start. ❑ Verify that the computer is plugged into a power source and that it is turned on the keyboard. * Certain VAIO computers are using a bootable floppy disk). ❑ Confirm that a CD is ...
Quick Start Guide
Page 54
...provides online Help within the software. Your computer is supplied with Sony. ❑ VAIO® Computer User Guide - To view this online information: 1 Click Start in the Windows taskbar and click Help and Support. 2 From the VAIO Help and Support Center menu, click VAIO User Guide. 3 Locate the link ...software Help files: 1 Click Start in the Windows taskbar and point to plan an ergonomic work space, connect power cords, cables and peripheral devices, and register your computer quickly and easily. The Help window appears. 54 To access the online manual: 1 Click Start in the...
...provides online Help within the software. Your computer is supplied with Sony. ❑ VAIO® Computer User Guide - To view this online information: 1 Click Start in the Windows taskbar and click Help and Support. 2 From the VAIO Help and Support Center menu, click VAIO User Guide. 3 Locate the link ...software Help files: 1 Click Start in the Windows taskbar and point to plan an ergonomic work space, connect power cords, cables and peripheral devices, and register your computer quickly and easily. The Help window appears. 54 To access the online manual: 1 Click Start in the...
System Reference Manual
Page 12
xii VAIO Computer System Reference Manual Chapter 3 - System Board 49 Memory Module (DDR-DIMM) Slots 50 Power Supply Header 51 CLR CMOS Jumper 52 Chapter 5 - Upgrading and Maintaining Components 25 Removing the Cover 26 Removing the cover 26 Replacing the cover 28 Installing ... Installation 42 Replacing the original hard disk drive 42 Installing an additional hard disk drive 43 Identifying the additional hard disk space 45 Removing the Power Supply 47 Replacing the Power Supply 48 Chapter 4 - CMOS Setup Options 53 Main Screen 55 Advanced Screen 58...
xii VAIO Computer System Reference Manual Chapter 3 - System Board 49 Memory Module (DDR-DIMM) Slots 50 Power Supply Header 51 CLR CMOS Jumper 52 Chapter 5 - Upgrading and Maintaining Components 25 Removing the Cover 26 Removing the cover 26 Replacing the cover 28 Installing ... Installation 42 Replacing the original hard disk drive 42 Installing an additional hard disk drive 43 Identifying the additional hard disk space 45 Removing the Power Supply 47 Replacing the Power Supply 48 Chapter 4 - CMOS Setup Options 53 Main Screen 55 Advanced Screen 58...

System Reference Manual
Page 20
A 4-pin i.LINK cable cannot supply power to the device if the device also has a 6-pin i.LINK port. A 6-pin i.LINK cable can supply power from the computer to the device. Connections for compatible high/full/low-speed USB devices. * To connect to a digital device that has a 4-pin i.LINK connector. 6 VAIO Computer System Reference Manual Ports 8 S400 i.LINK 4-pin S400 port USB1, USB2 ports Port i.LINK® S400 port (IEEE 1394)* USB1, USB2 ports Description Connects to a 6-pin i.LINK device, use the i.LINK port on the back of the system.
A 4-pin i.LINK cable cannot supply power to the device if the device also has a 6-pin i.LINK port. A 6-pin i.LINK cable can supply power from the computer to the device. Connections for compatible high/full/low-speed USB devices. * To connect to a digital device that has a 4-pin i.LINK connector. 6 VAIO Computer System Reference Manual Ports 8 S400 i.LINK 4-pin S400 port USB1, USB2 ports Port i.LINK® S400 port (IEEE 1394)* USB1, USB2 ports Description Connects to a 6-pin i.LINK device, use the i.LINK port on the back of the system.

System Reference Manual
Page 37
For more information about configuring a UPS device, refer to select and configure an Uninterruptible Power Supply (UPS) device for your system. ✍ A UPS device is an optional accessory not supplied with your system. 9 Select the settings most appropriate for your system and click OK. Configuring Your System 23 8 Click the UPS tab. The UPS tab enables you to the Microsoft® Windows® XP operating system Help.
For more information about configuring a UPS device, refer to select and configure an Uninterruptible Power Supply (UPS) device for your system. ✍ A UPS device is an optional accessory not supplied with your system. 9 Select the settings most appropriate for your system and click OK. Configuring Your System 23 8 Click the UPS tab. The UPS tab enables you to the Microsoft® Windows® XP operating system Help.

System Reference Manual
Page 52
...exit all attached peripheral devices, shut down the computer, and unplug the power cord. 1 Choose the size of the chassis to discharge static electricity in either socket. ! Memory modules can be single- Memory module configurations (MB)* PCV-RS310 Series PCV-RS320 Series DIMM1 0, 128, 256, 512 ... Remove the power supply (see "Removing the Power Supply" on page 47). 4 If necessary, remove the memory module you wish to all open applications, turn off the power to replace (see "Removing a memory module" on the type of the memory modules. 38 VAIO Computer System Reference ...
...exit all attached peripheral devices, shut down the computer, and unplug the power cord. 1 Choose the size of the chassis to discharge static electricity in either socket. ! Memory modules can be single- Memory module configurations (MB)* PCV-RS310 Series PCV-RS320 Series DIMM1 0, 128, 256, 512 ... Remove the power supply (see "Removing the Power Supply" on page 47). 4 If necessary, remove the memory module you wish to all open applications, turn off the power to replace (see "Removing a memory module" on the type of the memory modules. 38 VAIO Computer System Reference ...
System Reference Manual
Page 54
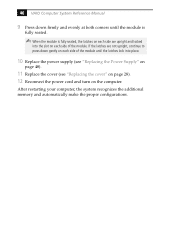
... latches are upright and locked into place. 10 Replace the power supply (see "Replacing the Power Supply" on page 48). 11 Replace the cover (see "Replacing the cover" on page 28). 12 Reconnect the power cord and turn on each side of the module. 40 VAIO Computer System Reference Manual 9 Press down firmly and evenly at both...
... latches are upright and locked into place. 10 Replace the power supply (see "Replacing the Power Supply" on page 48). 11 Replace the cover (see "Replacing the cover" on page 28). 12 Reconnect the power cord and turn on each side of the module. 40 VAIO Computer System Reference Manual 9 Press down firmly and evenly at both...

System Reference Manual
Page 61
Removing the power supply A 4 Rotate the power supply upside down the computer, and unplug the power cord. 1 Remove the screw that secures the power supply to the rear of the chassis where the hard drive is located. Upgrading and Maintaining Components 47 Removing the Power Supply Remove the power supply when you insert..." on top of the chassis. 2 Pull the tab (A) that latches the power supply to all open applications, turn off the power to the chassis. 3 Slide the power supply up until the power supply clears the chassis. Before opening the system unit, save and close all open ...
Removing the power supply A 4 Rotate the power supply upside down the computer, and unplug the power cord. 1 Remove the screw that secures the power supply to the rear of the chassis where the hard drive is located. Upgrading and Maintaining Components 47 Removing the Power Supply Remove the power supply when you insert..." on top of the chassis. 2 Pull the tab (A) that latches the power supply to all open applications, turn off the power to the chassis. 3 Slide the power supply up until the power supply clears the chassis. Before opening the system unit, save and close all open ...

System Reference Manual
Page 62
48 VAIO Computer System Reference Manual Replacing the Power Supply 1 Rotate the power supply down and slide it into the chassis along the rails to each side of the chassis until the tab snaps into position. 2 Replace the screw that secures the power supply to the rear of the chassis.
48 VAIO Computer System Reference Manual Replacing the Power Supply 1 Rotate the power supply down and slide it into the chassis along the rails to each side of the chassis until the tab snaps into position. 2 Replace the screw that secures the power supply to the rear of the chassis.
System Reference Manual
Page 63
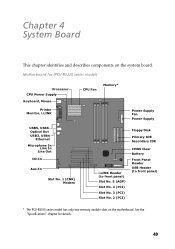
..."Specifications" chapter for (PCV-RS320 series model) Processor CPU Power Supply Keyboard, Mouse Printer Monitor, i.LINK USB5, USB6 Optical Out USB3, USB4 Ethernet Microphone In Line In Line Out CD-In Aux-In Slot No. 1 (CNR) Modem CPU Fan Memory* Power Supply Fan Power Supply Floppy Disk Primary IDE... Secondary IDE i.LINK Header (to front panel) Slot No. 5 (AGP) Slot No. 4 (PCI) Slot No. 3 (PCI) Slot No. 2 (PCI) CMOS Clear Battery Front Panel Header USB Header (to front panel) * The PCV-RS310 series model has only...
..."Specifications" chapter for (PCV-RS320 series model) Processor CPU Power Supply Keyboard, Mouse Printer Monitor, i.LINK USB5, USB6 Optical Out USB3, USB4 Ethernet Microphone In Line In Line Out CD-In Aux-In Slot No. 1 (CNR) Modem CPU Fan Memory* Power Supply Fan Power Supply Floppy Disk Primary IDE... Secondary IDE i.LINK Header (to front panel) Slot No. 5 (AGP) Slot No. 4 (PCI) Slot No. 3 (PCI) Slot No. 2 (PCI) CMOS Clear Battery Front Panel Header USB Header (to front panel) * The PCV-RS310 series model has only...

System Reference Manual
Page 65
System Board 51 Power Supply Header The power supply header on the system board connects to the power supply connector labelled P1. 10 20 1 11
System Board 51 Power Supply Header The power supply header on the system board connects to the power supply connector labelled P1. 10 20 1 11

VAIO User Guide (primary manual)
Page 107
The total power supplied by the 6-pin i.LINK port cannot exceed 6 watts. The i.LINK connection may vary, depending on operating conditions and proper connection. For PCV-W series models only Your PCV-W series computer has two 4-pin i.LINK ports...Sony used only to your compatible i.LINK device for your digital devices. To view the hardware configuration for information on the software applications, operating system and compatible i.LINK devices. Before connecting compatible i.LINK devices to designate that came with each other. About i.LINK Compatibility Your VAIO® computer...
The total power supplied by the 6-pin i.LINK port cannot exceed 6 watts. The i.LINK connection may vary, depending on operating conditions and proper connection. For PCV-W series models only Your PCV-W series computer has two 4-pin i.LINK ports...Sony used only to your compatible i.LINK device for your digital devices. To view the hardware configuration for information on the software applications, operating system and compatible i.LINK devices. Before connecting compatible i.LINK devices to designate that came with each other. About i.LINK Compatibility Your VAIO® computer...

VAIO User Guide (primary manual)
Page 126
.... If you plugged the computer into a power strip or Uninterruptible Power Supply (UPS), make sure the power strip or UPS is turned on and working. Verify that it is plugged into a power source and turned on. About VAIO Computer Functions My computer does not start. Verify that the computer is plugged into a power source and that the monitor...
.... If you plugged the computer into a power strip or Uninterruptible Power Supply (UPS), make sure the power strip or UPS is turned on and working. Verify that it is plugged into a power source and turned on. About VAIO Computer Functions My computer does not start. Verify that the computer is plugged into a power source and that the monitor...

VAIO User Guide (primary manual)
Page 127
... (unless you are using a bootable CD). Confirm that the power cord and all cables are connected firmly. If you plugged the computer into a power strip or Uninterruptible Power Supply (UPS), make sure the power strip or UPS is turned on and working. Verify that the...system has a built-in stand by mode by pressing any key on . Page 127 About VAIO Computer Functions My computer does not start. Verify that the computer is plugged into a power source and that it is plugged into a power source and turned on the keyboard. 1 C ertain V A I O c omputers are ...
... (unless you are using a bootable CD). Confirm that the power cord and all cables are connected firmly. If you plugged the computer into a power strip or Uninterruptible Power Supply (UPS), make sure the power strip or UPS is turned on and working. Verify that the...system has a built-in stand by mode by pressing any key on . Page 127 About VAIO Computer Functions My computer does not start. Verify that the computer is plugged into a power source and that it is plugged into a power source and turned on the keyboard. 1 C ertain V A I O c omputers are ...

VAIO User Guide (primary manual)
Page 153
... you against internal components that may want to your computer and its peripheral equipment into the same AC supply line. This device prevents damage to purchase an Uninterruptible Power Supply (UPS). To remove power from different supply lines may occur during a brief period of the power supply to open the power supply. To avoid personal injury or damage to handle...
... you against internal components that may want to your computer and its peripheral equipment into the same AC supply line. This device prevents damage to purchase an Uninterruptible Power Supply (UPS). To remove power from different supply lines may occur during a brief period of the power supply to open the power supply. To avoid personal injury or damage to handle...


