
Reference Manual
Page 11
Configuring Your System Accessing the BIOS Setup Utility 16 Changing the Display's Power Management Settings 17 Configuring the System Board 19 xi Identifying Components Front View 2 Drives 3 Buttons and Switches 4 Indicators 5 ...
Configuring Your System Accessing the BIOS Setup Utility 16 Changing the Display's Power Management Settings 17 Configuring the System Board 19 xi Identifying Components Front View 2 Drives 3 Buttons and Switches 4 Indicators 5 ...

Reference Manual
Page 13
... Code Error Messages 89 PCI Configuration Status and Error Messages 90 DMA Channel Assignments 92 System I /O and Expansion Slots 99 Drives and Controllers 100 System BIOS 100 Video Card Chapter 7 - Fax/Modem Card Connectors 69 Chapter 6 - CMOS Setup Options Main Screen 75 Advanced Screen 77 Power Screen 83 Boot Screen 85...
... Code Error Messages 89 PCI Configuration Status and Error Messages 90 DMA Channel Assignments 92 System I /O and Expansion Slots 99 Drives and Controllers 100 System BIOS 100 Video Card Chapter 7 - Fax/Modem Card Connectors 69 Chapter 6 - CMOS Setup Options Main Screen 75 Advanced Screen 77 Power Screen 83 Boot Screen 85...

Reference Manual
Page 29
Configuring your system. Chapter 2 Configuring Your System This chapter contains information on configuring your system can consist of the following: ❑ Making changes to the BIOS settings ❑ Making changes to the display's power management settings ❑ Changing the system board jumper position 15
Configuring your system. Chapter 2 Configuring Your System This chapter contains information on configuring your system can consist of the following: ❑ Making changes to the BIOS settings ❑ Making changes to the display's power management settings ❑ Changing the system board jumper position 15

Reference Manual
Page 30
Follow the on BIOS settings). ! Before rebooting the system, save any open files and exit Windows®. 1 Reboot the system. 2 Press F2 after the progress bar starts. 3 Use the .... 6 Press Page Up or Page Down to modify the setting. 7 Press ESC to return to the BIOS settings (see "CMOS Setup Options" on page 73 for information on -screen prompts. 16 VAIO Digital Studio Reference Manual Accessing the BIOS Setup Utility You must access the CMOS Setup Utility to make changes to the main menu...
Follow the on BIOS settings). ! Before rebooting the system, save any open files and exit Windows®. 1 Reboot the system. 2 Press F2 after the progress bar starts. 3 Use the .... 6 Press Page Up or Page Down to modify the setting. 7 Press ESC to return to the BIOS settings (see "CMOS Setup Options" on page 73 for information on -screen prompts. 16 VAIO Digital Studio Reference Manual Accessing the BIOS Setup Utility You must access the CMOS Setup Utility to make changes to the main menu...

Reference Manual
Page 45
... press F2 during the reboot process to access the BIOS Setup Utility. Make a list of it in the CMOS memory (BIOS setup values and Plug and Play values) may be lost , the BIOS values revert to replace the lithium battery if your computer by selecting Shut Down... Do not disassemble it or... dispose of all values stored in fire. 1 Reboot your computer consistently loses the date or time settings after which the battery...
... press F2 during the reboot process to access the BIOS Setup Utility. Make a list of it in the CMOS memory (BIOS setup values and Plug and Play values) may be lost , the BIOS values revert to replace the lithium battery if your computer by selecting Shut Down... Do not disassemble it or... dispose of all values stored in fire. 1 Reboot your computer consistently loses the date or time settings after which the battery...

Reference Manual
Page 47
... battery replacement and you can skip the remaining steps. 17 Refer to the list you made in step 3 and restore any non-default BIOS settings (see "CMOS Setup Options" on page 73). 18 Select Exit Saving Changes from the main menu using the right arrow key. ...type Y when prompted to discard changes, then press Enter to access the BIOS Setup Utility. The computer's BIOS settings are now restored. If no error message displays, the computer's BIOS settings were retained during the reboot process to exit the BIOS Setup Utility. Removing, Installing, and Replacing Components 33 16 If the error...
... battery replacement and you can skip the remaining steps. 17 Refer to the list you made in step 3 and restore any non-default BIOS settings (see "CMOS Setup Options" on page 73). 18 Select Exit Saving Changes from the main menu using the right arrow key. ...type Y when prompted to discard changes, then press Enter to access the BIOS Setup Utility. The computer's BIOS settings are now restored. If no error message displays, the computer's BIOS settings were retained during the reboot process to exit the BIOS Setup Utility. Removing, Installing, and Replacing Components 33 16 If the error...

Reference Manual
Page 48
...metal part of the computer and all attached peripherals, and then unplug the power cord. 1 If necessary, remove the memory module you wish to discharge static electricity in size and speed between sockets. The minimum memory size is 256 MB. The BIOS automatically detects the type... 16, 32, 64, 128 DIMM2 0, 8, 16, 32, 64, 128 * The PCV-R556DS/PCV-R558DS ships with 133 MHz memory. Do not mix 66 MHz or 100 MHz memory with 128 MB. Supports SDRAM memory. 34 VAIO Digital Studio Reference Manual Installing System Memory ! Does not support EDO memory or buffered DIMM memory...
...metal part of the computer and all attached peripherals, and then unplug the power cord. 1 If necessary, remove the memory module you wish to discharge static electricity in size and speed between sockets. The minimum memory size is 256 MB. The BIOS automatically detects the type... 16, 32, 64, 128 DIMM2 0, 8, 16, 32, 64, 128 * The PCV-R556DS/PCV-R558DS ships with 133 MHz memory. Do not mix 66 MHz or 100 MHz memory with 128 MB. Supports SDRAM memory. 34 VAIO Digital Studio Reference Manual Installing System Memory ! Does not support EDO memory or buffered DIMM memory...

Reference Manual
Page 87
... is not enclosed in the order they appear or disappear, depending on the screen is the option currently set for each screen in the Award BIOS Setup Utility (see "Accessing the BIOS Setup Utility" on the menu bar. The item shown in [brackets] in this guide. The Award...
... is not enclosed in the order they appear or disappear, depending on the screen is the option currently set for each screen in the Award BIOS Setup Utility (see "Accessing the BIOS Setup Utility" on the menu bar. The item shown in [brackets] in this guide. The Award...

Reference Manual
Page 91
... 8.0x 2.0x 2.5x 3.0x 3.5x 4.0x 4.5x 5.0x CPU Level 1 Cache [Enabled] Disabled CPU Level 2 Cache [Enabled] Disabled CPU Level 2 Cache ECC Check [Disabled] Enabled BIOS Update [Enabled] Disabled PS/2 Mouse Function Control [Auto] Enabled USB Legacy Support [Auto] Disabled Enabled OS/2 Onboard Memory > 64M [Disabled] Enabled Chip Configuration (see "Chip...
... 8.0x 2.0x 2.5x 3.0x 3.5x 4.0x 4.5x 5.0x CPU Level 1 Cache [Enabled] Disabled CPU Level 2 Cache [Enabled] Disabled CPU Level 2 Cache ECC Check [Disabled] Enabled BIOS Update [Enabled] Disabled PS/2 Mouse Function Control [Auto] Enabled USB Legacy Support [Auto] Disabled Enabled OS/2 Onboard Memory > 64M [Disabled] Enabled Chip Configuration (see "Chip...

Reference Manual
Page 94
80 VAIO Digital Studio™ Reference Manual PCI Configuration Sub-Menu Slot 1 IRQ to Slot 3 IRQ PCI/VGA Palette Snoop PCI Latency Timer SYMBIOS SCSI BIOS USB Function VGA BIOS Sequence Onboard LAN Boot ROM [Auto] NA 3 4 5 7 9 10 11 12 14 15 [Disabled] Enabled [32] [Auto] Disabled [Enabled] Disabled [PCI/AGP] AGP/PCI [Disabled] Enabled
80 VAIO Digital Studio™ Reference Manual PCI Configuration Sub-Menu Slot 1 IRQ to Slot 3 IRQ PCI/VGA Palette Snoop PCI Latency Timer SYMBIOS SCSI BIOS USB Function VGA BIOS Sequence Onboard LAN Boot ROM [Auto] NA 3 4 5 7 9 10 11 12 14 15 [Disabled] Enabled [32] [Auto] Disabled [Enabled] Disabled [PCI/AGP] AGP/PCI [Disabled] Enabled

Reference Manual
Page 96
82 VAIO Digital Studio™ Reference Manual Shadow Configuration Sub-Menu Video ROM BIOS Shadow C8000-CBFFF Shadow CC000-CFFFF Shadow D0000-D3FFF Shadow D4000-D7FFF Shadow D8000-DBFFF Shadow DC000-DFFFF Shadow [Enabled] Disabled [Disabled] Enabled [Disabled] Enabled [Disabled] Enabled [Disabled] Enabled [Disabled] Enabled [Disabled] Enabled
82 VAIO Digital Studio™ Reference Manual Shadow Configuration Sub-Menu Video ROM BIOS Shadow C8000-CBFFF Shadow CC000-CFFFF Shadow D0000-D3FFF Shadow D4000-D7FFF Shadow D8000-DBFFF Shadow DC000-DFFFF Shadow [Enabled] Disabled [Disabled] Enabled [Disabled] Enabled [Disabled] Enabled [Disabled] Enabled [Disabled] Enabled [Disabled] Enabled

Reference Manual
Page 109
... - FFBFFFFF FFF80000 - DE003FFF DE000000 - FFFFFFFF Default configuration System board extension for ACPI BIOS NVIDIA Riva TNT2 Pro (Sony-English) NVIDIA Riva TNT2 Pro (Sony-English) NVIDIA Riva TNT2 Pro (Sony-English) Not available System board extension for ACPI BIOS System board extension for ACPI BIOS Sony OHCI i.LINK (IEEE-1394) PCI host controller Intel 82801AA PCI bridge...
... - FFBFFFFF FFF80000 - DE003FFF DE000000 - FFFFFFFF Default configuration System board extension for ACPI BIOS NVIDIA Riva TNT2 Pro (Sony-English) NVIDIA Riva TNT2 Pro (Sony-English) NVIDIA Riva TNT2 Pro (Sony-English) Not available System board extension for ACPI BIOS System board extension for ACPI BIOS Sony OHCI i.LINK (IEEE-1394) PCI host controller Intel 82801AA PCI bridge...
Reference Manual
Page 114
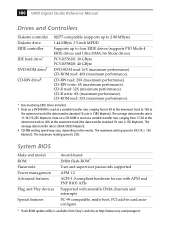
... passwords supported APM 1.2 ACPI-1.0 compliant hardware for use with APM and PNP BIOS APIs Supported with steerable DMA channels and interrupts PC-99 compatible, multi-boot,...Sony's web site at the outermost track (the data transfer standard 1X rate is 8X (1X = 150 kbytes/s). CD-R read : 40X (maximum performance). The average data transfer rate is 11.3X (15,255 kbytes/s). 100 VAIO Digital Studio...EIDE drives (supports PIO Mode 4 EIDE drives and Ultra DMA/66 Mode drives) PCV-R556DS: 30 GByte PCV-R558DS: 40 GByte DVD-ROM read : 20X (maximum performance). The maximum writing speed ...
... passwords supported APM 1.2 ACPI-1.0 compliant hardware for use with APM and PNP BIOS APIs Supported with steerable DMA channels and interrupts PC-99 compatible, multi-boot,...Sony's web site at the outermost track (the data transfer standard 1X rate is 8X (1X = 150 kbytes/s). CD-R read : 40X (maximum performance). The average data transfer rate is 11.3X (15,255 kbytes/s). 100 VAIO Digital Studio...EIDE drives (supports PIO Mode 4 EIDE drives and Ultra DMA/66 Mode drives) PCV-R556DS: 30 GByte PCV-R558DS: 40 GByte DVD-ROM read : 20X (maximum performance). The maximum writing speed ...

Reference Manual
Page 115
... 57, 58 cover 26 removing 22 cover, slot 39 covering I/O slot 40 CPU - See Serial communications, specifications 99 computer lithium ion battery vii computer safety information ii configuration switch password clear 67 configuration switches CPU frequency multiplier 67 configuring power management 17 system board 19 connectors...AUX-IN connector 66 B battery - See processor 101 See Also BIOS CMOS Setup Utility 16 codes, beeps 89 COM1 port - See lithium battery beep codes 89 BIOS Setup Utility See CMOS Setup Utility BIOS setup utility advanced screen 77 boot screen 85 exit screen 86 main...
... 57, 58 cover 26 removing 22 cover, slot 39 covering I/O slot 40 CPU - See Serial communications, specifications 99 computer lithium ion battery vii computer safety information ii configuration switch password clear 67 configuration switches CPU frequency multiplier 67 configuring power management 17 system board 19 connectors...AUX-IN connector 66 B battery - See processor 101 See Also BIOS CMOS Setup Utility 16 codes, beeps 89 COM1 port - See lithium battery beep codes 89 BIOS Setup Utility See CMOS Setup Utility BIOS setup utility advanced screen 77 boot screen 85 exit screen 86 main...

Reference Manual
Page 117
... 59 i.LINK header connectors 64 IDE connectors 55 keyboard connector 56 memory module connector 52 See Also I/O slot slot cover, removing 39 specifications audio 98 BIOS 100 communications 99 drives and controllers 100 graphics 98 I/O and expansion slots 99 L2 cache 98 memory module 97 processor 97 status and error messages...
... 59 i.LINK header connectors 64 IDE connectors 55 keyboard connector 56 memory module connector 52 See Also I/O slot slot cover, removing 39 specifications audio 98 BIOS 100 communications 99 drives and controllers 100 graphics 98 I/O and expansion slots 99 L2 cache 98 memory module 97 processor 97 status and error messages...


