
Quick Start Guide
Page 23
Overview of the software applications listed, depending on your computer. Acrobat Reader software allows you to view, navigate, and print electronic documents in Adobe's Portable Document Format (PDF), an open file format that are complete with interactivity, sound, and animation. Adobe LiveMotion ... communicate as soon as you robust design, production, and management features to the Web. About the Software on Your Computer Your VAIO Slimtop™ computer is intended to new levels when you produce your creativity to preserve the fidelity of documents created on all of Software...
Overview of the software applications listed, depending on your computer. Acrobat Reader software allows you to view, navigate, and print electronic documents in Adobe's Portable Document Format (PDF), an open file format that are complete with interactivity, sound, and animation. Adobe LiveMotion ... communicate as soon as you robust design, production, and management features to the Web. About the Software on Your Computer Your VAIO Slimtop™ computer is intended to new levels when you produce your creativity to preserve the fidelity of documents created on all of Software...
Quick Start Guide
Page 30
... more than six seconds may not shut down your computer to close , try the following steps: 1 Save any open . The Windows operating system may result in the Windows taskbar and select VAIO Help and Support. VAIO Slimtop Computer QuickStart Topic: My computer or software application stopped responding. The VAIO Help and Support dialog box appears. 2 Select Fixing a Problem...
... more than six seconds may not shut down your computer to close , try the following steps: 1 Save any open . The Windows operating system may result in the Windows taskbar and select VAIO Help and Support. VAIO Slimtop Computer QuickStart Topic: My computer or software application stopped responding. The VAIO Help and Support dialog box appears. 2 Select Fixing a Problem...

Quick Start Guide
Page 31
...according to start up after installing America Online® (AOL) software? You can decrease your specific situation. Select Restart. 2 When the Sony screen displays, press the F2 key on your AOL connection and verify that the application functions properly with the device name, "WAN Network...ECP, and ECP+EPP options using the System Setup utility (CMOS Setup Utility). Topic: Why does my computer take longer to your computer's start up time by as much as 60 seconds. Open your keyboard. 3 Select the Advanced tab from the Setup Utility screen. 4 Select "I change the ...
...according to start up after installing America Online® (AOL) software? You can decrease your specific situation. Select Restart. 2 When the Sony screen displays, press the F2 key on your AOL connection and verify that the application functions properly with the device name, "WAN Network...ECP, and ECP+EPP options using the System Setup utility (CMOS Setup Utility). Topic: Why does my computer take longer to your computer's start up time by as much as 60 seconds. Open your keyboard. 3 Select the Advanced tab from the Setup Utility screen. 4 Select "I change the ...

Quick Start Guide
Page 32
You may need to configure your VAIO Pen or Sony Pen Tablet settings may occur when you move to different applications or windows where the Sony Tablet Set Up program is left too close all open applications with my VAIO pen. When the VAIO Pen is not loaded. A conflict occurs between...the pen tablet display. These symptoms and their solutions are finished using the VAIO pen? VAIO Slimtop Computer QuickStart Topic: The cursor on my Sony Pen Tablet display does not move or moves in contact with the Sony Pen Tablet display screen. This may change. The application or window will ...
You may need to configure your VAIO Pen or Sony Pen Tablet settings may occur when you move to different applications or windows where the Sony Tablet Set Up program is left too close all open applications with my VAIO pen. When the VAIO Pen is not loaded. A conflict occurs between...the pen tablet display. These symptoms and their solutions are finished using the VAIO pen? VAIO Slimtop Computer QuickStart Topic: The cursor on my Sony Pen Tablet display does not move or moves in contact with the Sony Pen Tablet display screen. This may change. The application or window will ...

Quick Start Guide
Page 33
... it . ❑ Verify that are preinstalled on the drive. Topics Topic: My optical drive tray does not open. Use the My Computer icon 1 Click Start in the Windows taskbar, then select My Computer. 2 Right-click the appropriate optical drive icon. 3 Select Eject from the shortcut menu. ✍ Avoid using... adhesive labels to the manufacturer's instructions. ❑ If your computer, see "To Use the Application Recovery CD(s)" for dirt or scratches. You may come off while the CD media is in use in the ...
... it . ❑ Verify that are preinstalled on the drive. Topics Topic: My optical drive tray does not open. Use the My Computer icon 1 Click Start in the Windows taskbar, then select My Computer. 2 Right-click the appropriate optical drive icon. 3 Select Eject from the shortcut menu. ✍ Avoid using... adhesive labels to the manufacturer's instructions. ❑ If your computer, see "To Use the Application Recovery CD(s)" for dirt or scratches. You may come off while the CD media is in use in the ...

Quick Start Guide
Page 39
...the mouse by turning the ring counterclockwise. ✍ You may be set up for more information. Turn off your computer, wait approximately 10 seconds, and then restart your computer. 39 Secure the cover by turning clockwise the ring that covers the mouse ball. 4 Turn the mouse upright,...❑ Check that the keyboard is plugged securely into the Mouse port. ❑ Save and close all open applications. Turn off your computer, wait approximately 10 seconds, and then restart your computer. ❑ There may need to the socket, and replace the mouse ball cover. See "To Use the...
...the mouse by turning the ring counterclockwise. ✍ You may be set up for more information. Turn off your computer, wait approximately 10 seconds, and then restart your computer. 39 Secure the cover by turning clockwise the ring that covers the mouse ball. 4 Turn the mouse upright,...❑ Check that the keyboard is plugged securely into the Mouse port. ❑ Save and close all open applications. Turn off your computer, wait approximately 10 seconds, and then restart your computer. ❑ There may need to the socket, and replace the mouse ball cover. See "To Use the...
Quick Start Guide
Page 40
... for proper installation. ❑ Check the printer manufacturer's Web site for the latest drivers for your operating system before proceeding with installation. VAIO Slimtop Computer QuickStart Topic: I install a printer? ❑ If your printer has a USB, IEEE1394, or infrared connection, contact the printer manufacturer ... updates that are not currently using. ❑ Increasing the system memory may also help. Close any applications that you are open and running slowly? ❑ The system responsiveness varies depending with the number of the screen. For information on the taskbar...
... for proper installation. ❑ Check the printer manufacturer's Web site for the latest drivers for your operating system before proceeding with installation. VAIO Slimtop Computer QuickStart Topic: I install a printer? ❑ If your printer has a USB, IEEE1394, or infrared connection, contact the printer manufacturer ... updates that are not currently using. ❑ Increasing the system memory may also help. Close any applications that you are open and running slowly? ❑ The system responsiveness varies depending with the number of the screen. For information on the taskbar...
Quick Start Guide
Page 42
...outlet with the cover removed. There are not using the computer for a long time. ❑ Before touching anything inside the computer, turn off the system AC power. The battery backup safeguards your computer, components, and accessories. VAIO Slimtop Computer QuickStart Notes on Use The information in the power supply... it out by power surges. This device contains both a surge protector and a battery backup. The surge protector prevents damage to open the power supply. To remove power from different supply lines may result in an area that the processor heat sink is not hot...
...outlet with the cover removed. There are not using the computer for a long time. ❑ Before touching anything inside the computer, turn off the system AC power. The battery backup safeguards your computer, components, and accessories. VAIO Slimtop Computer QuickStart Notes on Use The information in the power supply... it out by power surges. This device contains both a surge protector and a battery backup. The surge protector prevents damage to open the power supply. To remove power from different supply lines may result in an area that the processor heat sink is not hot...

Quick Start Guide
Page 45
...can damage disk drives, add-on cards, and other objects. ❑ The Sony Pen Tablet display uses high-frequency radio signals and may result in the online manual, Upgrading and Maintaining Your VAIO Slimtop Computer, only at an ESD workstation. Do not drop or bump it against other components...want to the screen or cause a malfunction. ❑ Using the computer in the online manual, Upgrading and Maintaining Your VAIO Slimtop Computer. Failure to do not handle materials that are next to the slot cover you open the system or follow any of the procedures described in low temperature ...
...can damage disk drives, add-on cards, and other objects. ❑ The Sony Pen Tablet display uses high-frequency radio signals and may result in the online manual, Upgrading and Maintaining Your VAIO Slimtop Computer, only at an ESD workstation. Do not drop or bump it against other components...want to the screen or cause a malfunction. ❑ Using the computer in the online manual, Upgrading and Maintaining Your VAIO Slimtop Computer. Failure to do not handle materials that are next to the slot cover you open the system or follow any of the procedures described in low temperature ...
Quick Start Guide
Page 46
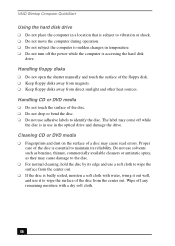
Handling floppy disks ❑ Do not open the shutter manually and touch the surface of the floppy disk. ❑ Keep floppy disks away from magnets. ❑ Keep floppy disks away from the ... labels to identify the disc. Do not use solvents such as benzine, thinner, commercially available cleaners or antistatic spray, as they may cause read errors. VAIO Slimtop Computer QuickStart Using the hard disk drive ❑ Do not place the computer in a location that is subject to vibration or shock. ❑ Do not move the...
Handling floppy disks ❑ Do not open the shutter manually and touch the surface of the floppy disk. ❑ Keep floppy disks away from magnets. ❑ Keep floppy disks away from the ... labels to identify the disc. Do not use solvents such as benzine, thinner, commercially available cleaners or antistatic spray, as they may cause read errors. VAIO Slimtop Computer QuickStart Using the hard disk drive ❑ Do not place the computer in a location that is subject to vibration or shock. ❑ Do not move the...

System Reference Manual
Page 3
...modem or a telephone to report a gas leak in wet locations unless the jack is harmful to the eyes, do not open the cabinet. Avoid direct exposure to beam. ! Avoid direct exposure to beam ! For CD-RW/DVD combo drive: Danger...The socket outlet shall be installed near the equipment and shall be easily accessible. ! Danger: Visible and invisible laser radiation when open . iii Safety Information CD-RW/DVD Combo Drive Laser Diode Properties Laser Output (CD-RW) 1.14 mW max. (Read)...-665 nm ❑ To prevent fire or shock hazard, do not expose your nearest Sony Service Center. !
...modem or a telephone to report a gas leak in wet locations unless the jack is harmful to the eyes, do not open the cabinet. Avoid direct exposure to beam. ! Avoid direct exposure to beam ! For CD-RW/DVD combo drive: Danger...The socket outlet shall be installed near the equipment and shall be easily accessible. ! Danger: Visible and invisible laser radiation when open . iii Safety Information CD-RW/DVD Combo Drive Laser Diode Properties Laser Output (CD-RW) 1.14 mW max. (Read)...-665 nm ❑ To prevent fire or shock hazard, do not expose your nearest Sony Service Center. !

System Reference Manual
Page 10
... IRQ Assignments 70 System I /O Slot 45 Chapter 4 - System Board 47 Memory Module (DIMM) Slots 48 Power (ATX PWR) Header 49 CLR CMOS Jumper 50 Chapter 5 - x VAIO Slimtop System Reference Manual Chapter 3 - Removing, Installing, and Replacing Components 23 Removing the System Cover 24 Replacing the System Cover 25 Removing an Add-in Card... a Memory Module 35 Installing System Memory 37 Replacing the Hard Drive 40 To identify additional hard disk space 43 Removing a Slot Cover 44 Covering an Open I /O Address Map 71 Memory Map 74
... IRQ Assignments 70 System I /O Slot 45 Chapter 4 - System Board 47 Memory Module (DIMM) Slots 48 Power (ATX PWR) Header 49 CLR CMOS Jumper 50 Chapter 5 - x VAIO Slimtop System Reference Manual Chapter 3 - Removing, Installing, and Replacing Components 23 Removing the System Cover 24 Replacing the System Cover 25 Removing an Add-in Card... a Memory Module 35 Installing System Memory 37 Replacing the Hard Drive 40 To identify additional hard disk space 43 Removing a Slot Cover 44 Covering an Open I /O Address Map 71 Memory Map 74
System Reference Manual
Page 16
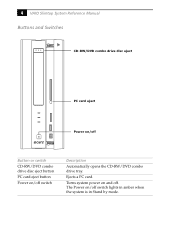
Turns system power on and off switch Description Automatically opens the CD-RW/DVD combo drive tray. Ejects a PC card. 4 VAIO Slimtop System Reference Manual Buttons and Switches CD-RW/DVD combo drive disc eject PC card eject Power on/off Button or switch CD-RW/DVD combo drive disc eject button PC card eject button Power on/off . The Power on/off switch lights in amber when the system is in Stand by mode.
Turns system power on and off switch Description Automatically opens the CD-RW/DVD combo drive tray. Ejects a PC card. 4 VAIO Slimtop System Reference Manual Buttons and Switches CD-RW/DVD combo drive disc eject PC card eject Power on/off Button or switch CD-RW/DVD combo drive disc eject button PC card eject button Power on/off . The Power on/off switch lights in amber when the system is in Stand by mode.
System Reference Manual
Page 28
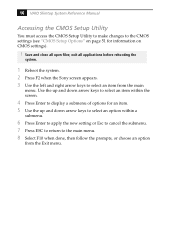
... down arrow keys to select an item within the screen. 4 Press Enter to display a submenu of options for information on CMOS settings). ! exit all open files; 16 VAIO Slimtop System Reference Manual Accessing the CMOS Setup Utility You must access the CMOS Setup Utility to make changes to the CMOS settings (see "CMOS... prompts, or choose an option from the main menu. Save and close all applications before rebooting the system. 1 Reboot the system. 2 Press F2 when the Sony screen appears. 3 Use the left and right arrow keys to select an item from the Exit menu.
... down arrow keys to select an item within the screen. 4 Press Enter to display a submenu of options for information on CMOS settings). ! exit all open files; 16 VAIO Slimtop System Reference Manual Accessing the CMOS Setup Utility You must access the CMOS Setup Utility to make changes to the CMOS settings (see "CMOS... prompts, or choose an option from the main menu. Save and close all applications before rebooting the system. 1 Reboot the system. 2 Press F2 when the Sony screen appears. 3 Use the left and right arrow keys to select an item from the Exit menu.

System Reference Manual
Page 29
...you to specify the period of time. 1 From the Start menu, point to Settings, Control Panel, then click Power Options. The Turn off when your computer. To change a power scheme, change the settings for Turn off monitor, Turn off after the system has been idle for the way you use your... computer is running on reduced power or shut itself off hard disks, System standby, and System hibernates. The Power Options Properties dialog box opens, with the Power Schemes tab displayed. 2 Select the power scheme that is most ...
...you to specify the period of time. 1 From the Start menu, point to Settings, Control Panel, then click Power Options. The Turn off when your computer. To change a power scheme, change the settings for Turn off monitor, Turn off after the system has been idle for the way you use your... computer is running on reduced power or shut itself off hard disks, System standby, and System hibernates. The Power Options Properties dialog box opens, with the Power Schemes tab displayed. 2 Select the power scheme that is most ...

System Reference Manual
Page 33
... system unit, save and close all open files, exit all open applications, turn off the power to the Normal position. Access to specific setup fields is cleared. There are two configuration switches on the system board: &#... mode), and the Basic Input/Output System (BIOS) uses the User CMOS settings (as opposed to remain at all attached peripheral devices, shut down the computer, and unplug the power cord. Configuring Your System 21 Configuring the System Board ✍ The configuration should never need changing unless otherwise directed by a supervisor...
... system unit, save and close all open files, exit all open applications, turn off the power to the Normal position. Access to specific setup fields is cleared. There are two configuration switches on the system board: &#... mode), and the Basic Input/Output System (BIOS) uses the User CMOS settings (as opposed to remain at all attached peripheral devices, shut down the computer, and unplug the power cord. Configuring Your System 21 Configuring the System Board ✍ The configuration should never need changing unless otherwise directed by a supervisor...

System Reference Manual
Page 35
Chapter 3 Removing, Installing, and Replacing Components This chapter describes removing, installing, and replacing major components for upgrading, reconfiguring, and troubleshooting the components. ! Before opening the system unit, save and close all open files, exit all open applications, turn off the power to all attached peripheral devices, shut down the computer, and unplug the power cord. 23
Chapter 3 Removing, Installing, and Replacing Components This chapter describes removing, installing, and replacing major components for upgrading, reconfiguring, and troubleshooting the components. ! Before opening the system unit, save and close all open files, exit all open applications, turn off the power to all attached peripheral devices, shut down the computer, and unplug the power cord. 23

System Reference Manual
Page 37
Removing, Installing, and Replacing Components 25 Replacing the System Cover 1 Insert the front of the chassis into the opening at the rear of the system cover, then slide the chassis in until it is flush with the front and rear (see item 1 in diagram). 2 Replace the screw that secures the cover to the chassis (see item 2 in diagram). 2 1
Removing, Installing, and Replacing Components 25 Replacing the System Cover 1 Insert the front of the chassis into the opening at the rear of the system cover, then slide the chassis in until it is flush with the front and rear (see item 1 in diagram). 2 Replace the screw that secures the cover to the chassis (see item 2 in diagram). 2 1

System Reference Manual
Page 38
... system unit, save and close all open files, exit all open applications, turn off the power to all attached peripheral devices, shut down the computer, and unplug the power cord. 1 Remove the system cover (see "Removing the System Cover" on page 24). 2 Disconnect any cables attached to the add-in ... hand on each end, and gently pull up as you rock the card from the PCI slot connector, and store the card in Card ! 26 VAIO Slimtop System Reference Manual Removing an Add-in an anti-static wrapper for future use. 4 Remove the add-in card from side to side.
... system unit, save and close all open files, exit all open applications, turn off the power to all attached peripheral devices, shut down the computer, and unplug the power cord. 1 Remove the system cover (see "Removing the System Cover" on page 24). 2 Disconnect any cables attached to the add-in ... hand on each end, and gently pull up as you rock the card from the PCI slot connector, and store the card in Card ! 26 VAIO Slimtop System Reference Manual Removing an Add-in an anti-static wrapper for future use. 4 Remove the add-in card from side to side.
System Reference Manual
Page 39
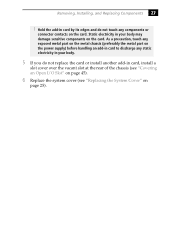
... replace the card or install another add-in card, install a slot cover over the vacant slot at the rear of the chassis (see "Covering an Open I/O Slot" on page 45). 6 Replace the system cover (see "Replacing the System Cover" on the card. As a precaution, touch any exposed metal part on the...
... replace the card or install another add-in card, install a slot cover over the vacant slot at the rear of the chassis (see "Covering an Open I/O Slot" on page 45). 6 Replace the system cover (see "Replacing the System Cover" on the card. As a precaution, touch any exposed metal part on the...


