Quick Start Guide
Page 6
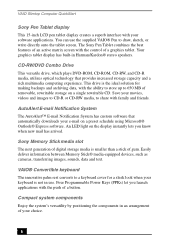
...Four Programmable Power Keys (PPKs) let you know when new mail has arrived. You can use . AutoAlert E-mail Notification System The AutoAlert™ E-mail Notification System has custom software that provides increased storage capacity and a rich multimedia computing experience. VAIO® Convertible... that automatically downloads your choice. 6 VAIO Slimtop Computer QuickStart Sony Pen Tablet display This 15-inch LCD pen tablet display creates a superb interface with the push of a button. Your graphics tablet display has built-in use the supplied VAIO® Pen to 650 MB of ...
...Four Programmable Power Keys (PPKs) let you know when new mail has arrived. You can use . AutoAlert E-mail Notification System The AutoAlert™ E-mail Notification System has custom software that provides increased storage capacity and a rich multimedia computing experience. VAIO® Convertible... that automatically downloads your choice. 6 VAIO Slimtop Computer QuickStart Sony Pen Tablet display This 15-inch LCD pen tablet display creates a superb interface with the push of a button. Your graphics tablet display has built-in use the supplied VAIO® Pen to 650 MB of ...

Quick Start Guide
Page 29
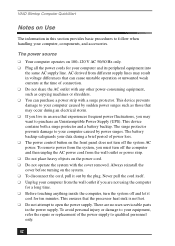
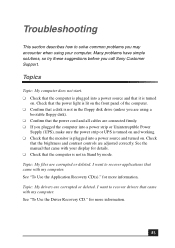
...encounter when using a bootable floppy disk). ❑ Confirm that the power cord and all cables are connected firmly. ❑ If you plugged the computer into a power strip or Uninterruptible Power Supply (UPS), make sure the power strip or UPS is not in Stand by mode. Many problems have ...simple solutions, so try these suggestions before you call Sony Customer Support. See "To Use the Application...
...encounter when using a bootable floppy disk). ❑ Confirm that the power cord and all cables are connected firmly. ❑ If you plugged the computer into a power strip or Uninterruptible Power Supply (UPS), make sure the power strip or UPS is not in Stand by mode. Many problems have ...simple solutions, so try these suggestions before you call Sony Customer Support. See "To Use the Application...
Quick Start Guide
Page 42
...10065; Do not attempt to your computer caused by the plug. Never pull the cord itself. ❑ Unplug your computer and its peripheral equipment into the same AC supply line. To avoid personal injury or damage to open the power supply. VAIO Slimtop Computer QuickStart Notes on the system. &#...10065; To disconnect the cord, pull it cool for your computer from the wall outlet or power strip. ❑ Do not place heavy objects on the power cord. ❑ Do not operate the...
...10065; Do not attempt to your computer caused by the plug. Never pull the cord itself. ❑ Unplug your computer and its peripheral equipment into the same AC supply line. To avoid personal injury or damage to open the power supply. VAIO Slimtop Computer QuickStart Notes on the system. &#...10065; To disconnect the cord, pull it cool for your computer from the wall outlet or power strip. ❑ Do not place heavy objects on the power cord. ❑ Do not operate the...

Quick Start Guide
Page 54
VAIO Slimtop Computer QuickStart operating system locks 30 optical drive tray eject 33 Pen Tablet drawing and erasing 32 VAIO Pen 32 Pen Tablet display Stand by/Suspend modes 32 printer 40 recover applications 29 recover drivers 29 software 35, 36 system response 40 using the mouse 32 turning off your computer... 42 TV interference 44, 45 W Windows taskbar 40 WordPerfect 27 work surfaces 10 U Uninterruptible Power Supply 42 Unpacking your computer 8 unpacking, system (pictured) 8 upgrading your computer 44 V VAIO Action Setup 27 VAIO Pen drawing and erasing on...
VAIO Slimtop Computer QuickStart operating system locks 30 optical drive tray eject 33 Pen Tablet drawing and erasing 32 VAIO Pen 32 Pen Tablet display Stand by/Suspend modes 32 printer 40 recover applications 29 recover drivers 29 software 35, 36 system response 40 using the mouse 32 turning off your computer... 42 TV interference 44, 45 W Windows taskbar 40 WordPerfect 27 work surfaces 10 U Uninterruptible Power Supply 42 Unpacking your computer 8 unpacking, system (pictured) 8 upgrading your computer 44 V VAIO Action Setup 27 VAIO Pen drawing and erasing on...

System Reference Manual
Page 10
... Replacing the Lithium Battery 30 Removing the Power Supply 33 Replacing the Power Supply 34 Removing a Memory Module 35 Installing System Memory 37 Replacing the Hard Drive 40 To identify additional hard disk space 43 Removing a Slot Cover 44 Covering an Open I /O Address Map 71 Memory Map 74 x VAIO Slimtop System Reference Manual Chapter 3 - System Board...
... Replacing the Lithium Battery 30 Removing the Power Supply 33 Replacing the Power Supply 34 Removing a Memory Module 35 Installing System Memory 37 Replacing the Hard Drive 40 To identify additional hard disk space 43 Removing a Slot Cover 44 Covering an Open I /O Address Map 71 Memory Map 74 x VAIO Slimtop System Reference Manual Chapter 3 - System Board...

System Reference Manual
Page 32
For more information about configuring a UPS device, refer to select and configure an Uninterruptible Power Supply (UPS) device for your system. 9 Select and configure the settings most appropriate for your Microsoft® Windows® XP operating system online Help. 20 VAIO Slimtop System Reference Manual The UPS tab enables you to your system and click OK.
For more information about configuring a UPS device, refer to select and configure an Uninterruptible Power Supply (UPS) device for your system. 9 Select and configure the settings most appropriate for your Microsoft® Windows® XP operating system online Help. 20 VAIO Slimtop System Reference Manual The UPS tab enables you to your system and click OK.
System Reference Manual
Page 36
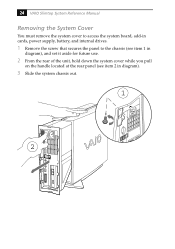
24 VAIO Slimtop System Reference Manual Removing the System Cover You must remove the system cover to access the system board, add-in cards, power supply, battery, and internal drives. 1 Remove the screw that secures the panel to the chassis (see item 1 in diagram), and set it aside for future use. 2 From the rear of the unit, hold down the system cover while you pull on the handle located at the rear panel (see item 2 in diagram). 3 Slide the system chassis out. 1 2
24 VAIO Slimtop System Reference Manual Removing the System Cover You must remove the system cover to access the system board, add-in cards, power supply, battery, and internal drives. 1 Remove the screw that secures the panel to the chassis (see item 1 in diagram), and set it aside for future use. 2 From the rear of the unit, hold down the system cover while you pull on the handle located at the rear panel (see item 2 in diagram). 3 Slide the system chassis out. 1 2
System Reference Manual
Page 39
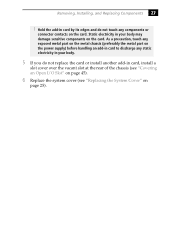
... body may damage sensitive components on the card. As a precaution, touch any exposed metal part on the metal chassis (preferably the metal part on the power supply) before handling an add-in card to discharge any static electricity in your body. 5 If you do not touch any components or connector contacts on...
... body may damage sensitive components on the card. As a precaution, touch any exposed metal part on the metal chassis (preferably the metal part on the power supply) before handling an add-in card to discharge any static electricity in your body. 5 If you do not touch any components or connector contacts on...

System Reference Manual
Page 43
One side of fire or explosion. 12 Replace the power supply (see "Replacing the Power Supply" on page 33). 9 Use a screwdriver or similar tool to the instructions that came with the new battery. 11 Insert the new battery into the battery ... (see 3 in diagram) and dispose according to push the tab against the battery holder (see 2 in diagram and "Removing the Power Supply" on page 34). Removing, Installing, and Replacing Components 31 8 Remove the power supply (see 1 in diagram). Using a type of battery other than a CR2032 may present a risk of the battery pops up , and...
One side of fire or explosion. 12 Replace the power supply (see "Replacing the Power Supply" on page 33). 9 Use a screwdriver or similar tool to the instructions that came with the new battery. 11 Insert the new battery into the battery ... (see 3 in diagram) and dispose according to push the tab against the battery holder (see 2 in diagram and "Removing the Power Supply" on page 34). Removing, Installing, and Replacing Components 31 8 Remove the power supply (see 1 in diagram). Using a type of battery other than a CR2032 may present a risk of the battery pops up , and...

System Reference Manual
Page 45
Removing, Installing, and Replacing Components 33 Removing the Power Supply You must remove the power supply to release the power supply. Before opening the system unit, save and close all open files, exit all open applications, turn off the power to all attached peripheral devices, shut down the computer, and unplug the power cord. 1 Remove the screw that secures the power supply to the chassis (see 1 in diagram), and set it aside for future use. 1 2 2 Press down on the plastic lever at the bottom of the power supply (see 2 in diagram) to replace the CMOS battery. !
Removing, Installing, and Replacing Components 33 Removing the Power Supply You must remove the power supply to release the power supply. Before opening the system unit, save and close all open files, exit all open applications, turn off the power to all attached peripheral devices, shut down the computer, and unplug the power cord. 1 Remove the screw that secures the power supply to the chassis (see 1 in diagram), and set it aside for future use. 1 2 2 Press down on the plastic lever at the bottom of the power supply (see 2 in diagram) to replace the CMOS battery. !
System Reference Manual
Page 46
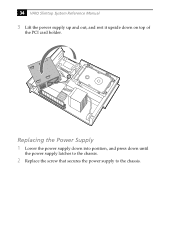
34 VAIO Slimtop System Reference Manual 3 Lift the power supply up and out, and rest it upside down until the power supply latches to the chassis. 2 Replace the screw that secures the power supply to the chassis. Replacing the Power Supply 1 Lower the power supply down into position, and press down on top of the PCI card holder.
34 VAIO Slimtop System Reference Manual 3 Lift the power supply up and out, and rest it upside down until the power supply latches to the chassis. 2 Replace the screw that secures the power supply to the chassis. Replacing the Power Supply 1 Lower the power supply down into position, and press down on top of the PCI card holder.
System Reference Manual
Page 53
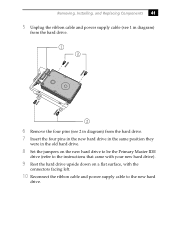
Removing, Installing, and Replacing Components 41 5 Unplug the ribbon cable and power supply cable (see 1 in diagram) from the hard drive. 1 2 2 6 Remove the four pins (see 2 in diagram) from the hard drive. 7 Insert the four pins in the ... with your new hard drive). 9 Rest the hard drive upside down on a flat surface, with the connectors facing left. 10 Reconnect the ribbon cable and power supply cable to the new hard drive.
Removing, Installing, and Replacing Components 41 5 Unplug the ribbon cable and power supply cable (see 1 in diagram) from the hard drive. 1 2 2 6 Remove the four pins (see 2 in diagram) from the hard drive. 7 Insert the four pins in the ... with your new hard drive). 9 Rest the hard drive upside down on a flat surface, with the connectors facing left. 10 Reconnect the ribbon cable and power supply cable to the new hard drive.
System Reference Manual
Page 61
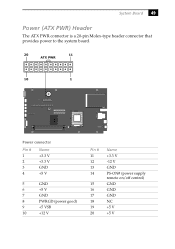
System Board 49 Power (ATX PWR) Header The ATX PWR connector is a 20-pin Molex-type header connector that provides power to the system board. 20 11 ATX PWR 10 1 O12 N Power connector Pin # 1 2 3 4 Name +3.3 V +3.3 V GND +5 V 5 GND 6 +5 V 7 GND 8 PWRGD (power good) 9 +5 VSB 10 +12 V Pin # 11 12 13 14 15 16 17 18 19 20 Name +3.3 V -12 V GND PS-ON# (power supply remote on/off control) GND GND GND NC +5 V +5 V
System Board 49 Power (ATX PWR) Header The ATX PWR connector is a 20-pin Molex-type header connector that provides power to the system board. 20 11 ATX PWR 10 1 O12 N Power connector Pin # 1 2 3 4 Name +3.3 V +3.3 V GND +5 V 5 GND 6 +5 V 7 GND 8 PWRGD (power good) 9 +5 VSB 10 +12 V Pin # 11 12 13 14 15 16 17 18 19 20 Name +3.3 V -12 V GND PS-ON# (power supply remote on/off control) GND GND GND NC +5 V +5 V
VAIO User Guide
Page 88
... to 12V. Sony computer supplies, accessories, and peripherals can : supply power from your system, such as an optical or hard disk drive, confirm their operating system compatibility and required operating conditions. Before connecting compatible i.LINK PC peripherals to your local retailer or by accessing the Sony VAIO Direct Web site (http://www.sonystyle.com/vaio), or by...
... to 12V. Sony computer supplies, accessories, and peripherals can : supply power from your system, such as an optical or hard disk drive, confirm their operating system compatibility and required operating conditions. Before connecting compatible i.LINK PC peripherals to your local retailer or by accessing the Sony VAIO Direct Web site (http://www.sonystyle.com/vaio), or by...
VAIO User Guide
Page 105
... you are using a bootable floppy disk). Confirm that the power cord and all cables are connected firmly. If you plugged the computer into a power strip or Uninterruptible Power Supply (UPS), make sure the power strip or UPS is turned on and working. Check that the... 1. Windows attempts to your computer by pressing and holding the power switch for more information. The Windows operating system may result in the Windows taskbar and select VAIO Help and Support. The VAIO Help and Support dialog box appears. 2. Check that the power light is lit on . I...
... you are using a bootable floppy disk). Confirm that the power cord and all cables are connected firmly. If you plugged the computer into a power strip or Uninterruptible Power Supply (UPS), make sure the power strip or UPS is turned on and working. Check that the... 1. Windows attempts to your computer by pressing and holding the power switch for more information. The Windows operating system may result in the Windows taskbar and select VAIO Help and Support. The VAIO Help and Support dialog box appears. 2. Check that the power light is lit on . I...
VAIO User Guide
Page 114
... that can cause unstable operation or unwanted weak currents at the time of the power supply to qualified personnel only. Never pull the cord itself. Unplug your computer from different supply lines may result in the power supply. The power source Your computer operates on 100-120 V AC 50/60 Hz only. Plug all the...
... that can cause unstable operation or unwanted weak currents at the time of the power supply to qualified personnel only. Never pull the cord itself. Unplug your computer from different supply lines may result in the power supply. The power source Your computer operates on 100-120 V AC 50/60 Hz only. Plug all the...
VAIO User Guide (primary manual)
Page 78
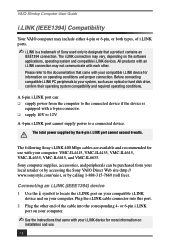
The total power supplied by calling 1-888-315-7669 (toll free). Before connecting compatible i.LINK PC peripherals to a connected device. The following Sony i.LINK 400 Mbps cables are available and recommended for use . 78 Plug the i.LINK cable connector into the corresponding 4- VAIO Slimtop Computer User Guide i.LINK (IEEE1394) Compatibility Your VAIO computer may include either 4-pin or 6-pin...
The total power supplied by calling 1-888-315-7669 (toll free). Before connecting compatible i.LINK PC peripherals to a connected device. The following Sony i.LINK 400 Mbps cables are available and recommended for use . 78 Plug the i.LINK cable connector into the corresponding 4- VAIO Slimtop Computer User Guide i.LINK (IEEE1394) Compatibility Your VAIO computer may include either 4-pin or 6-pin...
VAIO User Guide (primary manual)
Page 85
... and contrast controls are connected firmly. ❑ If you call Sony Customer Support. for more information. 85 See "To Use the Driver Recovery CD." Check that the power light is lit on the front panel of the computer. ❑ Confirm that a disk is not in Stand by mode.... Many problems have simple solutions, so try these suggestions before you plugged the computer into a power strip or Uninterruptible Power Supply (UPS), make sure the power strip or UPS is turned on and working. ❑ Check that it is plugged into a power source and that the monitor is turned on .
... and contrast controls are connected firmly. ❑ If you call Sony Customer Support. for more information. 85 See "To Use the Driver Recovery CD." Check that the power light is lit on the front panel of the computer. ❑ Confirm that a disk is not in Stand by mode.... Many problems have simple solutions, so try these suggestions before you plugged the computer into a power strip or Uninterruptible Power Supply (UPS), make sure the power strip or UPS is turned on and working. ❑ Check that it is plugged into a power source and that the monitor is turned on .
VAIO User Guide (primary manual)
Page 98
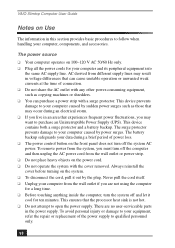
... from the system, you are no user-serviceable parts in the power supply. To avoid personal injury or damage to purchase an Uninterruptible Power Supply (UPS). VAIO Slimtop Computer User Guide Notes on Use The information in this section provides basic procedures to your computer caused by power surges. The battery backup safeguards your data during an electrical storm...
... from the system, you are no user-serviceable parts in the power supply. To avoid personal injury or damage to purchase an Uninterruptible Power Supply (UPS). VAIO Slimtop Computer User Guide Notes on Use The information in this section provides basic procedures to your computer caused by power surges. The battery backup safeguards your data during an electrical storm...

VAIO User Guide (primary manual)
Page 111
... TV interference 100, 101 U Uninterruptible Power Supply (UPS) 98 Universal Serial Bus back panel port 11 Universal Serial Bus (USB) port 12 Universal Serial Bus port 9 upgrading your computer 100 upper switch position 19 USB port 11 using Memory Stick media 13 V VAIO Action Setup 29 VAIO Pen 21 drawing and erasing on Pen Tablet...
... TV interference 100, 101 U Uninterruptible Power Supply (UPS) 98 Universal Serial Bus back panel port 11 Universal Serial Bus (USB) port 12 Universal Serial Bus port 9 upgrading your computer 100 upper switch position 19 USB port 11 using Memory Stick media 13 V VAIO Action Setup 29 VAIO Pen 21 drawing and erasing on Pen Tablet...


