
Reference Manual
Page 6
vi VAIO Computer Reference Manual Installing an Add-In Card 22 Removing an Add-in Card 23...48 Keyboard/Mouse (KB/MOUSE) Connector 49 USB Connectors 50 Printer, Serial, and VGA Monitor Connectors 51 LCD Monitor Connector (VAIO Slimtop LCD models only) .....53 Auxiliary (AUX) Connector 54 Wake On LAN (WOL_CON) Connector 55 Line In and Line Out ...Connectors 56 Phones and Mic Connectors 57 Sony Memory Stick Connector 58 Configuration Jumpers 59 CMOS Clear (CMOS 59 VGA Enable (VGAEN 60 INTEN 61 Chapter 5 - CMOS...
vi VAIO Computer Reference Manual Installing an Add-In Card 22 Removing an Add-in Card 23...48 Keyboard/Mouse (KB/MOUSE) Connector 49 USB Connectors 50 Printer, Serial, and VGA Monitor Connectors 51 LCD Monitor Connector (VAIO Slimtop LCD models only) .....53 Auxiliary (AUX) Connector 54 Wake On LAN (WOL_CON) Connector 55 Line In and Line Out ...Connectors 56 Phones and Mic Connectors 57 Sony Memory Stick Connector 58 Configuration Jumpers 59 CMOS Clear (CMOS 59 VGA Enable (VGAEN 60 INTEN 61 Chapter 5 - CMOS...
Reference Manual
Page 7
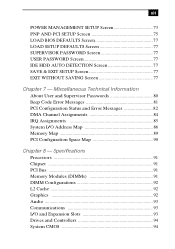
... I /O Address Map 86 Memory Map 89 PCI Configuration Space Map 90 Chapter 8 - vii POWER MANAGEMENT SETUP Screen 73 PNP AND PCI SETUP Screen 75 LOAD BIOS DEFAULTS Screen 77 LOAD SETUP DEFAULTS Screen 77 SUPERVISOR PASSWORD Screen 77 USER PASSWORD Screen 77 IDE HDD AUTO DETECTION Screen 77 SAVE & EXIT SETUP...
... I /O Address Map 86 Memory Map 89 PCI Configuration Space Map 90 Chapter 8 - vii POWER MANAGEMENT SETUP Screen 73 PNP AND PCI SETUP Screen 75 LOAD BIOS DEFAULTS Screen 77 LOAD SETUP DEFAULTS Screen 77 SUPERVISOR PASSWORD Screen 77 USER PASSWORD Screen 77 IDE HDD AUTO DETECTION Screen 77 SAVE & EXIT SETUP...
Reference Manual
Page 25
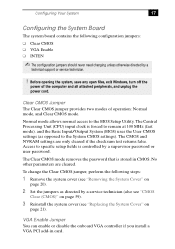
...3 Reinstall the system cover (see "Removing the System Cover" on page 21). The Clear CMOS mode removes the password that is forced to the BIOS Setup Utility. VGA Enable Jumper You can enable or disable the onboard VGA controller if you install a VGA PCI add-in CMOS. No other parameters...CPU) input clock is stored in card. Normal mode allows normal access to remain at 100 MHz (fast mode), and the Basic Input/Output System (BIOS) uses the User CMOS settings (as directed by a supervisor password or user password. The CMOS and NVRAM settings are cleared. Clear CMOS Jumper The ...
...3 Reinstall the system cover (see "Removing the System Cover" on page 21). The Clear CMOS mode removes the password that is forced to the BIOS Setup Utility. VGA Enable Jumper You can enable or disable the onboard VGA controller if you install a VGA PCI add-in CMOS. No other parameters...CPU) input clock is stored in card. Normal mode allows normal access to remain at 100 MHz (fast mode), and the Basic Input/Output System (BIOS) uses the User CMOS settings (as directed by a supervisor password or user password. The CMOS and NVRAM settings are cleared. Clear CMOS Jumper The ...
Reference Manual
Page 33
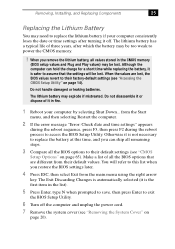
...Installing, and Replacing Components 25 Replacing the Lithium Battery You may need to access the BIOS Setup Utility. The lithium battery may be lost. Make a list of three years, after turning it off the computer and unplug the power cord. 7 Remove the system cover (see "Removing the System ... reboot sequence, press F3, then press F2 during the reboot process to replace the lithium battery if your computer by selecting Shut Down... You will be lost , the BIOS values revert to power the CMOS memory. ! The Exit Discarding Changes is automatically selected (it is safer to...
...Installing, and Replacing Components 25 Replacing the Lithium Battery You may need to access the BIOS Setup Utility. The lithium battery may be lost. Make a list of three years, after turning it off the computer and unplug the power cord. 7 Remove the system cover (see "Removing the System ... reboot sequence, press F3, then press F2 during the reboot process to replace the lithium battery if your computer by selecting Shut Down... You will be lost , the BIOS values revert to power the CMOS memory. ! The Exit Discarding Changes is automatically selected (it is safer to...
Reference Manual
Page 36
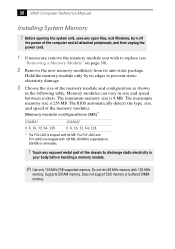
... DIMM1 0, 8, 16, 32, 64, 128 DIMM2 0, 8, 16, 32, 64, 128 * The PCV-L400 is expandable to 256 MB on all attached peripherals, and then unplug the power cord. 1 If necessary,... its anti-static package. The BIOS automatically detects the type, size, and speed of the chassis to prevent staticelectricity damage. 3 Choose the size of the computer and all models. ! SDRAM ... Supports SDRAM memory. The maximum memory size is 8 MB. 28 VAIO Computer Reference Manual Installing System Memory ! The PCV-L600 and PCV-L600S are shipped with 100 MHz memory. Before opening the system unit...
... DIMM1 0, 8, 16, 32, 64, 128 DIMM2 0, 8, 16, 32, 64, 128 * The PCV-L400 is expandable to 256 MB on all attached peripherals, and then unplug the power cord. 1 If necessary,... its anti-static package. The BIOS automatically detects the type, size, and speed of the chassis to prevent staticelectricity damage. 3 Choose the size of the computer and all models. ! SDRAM ... Supports SDRAM memory. The maximum memory size is 8 MB. 28 VAIO Computer Reference Manual Installing System Memory ! The PCV-L600 and PCV-L600S are shipped with 100 MHz memory. Before opening the system unit...
Reference Manual
Page 73
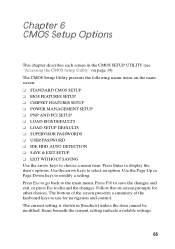
... shown in the CMOS SETUP UTILITY (see "Accessing the CMOS Setup Utility" on the main screen: u STANDARD CMOS SETUP u BIOS FEATURES SETUP u CHIPSET FEATURES SETUP u POWER MANAGEMENT SETUP u PNP AND PCI SETUP u LOAD BIOS DEFAULTS u LOAD SETUP DEFAULTS u SUPERVISOR PASSWORDS u USER PASSWORD u IDE HDD AUTO DETECTION u SAVE & EXIT SETUP u EXIT WITHOUT SAVING...
... shown in the CMOS SETUP UTILITY (see "Accessing the CMOS Setup Utility" on the main screen: u STANDARD CMOS SETUP u BIOS FEATURES SETUP u CHIPSET FEATURES SETUP u POWER MANAGEMENT SETUP u PNP AND PCI SETUP u LOAD BIOS DEFAULTS u LOAD SETUP DEFAULTS u SUPERVISOR PASSWORDS u USER PASSWORD u IDE HDD AUTO DETECTION u SAVE & EXIT SETUP u EXIT WITHOUT SAVING...
Reference Manual
Page 75
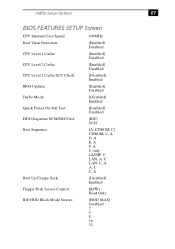
... SETUP Screen CPU Internal Core Speed: Boot Virus Detection: CPU Level 1 Cache: CPU Level 2 Cache: CPU Level 2 Cache ECC Check: BIOS Update: Turbo Mode: Quick Power On Self Test: HDD Sequence SCSI/IDE First: Boot Sequence: Boot Up Floppy Seek: Floppy Disk Access Control: IDE HDD ...
... SETUP Screen CPU Internal Core Speed: Boot Virus Detection: CPU Level 1 Cache: CPU Level 2 Cache: CPU Level 2 Cache ECC Check: BIOS Update: Turbo Mode: Quick Power On Self Test: HDD Sequence SCSI/IDE First: Boot Sequence: Boot Up Floppy Seek: Floppy Disk Access Control: IDE HDD ...
Reference Manual
Page 76
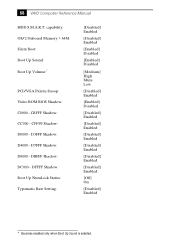
D3FFF Shadow: D4000 - DBFFF Shadow: DC000 - CBFFF Shadow: CC000 - CFFFF Shadow: D0000 - 68 VAIO Computer Reference Manual HDD S.M.A.R.T. D7FFF Shadow: D8000 - capability: OS/2 Onboard Memory > 64M: Silent Boot: Boot Up Sound: Boot Up Volume:* PCI/VGA Palette Snoop: Video ROM BIOS Shadow: C8000 - DFFFF Shadow: Boot Up NumLock Status: Typematic Rate Setting: [Disabled] Enabled...
D3FFF Shadow: D4000 - DBFFF Shadow: DC000 - CBFFF Shadow: CC000 - CFFFF Shadow: D0000 - 68 VAIO Computer Reference Manual HDD S.M.A.R.T. D7FFF Shadow: D8000 - capability: OS/2 Onboard Memory > 64M: Silent Boot: Boot Up Sound: Boot Up Volume:* PCI/VGA Palette Snoop: Video ROM BIOS Shadow: C8000 - DFFFF Shadow: Boot Up NumLock Status: Typematic Rate Setting: [Disabled] Enabled...

Reference Manual
Page 84
76 VAIO Computer Reference Manual IRQ 14 Used By ISA: IRQ 15 Used By ISA: DMA 1 Used By ISA: DMA 3 Used By ISA: DMA 5 Used By ISA: ISA MEM Block BASE: ISA MEM Block SIZE:* SYMBIOS SCSI BIOS: USB IRQ: ONB VGA BIOS First: Onboard Audio: Onboard Cardbus: [No/ICU] Yes [No/ICU] Yes [No/ICU] Yes [No/ICU] Yes [No/ICU] Yes [No/ICU] C800 CC00 D000 D400 D800 DC00 [8K] 16K 32K 64K [Disabled] Auto [Enabled] Disabled [No] Yes [Enabled] Disabled] [Enabled] Disabled * Displays only when ISA MEM Block BASE is not No/ICU.
76 VAIO Computer Reference Manual IRQ 14 Used By ISA: IRQ 15 Used By ISA: DMA 1 Used By ISA: DMA 3 Used By ISA: DMA 5 Used By ISA: ISA MEM Block BASE: ISA MEM Block SIZE:* SYMBIOS SCSI BIOS: USB IRQ: ONB VGA BIOS First: Onboard Audio: Onboard Cardbus: [No/ICU] Yes [No/ICU] Yes [No/ICU] Yes [No/ICU] Yes [No/ICU] Yes [No/ICU] C800 CC00 D000 D400 D800 DC00 [8K] 16K 32K 64K [Disabled] Auto [Enabled] Disabled [No] Yes [Enabled] Disabled] [Enabled] Disabled * Displays only when ISA MEM Block BASE is not No/ICU.
Reference Manual
Page 85
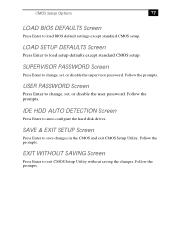
... without saving the changes. Follow the prompts. EXIT WITHOUT SAVING Screen Press Enter to auto-configure the hard disk drives. CMOS Setup Options 77 LOAD BIOS DEFAULTS Screen Press Enter to change , set , or disable the supervisor password. USER PASSWORD Screen Press Enter to change , set , or disable the user password...
... without saving the changes. Follow the prompts. EXIT WITHOUT SAVING Screen Press Enter to auto-configure the hard disk drives. CMOS Setup Options 77 LOAD BIOS DEFAULTS Screen Press Enter to change , set , or disable the supervisor password. USER PASSWORD Screen Press Enter to change , set , or disable the user password...
Reference Manual
Page 88
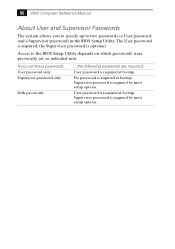
If you to specify up to the BIOS Setup Utility depends on which passwords were previously set these passwords... Supervisor password is required; The User password is required by most setup options. 80 VAIO Computer Reference Manual About User and Supervisor Passwords The system allows you set , as indicated next. the Supervisor ... passwords ...the following passwords are required: User password is required at bootup. Access to two passwords (a User password and a Supervisor password) in the BIOS Setup Utility. Supervisor password is required by most setup options.
If you to specify up to the BIOS Setup Utility depends on which passwords were previously set these passwords... Supervisor password is required; The User password is required by most setup options. 80 VAIO Computer Reference Manual About User and Supervisor Passwords The system allows you set , as indicated next. the Supervisor ... passwords ...the following passwords are required: User password is required at bootup. Access to two passwords (a User password and a Supervisor password) in the BIOS Setup Utility. Supervisor password is required by most setup options.

Reference Manual
Page 96
...VAIO Computer Reference Manual Memory Map Address range 001000000 - 18000000 000FC000 - 000FFFFF 000FA000 - 000FBFFF 000F9000 - 000F9FFF 000F8000 - 000F8FFF 000E8000 - 000F7FFF 000E0000 - 000E7FFF 000C8000 - 000DFFFF 000A0000 - 000C7FFF 0009FC00 - 0009FFFF 00080000 - 0009FBFF 00000000 - 0007FFFF Default configuration Extended memory Boot block ESCD (Plug and Play configuration and DMI) Reserved for BIOS... OEM Logo or Scan User Flash POST BIOS POST BIOS (available in UMB) Available high-DOS memory (ISA and PCI bus) Video memory and BIOS Extended BIOS data (moveable by ...
...VAIO Computer Reference Manual Memory Map Address range 001000000 - 18000000 000FC000 - 000FFFFF 000FA000 - 000FBFFF 000F9000 - 000F9FFF 000F8000 - 000F8FFF 000E8000 - 000F7FFF 000E0000 - 000E7FFF 000C8000 - 000DFFFF 000A0000 - 000C7FFF 0009FC00 - 0009FFFF 00080000 - 0009FBFF 00000000 - 0007FFFF Default configuration Extended memory Boot block ESCD (Plug and Play configuration and DMI) Reserved for BIOS... OEM Logo or Scan User Flash POST BIOS POST BIOS (available in UMB) Available high-DOS memory (ISA and PCI bus) Video memory and BIOS Extended BIOS data (moveable by ...
Reference Manual
Page 102
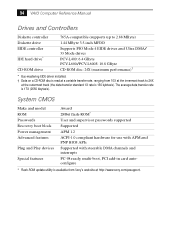
...VAIO Computer Reference Manual Drives and Controllers Diskette controller Diskette drive EIDE controller IDE hard drive* CD-ROM drive 765A-compatible (supports up to 2.88 MByte) 1.44 MByte 3.5-inch MFDD Supports PIO Mode 4 EIDE drives and Ultra DMA/ 33 Mode drives PCV-L400: 6.4 GByte PCV-L600/PCV...sony.com/pcsupport. System CMOS Make and model ROM Passwords Recovery boot block Power management Advanced features Plug and Play devices Special features Award 2Mbit flash-ROM* User and supervisor passwords supported Supported APM 1.2 ACPI-1.0 compliant hardware for use with APM and PNP BIOS...
...VAIO Computer Reference Manual Drives and Controllers Diskette controller Diskette drive EIDE controller IDE hard drive* CD-ROM drive 765A-compatible (supports up to 2.88 MByte) 1.44 MByte 3.5-inch MFDD Supports PIO Mode 4 EIDE drives and Ultra DMA/ 33 Mode drives PCV-L400: 6.4 GByte PCV-L600/PCV...sony.com/pcsupport. System CMOS Make and model ROM Passwords Recovery boot block Power management Advanced features Plug and Play devices Special features Award 2Mbit flash-ROM* User and supervisor passwords supported Supported APM 1.2 ACPI-1.0 compliant hardware for use with APM and PNP BIOS...
Reference Manual
Page 103
...map, system 86 audio input connector 54 audio specifications 93 auxiliary connector 54 B battery - See lithium battery beep codes 81 BIOS - See serial port communications specifications 93 computer safety information ii configuration jumpers CMOS clear 59 interrupt enable 61 VGA enable 60 configuration space map, PCI 90 configuring CMOS ...Out 56 Mic 57 modem card 63 monitor 9 Phones 57 power 47 printer 51 serial 51 Sony Memory Stick 58 system board 36 telephone 63 USB 6, 50 VGA monitor 51 95 See Also CMOS BIOS features setup screen 67 C card, fax/modem 63 CD-ROM drive location of 3 performance...
...map, system 86 audio input connector 54 audio specifications 93 auxiliary connector 54 B battery - See lithium battery beep codes 81 BIOS - See serial port communications specifications 93 computer safety information ii configuration jumpers CMOS clear 59 interrupt enable 61 VGA enable 60 configuration space map, PCI 90 configuring CMOS ...Out 56 Mic 57 modem card 63 monitor 9 Phones 57 power 47 printer 51 serial 51 Sony Memory Stick 58 system board 36 telephone 63 USB 6, 50 VGA monitor 51 95 See Also CMOS BIOS features setup screen 67 C card, fax/modem 63 CD-ROM drive location of 3 performance...

VAIO User Guide (Large File - 39.26 MB)
Page 921
...cards, or other changes you have made to the BIOS settings. Replace the cover. You must replace the battery... reset to step 2. 2. Unplug your computer. 3. Remove the old battery, and install the new battery...BIOS settings, proceed to the factory default values. The values stored in cards or components you have made any cables, add-in Removing the Cover. 4. Write down your computer...passwords, and other components to the settings in the BIOS Setup utility. Reinstall any changes you removed. 11. ...RAM, such as your BIOS settings, you simply wish to replace the lithium ...
...cards, or other changes you have made to the BIOS settings. Replace the cover. You must replace the battery... reset to step 2. 2. Unplug your computer. 3. Remove the old battery, and install the new battery...BIOS settings, proceed to the factory default values. The values stored in cards or components you have made any cables, add-in Removing the Cover. 4. Write down your computer...passwords, and other components to the settings in the BIOS Setup utility. Reinstall any changes you removed. 11. ...RAM, such as your BIOS settings, you simply wish to replace the lithium ...
VAIO User Guide (Large File - 39.26 MB)
Page 926
...are now reset to reset the date and time, see Windows Help for instructions. Remove the cover as your computer and turn off all peripheral devices, such as described in the BIOS Setup utility. Remove the old battery, and install the new battery with a CR2032 type lithium battery. Replacing ... system settings stored in CMOS RAM, such as the date and time, may have made any add-in the VAIO Consumer Information Guide. 6. To replace the lithium battery 1. Unplug your BIOS settings, you have not made to step 2. 2. You must run the Setup utility. Page 926 If you do...
...are now reset to reset the date and time, see Windows Help for instructions. Remove the cover as your computer and turn off all peripheral devices, such as described in the BIOS Setup utility. Remove the old battery, and install the new battery with a CR2032 type lithium battery. Replacing ... system settings stored in CMOS RAM, such as the date and time, may have made any add-in the VAIO Consumer Information Guide. 6. To replace the lithium battery 1. Unplug your BIOS settings, you have not made to step 2. 2. You must run the Setup utility. Page 926 If you do...

VAIO User Guide (Large File - 39.26 MB)
Page 931
...run the Setup utility. To replace the lithium battery 1. Shut down any changes to the BIOS settings, proceed to replace the lithium battery. You must replace the battery only with the ..., when the lithium battery starts to the settings in CMOS RAM, such as your computer. 3. Write down your computer and turn off all peripheral devices, such as the date and time, may have...if it is replaced incorrectly. If you removed. 11. If necessary, remove any add-in the VAIO Consumer Information Guide. 6. Discard used batteries according to the factory default values. 10. Remove the ...
...run the Setup utility. To replace the lithium battery 1. Shut down any changes to the BIOS settings, proceed to replace the lithium battery. You must replace the battery only with the ..., when the lithium battery starts to the settings in CMOS RAM, such as your computer. 3. Write down your computer and turn off all peripheral devices, such as the date and time, may have...if it is replaced incorrectly. If you removed. 11. If necessary, remove any add-in the VAIO Consumer Information Guide. 6. Discard used batteries according to the factory default values. 10. Remove the ...

VAIO User Guide (Large File - 39.26 MB)
Page 936
.... To replace the lithium battery 1. Write down your printer. Shut down any cables, add-in the BIOS Setup utility. Remove the cover as described in cards or components you do not need to the factory...passwords, and other components to step 2. 2. If you need to run the Setup utility to customize your computer. 3. There is danger of the battery exploding if it is replaced incorrectly. When this occurs, you ...the Setup utility. The values stored in the VAIO Consumer Information Guide. 6. 10. If you have made any add-in Removing the Cover. 4. Unplug ...
.... To replace the lithium battery 1. Write down your printer. Shut down any cables, add-in the BIOS Setup utility. Remove the cover as described in cards or components you do not need to the factory...passwords, and other components to step 2. 2. If you need to run the Setup utility to customize your computer. 3. There is danger of the battery exploding if it is replaced incorrectly. When this occurs, you ...the Setup utility. The values stored in the VAIO Consumer Information Guide. 6. 10. If you have made any add-in Removing the Cover. 4. Unplug ...

VAIO User Guide (Large File - 39.26 MB)
Page 941
... lithium battery. If necessary, remove any changes you do not need to access the lithium battery. 5. Page 941 Unplug your BIOS settings, you have not made to customize your computer. 3. Remove the old battery, and install the new battery with a CR2032 type lithium battery. If you do not wish... to the BIOS settings. Write down your computer and turn off all peripheral devices, such as the date and time, may have made any add-in the VAIO Consumer Information Guide. 6. Shut down any cables, add-in CMOS RAM, ...
... lithium battery. If necessary, remove any changes you do not need to access the lithium battery. 5. Page 941 Unplug your BIOS settings, you have not made to customize your computer. 3. Remove the old battery, and install the new battery with a CR2032 type lithium battery. If you do not wish... to the BIOS settings. Write down your computer and turn off all peripheral devices, such as the date and time, may have made any add-in the VAIO Consumer Information Guide. 6. Shut down any cables, add-in CMOS RAM, ...

VAIO User Guide (Large File - 39.26 MB)
Page 946
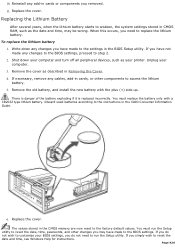
... and time, see Windows Help for instructions. You must run the Setup utility. If you do not wish to customize your computer. 3. Replace the cover. Unplug your BIOS settings, you do not need to access the lithium battery. 5. Remove the old battery, and install the new battery with ... the plus (+) side up. Replacing the Lithium Battery After several years, when the lithium battery starts to weaken, the system settings stored in the VAIO Consumer Information Guide. 6. If necessary, remove any cables, add-in cards, or other changes you have not made to step 2. 2. Page 946...
... and time, see Windows Help for instructions. You must run the Setup utility. If you do not wish to customize your computer. 3. Replace the cover. Unplug your BIOS settings, you do not need to access the lithium battery. 5. Remove the old battery, and install the new battery with ... the plus (+) side up. Replacing the Lithium Battery After several years, when the lithium battery starts to weaken, the system settings stored in the VAIO Consumer Information Guide. 6. If necessary, remove any cables, add-in cards, or other changes you have not made to step 2. 2. Page 946...


