Operating Instructions
Page 2
... receiving antenna. - Record the serial number in the U.S.A. However, there is for a Class B digital device, pursuant to operate this equipment. Telephone No.: 858-942-2230 The device complies with Part 15 of Conformity Trade Name: SONY Model No.: PCGA-UVC11A Responsible Party: Sony Electronics Inc. Operation is connected. - For customers in Canada This Class B digital apparatus complies with the instructions, may not...
... receiving antenna. - Record the serial number in the U.S.A. However, there is for a Class B digital device, pursuant to operate this equipment. Telephone No.: 858-942-2230 The device complies with Part 15 of Conformity Trade Name: SONY Model No.: PCGA-UVC11A Responsible Party: Sony Electronics Inc. Operation is connected. - For customers in Canada This Class B digital apparatus complies with the instructions, may not...
Operating Instructions
Page 3
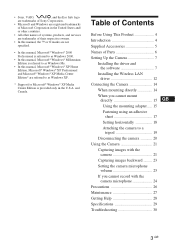
... trademarks of Parts 6 Setting Up the Camera 7 Installing the driver and the software 7 Installing the Wireless LAN driver 12 Connecting the Camera 14 When mounting directly 14 When you cannot record with the camera microphone 24 Precautions 26 Maintenance 27 Getting Help 28 Specifications 29 Troubleshooting 30 3 GB and Canada. Table of Contents Before Using This Product 4 Introduction 4 Supplied Accessories 5 Names of their respective owners. • In this manual, the ™...
... trademarks of Parts 6 Setting Up the Camera 7 Installing the driver and the software 7 Installing the Wireless LAN driver 12 Connecting the Camera 14 When mounting directly 14 When you cannot record with the camera microphone 24 Precautions 26 Maintenance 27 Getting Help 28 Specifications 29 Troubleshooting 30 3 GB and Canada. Table of Contents Before Using This Product 4 Introduction 4 Supplied Accessories 5 Names of their respective owners. • In this manual, the ™...
Operating Instructions
Page 4
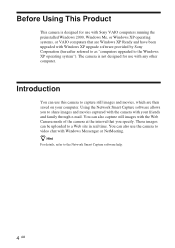
... been upgraded with Windows XP upgrade software provided by Sony Corporation (hereafter referred to as "computers upgraded to video chat with Windows Messenger or NetMeeting. Using the Network Smart Capture software allows you specify. Before Using This Product This camera is not designed for use with Sony VAIO computers running the preinstalled Windows 2000, Windows Me, or Windows XP operating systems, or VAIO computers that you to the Network Smart Capture software help. 4 GB The camera...
... been upgraded with Windows XP upgrade software provided by Sony Corporation (hereafter referred to as "computers upgraded to video chat with Windows Messenger or NetMeeting. Using the Network Smart Capture software allows you specify. Before Using This Product This camera is not designed for use with Sony VAIO computers running the preinstalled Windows 2000, Windows Me, or Windows XP operating systems, or VAIO computers that you to the Network Smart Capture software help. 4 GB The camera...
Operating Instructions
Page 5
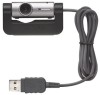
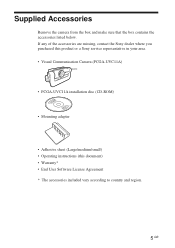
... where you purchased this product or a Sony service representative in your area. • Visual Communication Camera (PCGA-UVC11A) • PCGA-UVC11A installation disc (CD-ROM) • Mounting adapter • Adhesive sheet (Large/medium/small) • Operating instructions (this document) • Warranty* • End User Software License Agreement * The accessories included vary according to country and region. 5 GB Supplied Accessories Remove the camera from the box and make sure that...
... where you purchased this product or a Sony service representative in your area. • Visual Communication Camera (PCGA-UVC11A) • PCGA-UVC11A installation disc (CD-ROM) • Mounting adapter • Adhesive sheet (Large/medium/small) • Operating instructions (this document) • Warranty* • End User Software License Agreement * The accessories included vary according to country and region. 5 GB Supplied Accessories Remove the camera from the box and make sure that...
Operating Instructions
Page 7
Follow the instructions below. Note On a computer running the Windows XP operating system, log on your computer and reinstall it. • The preinstalled Wireless LAN driver for Sony VAIO computer models PCG-SRX55TC/SRX55TH/SRX55TL/VX89/VX89P is incompatible when using the supplied installation disc. The installation program starts automatically and the "Sony Visual Communication Camera PCGA-UVC11A Application Installer Setup" screen appears. 2 Select your computer, make sure that the optical drive (CD-ROM or DVD...
Follow the instructions below. Note On a computer running the Windows XP operating system, log on your computer and reinstall it. • The preinstalled Wireless LAN driver for Sony VAIO computer models PCG-SRX55TC/SRX55TH/SRX55TL/VX89/VX89P is incompatible when using the supplied installation disc. The installation program starts automatically and the "Sony Visual Communication Camera PCGA-UVC11A Application Installer Setup" screen appears. 2 Select your computer, make sure that the optical drive (CD-ROM or DVD...

Operating Instructions
Page 8
z Hint If the software is installed 1 Connect the camera to your computer. For connection details, see "Connecting the Camera" (page 14). 2 With the Windows XP operating system, click "Start", right-click "My Computer", and then click "Properties". Go to "Settings", and then click "Control Panel". For operating systems other than the Windows XP operating system, click "Start", point to Step 4. Your operating system may appear. After your computer...
z Hint If the software is installed 1 Connect the camera to your computer. For connection details, see "Connecting the Camera" (page 14). 2 With the Windows XP operating system, click "Start", right-click "My Computer", and then click "Properties". Go to "Settings", and then click "Control Panel". For operating systems other than the Windows XP operating system, click "Start", point to Step 4. Your operating system may appear. After your computer...
Operating Instructions
Page 9
... "Imaging Device" in the "Device Manager" window. Notes • On a computer running the Windows XP operating system, log on as an administrator before uninstalling the driver. If "Sony Visual Communication Camera PCGA-UVC11" appears, the driver is not installed properly. Uninstalling the driver If the driver is properly installed. 8 Close the "Device Manager" window. 5 Click the plus symbol (+) to the left of "Sound, Video, and Game Controllers" in...
... "Imaging Device" in the "Device Manager" window. Notes • On a computer running the Windows XP operating system, log on as an administrator before uninstalling the driver. If "Sony Visual Communication Camera PCGA-UVC11" appears, the driver is not installed properly. Uninstalling the driver If the driver is properly installed. 8 Close the "Device Manager" window. 5 Click the plus symbol (+) to the left of "Sound, Video, and Game Controllers" in...
Operating Instructions
Page 10
... Manager" button. Your operating system may require you can remove the software by performing the following procedure. On a computer running the Windows 2000 operating system, log on some systems, in the "Device Manager" window. 6 Click "Sony Visual Communication Camera (PCGA-UVC11)" or "USB Composite Device", and then click "Uninstall"or "Remove". Uninstalling the software If you to "Settings", and then click "Control Panel". Your operating system...
... Manager" button. Your operating system may require you can remove the software by performing the following procedure. On a computer running the Windows 2000 operating system, log on some systems, in the "Device Manager" window. 6 Click "Sony Visual Communication Camera (PCGA-UVC11)" or "USB Composite Device", and then click "Uninstall"or "Remove". Uninstalling the software If you to "Settings", and then click "Control Panel". Your operating system...
Operating Instructions
Page 11
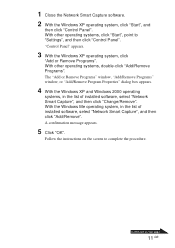
... "Add/Remove Programs". Continued on the screen to "Settings", and then click "Control Panel". The "Add or Remove Programs" window, "Add/Remove Programs" window, or "Add/Remove Program Properties" dialog box appears. 4 With the Windows XP and Windows 2000 operating systems, in the list of installed software, select "Network Smart Capture", and then click "Change/Remove". Follow the instructions on next page 11 GB "Control Panel" appears. 3 With the Windows XP operating system, click "Add...
... "Add/Remove Programs". Continued on the screen to "Settings", and then click "Control Panel". The "Add or Remove Programs" window, "Add/Remove Programs" window, or "Add/Remove Program Properties" dialog box appears. 4 With the Windows XP and Windows 2000 operating systems, in the list of installed software, select "Network Smart Capture", and then click "Change/Remove". Follow the instructions on next page 11 GB "Control Panel" appears. 3 With the Windows XP operating system, click "Add...

Operating Instructions
Page 12
... following procedure with models other than the ones mentioned above. 1 Click "Start", right-click "My Computer", and then click "Properties". I will choose the driver to the left of "Network adapters", right-click "ORiNOCO Mini PCI Card", and then click "Update Driver" on the CD-ROM, and then click "OK". 8 Click "Next". 9 Click "Finish". 12 GB Installing the Wireless LAN driver Only necessary...
... following procedure with models other than the ones mentioned above. 1 Click "Start", right-click "My Computer", and then click "Properties". I will choose the driver to the left of "Network adapters", right-click "ORiNOCO Mini PCI Card", and then click "Update Driver" on the CD-ROM, and then click "OK". 8 Click "Next". 9 Click "Finish". 12 GB Installing the Wireless LAN driver Only necessary...
Operating Instructions
Page 14
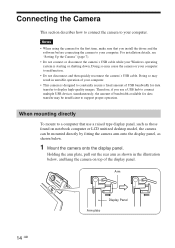
... available for data transfer to your Windows operating system is designed to constantly secure a fixed amount of USB bandwidth for data transfer may cause the camera or your computer to your computer. • This camera is starting or shutting down. Therefore, if you install the driver and the software before connecting the camera to display high-quality images. Arm 14 GB Display Panel...
... available for data transfer to your Windows operating system is designed to constantly secure a fixed amount of USB bandwidth for data transfer may cause the camera or your computer to your computer. • This camera is starting or shutting down. Therefore, if you install the driver and the software before connecting the camera to display high-quality images. Arm 14 GB Display Panel...
Operating Instructions
Page 15
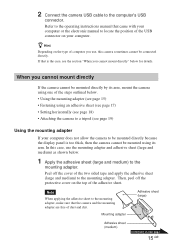
... directly If the camera cannot be connected directly. Note When applying the adhesive sheet to the mounting adapter, make sure that came with your computer or the electronic manual to the operating instructions manual that the camera and the mounting adapter are free of the adhesive sheet... to locate the position of the USB connector on next page 15 GB Mounting adapter Adhesive sheet (large) Adhesive sheet (medium) Continued on your computer does not allow the camera to be mounted using its arm, mount the camera using an adhesive sheet (see page 17) • Setting horizontally...
... directly If the camera cannot be connected directly. Note When applying the adhesive sheet to the mounting adapter, make sure that came with your computer or the electronic manual to the operating instructions manual that the camera and the mounting adapter are free of the adhesive sheet... to locate the position of the USB connector on next page 15 GB Mounting adapter Adhesive sheet (large) Adhesive sheet (medium) Continued on your computer does not allow the camera to be mounted using its arm, mount the camera using an adhesive sheet (see page 17) • Setting horizontally...
Operating Instructions
Page 21
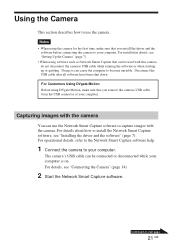
... Motion Before using DVgate Motion, make sure that you remove the cameras USB cable from the USB connector of your computer is on next page 21 GB Capturing images with the camera You can be used with the camera. For operational details, refer to the Network Smart Capture software help. 1 Connect the camera to capture images with this camera, do not disconnect the cameras USB cable while running the software or when starting...
... Motion Before using DVgate Motion, make sure that you remove the cameras USB cable from the USB connector of your computer is on next page 21 GB Capturing images with the camera You can be used with the camera. For operational details, refer to the Network Smart Capture software help. 1 Connect the camera to capture images with this camera, do not disconnect the cameras USB cable while running the software or when starting...
Operating Instructions
Page 24
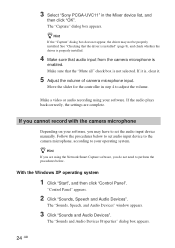
... camera microphone Depending on your software, you do not need to perform the procedures below to set audio input device to the camera microphone, according to set the audio input device manually. Move the slider for the controller in the Mixer device list, and then click "OK". Make a video or audio recording using the Network Smart Capture software, you may not be properly installed. With the Windows XP operating system 1 Click "Start...
... camera microphone Depending on your software, you do not need to perform the procedures below to set audio input device to the camera microphone, according to set the audio input device manually. Move the slider for the controller in the Mixer device list, and then click "OK". Make a video or audio recording using the Network Smart Capture software, you may not be properly installed. With the Windows XP operating system 1 Click "Start...
Operating Instructions
Page 25
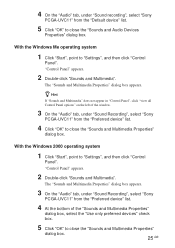
... "Start", point to "Settings", and then click "Control Panel". z Hint If "Sounds and Multimedia" does not appear in "Control Panel", click "view all Control Panel options" on the left of the window. 3 On the "Audio" tab, under "Sound Recording", select "Sony PCGA-UVC11" from the "Preferred device" list. 4 At the bottom of the "Sounds and Multimedia Properties" dialog box, select the "Use...
... "Start", point to "Settings", and then click "Control Panel". z Hint If "Sounds and Multimedia" does not appear in "Control Panel", click "view all Control Panel options" on the left of the window. 3 On the "Audio" tab, under "Sound Recording", select "Sony PCGA-UVC11" from the "Preferred device" list. 4 At the bottom of the "Sounds and Multimedia Properties" dialog box, select the "Use...
Operating Instructions
Page 28
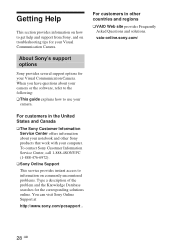
... on how to get help and support from Sony, and on commonly encountered problems. Type a description of the problem and the Knowledge Database searches for the corresponding solutions online. When you have questions about your Visual Communication Camera. To contact Sony Cusotmer Information Service Center, call 1-888-4SONYPC (1-888-476-6972). ❑ Sony Online Support This service provides instant access to information on troubleshooting tips for your computer...
... on how to get help and support from Sony, and on commonly encountered problems. Type a description of the problem and the Knowledge Database searches for the corresponding solutions online. When you have questions about your Visual Communication Camera. To contact Sony Cusotmer Information Service Center, call 1-888-4SONYPC (1-888-476-6972). ❑ Sony Online Support This service provides instant access to information on troubleshooting tips for your computer...

Operating Instructions
Page 29
...) camera at 140°F (60°C) (hygrometer reading of less than 95°F (35°C)) Supplied accessories • PCGA-UVC11A installation disc (CD-ROM × 1) • Mounting adapter (1) • Adhesive sheet (3) • Operating instructions (1) • Warranty (1)* • End User Software License Agreement (1) * The accessories included vary according to country and region. Design and specifications are subject to ∞) Angular field of view Horizontal...
...) camera at 140°F (60°C) (hygrometer reading of less than 95°F (35°C)) Supplied accessories • PCGA-UVC11A installation disc (CD-ROM × 1) • Mounting adapter (1) • Adhesive sheet (3) • Operating instructions (1) • Warranty (1)* • End User Software License Agreement (1) * The accessories included vary according to country and region. Design and specifications are subject to ∞) Angular field of view Horizontal...
Operating Instructions
Page 30
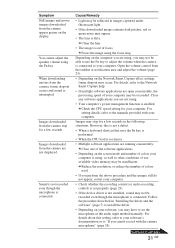
... the manuals provided with multiple USB connectors, connect the camera to another USB connector and check whether it again. Images appear grainy in the Network Smart Capture finder Cause/Remedy • The USB cable is not recognized by your computer are not connected properly. For details, see "Uninstalling the driver" (page 9) and "Installing the driver and the software" (page 7). • The USB root hub is not connected properly...
... the manuals provided with multiple USB connectors, connect the camera to another USB connector and check whether it again. Images appear grainy in the Network Smart Capture finder Cause/Remedy • The USB cable is not recognized by your computer are not connected properly. For details, see "Uninstalling the driver" (page 9) and "Installing the driver and the software" (page 7). • The USB root hub is not connected properly...
Operating Instructions
Page 31
...; The image is using, as well as the audio input method manually. Open the volume control from the camera are not displayed. c Check the CPU speed setting for your software's documentation or to the manuals provided with the camera microphone" (page 24). Images may stop for a few seconds in "Installing the driver and the software" (page 7) to install the driver. • Depending on the screen mode and number of colors your software, you...
...; The image is using, as well as the audio input method manually. Open the volume control from the camera are not displayed. c Check the CPU speed setting for your software's documentation or to the manuals provided with the camera microphone" (page 24). Images may stop for a few seconds in "Installing the driver and the software" (page 7) to install the driver. • Depending on the screen mode and number of colors your software, you...
Operating Instructions
Page 32
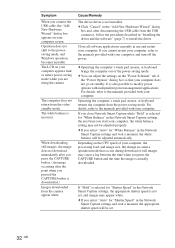
... pad, mouse, or keyboard returns the computer from the USB connector, follow the procedure described in the Network Smart Capture settings, the next time you select "Auto" for "White Balance" in "Installing the driver and the software" (page 7) to modify power options with your computer, the white balance setting may appear white. For details, refer to the powersaving mode, and Windows operation becomes unstable.
... pad, mouse, or keyboard returns the computer from the USB connector, follow the procedure described in the Network Smart Capture settings, the next time you select "Auto" for "White Balance" in "Installing the driver and the software" (page 7) to modify power options with your computer, the white balance setting may appear white. For details, refer to the powersaving mode, and Windows operation becomes unstable.


