
Camera Operations Guide
Page 3
.... - Owner's Record The model and serial numbers are marked with Handycam Station Model DCRA-C111 and AC Power Adaptor Model AC-L25A/L25B. This equipment generates, uses, and can use in your camcorder (p. 128). The supplied interface cable must accept any questions about half... subject to Subpart B of Part 15 of Conformity Trade Name: SONY Model No.: DCR-PC109 Responsible Party: Sony Electronics Inc. b Note: This equipment has been tested and found to comply with the limits for a digital device pursuant to the following measures: - If this product. Connect...
.... - Owner's Record The model and serial numbers are marked with Handycam Station Model DCRA-C111 and AC Power Adaptor Model AC-L25A/L25B. This equipment generates, uses, and can use in your camcorder (p. 128). The supplied interface cable must accept any questions about half... subject to Subpart B of Part 15 of Conformity Trade Name: SONY Model No.: DCR-PC109 Responsible Party: Sony Electronics Inc. b Note: This equipment has been tested and found to comply with the limits for a digital device pursuant to the following measures: - If this product. Connect...
Camera Operations Guide
Page 5
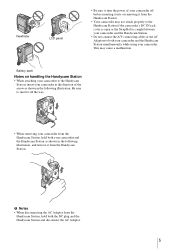
... your camcorder from the Handycam Station, hold both your camcorder and the Handycam Station as shown in the direction of your camcorder off before inserting it into or removing it from the Handycam Station, hold both your camcorder and the Handycam Station simultaneously while using your camcorder and the Handycam Station....AC Adaptors to both the DC plug and the Handycam Station and disconnect the AC Adaptor. 5 Battery pack Notes on handling the Handycam Station • When attaching your camcorder to the Handycam Station if the camcorder's DC IN jack cover is open or the Strap...
... your camcorder from the Handycam Station, hold both your camcorder and the Handycam Station as shown in the direction of your camcorder off before inserting it into or removing it from the Handycam Station, hold both your camcorder and the Handycam Station simultaneously while using your camcorder and the Handycam Station....AC Adaptors to both the DC plug and the Handycam Station and disconnect the AC Adaptor. 5 Battery pack Notes on handling the Handycam Station • When attaching your camcorder to the Handycam Station if the camcorder's DC IN jack cover is open or the Strap...
Camera Operations Guide
Page 6
...Inserting a "Memory Stick Duo 24 Step 7: Setting the screen language 25 Recording Recording movies 27 Recording for "Memory Stick Duo" only. Easy Handycam 35 Recording a movie 35 Recording a still image 36 Making full use of Contents : Features available for tape only. : Features available for...longer time 29 Using zoom ...29 Recording in mirror mode 30 Using the self-timer ...31 Recording still images - Table of Easy Handycam operation 37 6 Read this first 2 Quick Start Guide Recording movies 10 Recording still images 12 Recording/Playing back with ease 14 Getting ...
...Inserting a "Memory Stick Duo 24 Step 7: Setting the screen language 25 Recording Recording movies 27 Recording for "Memory Stick Duo" only. Easy Handycam 35 Recording a movie 35 Recording a still image 36 Making full use of Contents : Features available for tape only. : Features available for...longer time 29 Using zoom ...29 Recording in mirror mode 30 Using the self-timer ...31 Recording still images - Table of Easy Handycam operation 37 6 Read this first 2 Quick Start Guide Recording movies 10 Recording still images 12 Recording/Playing back with ease 14 Getting ...
Camera Operations Guide
Page 7
EDIT SEARCH 48 Reviewing the most recent recording - Digital effect 52 Viewing recordings on a tape 50 Playing back in various modes from a "Memory Stick Duo 54 Playing back with added effects - Easy Handycam 55 Making full use of recording - SPOT FOCUS 41 Adjusting the focus manually 42 ...date/time and camera settings data - MEMORY MIX 46 Searching for the starting point 48 Searching for a scene by date of Easy Handycam operation 56 Various playback functions 57 Magnifying pictures - END SEARCH 48 Searching manually - Date search 62 ,continued 7 Rec review 49 ...
EDIT SEARCH 48 Reviewing the most recent recording - Digital effect 52 Viewing recordings on a tape 50 Playing back in various modes from a "Memory Stick Duo 54 Playing back with added effects - Easy Handycam 55 Making full use of recording - SPOT FOCUS 41 Adjusting the focus manually 42 ...date/time and camera settings data - MEMORY MIX 46 Searching for the starting point 48 Searching for a scene by date of Easy Handycam operation 56 Various playback functions 57 Magnifying pictures - END SEARCH 48 Searching manually - Date search 62 ,continued 7 Rec review 49 ...
Camera Operations Guide
Page 14
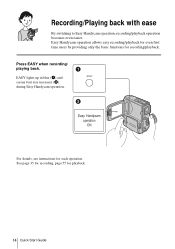
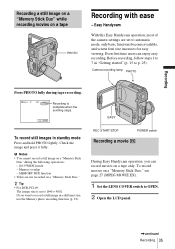
Easy Handycam operation ON For details, see instructions for playback. 14 Quick Start Guide See page 35 for recording, page 55 for each operation. Easy Handycam operation allows easy recording/playback for even first time users by providing only the basic functions for recording/playback. EASY lights up in blue (1) and screen font size increases (2) during Easy Handycam operation. Press EASY when recording/ playing back. Recording/Playing back with ease By switching to Easy Handycam operation, recording/playback operation becomes even easier.
Easy Handycam operation ON For details, see instructions for playback. 14 Quick Start Guide See page 35 for recording, page 55 for each operation. Easy Handycam operation allows easy recording/playback for even first time users by providing only the basic functions for recording/playback. EASY lights up in blue (1) and screen font size increases (2) during Easy Handycam operation. Press EASY when recording/ playing back. Recording/Playing back with ease By switching to Easy Handycam operation, recording/playback operation becomes even easier.
Camera Operations Guide
Page 15
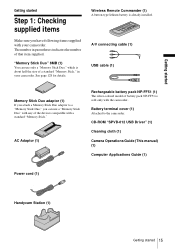
... adaptor (1) If you attach a Memory Stick Duo adaptor to the camcorder. The number in your camcorder. Battery terminal cover (1) Attached to a "Memory Stick Duo," you have following items supplied with your camcorder. Wireless Remote Commander (1) A button-type lithium battery is sold only... CD-ROM "SPVD-012 USB Driver" (1) Cleaning cloth (1) Camera Operations Guide (This manual) (1) Computer Applications Guide (1) Power cord (1) Handycam Station (1) Getting started Step 1: Checking supplied items Make sure you can use a "Memory Stick Duo" with any of the devices compatible...
... adaptor (1) If you attach a Memory Stick Duo adaptor to the camcorder. The number in your camcorder. Battery terminal cover (1) Attached to a "Memory Stick Duo," you have following items supplied with your camcorder. Wireless Remote Commander (1) A button-type lithium battery is sold only... CD-ROM "SPVD-012 USB Driver" (1) Cleaning cloth (1) Camera Operations Guide (This manual) (1) Computer Applications Guide (1) Power cord (1) Handycam Station (1) Getting started Step 1: Checking supplied items Make sure you can use a "Memory Stick Duo" with any of the devices compatible...

Camera Operations Guide
Page 16
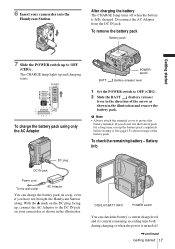
...outlet. v mark DC IN jack 4 Connect the power cord to the AC Adaptor. 5 Connect the power cord to the DC IN jack on the Handycam Station. BATT (battery release) lever 2 Attach the battery pack with any malfunction occurs. 1 Slide the BATT (battery release) lever and remove the ...if any metallic objects. Step 2: Charging the battery pack You can charge the battery by attaching the "InfoLITHIUM" battery pack (F series) to your camcorder as shown in the following illustration and press down the battery pack until it clicks. b Notes • You cannot use batteries other than the ...
...outlet. v mark DC IN jack 4 Connect the power cord to the AC Adaptor. 5 Connect the power cord to the DC IN jack on the Handycam Station. BATT (battery release) lever 2 Attach the battery pack with any malfunction occurs. 1 Slide the BATT (battery release) lever and remove the ...if any metallic objects. Step 2: Charging the battery pack You can charge the battery by attaching the "InfoLITHIUM" battery pack (F series) to your camcorder as shown in the following illustration and press down the battery pack until it clicks. b Notes • You cannot use batteries other than the ...
Camera Operations Guide
Page 17
... jack. To remove the battery pack Battery pack Getting started 17 If you have not brought the Handycam Station along. DISPLAY/BATT INFO POWER switch You can charge the battery pack on your camcorder into the Handycam Station. b Note • Always attach the terminal cover to OFF (CHG) . 2 Slide the BATT (battery release...
... jack. To remove the battery pack Battery pack Getting started 17 If you have not brought the Handycam Station along. DISPLAY/BATT INFO POWER switch You can charge the battery pack on your camcorder into the Handycam Station. b Note • Always attach the terminal cover to OFF (CHG) . 2 Slide the BATT (battery release...
Camera Operations Guide
Page 19
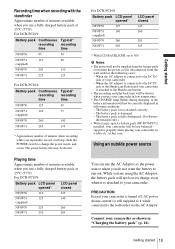
.... - Playing time Approximate number of minutes when recording while you do not want the battery to the wall outlet via the AC Adaptor. For DCR-PC109: Battery pack LCD panel LCD panel opened* closed NP-FF50 110 125 NP-FF51 125 140 (supplied) NP-FF70 225 260 NP-FF71 250 285... * With LCD BACKLIGHT set to change the power mode, and zoom. When the AC adaptor is connected to the DC IN jack of the Handycam Station and your camcorder is attached to the Handycam Station • The recording and playback time will not lose its charge even when it properly when placing your...
.... - Playing time Approximate number of minutes when recording while you do not want the battery to the wall outlet via the AC Adaptor. For DCR-PC109: Battery pack LCD panel LCD panel opened* closed NP-FF50 110 125 NP-FF51 125 140 (supplied) NP-FF70 225 260 NP-FF71 250 285... * With LCD BACKLIGHT set to change the power mode, and zoom. When the AC adaptor is connected to the DC IN jack of the Handycam Station and your camcorder is attached to the Handycam Station • The recording and playback time will not lose its charge even when it properly when placing your...
Camera Operations Guide
Page 27
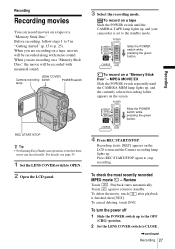
...details, see page 35. 1 Set the LENS COVER switch to CLOSE . ,continued Recording 27 Recording REC START/STOP z Tip • Performing Easy Handycam operation, even first time users can record movies on the screen. Press REC START/STOP again to p. 25). To cancel deleting, touch [NO]. Recording... the movie will be recorded with stereo sound. To record on a tape Slide the POWER switch until the CAMERA-MEM lamp lights up , and your camcorder is finished, then [YES]. Before recording, follow steps 1 to 7 in "Getting started" (p. 15 to stop recording. Review Touch . Touch again to...
...details, see page 35. 1 Set the LENS COVER switch to CLOSE . ,continued Recording 27 Recording REC START/STOP z Tip • Performing Easy Handycam operation, even first time users can record movies on the screen. Press REC START/STOP again to p. 25). To cancel deleting, touch [NO]. Recording... the movie will be recorded with stereo sound. To record on a tape Slide the POWER switch until the CAMERA-MEM lamp lights up , and your camcorder is finished, then [YES]. Before recording, follow steps 1 to 7 in "Getting started" (p. 15 to stop recording. Review Touch . Touch again to...

Camera Operations Guide
Page 32
...*The number of images that can be recorded.* 60min 101 1152 FINE 30 LENS COVER switch POWER switch z Tip • Performing Easy Handycam operation, even first time users can be recorded varies depending on the image quality setting and the recording environment. 5 Press PHOTO fully. ... can record 3 to 13 images continuously in "Getting started" (p. 15 to CLOSE. When bars of about 0.5 seconds. 32 Recording Burst For DCR-PC109: Select the (MEMORY SET) menu, [STILL SET], then [ BURST] (p. 71). The selected recording folder is heard. The indicator stops flashing. ...
...*The number of images that can be recorded.* 60min 101 1152 FINE 30 LENS COVER switch POWER switch z Tip • Performing Easy Handycam operation, even first time users can be recorded varies depending on the image quality setting and the recording environment. 5 Press PHOTO fully. ... can record 3 to 13 images continuously in "Getting started" (p. 15 to CLOSE. When bars of about 0.5 seconds. 32 Recording Burst For DCR-PC109: Select the (MEMORY SET) menu, [STILL SET], then [ BURST] (p. 71). The selected recording folder is heard. The indicator stops flashing. ...
Camera Operations Guide
Page 35
...25). EASY REC START/STOP Recording a movie POWER switch During Easy Handycam operation, you want to OPEN. 2 Open the LCD panel. ,continued Recording 35 Check the image and press it fully. z Tip • For DCR-PC109: The image size is complete when the scrolling stops. P-MENU To...during the following operations: - [16:9 WIDE] mode - If you can enjoy easy recording. To record movies on a tape only. Easy Handycam With this Easy Handycam operation, most of the camera settings are not recorded on a tape PHOTO Recording with ease - Before recording, follow steps 1 to 7 in...
...25). EASY REC START/STOP Recording a movie POWER switch During Easy Handycam operation, you want to OPEN. 2 Open the LCD panel. ,continued Recording 35 Check the image and press it fully. z Tip • For DCR-PC109: The image size is complete when the scrolling stops. P-MENU To...during the following operations: - [16:9 WIDE] mode - If you can enjoy easy recording. To record movies on a tape only. Easy Handycam With this Easy Handycam operation, most of the camera settings are not recorded on a tape PHOTO Recording with ease - Before recording, follow steps 1 to 7 in...

Camera Operations Guide
Page 36
...switch while pressing the green button. 5 Press REC START/STOP. Press REC START/STOP again to CLOSE. USB Streaming • During Easy Handycam operation, the following buttons are adjusted. You will hear a light beeping sound when the focus and brightness settings are not available: - To cancel...] appears on the "Memory Stick Duo." A shutter sound is recorded on the LCD screen and the Camera recording lamp lights up. To cancel Easy Handycam operation Press EASY again. The EASY lights up in blue. 5 Press and hold PHOTO lightly. To turn the power off during: - Previously made...
...switch while pressing the green button. 5 Press REC START/STOP. Press REC START/STOP again to CLOSE. USB Streaming • During Easy Handycam operation, the following buttons are adjusted. You will hear a light beeping sound when the focus and brightness settings are not available: - To cancel...] appears on the "Memory Stick Duo." A shutter sound is recorded on the LCD screen and the Camera recording lamp lights up. To cancel Easy Handycam operation Press EASY again. The EASY lights up in blue. 5 Press and hold PHOTO lightly. To turn the power off during: - Previously made...

Camera Operations Guide
Page 37
... For [SELF-TIMER] (in the same way as [Y] (year), then touch . LCD BACKLIGHT (p. 21) - BACK LIGHT (p. 38) • During Easy Handycam operation, the settings of the functions that are displayed on the screen. For [LANGUAGE] Select the desired language with / , then touch . 2 Set [M] (...not available: - Recording b Notes • You cannot turn Easy Handycam operation on or off during recording. • During Easy Handycam operation, the following buttons are restored when you cancel the Easy Handycam operation. Making full use of disappear, the image is recorded on the...
... For [SELF-TIMER] (in the same way as [Y] (year), then touch . LCD BACKLIGHT (p. 21) - BACK LIGHT (p. 38) • During Easy Handycam operation, the settings of the functions that are displayed on the screen. For [LANGUAGE] Select the desired language with / , then touch . 2 Set [M] (...not available: - Recording b Notes • You cannot turn Easy Handycam operation on or off during recording. • During Easy Handycam operation, the following buttons are restored when you cancel the Easy Handycam operation. Making full use of disappear, the image is recorded on the...

Camera Operations Guide
Page 50
Playback Viewing movies recorded on a tape Make sure you want to play back recordings on your camcorder. Some of the operations are possible using the Remote Commander or using the touch panel. To stop playback Touch (stop mode. (rewind) in To review ... LCD panel. 2 Slide the POWER switch repeatedly to view. 60min 0:00:00:00 60min P-MENU 4 Touch (play back easily. POWER switch z Tip • Performing Easy Handycam operation, even first time users can play ) to restart the playback. When you cannot find it, touch [MENU], and select it again to start playback.
Playback Viewing movies recorded on a tape Make sure you want to play back recordings on your camcorder. Some of the operations are possible using the Remote Commander or using the touch panel. To stop playback Touch (stop mode. (rewind) in To review ... LCD panel. 2 Slide the POWER switch repeatedly to view. 60min 0:00:00:00 60min P-MENU 4 Touch (play back easily. POWER switch z Tip • Performing Easy Handycam operation, even first time users can play ) to restart the playback. When you cannot find it, touch [MENU], and select it again to start playback.

Camera Operations Guide
Page 55
... the single display mode, touch the picture that you have a recorded cassette or a recorded "Memory Stick Duo" inserted into your camcorder. Also screen font size increases for playback. Easy Handycam Easy Handycam operation allows easy playback for even first time users by providing only the basic functions for easy viewing. Make sure you...
... the single display mode, touch the picture that you have a recorded cassette or a recorded "Memory Stick Duo" inserted into your camcorder. Also screen font size increases for playback. Easy Handycam Easy Handycam operation allows easy playback for even first time users by providing only the basic functions for easy viewing. Make sure you...

Camera Operations Guide
Page 56
...as [Y] (year), then touch For [LANGUAGE] Select the desired language with another tape" (p. 94) 1 Touch [MENU]. To cancel Easy Handycam operation Press EASY again. For [CLOCK SET] 56 Playback For [DATA CODE] During playback, you can control playback with the Remote Commander. Making... full use of Easy Handycam operation 1 Set [Y] (year) with / , then touch . 2 Set [M] (month), [D] (day), hour and minutes in blue. 4 Play back pictures. When...
...as [Y] (year), then touch For [LANGUAGE] Select the desired language with another tape" (p. 94) 1 Touch [MENU]. To cancel Easy Handycam operation Press EASY again. For [CLOCK SET] 56 Playback For [DATA CODE] During playback, you can control playback with the Remote Commander. Making... full use of Easy Handycam operation 1 Set [Y] (year) with / , then touch . 2 Set [M] (month), [D] (day), hour and minutes in blue. 4 Play back pictures. When...
Camera Operations Guide
Page 60
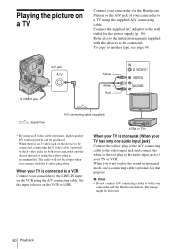
...TV or VCR. The image might be distorted. 60 Playback To copy to LINE. b Note • Do not connect A/V connecting cables to both your camcorder and the Handycam Station. Connect the supplied AC Adaptor to the wall outlet for that purpose. Playing the picture on a TV Connect your... camcorder via the Handycam Station or the A/V jack of your camcorder to a TV using an S video cable (optional), higher quality DV format pictures can be produced. When you connect with the devices ...
...TV or VCR. The image might be distorted. 60 Playback To copy to LINE. b Note • Do not connect A/V connecting cables to both your camcorder and the Handycam Station. Connect the supplied AC Adaptor to the wall outlet for that purpose. Playing the picture on a TV Connect your... camcorder via the Handycam Station or the A/V jack of your camcorder to a TV using an S video cable (optional), higher quality DV format pictures can be produced. When you connect with the devices ...
Camera Operations Guide
Page 93
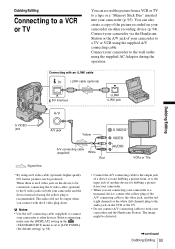
... A/V connecting cables to the S video jacks on both your camcorder and the device instead of another device for dubbing a picture from your camcorder on the device to be connected, connecting the S video cable (optional) to both your camcorder and the Handycam Station. Connecting with the S video plug alone. The audio... Connecting to a VCR or TV You can record the picture from a VCR or TV to other recording device (p. 94). Connect your camcorder via the Handycam Station or the A/V jack of your camcorder to the input jack of using the supplied AC Adaptor during the operation.
... A/V connecting cables to the S video jacks on both your camcorder and the device instead of another device for dubbing a picture from your camcorder on the device to be connected, connecting the S video cable (optional) to both your camcorder and the Handycam Station. Connecting with the S video plug alone. The audio... Connecting to a VCR or TV You can record the picture from a VCR or TV to other recording device (p. 94). Connect your camcorder via the Handycam Station or the A/V jack of your camcorder to the input jack of using the supplied AC Adaptor during the operation.

Camera Operations Guide
Page 105
... required). • Connecting a microphone (optional) to the MIC jack. (A) • Connecting a microphone (optional) to the Intelligent accessory shoe for DCR-PC109. (B) • Connecting audio device to the Handycam Station or your camcorder to record additional sound, the picture will not be recorded takes precedence over others in the order of the cassette is...
... required). • Connecting a microphone (optional) to the MIC jack. (A) • Connecting a microphone (optional) to the Intelligent accessory shoe for DCR-PC109. (B) • Connecting audio device to the Handycam Station or your camcorder to record additional sound, the picture will not be recorded takes precedence over others in the order of the cassette is...


