Operating Instructions
Page 5
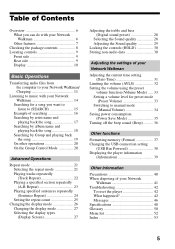
... manual mode (Manual Volume 34 Saving power consumption (Power Save Mode 35 Turning off the beep sound (Beep 36 Other functions Formatting memory (Format 37 Changing the USB connection setting (USB Bus Powered 38 Displaying the player information (Information 39 Other Information Precautions 40 When disposing of your Network Walkman 41 Troubleshooting 42 To...
... manual mode (Manual Volume 34 Saving power consumption (Power Save Mode 35 Turning off the beep sound (Beep 36 Other functions Formatting memory (Format 37 Changing the USB connection setting (USB Bus Powered 38 Displaying the player information (Information 39 Other Information Precautions 40 When disposing of your Network Walkman 41 Troubleshooting 42 To...

Operating Instructions
Page 9
button (pages 14, 33) 6 DISPLAY button (pages 26 to 27) 7 REPEAT/SOUND button (pages 22 to page 10. 5 VOL (Volume) +/- Front side Rear side 9 1 5 7 0 2 6 3 8 4 qa 1 Shuttle switch (pages 17 to 22, 25, 27 to 39) 2 Nx button (pages 14 to 25, 27 to 29, 31 ...
button (pages 14, 33) 6 DISPLAY button (pages 26 to 27) 7 REPEAT/SOUND button (pages 22 to page 10. 5 VOL (Volume) +/- Front side Rear side 9 1 5 7 0 2 6 3 8 4 qa 1 Shuttle switch (pages 17 to 22, 25, 27 to 39) 2 Nx button (pages 14 to 25, 27 to 29, 31 ...
Operating Instructions
Page 14
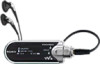
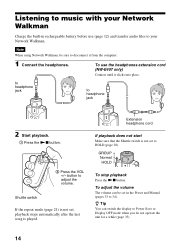
... built-in the Preset and Manual (pages 33 to disconnect it clicks into place. Listening to music with your Network Walkman. z Tip You can be sure to 34). to headphone jack to adjust the volume. button to headphone jack 2 Start playback. 1 Press the Nx button. 2 Press the VOL +/- Extension headphone cord If playback... mode (page 21) is not set, playback stops automatically after the last song is not set in rechargeable battery before use the headphones extension cord (NW-E407 only) Connect until it from the computer. 1 Connect the headphones.
... built-in the Preset and Manual (pages 33 to disconnect it clicks into place. Listening to music with your Network Walkman. z Tip You can be sure to 34). to headphone jack to adjust the volume. button to headphone jack 2 Start playback. 1 Press the Nx button. 2 Press the VOL +/- Extension headphone cord If playback... mode (page 21) is not set, playback stops automatically after the last song is not set in rechargeable battery before use the headphones extension cord (NW-E407 only) Connect until it from the computer. 1 Connect the headphones.

Operating Instructions
Page 21
Repeat Mode Sound Volume Mode 2 Rotate the Shuttle switch to select "Repeat Mode>" and press the Nx button to . Shuffle Repeat All the songs in the Play Range (coverage ...
Repeat Mode Sound Volume Mode 2 Rotate the Shuttle switch to select "Repeat Mode>" and press the Nx button to . Shuffle Repeat All the songs in the Play Range (coverage ...

Operating Instructions
Page 25
... the previous stage. To cancel the Menu mode Press the SEARCH/MENU button to return the screen to . Press repeatedly to confirm. Repeat Mode Sound Volume Mode 2 Rotate the Shuttle switch to select "Repeat Mode>" and press the Nx button to confirm. 3 Rotate the Shuttle switch to select "Sentence Rep" and...
... the previous stage. To cancel the Menu mode Press the SEARCH/MENU button to return the screen to . Press repeatedly to confirm. Repeat Mode Sound Volume Mode 2 Rotate the Shuttle switch to select "Repeat Mode>" and press the Nx button to confirm. 3 Rotate the Shuttle switch to select "Sentence Rep" and...

Operating Instructions
Page 26
Hour 2005 12/14 Minute Date • Bubble: Displays animated bubbles. Current track position within the Play Range, the elapsed time, and the current volume level. • Clock: Displays the current time and date. There are 4 types of display, and you can view various information in the Menu mode (page ... Artist 25/545 35/980 ATRAC3 plus 64 kbps • Lap Meter: Displays the current track position within the Play Range 03:23 Current 24 volume VOL level Elapsed time 26 Change the display mode by pressing the DISPLAY button.
Hour 2005 12/14 Minute Date • Bubble: Displays animated bubbles. Current track position within the Play Range, the elapsed time, and the current volume level. • Clock: Displays the current time and date. There are 4 types of display, and you can view various information in the Menu mode (page ... Artist 25/545 35/980 ATRAC3 plus 64 kbps • Lap Meter: Displays the current track position within the Play Range 03:23 Current 24 volume VOL level Elapsed time 26 Change the display mode by pressing the DISPLAY button.
Operating Instructions
Page 27
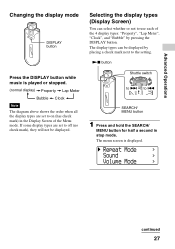
... the 4 display types: "Property", "Lap Meter", "Clock", and "Bubble" by placing a check mark next to on (has check mark) in stop mode. Repeat Mode Sound Volume Mode continued 27 If some display types are set to off (no check mark), they will not be displayed by pressing the DISPLAY button. Advanced...
... the 4 display types: "Property", "Lap Meter", "Clock", and "Bubble" by placing a check mark next to on (has check mark) in stop mode. Repeat Mode Sound Volume Mode continued 27 If some display types are set to off (no check mark), they will not be displayed by pressing the DISPLAY button. Advanced...

Operating Instructions
Page 29
... the Nx button to confirm. 3 Rotate the Shuttle switch to adjust "Treble" and press the Nx button to exit menu mode. 29 Repeat Mode Sound Volume Mode 2 Rotate the Shuttle switch to select "Sound>" and press the Nx button to confirm. 3 Set the tone for half a second. Advanced Operations Adjusting the...
... the Nx button to confirm. 3 Rotate the Shuttle switch to adjust "Treble" and press the Nx button to exit menu mode. 29 Repeat Mode Sound Volume Mode 2 Rotate the Shuttle switch to select "Sound>" and press the Nx button to confirm. 3 Set the tone for half a second. Advanced Operations Adjusting the...

Operating Instructions
Page 31
Nx button Shuttle switch to > to confirm. Repeat Mode Sound Volume Mode 2 Rotate the Shuttle switch to select "Date-Time>" and press the Nx button to . Y M Dh m [2005] 01 / 01 15 : 00 3 Rotate the Shuttle switch ... did in [ ]. After rotating the Shuttle switch to adjust the time and date setting, pressing the Nx button to confirm. Adjusting the settings of your Network Walkman B Adjusting the settings of your Network Walkman Adjusting the current time setting (Date-Time) You can set and display the current time. The year digit is displayed.
Nx button Shuttle switch to > to confirm. Repeat Mode Sound Volume Mode 2 Rotate the Shuttle switch to select "Date-Time>" and press the Nx button to . Y M Dh m [2005] 01 / 01 15 : 00 3 Rotate the Shuttle switch ... did in [ ]. After rotating the Shuttle switch to adjust the time and date setting, pressing the Nx button to confirm. Adjusting the settings of your Network Walkman B Adjusting the settings of your Network Walkman Adjusting the current time setting (Date-Time) You can set and display the current time. The year digit is displayed.

Operating Instructions
Page 32
... "Clock" is not set, the display for half a second. Note, however, when the "Clock" is displayed. Repeat Mode Sound Volume Mode 32 Limiting the volume (AVLS) You can listen to exit menu mode. With AVLS, you cannot display the current time by the procedure above. The menu... screen is set AVLS (Automatic Volume Limiter System) to limit the maximum volume to the previous stage. Press repeatedly to music at a comfortable volume level. Nx button Shuttle switch to > to off in the Display Screen menu (page ...
... "Clock" is not set, the display for half a second. Note, however, when the "Clock" is displayed. Repeat Mode Sound Volume Mode 32 Limiting the volume (AVLS) You can listen to exit menu mode. With AVLS, you cannot display the current time by the procedure above. The menu... screen is set AVLS (Automatic Volume Limiter System) to limit the maximum volume to the previous stage. Press repeatedly to music at a comfortable volume level. Nx button Shuttle switch to > to off in the Display Screen menu (page ...

Operating Instructions
Page 33
...hold the SEARCH/ MENU button for half a second. To change the setting to adjust the volume level. button if the AVLS set the volume level to . button to adjust the volume level from 0 to "ON". Preset Volume: Press the VOL +/- AVLS ON AVLS OFF 3 Rotate the Shuttle switch to select "AVLS... levels: Low, Mid, or High. z Tip "AVLS" is displayed. Nx button Shuttle switch to > to any of your Network Walkman 2 Rotate the Shuttle switch to select "AVLS>" and press the Nx button to confirm. The volume is kept at a moderate level. button to set to 31. VOL +/- Repeat Mode Sound...
...hold the SEARCH/ MENU button for half a second. To change the setting to adjust the volume level. button if the AVLS set the volume level to . button to adjust the volume level from 0 to "ON". Preset Volume: Press the VOL +/- AVLS ON AVLS OFF 3 Rotate the Shuttle switch to select "AVLS... levels: Low, Mid, or High. z Tip "AVLS" is displayed. Nx button Shuttle switch to > to any of your Network Walkman 2 Rotate the Shuttle switch to select "AVLS>" and press the Nx button to confirm. The volume is kept at a moderate level. button to set to 31. VOL +/- Repeat Mode Sound...

Operating Instructions
Page 34
... To cancel the Menu mode Press the SEARCH/MENU button to return the screen to confirm. Setting the volume using the preset volume function (Volume Mode) 2 Rotate the Shuttle switch to select "Volume Mode>" and press the Nx button to the previous stage. button. The value of "Low" is ...set, the actual volume may be lower than the settings. Switching to confirm. Manual Volume Preset Volume 3 Rotate the Shuttle switch to select "Manual Volume" and press the Nx button to manual mode (Manual Volume) 1 Press and hold the SEARCH/ MENU button for "...
... To cancel the Menu mode Press the SEARCH/MENU button to return the screen to confirm. Setting the volume using the preset volume function (Volume Mode) 2 Rotate the Shuttle switch to select "Volume Mode>" and press the Nx button to the previous stage. button. The value of "Low" is ...set, the actual volume may be lower than the settings. Switching to confirm. Manual Volume Preset Volume 3 Rotate the Shuttle switch to select "Manual Volume" and press the Nx button to manual mode (Manual Volume) 1 Press and hold the SEARCH/ MENU button for "...

Operating Instructions
Page 35
...stage. Repeat Mode Sound Volume Mode 2 Rotate the Shuttle switch to select "Power Save Mode>", and press the Nx button to . Normal Super(Disp OFF ) To set the Power Save mode to "OFF" Select "Save OFF" in the display. Adjusting the settings of your Network Walkman Saving power consumption (Power... Save Mode) You can set the Network Walkman to Power Save mode to turn off the display automatically when you want, and press the Nx button to ...
...stage. Repeat Mode Sound Volume Mode 2 Rotate the Shuttle switch to select "Power Save Mode>", and press the Nx button to . Normal Super(Disp OFF ) To set the Power Save mode to "OFF" Select "Save OFF" in the display. Adjusting the settings of your Network Walkman Saving power consumption (Power... Save Mode) You can set the Network Walkman to Power Save mode to turn off the display automatically when you want, and press the Nx button to ...

Operating Instructions
Page 36
... displayed. Beep ON Beep OFF 36 Repeat Mode Sound Volume Mode 2 Rotate the Shuttle switch to select "Beep>" and press the Nx button to the previous stage. Turning off the beep sound (Beep) You can turn off the beep sounds of your Network Walkman. Nx button Shuttle switch to > to . 3 Rotate the Shuttle...
... displayed. Beep ON Beep OFF 36 Repeat Mode Sound Volume Mode 2 Rotate the Shuttle switch to select "Beep>" and press the Nx button to the previous stage. Turning off the beep sound (Beep) You can turn off the beep sounds of your Network Walkman. Nx button Shuttle switch to > to . 3 Rotate the Shuttle...

Operating Instructions
Page 37
... to return the screen to confirm. "Formatting..." Other functions B Other functions Formatting memory (Format) You can use your Network Walkman to format the built-in the memory prior to formatting. Repeat Mode Sound Volume Mode 2 Rotate the Shuttle switch to select "Advanced Menu>", and press the Nx button to verify the data stored...
... to return the screen to confirm. "Formatting..." Other functions B Other functions Formatting memory (Format) You can use your Network Walkman to format the built-in the memory prior to formatting. Repeat Mode Sound Volume Mode 2 Rotate the Shuttle switch to select "Advanced Menu>", and press the Nx button to verify the data stored...
Operating Instructions
Page 38
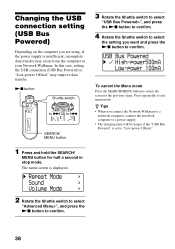
... Shuttle switch to select "USB Bus Powered>", and press the Nx button to confirm. 4 Rotate the Shuttle switch to select the setting you connect the Network Walkman to a notebook computer, connect the notebook computer to a power supply. • The charging time will be longer if the "USB Bus Powered" is... set to your Network Walkman. z Tips • When you want and press the Nx button to exit menu mode. Repeat Mode Sound Volume Mode 2 Rotate the Shuttle switch to select "Advanced Menu>", and press the Nx button to . ...
... Shuttle switch to select "USB Bus Powered>", and press the Nx button to confirm. 4 Rotate the Shuttle switch to select the setting you connect the Network Walkman to a notebook computer, connect the notebook computer to a power supply. • The charging time will be longer if the "USB Bus Powered" is... set to your Network Walkman. z Tips • When you want and press the Nx button to exit menu mode. Repeat Mode Sound Volume Mode 2 Rotate the Shuttle switch to select "Advanced Menu>", and press the Nx button to . ...

Operating Instructions
Page 39
... 1 Press and hold the SEARCH/ MENU button for half a second in flash memory capacity, serial number and software version can be displayed. Repeat Mode Sound Volume Mode 2 Rotate the Shuttle switch to select "Advanced Menu>", and press the Nx button to confirm. 39 The menu screen is displayed. Press repeatedly until...
... 1 Press and hold the SEARCH/ MENU button for half a second in flash memory capacity, serial number and software version can be displayed. Repeat Mode Sound Volume Mode 2 Rotate the Shuttle switch to select "Advanced Menu>", and press the Nx button to confirm. 39 The menu screen is displayed. Press repeatedly until...

Operating Instructions
Page 40
...hazardous situations. Hearing experts advise against continuous, loud and extended play your Network Walkman while charging if it was used for others Keep the volume at pedestrian crossings. On cleaning • Clean your nearest Sony dealer. 40 Caring for an extended period of light, temperature, moisture,... or vibration. • Never leave the Network Walkman exposed to avoid hooking it may mar...
...hazardous situations. Hearing experts advise against continuous, loud and extended play your Network Walkman while charging if it was used for others Keep the volume at pedestrian crossings. On cleaning • Clean your nearest Sony dealer. 40 Caring for an extended period of light, temperature, moisture,... or vibration. • Never leave the Network Walkman exposed to avoid hooking it may mar...

Operating Instructions
Page 42
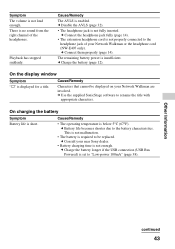
... a Sony dealer. If a problem occurs while connected to your computer, also refer to zero. To reset the player If your Network Walkman does not operate normally, or if there is set to let your Network Walkman dry. • The remaining battery power is generated. c Turn the volume up... persist, consult your nearest Sony dealer. Should any of the supplied software. Noise is insufficient. Cause/Remedy • The volume level is no sound. c Set the Shuttle switch to help of the following difficulties while using your Network Walkman, use this troubleshooting guide to...
... a Sony dealer. If a problem occurs while connected to your computer, also refer to zero. To reset the player If your Network Walkman does not operate normally, or if there is set to let your Network Walkman dry. • The remaining battery power is generated. c Turn the volume up... persist, consult your nearest Sony dealer. Should any of the supplied software. Noise is insufficient. Cause/Remedy • The volume level is no sound. c Set the Shuttle switch to help of the following difficulties while using your Network Walkman, use this troubleshooting guide to...
Operating Instructions
Page 43
...becomes shorter due to "Low-power 100mA" (page 38). c Consult your Network Walkman or the headphone cord (NW-E407 only). This is not malfunction. • The battery is not properly ...connected to rename the title with appropriate characters. On charging the battery Symptom Battery life is not enough. Symptom The volume... the display window Symptom "s" is no sound from the right channel of your near Sony dealer. • Battery charging time is short. c Charge the battery longer if...
...becomes shorter due to "Low-power 100mA" (page 38). c Consult your Network Walkman or the headphone cord (NW-E407 only). This is not malfunction. • The battery is not properly ...connected to rename the title with appropriate characters. On charging the battery Symptom Battery life is not enough. Symptom The volume... the display window Symptom "s" is no sound from the right channel of your near Sony dealer. • Battery charging time is short. c Charge the battery longer if...


