

User Guide
Page 3
... Settings Alarms and Events 33 Displaying Configuration Window 33 Registering Devices 34 Changing Registration Details 34 Deleting Devices 35 Settings Required when Using SNC-CS20/CM120/DS10/DM110/ DS60/DM160 35 Registering Device Groups 36 Details of Each Screen 37 Configuring Camera Video Settings 41 Configuring Camera Operations 45 Configuring Preset Positions 45 Configuring Camera Tours 46 Configuring Shadow Tours 47 Configuring Masks (Camera 48 Configuring Control Protocols for Analog Cameras 50 Configuring Network Camera Control 50 Configuring Audio 51 Settings...
... Settings Alarms and Events 33 Displaying Configuration Window 33 Registering Devices 34 Changing Registration Details 34 Deleting Devices 35 Settings Required when Using SNC-CS20/CM120/DS10/DM110/ DS60/DM160 35 Registering Device Groups 36 Details of Each Screen 37 Configuring Camera Video Settings 41 Configuring Camera Operations 45 Configuring Preset Positions 45 Configuring Camera Tours 46 Configuring Shadow Tours 47 Configuring Masks (Camera 48 Configuring Control Protocols for Analog Cameras 50 Configuring Network Camera Control 50 Configuring Audio 51 Settings...
User Guide
Page 7
... system allows continued operation should one hard disk drive. Control compatible cameras from remote locations You can monitor and record images from analog cameras by camera name, date, alarm, and other methods. • Audio recording and playback1) are also supported from compatible cameras. • If a video loss occurs due to the network connection being disrupted or an abnormal shutdown occurring, video can be recorded to the camera's Edge Storage, allowing you to display images in a variety...
... system allows continued operation should one hard disk drive. Control compatible cameras from remote locations You can monitor and record images from analog cameras by camera name, date, alarm, and other methods. • Audio recording and playback1) are also supported from compatible cameras. • If a video loss occurs due to the network connection being disrupted or an abnormal shutdown occurring, video can be recorded to the camera's Edge Storage, allowing you to display images in a variety...
User Guide
Page 9
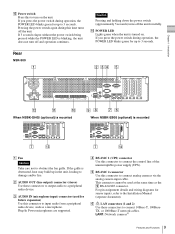
... (optional) is blinking, the unit does not turn on . Plug-In Power microphones are supported. For pin assignment details and wiring diagrams for up to 3 seconds. F LAN connectors (1 and 2) Use these connectors to output audio to a peripheral audio device. C AUDIO IN (microphone input) connector (used at the same time as a microphone. E RS-232C 2 connector Use this connector to connect the control line of the uninterruptible power supply (UPS). This connector cannot be used for up in the unit, leading to damage...
... (optional) is blinking, the unit does not turn on . Plug-In Power microphones are supported. For pin assignment details and wiring diagrams for up to 3 seconds. F LAN connectors (1 and 2) Use these connectors to output audio to a peripheral audio device. C AUDIO IN (microphone input) connector (used at the same time as a microphone. E RS-232C 2 connector Use this connector to connect the control line of the uninterruptible power supply (UPS). This connector cannot be used for up in the unit, leading to damage...
User Guide
Page 10
For details, see "Configuring Settings Related to connect a monitor that supports HDMI input. For connection details and wiring diagrams for use. M HDMI monitor connector Use this connector to Servers" (page 18). Caution If the optional NSBK-DH05 is installed, monitor connector 1 will be used at the same time. For pin assignment details and wiring diagrams for alarm output, refer to the following ports. - J ALARM OUT (alarm output) connector Use this connector to connect the alarm output lines. Caution • Do not configure LAN connectors 1 and 2 to...
For details, see "Configuring Settings Related to connect a monitor that supports HDMI input. For connection details and wiring diagrams for use. M HDMI monitor connector Use this connector to Servers" (page 18). Caution If the optional NSBK-DH05 is installed, monitor connector 1 will be used at the same time. For pin assignment details and wiring diagrams for alarm output, refer to the following ports. - J ALARM OUT (alarm output) connector Use this connector to connect the alarm output lines. Caution • Do not configure LAN connectors 1 and 2 to...

User Guide
Page 14
... if it is enabled, enable [Synchronize with NTP Server] as follows in accordance with your environment. 14 Changing Initial Settings with the Setup Menu If you select a time zone in the Server Configuration screen. Hosts If host name registration is being obtained. Setting Items of Network Device Menu Screen The network settings consist of General Network Screen Configure each item, and click [OK]. Secondary DNS Enter the IP address for the...
... if it is enabled, enable [Synchronize with NTP Server] as follows in accordance with your environment. 14 Changing Initial Settings with the Setup Menu If you select a time zone in the Server Configuration screen. Hosts If host name registration is being obtained. Setting Items of Network Device Menu Screen The network settings consist of General Network Screen Configure each item, and click [OK]. Secondary DNS Enter the IP address for the...
User Guide
Page 15
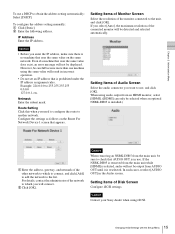
... error message will be displayed. However, be sure to obtain the address setting automatically: Select [DHCP]. Route Setting Click this when you will result in use. Netmask Enter the subnet mask. Setting Items of Audio Screen Select the audio connector you select [Auto], the maximum resolution of the connected monitor will not be detected and selected automatically. Caution When removing an NSBK-DH05 from the main unit...
... error message will be displayed. However, be sure to obtain the address setting automatically: Select [DHCP]. Route Setting Click this when you will result in use. Netmask Enter the subnet mask. Setting Items of Audio Screen Select the audio connector you select [Auto], the maximum resolution of the connected monitor will not be detected and selected automatically. Caution When removing an NSBK-DH05 from the main unit...
User Guide
Page 16
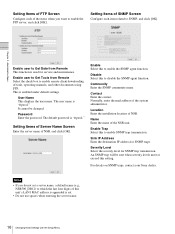
... Setup Menu Chapter 2 Administration Menu Enable user to enable remote client downloading of NSR, and click [OK]. User Name This displays the user name. Setting Items of Server Name Screen Enter the server name of tools, operating manuals, and other documents using FTP. Enable Select this to enable the SNMP agent function. Sink IP Address Enter the destination IP address for SNMP trap transmission. An SNMP trap will be changed. Enable Trap Select this unit's LAN1 MAC address...
... Setup Menu Chapter 2 Administration Menu Enable user to enable remote client downloading of NSR, and click [OK]. User Name This displays the user name. Setting Items of Server Name Screen Enter the server name of tools, operating manuals, and other documents using FTP. Enable Select this to enable the SNMP agent function. Sink IP Address Enter the destination IP address for SNMP trap transmission. An SNMP trap will be changed. Enable Trap Select this unit's LAN1 MAC address...

User Guide
Page 19
... [Auto Setting], the [Use] check box will be sure to connect from a remote client. Network Interface for Remote Client Select the network to Servers Record Server Configure the port number for the central server. If a server is used . Event Action Server Configure the port number for the proxy server. If the router supports the UPnP function, you can set one master server for uniformly managing users in this dialog box. • If you changed the network interface for the remote client...
... [Auto Setting], the [Use] check box will be sure to connect from a remote client. Network Interface for Remote Client Select the network to Servers Record Server Configure the port number for the central server. If a server is used . Event Action Server Configure the port number for the proxy server. If the router supports the UPnP function, you can set one master server for uniformly managing users in this dialog box. • If you changed the network interface for the remote client...
User Guide
Page 20
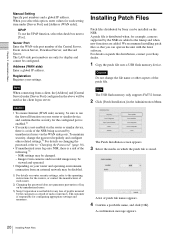
..., cameras supported by unauthorized users via the router or similar device, there is not liable for configuring appropriate settings and measures. UPnP To use the firewall function on your router and operating environment, connection from a client, the [Address] and [Central Server] under [Server Port] and [Address (WAN side)]. To maintain security, change the file name or other related settings.2) For details on changing the password, refer to the operating instructions for display and...
..., cameras supported by unauthorized users via the router or similar device, there is not liable for configuring appropriate settings and measures. UPnP To use the firewall function on your router and operating environment, connection from a client, the [Address] and [Central Server] under [Server Port] and [Address (WAN side)]. To maintain security, change the file name or other related settings.2) For details on changing the password, refer to the operating instructions for display and...
User Guide
Page 34
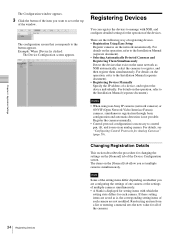
... the setting state differs for changing the settings on the network automatically. Register the cameras manually. • Control protocol configuration is , the corresponding setting items of the Device Configuration screen. For details, see "Configuring Control Protocols for all of registering devices. • Registration Using Easy Setup Register cameras on the [General] tab of each camera. If these setting items are not modified. For details on the operation, refer to control pan, tilt, and zoom on...
... the setting state differs for changing the settings on the network automatically. Register the cameras manually. • Control protocol configuration is , the corresponding setting items of the Device Configuration screen. For details, see "Configuring Control Protocols for all of registering devices. • Registration Using Easy Setup Register cameras on the [General] tab of each camera. If these setting items are not modified. For details on the operation, refer to control pan, tilt, and zoom on...
User Guide
Page 38
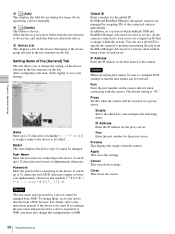
... change the user name and password for connecting to save your settings. D (Delete) This deletes a device. It can use a global ID to specify the cameras to delete from a Web browser. Preview This displays the images from RealShot Manager Advanced of a remote client without being aware of the device to the connected cameras individually. For details, refer to the instruction manual of each server. Chapter 4 Application Settings C (Add) This displays the Add...
... change the user name and password for connecting to save your settings. D (Delete) This deletes a device. It can use a global ID to specify the cameras to delete from a Web browser. Preview This displays the images from RealShot Manager Advanced of a remote client without being aware of the device to the connected cameras individually. For details, refer to the instruction manual of each server. Chapter 4 Application Settings C (Add) This displays the Add...
User Guide
Page 39
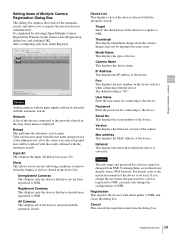
... you change the configurations in some cases. Serial No. Version This displays the firmware version of the device. Chapter 4 Application Settings Setting Items of Multiple Camera Registration Dialog Box This dialog box displays the results of the device to be used. For details, refer to the instruction manual of the automatic search, and allows you must also change the user name and password for when connecting with...
... you change the configurations in some cases. Serial No. Version This displays the firmware version of the device. Chapter 4 Application Settings Setting Items of Multiple Camera Registration Dialog Box This dialog box displays the results of the device to be used. For details, refer to the instruction manual of the automatic search, and allows you must also change the user name and password for when connecting with...

User Guide
Page 40
... server. Enable Select the check box, and configure the following setting items when registering devices detected via a proxy server. Port Enter the port number for when connecting with the device. Enter the port number on the Device Configuration screen (page 37). This dialog box is displayed by clicking (Add) on the device side for the proxy server. 40 Registering Devices Password Enter the password for the following items. IP Address...
... server. Enable Select the check box, and configure the following setting items when registering devices detected via a proxy server. Port Enter the port number for when connecting with the device. Enter the port number on the Device Configuration screen (page 37). This dialog box is displayed by clicking (Add) on the device side for the proxy server. 40 Registering Devices Password Enter the password for the following items. IP Address...

User Guide
Page 42
... of images output from CH01 to CH04 for the audio channel. Note You can be used . The audio of each item, click [Apply] to save your settings. Event/Alarm Record Configure settings related to night mode. Image Size Select the resolution for the camera. Bit Rate (for MPEG4 or H.264) Select the bit rate for when recording an alarm or event. Image Size Select the resolution for the camera. Note The light funnel...
... of images output from CH01 to CH04 for the audio channel. Note You can be used . The audio of each item, click [Apply] to save your settings. Event/Alarm Record Configure settings related to night mode. Image Size Select the resolution for the camera. Bit Rate (for MPEG4 or H.264) Select the bit rate for when recording an alarm or event. Image Size Select the resolution for the camera. Note The light funnel...

User Guide
Page 43
... at high shutter speed. This improves the effectiveness of image noise. Setting Configuration Edge Storage On Overwrite setting Off Video recording Video 1 or Video 2 Audio recording Off Recording duration If Video 1: 1 second before alarm/event start, 10 seconds after alarm/event start If Video 2: 0 seconds before alarm/event start, 10 seconds after the system is restored. Maximum Strength Select the maximum strength of the infrared sensor. Edge Storage Select this unit Active time frame Always...
... at high shutter speed. This improves the effectiveness of image noise. Setting Configuration Edge Storage On Overwrite setting Off Video recording Video 1 or Video 2 Audio recording Off Recording duration If Video 1: 1 second before alarm/event start, 10 seconds after alarm/event start If Video 2: 0 seconds before alarm/event start, 10 seconds after the system is restored. Maximum Strength Select the maximum strength of the infrared sensor. Edge Storage Select this unit Active time frame Always...

User Guide
Page 44
... want to use during manual recording. Manual Recording Select the video codec to reduce the amount of a camera server with this function. XDNR If the camera is selected in high-contrast environments, such as the strength of the image without motion and those with an image taken at high shutter speed. Video Channel In the case of image noise. Audio Channel Select the analog camera audio channel to...
... want to use during manual recording. Manual Recording Select the video codec to reduce the amount of a camera server with this function. XDNR If the camera is selected in high-contrast environments, such as the strength of the image without motion and those with an image taken at high shutter speed. Video Channel In the case of image noise. Audio Channel Select the analog camera audio channel to...

User Guide
Page 47
... you can record the motions of the camera, when operated remotely using the pan, tilt, and zoom operations while confirming the image in the preview area. 3 Configure each position specified by an operation. 4 Click [Record] to start recording. 5 Adjust the camera position using a mouse or joystick, and configure them as a shadow tour. The camera image appears in the preview area. Chapter 4 Application Settings 8 Click [Test] to show and check the set the length of time to...
... you can record the motions of the camera, when operated remotely using the pan, tilt, and zoom operations while confirming the image in the preview area. 3 Configure each position specified by an operation. 4 Click [Record] to start recording. 5 Adjust the camera position using a mouse or joystick, and configure them as a shadow tour. The camera image appears in the preview area. Chapter 4 Application Settings 8 Click [Test] to show and check the set the length of time to...

User Guide
Page 103
... displays the recording type (MANUAL, ALARM, SCHEDULE, or EVENT) during the monitoring and recording of live images, and the date and time at which the camera images are imported from the camera. C D F E A Camera Name This displays the name of when alarms occurred. During the playback of recorded images, the playback operation state (PAUSE, etc.) or playback speed (+1x, -0.2x, etc.) is displayed ("+" is used for an image pasted in the forward direction, and "-" to display...
... displays the recording type (MANUAL, ALARM, SCHEDULE, or EVENT) during the monitoring and recording of live images, and the date and time at which the camera images are imported from the camera. C D F E A Camera Name This displays the name of when alarms occurred. During the playback of recorded images, the playback operation state (PAUSE, etc.) or playback speed (+1x, -0.2x, etc.) is displayed ("+" is used for an image pasted in the forward direction, and "-" to display...

User Guide
Page 106
... of camera motions recorded manually. When such images are available for playing recorded images, including quick playback for recorded images. • "Playing Recorded Images from Search Results" (page 108) You can play back recorded image data and audio data. Note To use the camera tour or shadow tour functions, a camera tour or shadow tour must be configured beforehand. Chapter 5 Operation and Control 106 Recording, Searching, and Playing Images are camera tours and S-1 to preset pan, tilt, and zoom positions. Recording Live Images...
... of camera motions recorded manually. When such images are available for playing recorded images, including quick playback for recorded images. • "Playing Recorded Images from Search Results" (page 108) You can play back recorded image data and audio data. Note To use the camera tour or shadow tour functions, a camera tour or shadow tour must be configured beforehand. Chapter 5 Operation and Control 106 Recording, Searching, and Playing Images are camera tours and S-1 to preset pan, tilt, and zoom positions. Recording Live Images...

User Guide
Page 132
... Screen 98 Manual Action 82 Mask 48 Monitor Layout 51 Monitoring 96 Monitoring Audio 97 Motion Detection 59 Multiple Camera Registration Dialog Box 39 N NAT Setting 19 Network Camera Configuration 50 Network Device Menu 14 O Object Detection 59 P Password 30 Patch Files 20 Patch Installation 20 Permissions 91 Playing 106 Preset Positions 45 Presets 105 Protecting Recorded Images 111 PTZ 104 Q Quick Playback 95 R Reboot 32 Recording 106 Registering Devices 34 Registering Users 91 Resolution 42 Restarting 32 Restore Configuration...
... Screen 98 Manual Action 82 Mask 48 Monitor Layout 51 Monitoring 96 Monitoring Audio 97 Motion Detection 59 Multiple Camera Registration Dialog Box 39 N NAT Setting 19 Network Camera Configuration 50 Network Device Menu 14 O Object Detection 59 P Password 30 Patch Files 20 Patch Installation 20 Permissions 91 Playing 106 Preset Positions 45 Presets 105 Protecting Recorded Images 111 PTZ 104 Q Quick Playback 95 R Reboot 32 Recording 106 Registering Devices 34 Registering Users 91 Resolution 42 Restarting 32 Restore Configuration...


