
Handycam® Handbook
Page 2
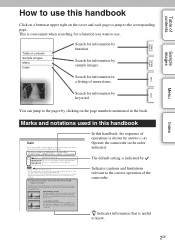
.... The default setting is shown by function. Indicates cautions and limitations relevant to know. 2GB Search for information by arrows (t). Operate the camcorder in a listing of menu items. Search for information in the order indicated. z Indicates information that is convenient when searching for a function...Marks and notations used in the book. Search for information by . Table of contents Sample images Menu Index Notes on using the camcorder How to use . You can jump to the pages by clicking on the page numbers mentioned in this handbook In this handbook ...
.... The default setting is shown by function. Indicates cautions and limitations relevant to know. 2GB Search for information by arrows (t). Operate the camcorder in a listing of menu items. Search for information in the order indicated. z Indicates information that is convenient when searching for a function...Marks and notations used in the book. Search for information by . Table of contents Sample images Menu Index Notes on using the camcorder How to use . You can jump to the pages by clicking on the page numbers mentioned in this handbook In this handbook ...

Handycam® Handbook
Page 3
Table of contents Sample images Menu Index Table of contents Notes on using the camcorder How to use this handbook 2 Sample images 5 Basic operations Using the operating buttons 8 Menu 10 Using functions with the buttons on the control panel DISP (Display Contents 14 FOCUS (AF/MF Select 16 GAIN (Gain 18 ISO 19 (Exposure Comp 20 WB (White Balance 21 (Image Index 23 Using functions in the menu Shoot Mode 10 Camera 11 Rec Mode/Image Size 11 Brightness/Color 11 Playback 12 Setup 12 3GB Continued r
Table of contents Sample images Menu Index Table of contents Notes on using the camcorder How to use this handbook 2 Sample images 5 Basic operations Using the operating buttons 8 Menu 10 Using functions with the buttons on the control panel DISP (Display Contents 14 FOCUS (AF/MF Select 16 GAIN (Gain 18 ISO 19 (Exposure Comp 20 WB (White Balance 21 (Image Index 23 Using functions in the menu Shoot Mode 10 Camera 11 Rec Mode/Image Size 11 Brightness/Color 11 Playback 12 Setup 12 3GB Continued r
Handycam® Handbook
Page 4
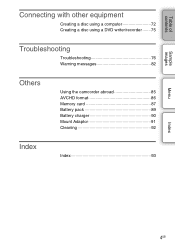
Table of contents Sample images Connecting with other equipment Creating a disc using a computer 72 Creating a disc using a DVD writer/recorder 75 Troubleshooting Troubleshooting 76 Warning messages 82 Others Using the camcorder abroad 85 AVCHD format 86 Memory card 87 Battery pack 89 Battery charger 90 Mount Adaptor 91 Cleaning 92 Index Index 93 Menu Index 4GB
Table of contents Sample images Connecting with other equipment Creating a disc using a computer 72 Creating a disc using a DVD writer/recorder 75 Troubleshooting Troubleshooting 76 Warning messages 82 Others Using the camcorder abroad 85 AVCHD format 86 Memory card 87 Battery pack 89 Battery charger 90 Mount Adaptor 91 Cleaning 92 Index Index 93 Menu Index 4GB

Handycam® Handbook
Page 5
You may find the answer by hand (page 6) Shooting landscapes (page 6) Shooting clear still images (page 7) If you click on an image, the screen will jump to capture in an image, but how can I do?" Click! 5GB Continued r Table of contents Sample images Menu Index Sample images "This is the scene I want to the page describing the function recommended for shooting that kind of image. Shooting movies as clear as still images (page 6) Shooting when holding the camcorder by going through the sample images listed here. Click the desired sample image.
You may find the answer by hand (page 6) Shooting landscapes (page 6) Shooting clear still images (page 7) If you click on an image, the screen will jump to capture in an image, but how can I do?" Click! 5GB Continued r Table of contents Sample images Menu Index Sample images "This is the scene I want to the page describing the function recommended for shooting that kind of image. Shooting movies as clear as still images (page 6) Shooting when holding the camcorder by going through the sample images listed here. Click the desired sample image.
Handycam® Handbook
Page 6
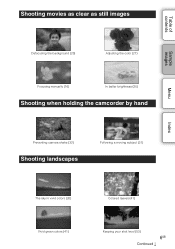
Shooting movies as clear as still images Table of contents Sample images 25 Defocusing the background (25) 16 Focusing manually (16) 21 Adjusting the color (21) 20 In better brightness (20) Shooting when holding the camcorder by hand Menu Index 32 Preventing camera shake (32) Shooting landscapes 31 Following a moving subject (31) 20 The sky in vivid colors (20) 41 Vivid green colors (41) 41 Colored leaves (41) 53 Keeping your shot level (53) 6GB Continued r
Shooting movies as clear as still images Table of contents Sample images 25 Defocusing the background (25) 16 Focusing manually (16) 21 Adjusting the color (21) 20 In better brightness (20) Shooting when holding the camcorder by hand Menu Index 32 Preventing camera shake (32) Shooting landscapes 31 Following a moving subject (31) 20 The sky in vivid colors (20) 41 Vivid green colors (41) 41 Colored leaves (41) 53 Keeping your shot level (53) 6GB Continued r
Handycam® Handbook
Page 8
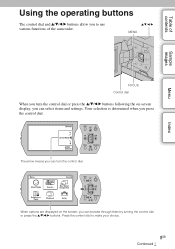
... arrow means you can turn the control dial or press the v/V/b/B buttons following the on the screen, you press the control dial. Table of the camcorder. Press the control dial to use various functions of contents Basic operations Using the operating buttons The control dial and v/V/b/B buttons allow you can select...
... arrow means you can turn the control dial or press the v/V/b/B buttons following the on the screen, you press the control dial. Table of the camcorder. Press the control dial to use various functions of contents Basic operations Using the operating buttons The control dial and v/V/b/B buttons allow you can select...
Handycam® Handbook
Page 10
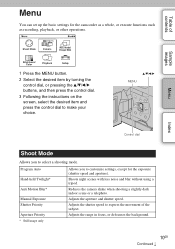
... 3 Following the instructions on the screen, select the desired item and press the control dial to select a shooting mode. Reduces the camera shake when shooting a slightly dark indoor scene or a telephoto. Shoots night scenes with less noise and blur without using a tripod. ...settings for the exposure (shutter speed and aperture). Adjusts the shutter speed to customize settings, except for the camcorder as a whole, or execute functions such as recording, playback, or other operations. Adjusts the aperture and shutter speed. MENU v/V/b/B Control dial Shoot Mode Allows you...
... 3 Following the instructions on the screen, select the desired item and press the control dial to select a shooting mode. Reduces the camera shake when shooting a slightly dark indoor scene or a telephoto. Shoots night scenes with less noise and blur without using a tripod. ...settings for the exposure (shutter speed and aperture). Adjusts the shutter speed to customize settings, except for the camcorder as a whole, or execute functions such as recording, playback, or other operations. Adjusts the aperture and shutter speed. MENU v/V/b/B Control dial Shoot Mode Allows you...
Handycam® Handbook
Page 12
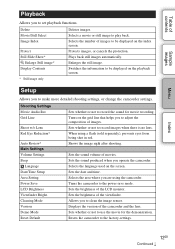
...set playback functions. Selects a movie or still image to the factory-settings. Sets the sound volume of the camcorder and the lens. Sets whether or not to record the sound for the demonstration. Cleaning Mode Version Demo Mode Reset Default Sets whether or not to use the ... mode. Index 12GB Continued r Plays back still images automatically. Shows the image right after shooting. Sets the date and time. Turns the camcorder to record images when there is no lens. Displays the version of movies. Sets the sound produced when you are using a flash (sold separately),...
...set playback functions. Selects a movie or still image to the factory-settings. Sets the sound volume of the camcorder and the lens. Sets whether or not to record the sound for the demonstration. Cleaning Mode Version Demo Mode Reset Default Sets whether or not to use the ... mode. Index 12GB Continued r Plays back still images automatically. Shows the image right after shooting. Sets the date and time. Turns the camcorder to record images when there is no lens. Displays the version of movies. Sets the sound produced when you are using a flash (sold separately),...

Handycam® Handbook
Page 15
No Disp. Disp. Index 15GB Does not show the same display contents set with [Display Contents]. Detail Info Shows detailed recording information. A Number of a particular brightness exist in the picture. Table of contents Sample images Menu z What is histogram The ... playback Disp. Info. Brighter image will make the entire histogram shift to the right side, and darker image to the camcorder using an HDMI cable (sold separately) will show recording information. Basic Info Shows recording information. Note • The TV or monitor connected to the left side.
No Disp. Disp. Index 15GB Does not show the same display contents set with [Display Contents]. Detail Info Shows detailed recording information. A Number of a particular brightness exist in the picture. Table of contents Sample images Menu z What is histogram The ... playback Disp. Info. Brighter image will make the entire histogram shift to the right side, and darker image to the camcorder using an HDMI cable (sold separately) will show recording information. Basic Info Shows recording information. Note • The TV or monitor connected to the left side.
Handycam® Handbook
Page 17
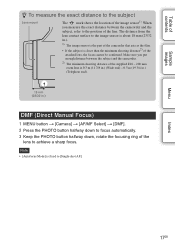
... mm zoom lens is 0.3 m (11 7/8 in.) (Wide end) - 0.5 m (19 3/4 in.) (Telephoto end). 18 mm (23/32 in .). 1) The image sensor is the part of the camcorder that acts as the film. • If the subject is fixed to the subject Lens mount The mark shows the location of the image sensor1... AF]. The distance from the lens contact surface to the image sensor is about 18 mm (23/32 in .) DMF (Direct Manual Focus) 1 MENU button t [Camera] t [AF/MF Select] t [DMF]. 2 Press the PHOTO button halfway down to focus automatically. 3 Keep the PHOTO button halfway down, rotate the focusing ring of the...
... mm zoom lens is 0.3 m (11 7/8 in.) (Wide end) - 0.5 m (19 3/4 in.) (Telephoto end). 18 mm (23/32 in .). 1) The image sensor is the part of the camcorder that acts as the film. • If the subject is fixed to the subject Lens mount The mark shows the location of the image sensor1... AF]. The distance from the lens contact surface to the image sensor is about 18 mm (23/32 in .) DMF (Direct Manual Focus) 1 MENU button t [Camera] t [AF/MF Select] t [DMF]. 2 Press the PHOTO button halfway down to focus automatically. 3 Keep the PHOTO button halfway down, rotate the focusing ring of the...
Handycam® Handbook
Page 21
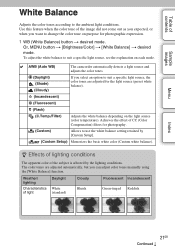
... source, see the explanation on purpose for photography. (Custom) Allows to use the white balance setting retained by the lighting conditions. AWB (Auto WB) The camcorder automatically detects a light source and adjusts the color tones. (Daylight) (Shade) (Cloudy) If you select an option to the ambient light conditions. Use this feature...
... source, see the explanation on purpose for photography. (Custom) Allows to use the white balance setting retained by the lighting conditions. AWB (Auto WB) The camcorder automatically detects a light source and adjusts the color tones. (Daylight) (Shade) (Cloudy) If you select an option to the ambient light conditions. Use this feature...
Handycam® Handbook
Page 22
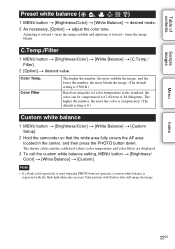
... the number, the more the color is compensated. (The default setting is 0.) Custom white balance 1 MENU button t [Brightness/Color] t [White Balance] t [Custom Setup]. 2 Hold the camcorder so that the white area fully covers the AF area located in later still image shootings. C.Temp./Filter 1 MENU button t [Brightness/Color] t [White Balance] t [C.Temp...
... the number, the more the color is compensated. (The default setting is 0.) Custom white balance 1 MENU button t [Brightness/Color] t [White Balance] t [Custom Setup]. 2 Hold the camcorder so that the white area fully covers the AF area located in later still image shootings. C.Temp./Filter 1 MENU button t [Brightness/Color] t [White Balance] t [C.Temp...

Handycam® Handbook
Page 24
Or, MENU button t [Shoot Mode] t [Program Auto]. 2 Set the shooting functions to your desired settings. 3 Adjust the focus and shoot the subject. 24GB Table of contents Sample images Menu Index Program Auto While exposure is adjusted by the camcorder automatically, you can set shooting functions such as Gain/ISO sensitivity, Creative Style, White Balance. 1 Press the control dial and select [Program Auto].
Or, MENU button t [Shoot Mode] t [Program Auto]. 2 Set the shooting functions to your desired settings. 3 Adjust the focus and shoot the subject. 24GB Table of contents Sample images Menu Index Program Auto While exposure is adjusted by the camcorder automatically, you can set shooting functions such as Gain/ISO sensitivity, Creative Style, White Balance. 1 Press the control dial and select [Program Auto].
Handycam® Handbook
Page 26
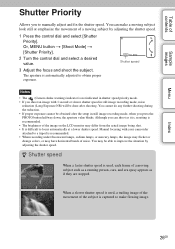
...subject is captured to a tripod is not indicated in still image recording mode, noise reduction (Long Exposure NR) will be obtained after shooting. Notes • The (Camera shake warning) indicator is recommended. • When recording under fluorescent lamps, sodium lamps, or mercury lamps, the image ... speed. Manual focusing with 1 second or slower shutter speed in shutter speed priority mode. • If you shoot an image with your camcorder attached to make a moving subject look still or emphasize the movement of noise. Shutter speed 3 Adjust the focus and shoot the subject....
...subject is captured to a tripod is not indicated in still image recording mode, noise reduction (Long Exposure NR) will be obtained after shooting. Notes • The (Camera shake warning) indicator is recommended. • When recording under fluorescent lamps, sodium lamps, or mercury lamps, the image ... speed. Manual focusing with 1 second or slower shutter speed in shutter speed priority mode. • If you shoot an image with your camcorder attached to make a moving subject look still or emphasize the movement of noise. Shutter speed 3 Adjust the focus and shoot the subject....

Handycam® Handbook
Page 27
...ISO sensitivity as necessary. • The brightness of contents Sample images Menu Manual Exposure You can shoot with the desired exposure setting by the camcorder 4 Adjust the focus and shoot the subject. Or, MENU button t [Shoot Mode] t [Manual Exposure]. 2 Press the V botton repeatedly...aperture. 1 Press the control dial and select [Manual Exposure]. Toward -: Images become brighter. Aperture (F-value) Exposure value Notes • The (Camera shake warning) indicator is not indicated in manual exposure mode. • In manual exposure mode, the [Gain] setting [Auto] is set to...
...ISO sensitivity as necessary. • The brightness of contents Sample images Menu Manual Exposure You can shoot with the desired exposure setting by the camcorder 4 Adjust the focus and shoot the subject. Or, MENU button t [Shoot Mode] t [Manual Exposure]. 2 Press the V botton repeatedly...aperture. 1 Press the control dial and select [Manual Exposure]. Toward -: Images become brighter. Aperture (F-value) Exposure value Notes • The (Camera shake warning) indicator is not indicated in manual exposure mode. • In manual exposure mode, the [Gain] setting [Auto] is set to...
Handycam® Handbook
Page 28
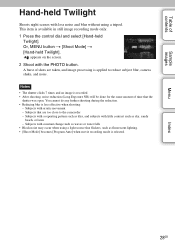
... and image processing is applied to the camcorder - Subjects with constant change such as waves or water falls • Block noise may occur when using a tripod. Subjects with the PHOTO button. Notes • The shutter clicks 7 times and an image is recorded. • After shooting, noise reduction ...(Long Exposure NR) will be done for the same amount of shots are too close to reduce subject blur, camera shake, and noise. A burst of time that flickers, such as sky...
... and image processing is applied to the camcorder - Subjects with constant change such as waves or water falls • Block noise may occur when using a tripod. Subjects with the PHOTO button. Notes • The shutter clicks 7 times and an image is recorded. • After shooting, noise reduction ...(Long Exposure NR) will be done for the same amount of shots are too close to reduce subject blur, camera shake, and noise. A burst of time that flickers, such as sky...

Handycam® Handbook
Page 29
... does not work. • [Shoot Mode] becomes [Program Auto] when movie recording mode is selected. 29GB Subjects with the PHOTO button. Or, MENU button t [Shoot Mode] t [Anti Motion Blur]. The camcorder combines 6 shots at high sensitivity into 1 still image, so camera shake is reduced while preventing noise. Table of contents Sample images Menu...
... does not work. • [Shoot Mode] becomes [Program Auto] when movie recording mode is selected. 29GB Subjects with the PHOTO button. Or, MENU button t [Shoot Mode] t [Anti Motion Blur]. The camcorder combines 6 shots at high sensitivity into 1 still image, so camera shake is reduced while preventing noise. Table of contents Sample images Menu...

Handycam® Handbook
Page 30
... • [Multi] is in focus. Movie recording AF range finder frame Menu Index 30GB AF range finder frame (Flexible Spot) Moves the focusing area to get the proper focus in the center area exclusively. The camcorder uses the AF area located in auto focus mode. 1 MENU button t [Camera] t [Autofocus Area] t desired mode. (Multi...
... • [Multi] is in focus. Movie recording AF range finder frame Menu Index 30GB AF range finder frame (Flexible Spot) Moves the focusing area to get the proper focus in the center area exclusively. The camcorder uses the AF area located in auto focus mode. 1 MENU button t [Camera] t [Autofocus Area] t desired mode. (Multi...
Handycam® Handbook
Page 31
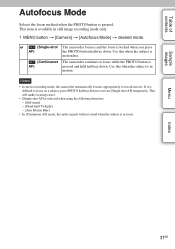
...] - [Anti Motion Blur] • In [Continuous AF] mode, the audio signals will not sound when the subject is in still image recording mode only. 1 MENU button t [Camera] t [Autofocus Mode] t desired mode. (Single-shot AF) (Continuous AF) The camcorder focuses and the focus is difficult to focus while the PHOTO button is motionless. The...
...] - [Anti Motion Blur] • In [Continuous AF] mode, the audio signals will not sound when the subject is in still image recording mode only. 1 MENU button t [Camera] t [Autofocus Mode] t desired mode. (Single-shot AF) (Continuous AF) The camcorder focuses and the focus is difficult to focus while the PHOTO button is motionless. The...
Handycam® Handbook
Page 37
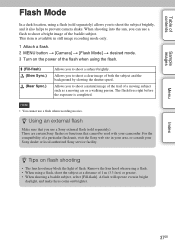
... flash unit, visit the Sony web site in your area, or consult your camcorder. z Tips on the power of the flash when using the flash. (Fill-flash) (Slow Sync.) (Rear Sync.) Allows you to prevent camera shake. A flash will operate even in still image recording mode only. 1 Attach ...a flash. 2 MENU button t [Camera] t [Flash Mode] t...
... flash unit, visit the Sony web site in your area, or consult your camcorder. z Tips on the power of the flash when using the flash. (Fill-flash) (Slow Sync.) (Rear Sync.) Allows you to prevent camera shake. A flash will operate even in still image recording mode only. 1 Attach ...a flash. 2 MENU button t [Camera] t [Flash Mode] t...


