User Manual
Page 1
is a registered trademark of Sony Corporation. © 2005 Sony Corporation This warranty is valid only in the United States. 2-588-603-11(1) Operating Instructions MZ-RH910 Recorder Operation ______p_a_g_e_1_2 Software Operation ______p_a_g_e_8_6 Portable MD Recorder MZ-RH910 Printed in Malaysia * 2 5 8 8 6 0 3 1 1 * (1) Hi-MD Walkman Portable MD Recorder "WALKMAN" is a trademark of Sony Corporation to represent Headphone Stereo products.
is a registered trademark of Sony Corporation. © 2005 Sony Corporation This warranty is valid only in the United States. 2-588-603-11(1) Operating Instructions MZ-RH910 Recorder Operation ______p_a_g_e_1_2 Software Operation ______p_a_g_e_8_6 Portable MD Recorder MZ-RH910 Printed in Malaysia * 2 5 8 8 6 0 3 1 1 * (1) Hi-MD Walkman Portable MD Recorder "WALKMAN" is a trademark of Sony Corporation to represent Headphone Stereo products.
User Manual
Page 2
...will enable us to them whenever you periodic mailings about this product, contact: - CAUTION - MZ-RH910 Serial No. Do not install the appliance in a confined space, such as vases, on the apparatus. Record the serial number in cabinet. If you . Certain countries may regulate disposal of the apparatus...send you call upon your local authority. To prevent fire, do not place objects filled with news papers, table cloths, curtains, etc. Sony Network Portable Audio Support Line 1-(866)-456-7669 - Model No. Caution The use of the disc compartment lid and the model number is ...
...will enable us to them whenever you periodic mailings about this product, contact: - CAUTION - MZ-RH910 Serial No. Do not install the appliance in a confined space, such as vases, on the apparatus. Record the serial number in cabinet. If you . Certain countries may regulate disposal of the apparatus...send you call upon your local authority. To prevent fire, do not place objects filled with news papers, table cloths, curtains, etc. Sony Network Portable Audio Support Line 1-(866)-456-7669 - Model No. Caution The use of the disc compartment lid and the model number is ...

User Manual
Page 4
...compatible with the desired language you purchased the product. We do not guarantee all the languages will SONY be caused by third parties, arising out of the use of the software supplied with this recorder. • In the event a problem occurs with this product, please contact your local city ...office, your PC. However, SONY bears no event will be able to be displayed properly on your household waste ...
...compatible with the desired language you purchased the product. We do not guarantee all the languages will SONY be caused by third parties, arising out of the use of the software supplied with this recorder. • In the event a problem occurs with this product, please contact your local city ...office, your PC. However, SONY bears no event will be able to be displayed properly on your household waste ...

User Manual
Page 6
... of menus 28 Various ways of recording 30 Before recording 30 Viewing various information 31 Recording from a microphone 32 Recording from a TV or radio (Analog Recording 34 Selecting the recording mode 34 Adjusting the recording level manually 35 Adding track marks while recording 36 Recording without creating a new group 37 To start/stop recording in sync with the sound source...
... of menus 28 Various ways of recording 30 Before recording 30 Viewing various information 31 Recording from a microphone 32 Recording from a TV or radio (Analog Recording 34 Selecting the recording mode 34 Adjusting the recording level manually 35 Adding track marks while recording 36 Recording without creating a new group 37 To start/stop recording in sync with the sound source...

User Manual
Page 7
... Adding titles (Title Input 46 Assigning tracks or groups as a new group (Group Set 49 Releasing a group setting (Group Release 50 Moving recorded tracks or groups (Move 50 Erasing tracks and the entire disc (Erase 52 Dividing a track (Divide 53 Combining tracks (Combine 54 Formatting the...........58 Changing the operational direction of the display 59 Selecting the display language 59 Using the recorder with a computer 60 What you can do through connection with a computer 60 Connecting the recorder to your computer 61 Storing non-audio data to a disc 62 Viewing non-audio data ...
... Adding titles (Title Input 46 Assigning tracks or groups as a new group (Group Set 49 Releasing a group setting (Group Release 50 Moving recorded tracks or groups (Move 50 Erasing tracks and the entire disc (Erase 52 Dividing a track (Divide 53 Combining tracks (Combine 54 Formatting the...........58 Changing the operational direction of the display 59 Selecting the display language 59 Using the recorder with a computer 60 What you can do through connection with a computer 60 Connecting the recorder to your computer 61 Storing non-audio data to a disc 62 Viewing non-audio data ...

User Manual
Page 8
... disc 98 Using SonicStage Help 100 Referring to SonicStage Help 102 Using MD Simple Burner 104 Before using MD Simple Burner 104 Recording using MD Walkman operations (Simple mode 105 Recording by computer operations (Standard mode 106 Other information 108 Uninstalling SonicStage/MD Simple Burner 108 On copyright protection 109 Troubleshooting 110...
... disc 98 Using SonicStage Help 100 Referring to SonicStage Help 102 Using MD Simple Burner 104 Before using MD Simple Burner 104 Recording using MD Walkman operations (Simple mode 105 Recording by computer operations (Standard mode 106 Other information 108 Uninstalling SonicStage/MD Simple Burner 108 On copyright protection 109 Troubleshooting 110...

User Manual
Page 10
... supplied manuals This section explains the functions of Hi-MD Walkman and how it . The "What you made. Please refer to the recordings that you can enjoy recording from a CD player or a microphone, then enjoy listening to the manual that have been supplied with it differs with standard MD Walkman... "Hi-MD" is a new MiniDisc format with the Hi-MD Walkman" flyer This flyer explains the major features of this portable MiniDisc recorder and the manuals that applies to "Troubleshooting and explanations" (page 69). 10 Learning more about what to 85) This section explains all of the...
... supplied manuals This section explains the functions of Hi-MD Walkman and how it . The "What you made. Please refer to the recordings that you can enjoy recording from a CD player or a microphone, then enjoy listening to the manual that have been supplied with it differs with standard MD Walkman... "Hi-MD" is a new MiniDisc format with the Hi-MD Walkman" flyer This flyer explains the major features of this portable MiniDisc recorder and the manuals that applies to "Troubleshooting and explanations" (page 69). 10 Learning more about what to 85) This section explains all of the...

User Manual
Page 11
... on your computer and the operating system, please refer to online help explains the detailed operations and information about SonicStage software. Using the recorder while it is an online help that appear in this section cover general Hi-MD/Net MD products. SonicStage Help This is connected to...not be applicable to 112) This section explains the installation and basic operations of your Hi-MD/Net MD. Online help if you to record audio data to the operating instructions of the supplied SonicStage/MD Simple Burner software. For details on the "Software Operation" section • ...
... on your computer and the operating system, please refer to online help explains the detailed operations and information about SonicStage software. Using the recorder while it is an online help that appear in this section cover general Hi-MD/Net MD products. SonicStage Help This is connected to...not be applicable to 112) This section explains the installation and basic operations of your Hi-MD/Net MD. Online help if you to record audio data to the operating instructions of the supplied SonicStage/MD Simple Burner software. For details on the "Software Operation" section • ...

User Manual
Page 13
..., make sure to attach the clamp filters in .) from the plug connected to step 2 below for the distance from the plug 3 Close the clamp filter. Recorder Operation 13 Make sure the clasps are fully engaged. For the supplied remote control: Wind the cord around the clamp filter once/Approx. 4 cm (1.6 in... (RK-G129/RK-G136): small-size clamp filter/ ESD-SR-110 (except for the Southeast Asian, African, Mexican and tourist models) 12 3 Refer to the recorder. 1 Open the clamp filter. 2 Attach the clamp filters as follows.
..., make sure to attach the clamp filters in .) from the plug connected to step 2 below for the distance from the plug 3 Close the clamp filter. Recorder Operation 13 Make sure the clasps are fully engaged. For the supplied remote control: Wind the cord around the clamp filter once/Approx. 4 cm (1.6 in... (RK-G129/RK-G136): small-size clamp filter/ ESD-SR-110 (except for the Southeast Asian, African, Mexican and tourist models) 12 3 Refer to the recorder. 1 Open the clamp filter. 2 Attach the clamp filters as follows.

User Manual
Page 14
indicates a function that requires a slight press of the arrow to disable the buttons on the recorder. Looking at controls The recorder A MIC (PLUG IN POWER) jack1) B LINE IN (OPT) jack C HOLD switch Slide the switch in the direction of the button. D Display window E OPEN switch F Jog .... 2) • indicates a function that requires pressing the button for 2 seconds or more. 14 To prevent the buttons from being accidentally operated when you carry the recorder, use this function.
indicates a function that requires a slight press of the arrow to disable the buttons on the recorder. Looking at controls The recorder A MIC (PLUG IN POWER) jack1) B LINE IN (OPT) jack C HOLD switch Slide the switch in the direction of the button. D Display window E OPEN switch F Jog .... 2) • indicates a function that requires pressing the button for 2 seconds or more. 14 To prevent the buttons from being accidentally operated when you carry the recorder, use this function.

User Manual
Page 15
... display area Displays titles, menu items, error messages, etc. F Battery indication Shows the approximate remaining battery power. C SYNC (synchro-recording) indication D REC indication Lights up when the disc used in the recorder. If the batteries are preceded by the following icons. : track name : artist name* : album name* : group name :... disc name * Appears only for discs used in MD mode is in record standby mode. E Hi-MD/MD indication "Hi-MD" lights up when the disc used in Hi-MD mode is inserted in the...
... display area Displays titles, menu items, error messages, etc. F Battery indication Shows the approximate remaining battery power. C SYNC (synchro-recording) indication D REC indication Lights up when the disc used in the recorder. If the batteries are preceded by the following icons. : track name : artist name* : album name* : group name :... disc name * Appears only for discs used in MD mode is in record standby mode. E Hi-MD/MD indication "Hi-MD" lights up when the disc used in Hi-MD mode is inserted in the...

User Manual
Page 16
button E NX (play, pause) button F x (stop) button G . (AMS, fast rewind), > (AMS, fast forward) button 16 control B HOLD switch Slide the switch in the direction of the arrow to disable the buttons on the remote control. To prevent the buttons from being accidentally operated when you carry the recorder, use this function. C Clip D (group) +, - The earphones with a remote control (except for the North American model) A B E C F D G A VOL (volume) +, -
button E NX (play, pause) button F x (stop) button G . (AMS, fast rewind), > (AMS, fast forward) button 16 control B HOLD switch Slide the switch in the direction of the arrow to disable the buttons on the remote control. To prevent the buttons from being accidentally operated when you carry the recorder, use this function. C Clip D (group) +, - The earphones with a remote control (except for the North American model) A B E C F D G A VOL (volume) +, -
User Manual
Page 17
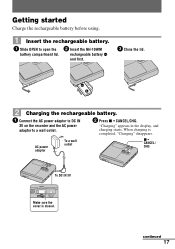
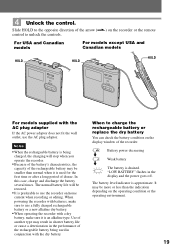
... completed, "Charging" disappears. rechargeable battery E end first. 3 Close the lid. 2 Charging the rechargeable battery. 1 Connect the AC power adaptor to DC IN 3V on the recorder and the AC power adaptor to open the 2 Insert the NH-10WM battery compartment lid. "Charging" appears in the display, and charging starts.
... completed, "Charging" disappears. rechargeable battery E end first. 3 Close the lid. 2 Charging the rechargeable battery. 1 Connect the AC power adaptor to DC IN 3V on the recorder and the AC power adaptor to open the 2 Insert the NH-10WM battery compartment lid. "Charging" appears in the display, and charging starts.

User Manual
Page 18
... the rechargeable battery. Connect firmly To i 18 Inset the battery E end first. 3 Make connections. The charging time may vary, depending on the condition of the recorder 2 Insert a LR6 (size AA) alkaline dry battery. Connect firmly To i For models except USA and Canadian models Connect the earphones with the remote control to...
... the rechargeable battery. Connect firmly To i 18 Inset the battery E end first. 3 Make connections. The charging time may vary, depending on the condition of the recorder 2 Insert a LR6 (size AA) alkaline dry battery. Connect firmly To i For models except USA and Canadian models Connect the earphones with the remote control to...
User Manual
Page 19
... the remote control to the opposite direction of the arrow (.) on the display window of the recorder. Slide HOLD to unlock the controls. When powering the recorder with batteries, make sure it is being charged, the charging will be restored. • It is an alkaline type. Battery... "LOW BATTERY" flashes in conjunction with the dry battery. 4 Unlock the control. The normal battery life will stop when you operate the recorder. • Because of the battery's characteristics, the capacity of the rechargeable battery may result in shorter battery life or cause a deterioration in...
... the remote control to the opposite direction of the arrow (.) on the display window of the recorder. Slide HOLD to unlock the controls. When powering the recorder with batteries, make sure it is being charged, the charging will be restored. • It is an alkaline type. Battery... "LOW BATTERY" flashes in conjunction with the dry battery. 4 Unlock the control. The normal battery life will stop when you operate the recorder. • Because of the battery's characteristics, the capacity of the rechargeable battery may result in shorter battery life or cause a deterioration in...

User Manual
Page 20
Battery life When recording continuously in Hi-MD mode Disc type 1GB Hi-MD disc 60/74/80-minute standard disc Batteries...Electronics and Information Technology Industries Association) standard. 2) When using a 100% fully charged nickel metal hydride rechargeable battery 3) When using a Sony LR6 (size AA) alkaline dry battery (produced in Japan) When playing continuously in Hi-MD mode Disc type 1GB Hi-MD disc 60... 33 (Unit: approx.hours)(JEITA) LP2 LP4 11 12 20 21 37 39.5 Notes • Stop the recorder before replacing the battery. • When using a 1GB Hi-MD disc, the continuous...
Battery life When recording continuously in Hi-MD mode Disc type 1GB Hi-MD disc 60/74/80-minute standard disc Batteries...Electronics and Information Technology Industries Association) standard. 2) When using a 100% fully charged nickel metal hydride rechargeable battery 3) When using a Sony LR6 (size AA) alkaline dry battery (produced in Japan) When playing continuously in Hi-MD mode Disc type 1GB Hi-MD disc 60... 33 (Unit: approx.hours)(JEITA) LP2 LP4 11 12 20 21 37 39.5 Notes • Stop the recorder before replacing the battery. • When using a 1GB Hi-MD disc, the continuous...

User Manual
Page 21
...To LINE IN (OPT) ∗ See "Optional accessories" (page 68). This section explains the basic procedure for making digital recordings using a computer. You can record in MD mode when you record directly with this recorder. 1 Make connections. (Insert the cables firmly and completely into the appropriate jacks.) 1 Connect the AC power adaptor to ... (optical) out jack To DC IN 3V Optical miniplug Optical plug Optical cable* Make sure the cover is closed. Make sure to the recorder and an external component. continued 21 CD player, MD player, DVD video player, etc. Note...
...To LINE IN (OPT) ∗ See "Optional accessories" (page 68). This section explains the basic procedure for making digital recordings using a computer. You can record in MD mode when you record directly with this recorder. 1 Make connections. (Insert the cables firmly and completely into the appropriate jacks.) 1 Connect the AC power adaptor to ... (optical) out jack To DC IN 3V Optical miniplug Optical plug Optical cable* Make sure the cover is closed. Make sure to the recorder and an external component. continued 21 CD player, MD player, DVD video player, etc. Note...
User Manual
Page 22
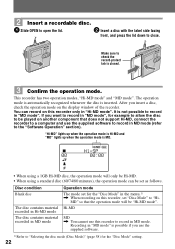
... operation mode is automatically recognized whenever the disc is MD. MD" so that does not support Hi-MD, connect the recorder to a computer and use the supplied software to record in MD mode (refer to the "Software Operation" section). x • When using a standard disc (60/74/...80 minutes), the operation mode can record on the display window of the recorder. This recorder has two operation modes, "Hi-MD mode" and "MD mode". It is closed. 3 Confirm the operation mode. Disc condition...
... operation mode is automatically recognized whenever the disc is MD. MD" so that does not support Hi-MD, connect the recorder to a computer and use the supplied software to record in MD mode (refer to the "Software Operation" section). x • When using a standard disc (60/74/...80 minutes), the operation mode can record on the display window of the recorder. This recorder has two operation modes, "Hi-MD mode" and "MD mode". It is closed. 3 Confirm the operation mode. Disc condition...

User Manual
Page 23
...point where you press X again to resume recording. Press X again to resume recording while pausing; 4 Record a disc. 1 Select and pause the sound source to record. REC(+N)/ T MARK Jog dial (N/ENT) 4 Play the source you insert a previously recorded disc, the recording starts after the existing contents. PAUSE Connected ...REC(+N)/T MARK. If you want to be counted as a group. thus the remainder of the track will be recorded. Connected component 3 While the recorder is displayed. PAUSE 2 Make sure that the x indication appears in the display window. "REC" lights up and...
...point where you press X again to resume recording. Press X again to resume recording while pausing; 4 Record a disc. 1 Select and pause the sound source to record. REC(+N)/ T MARK Jog dial (N/ENT) 4 Play the source you insert a previously recorded disc, the recording starts after the existing contents. PAUSE Connected ...REC(+N)/T MARK. If you want to be counted as a group. thus the remainder of the track will be recorded. Connected component 3 While the recorder is displayed. PAUSE 2 Make sure that the x indication appears in the display window. "REC" lights up and...
User Manual
Page 24
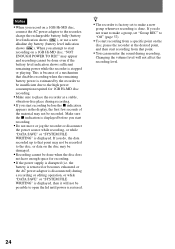
... lid until power is restored. If you start recording before you record on the disc may not be recorded to place the recorder at the desired point, and then start recording from that point. • You can monitor the sound during recording. the battery is removed or becomes exhausted or ... 1GB Hi-MD disc, connect the AC power adaptor to make a new group whenever recording is done. Notes • When you start recording. • Do not move or jog the recorder or disconnect the power source while recording, or while "DATA SAVE" or "SYSTEM FILE WRITING" is displayed. Make sure the...
... lid until power is restored. If you start recording before you record on the disc may not be recorded to place the recorder at the desired point, and then start recording from that point. • You can monitor the sound during recording. the battery is removed or becomes exhausted or ... 1GB Hi-MD disc, connect the AC power adaptor to make a new group whenever recording is done. Notes • When you start recording. • Do not move or jog the recorder or disconnect the power source while recording, or while "DATA SAVE" or "SYSTEM FILE WRITING" is displayed. Make sure the...


