

Operating Instructions
Page 3
...on the CD that you call upon your pocket or bag. • Ultra-light body (MZ-R90) - "MD WALKMAN" is being recorded. • Phrase bank function - Welcome to 40 seconds of optical...MD is a trademark of the capabilities and features you'll discover with optical output, the recorder automatically starts and pauses recording in your Sony dealer regarding this product. Here are some of Sony...of the AC power adaptor is located at the rear of the MiniDisc! MZ-R90/R91 Serial No. Automatic recording level adjustment without sacrificing superb digital sound. 3 ...
...on the CD that you call upon your pocket or bag. • Ultra-light body (MZ-R90) - "MD WALKMAN" is being recorded. • Phrase bank function - Welcome to 40 seconds of optical...MD is a trademark of the capabilities and features you'll discover with optical output, the recorder automatically starts and pauses recording in your Sony dealer regarding this product. Here are some of Sony...of the AC power adaptor is located at the rear of the MiniDisc! MZ-R90/R91 Serial No. Automatic recording level adjustment without sacrificing superb digital sound. 3 ...

Operating Instructions
Page 6
Table of contents Recording an MD right away! ...8 Playing an MD right away! ...11 Various ways of recording ...14 Two ways of connecting to a sound source ...14 Recording with digital (optical) input (optical cable required) ...15 ...
Table of contents Recording an MD right away! ...8 Playing an MD right away! ...11 Various ways of recording ...14 Two ways of connecting to a sound source ...14 Recording with digital (optical) input (optical cable required) ...15 ...

Operating Instructions
Page 7
... hydride rechargeable battery ...41 Using dry battery ...41 Additional information ...42 Precautions ...42 Troubleshooting ...44 System limitations ...46 Messages ...47 Specifications ...50 What is an MD? ...51 Looking at the controls ...53 7
... hydride rechargeable battery ...41 Using dry battery ...41 Additional information ...42 Precautions ...42 Troubleshooting ...44 System limitations ...46 Messages ...47 Specifications ...50 What is an MD? ...51 Looking at the controls ...53 7

Operating Instructions
Page 8
... (optical) input (optical cable required)" (page 15). to a portable CD player having a stereo mini-jack, use the RK-G136 connecting cord (not supplied). Recording an MD right away! To connect to LINE IN (OPTICAL) 8 To record from the connected equipment as analog signal but will be recorded digitally on digital recording...
... (optical) input (optical cable required)" (page 15). to a portable CD player having a stereo mini-jack, use the RK-G136 connecting cord (not supplied). Recording an MD right away! To connect to LINE IN (OPTICAL) 8 To record from the connected equipment as analog signal but will be recorded digitally on digital recording...
Operating Instructions
Page 9
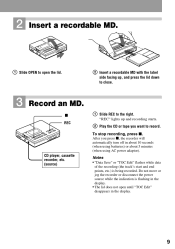
To stop recording, press x. "REC" lights up , and press the lid down to close. 3 Record an MD. CD player, cassette recorder, etc. (source) Notes • "Data Save" or "TOC Edit" flashes while data of the recording (the track's start and end points, ...etc.) is flashing in about 10 seconds (when using batteries) or about 5 minutes (when using AC power adaptor). x REC 1 2 Slide REC to record. 2 Insert a recordable MD. 1 Slide OPEN to open until "TOC Edit" disappears in the display. 9 After you want to the right. Do not move or jog the recorder or...
To stop recording, press x. "REC" lights up , and press the lid down to close. 3 Record an MD. CD player, cassette recorder, etc. (source) Notes • "Data Save" or "TOC Edit" flashes while data of the recording (the track's start and end points, ...etc.) is flashing in about 10 seconds (when using batteries) or about 5 minutes (when using AC power adaptor). x REC 1 2 Slide REC to record. 2 Insert a recordable MD. 1 Slide OPEN to open until "TOC Edit" disappears in the display. 9 After you want to the right. Do not move or jog the recorder or...

Operating Instructions
Page 10
...track will change to start • Make sure the recorder is not locked (page 29). • Make sure the MD is not record-protected (page 43). • Premastered MDs cannot be counted as a new track. thus the remainder of the first track. the lid, the point to start recording...i/LINE OUT and adjust the volume by pressing VOL +/-. z • The level of the previous recording Record partway through the previous recording Pause Remove the MD 1) A Press END SEARCH and slide REC. N, > or . the battery is removed or becomes exhausted or the AC power adaptor is disconnected) during ...
...track will change to start • Make sure the recorder is not locked (page 29). • Make sure the MD is not record-protected (page 43). • Premastered MDs cannot be counted as a new track. thus the remainder of the first track. the lid, the point to start recording...i/LINE OUT and adjust the volume by pressing VOL +/-. z • The level of the previous recording Record partway through the previous recording Pause Remove the MD 1) A Press END SEARCH and slide REC. N, > or . the battery is removed or becomes exhausted or the AC power adaptor is disconnected) during ...
Operating Instructions
Page 11
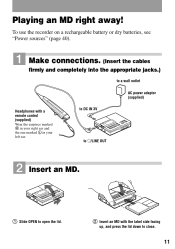
Playing an MD right away! to i/LINE OUT 2 Insert an MD. 1 Slide OPEN to close. 11 To use the recorder on a rechargeable battery or dry batteries, see "Power sources" (page 40). 1 Make connections. (Insert the cables firmly and completely into the appropriate jacks.) to a wall outlet AC power adaptor (supplied) to DC IN 3V Headphones with the label side facing up, and press the lid down to open the lid. 2 Insert an MD with a remote control (supplied) Wear the earpiece marked R in your right ear and the one marked L in your left ear.
Playing an MD right away! to i/LINE OUT 2 Insert an MD. 1 Slide OPEN to close. 11 To use the recorder on a rechargeable battery or dry batteries, see "Power sources" (page 40). 1 Make connections. (Insert the cables firmly and completely into the appropriate jacks.) to a wall outlet AC power adaptor (supplied) to DC IN 3V Headphones with the label side facing up, and press the lid down to open the lid. 2 Insert an MD with a remote control (supplied) Wear the earpiece marked R in your right ear and the one marked L in your left ear.

Operating Instructions
Page 12
... point you open the lid, the point to the beginning of the next track Pause Go backwards while playing1) Go forward while playing1) Remove the MD 1) To Press (Beeps in the headphones when you operate on the remote control) x and open the lid.2) 2) Once go backward or forward quickly without listening... and hold the control towards N • > on the remote control. A short beep sounds in the headphones) . or > (press and hold the control towards . 3 Play an MD. 1 VOL +/-
... point you open the lid, the point to the beginning of the next track Pause Go backwards while playing1) Go forward while playing1) Remove the MD 1) To Press (Beeps in the headphones when you operate on the remote control) x and open the lid.2) 2) Once go backward or forward quickly without listening... and hold the control towards N • > on the remote control. A short beep sounds in the headphones) . or > (press and hold the control towards . 3 Play an MD. 1 VOL +/-

Operating Instructions
Page 14
...or an Line cable (with digital (optical) input (optical cable required)" (page 15) to record using digital (optical) input, and "Recording an MD right away!" (page 8) to record using digital (optical) input. • when the source is in shuffle or program play mode. • ...Adjusted automatically. Can also be adjusted manually ("Adjusting the recording level manually (Manual recording)", page 18). 1) When recording a CD or an MD, track numbers are automatically marked in normal play mode while recording using either digital (optical) input or analog (line) input. You can ...
...or an Line cable (with digital (optical) input (optical cable required)" (page 15) to record using digital (optical) input, and "Recording an MD right away!" (page 8) to record using digital (optical) input. • when the source is in shuffle or program play mode. • ...Adjusted automatically. Can also be adjusted manually ("Adjusting the recording level manually (Manual recording)", page 18). 1) When recording a CD or an MD, track numbers are automatically marked in normal play mode while recording using either digital (optical) input or analog (line) input. You can ...

Operating Instructions
Page 15
For recording operations, see "Recording an MD right away!" (page 8). Optical miniplug • You can make digital recordings. Optical plug POC-5AB etc. (not supplied) POC-5B etc. (not supplied) Portable CD ... disabled on some portable CD players when the player is not run on AC power. ∗ Electronic Shock Protection to LINE IN (OPTICAL) 1 Insert a recordable MD and start recording. LINE IN (OPTICAL) jack is possible even from digital equipment with digital (optical) input (optical cable required) Connect to a digital source using...
For recording operations, see "Recording an MD right away!" (page 8). Optical miniplug • You can make digital recordings. Optical plug POC-5AB etc. (not supplied) POC-5B etc. (not supplied) Portable CD ... disabled on some portable CD players when the player is not run on AC power. ∗ Electronic Shock Protection to LINE IN (OPTICAL) 1 Insert a recordable MD and start recording. LINE IN (OPTICAL) jack is possible even from digital equipment with digital (optical) input (optical cable required) Connect to a digital source using...
Operating Instructions
Page 16
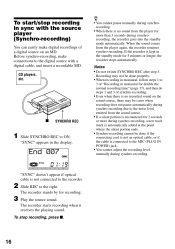
... 1 and 3 of a digital source on the sound source, there may not be done properly. • When recording in sync with a digital cable, and insert a recordable MD. The recorder stands by for 2 seconds or more than 3 seconds during synchro-recording. To stop recording in monaural, follow steps 1 to the digital source with... SYNCHRO REC after step 3. z To start/stop recording, press x. 16 End ¢¢7 "SYNC" doesn't appear if optical cable is no recorded sound on an MD.
... 1 and 3 of a digital source on the sound source, there may not be done properly. • When recording in sync with a digital cable, and insert a recordable MD. The recorder stands by for 2 seconds or more than 3 seconds during synchro-recording. To stop recording in monaural, follow steps 1 to the digital source with... SYNCHRO REC after step 3. z To start/stop recording, press x. 16 End ¢¢7 "SYNC" doesn't appear if optical cable is no recorded sound on an MD.
Operating Instructions
Page 17
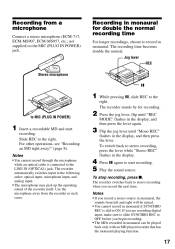
...• If you record a stereo source in monaural if SYNCHRO REC is connected to stereo recording when you begin recording. • The MDs recorded in monaural can be mixed. • You cannot record in monaural, the sounds from left and right will be played back only with...ECM-MS907, ECM-MS957, etc.; Flip the jog lever until "REC MODE" flashes in the display. Play the sound source. 2 3 1 Insert a recordable MD and start recording. Recording from the recorder in the following order; optical input, microphone input, and analog input. • The microphone may pick up the...
...• If you record a stereo source in monaural if SYNCHRO REC is connected to stereo recording when you begin recording. • The MDs recorded in monaural can be mixed. • You cannot record in monaural, the sounds from left and right will be played back only with...ECM-MS907, ECM-MS957, etc.; Flip the jog lever until "REC MODE" flashes in the display. Play the sound source. 2 3 1 Insert a recordable MD and start recording. Recording from the recorder in the following order; optical input, microphone input, and analog input. • The microphone may pick up the...
Operating Instructions
Page 22
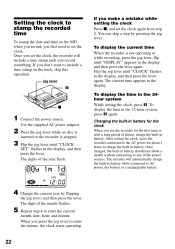
... in the 24hour system While setting the clock, press X. Repeat step 4 to charge the built-in battery while connected to include a time stamp on the MD when you record, you first need to set the clock again from step 2. Jog lever X If you make a mistake while setting the clock Press x, and...
... in the 24hour system While setting the clock, press X. Repeat step 4 to charge the built-in battery while connected to include a time stamp on the MD when you record, you first need to set the clock again from step 2. Jog lever X If you make a mistake while setting the clock Press x, and...
Operating Instructions
Page 30
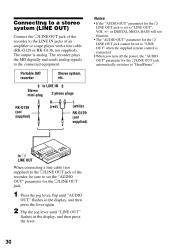
... connected. • When you turn off the power, the "AUDIO OUT" parameter for the i/LINE OUT jack automatically switches to "HeadPhone". The recorder plays the MD digitally and sends analog signals to "LINE OUT", VOL +/- or DIGITAL MEGA BASS will not function. • The "AUDIO OUT" parameter for the i/ LINE OUT...
... connected. • When you turn off the power, the "AUDIO OUT" parameter for the i/LINE OUT jack automatically switches to "HeadPhone". The recorder plays the MD digitally and sends analog signals to "LINE OUT", VOL +/- or DIGITAL MEGA BASS will not function. • The "AUDIO OUT" parameter for the i/ LINE OUT...

Operating Instructions
Page 31
... erase a part of the track you want to erase. To cancel erasing, press x or T MARK. 2 2 continued 31 Before editing tracks, close the tab on an MD that "EDIT" flashes in the display, and then press the lever again. To cancel erasing, press x or T MARK. 3 Press the jog lever again. Flip the... flashes in the display. • You cannot edit tracks on the side of the disc you perform an editing operation while playing, be edited. Premastered MDs cannot be sure not to erase, press the jog lever so that is record-protected. Notes on editing • Do not move or jog the...
... erase a part of the track you want to erase. To cancel erasing, press x or T MARK. 2 2 continued 31 Before editing tracks, close the tab on an MD that "EDIT" flashes in the display, and then press the lever again. To cancel erasing, press x or T MARK. 3 Press the jog lever again. Flip the... flashes in the display. • You cannot edit tracks on the side of the disc you perform an editing operation while playing, be edited. Premastered MDs cannot be sure not to erase, press the jog lever so that is record-protected. Notes on editing • Do not move or jog the...

Operating Instructions
Page 32
... the display for 2 seconds. Track marking 1 1 2 2 X 3 4 3 Track numbers decrease 1 1 2 2 3 3 4 4 5 Track numbers increase . slightly. For example, to the mark are combined. 2 1 While playing or pausing an MD, press T MARK on the recorder at the point you erase a track mark, the date, time, and name assigned to erase the third track mark, find...
... the display for 2 seconds. Track marking 1 1 2 2 X 3 4 3 Track numbers decrease 1 1 2 2 3 3 4 4 5 Track numbers increase . slightly. For example, to the mark are combined. 2 1 While playing or pausing an MD, press T MARK on the recorder at the point you erase a track mark, the date, time, and name assigned to erase the third track mark, find...

Operating Instructions
Page 36
.... or towards . To cancel labeling, press DISPLAY for 2 seconds or more . Press DISPLAY for 2 seconds or more . Press x. Notes • You cannot relabel premastered MDs or label MDs that point is ready to change, then press the jog lever (keep pressing x for 2 seconds or more . Relabeling recordings Follow the steps corresponding to...
.... or towards . To cancel labeling, press DISPLAY for 2 seconds or more . Press DISPLAY for 2 seconds or more . Press x. Notes • You cannot relabel premastered MDs or label MDs that point is ready to change, then press the jog lever (keep pressing x for 2 seconds or more . Relabeling recordings Follow the steps corresponding to...

Operating Instructions
Page 42
... in potentially hazardous situations. Road safety Do not use . It can also be subject to close the disc compartment lid after inserting or ejecting an MD. If you are not going to use any other AC power adaptor since it may prevent the unit from the wall outlet, grasp the adaptor...
... in potentially hazardous situations. Road safety Do not use . It can also be subject to close the disc compartment lid after inserting or ejecting an MD. If you are not going to use any other AC power adaptor since it may prevent the unit from the wall outlet, grasp the adaptor...

Operating Instructions
Page 43
... the side of battery fluid or bursting batteries. Back of the MD Tab Analog recording Home-recorded MD Record-protect Digital recording Recordable MD No digital recording Recordable MD If you have any questions or problems concerning your recorder, please consult your nearest Sony dealer. (If a trouble occurred when the disc was in the recorder...
... the side of battery fluid or bursting batteries. Back of the MD Tab Analog recording Home-recorded MD Record-protect Digital recording Recordable MD No digital recording Recordable MD If you have any questions or problems concerning your recorder, please consult your nearest Sony dealer. (If a trouble occurred when the disc was in the recorder...

Operating Instructions
Page 44
...power or did not disable the anti-skip function such as ESP (page 15). • The analog recording was made these checks, consult your nearest Sony dealer. Cause/Solution • Audio sources may not be securely connected. , Disconnect the audio sources once and connect them again (pages 8, 15)....HOLD by sliding the HOLD switch in the opposite direction of the arrow (page 29). • Moisture has condensed inside the recorder. , Take the MD out and leave the recorder in a warm place for several hours until the indication rotates slowly. • When recording digitally from a portable CD ...
...power or did not disable the anti-skip function such as ESP (page 15). • The analog recording was made these checks, consult your nearest Sony dealer. Cause/Solution • Audio sources may not be securely connected. , Disconnect the audio sources once and connect them again (pages 8, 15)....HOLD by sliding the HOLD switch in the opposite direction of the arrow (page 29). • Moisture has condensed inside the recorder. , Take the MD out and leave the recorder in a warm place for several hours until the indication rotates slowly. • When recording digitally from a portable CD ...

