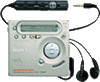

Operating Instructions
Page 4
Table of contents Looking at the controls 6 Getting started 9 Recording an MD right away 12 Playing an MD right away 16 Various ways of recording Two ways of connecting to a sound source 18 Recording with analog input (line cable required 20 Long-time ...
Table of contents Looking at the controls 6 Getting started 9 Recording an MD right away 12 Playing an MD right away 16 Various ways of recording Two ways of connecting to a sound source 18 Recording with analog input (line cable required 20 Long-time ...

Operating Instructions
Page 7
...display D Battery indication (50) Shows approximate battery condition. E Mega bass indication (34) F Level meter (29) Shows the volume of the MD. K Disc indication Shows that the disc is in record standby mode. G Recording mode (LP2/LP4/ MONO) indication H SYNC (synchro-recording...) indication I REC indication (13) Lights up along with the remaining time of the track, the remaining time of the MD, or the remaining number of tracks. P HOLD switch (10) (37) The display window A B C D E F GHI J K A Character information display (...
...display D Battery indication (50) Shows approximate battery condition. E Mega bass indication (34) F Level meter (29) Shows the volume of the MD. K Disc indication Shows that the disc is in record standby mode. G Recording mode (LP2/LP4/ MONO) indication H SYNC (synchro-recording...) indication I REC indication (13) Lights up along with the remaining time of the track, the remaining time of the MD, or the remaining number of tracks. P HOLD switch (10) (37) The display window A B C D E F GHI J K A Character information display (...

Operating Instructions
Page 10
HOLD to i 1 Connect the supplied headphones/earphones with the remote control to i. 2 Slide HOLD in the opposite direction of the arrow (.) to unlock the controls. 4 Insert an MD. (Use a recordable MD for recording.) 1 Press OPEN to open the lid. 2 Insert an MD with the label side facing front, and press the lid down to close. 10 3 Make connections and unlock the control.
HOLD to i 1 Connect the supplied headphones/earphones with the remote control to i. 2 Slide HOLD in the opposite direction of the arrow (.) to unlock the controls. 4 Insert an MD. (Use a recordable MD for recording.) 1 Press OPEN to open the lid. 2 Insert an MD with the label side facing front, and press the lid down to close. 10 3 Make connections and unlock the control.

Operating Instructions
Page 12
...)" (page 20). Connect to a digital source using the built-in sampling rate converter. Using the AC power adaptor (supplied) is possible even from an MD, see "Recording with different sampling rates, such as a DAT deck or a BS tuner, using an optical cable (supplied) to a wall outlet AC power... adaptor (supplied) CD player, MD player, DVD video player, etc. Optical plug to DIGITAL OUT (OPTICAL) Optical cable (supplied)* Optical miniplug to DC IN 3V to LINE IN (OPTICAL) ...
...)" (page 20). Connect to a digital source using the built-in sampling rate converter. Using the AC power adaptor (supplied) is possible even from an MD, see "Recording with different sampling rates, such as a DAT deck or a BS tuner, using an optical cable (supplied) to a wall outlet AC power... adaptor (supplied) CD player, MD player, DVD video player, etc. Optical plug to DIGITAL OUT (OPTICAL) Optical cable (supplied)* Optical miniplug to DC IN 3V to LINE IN (OPTICAL) ...

Operating Instructions
Page 13
... right. REC x 1 Press and slide REC to resume recording. 13 Then press and slide REC. N, > or . REC indication lights up in the display. 2 Record an MD.
... right. REC x 1 Press and slide REC to resume recording. 13 Then press and slide REC. N, > or . REC indication lights up in the display. 2 Record an MD.

Operating Instructions
Page 14
... be recorded over. About the DSP TYPE-R for ATRAC "TYPE-R" is a high-level Sony specification used in the Digital Signal Processor (DSP), which is not record-protected (page 54). • Premastered MDs cannot be counted as previous MiniDisc Walkman models, producing a sound quality close to that of... MiniDisc decks. Notes • If the power supply is disrupted (i.e. To Remove the MD Press x and open the lid.3) (The lid does not open while "TOC Edit" flashing in the display.) 1) By setting "REC-Posi" to ...
... be recorded over. About the DSP TYPE-R for ATRAC "TYPE-R" is a high-level Sony specification used in the Digital Signal Processor (DSP), which is not record-protected (page 54). • Premastered MDs cannot be counted as previous MiniDisc Walkman models, producing a sound quality close to that of... MiniDisc decks. Notes • If the power supply is disrupted (i.e. To Remove the MD Press x and open the lid.3) (The lid does not open while "TOC Edit" flashing in the display.) 1) By setting "REC-Posi" to ...
Operating Instructions
Page 16
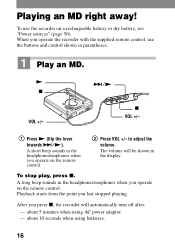
... 2 Press VOL +/- about 10 seconds when using AC power adaptor. - To use the buttons and control shown in parentheses. 1 Play an MD. When you operate the recorder with the supplied remote control, use the recorder on the remote control. A short beep sounds in the display. The... beep sounds in the headphones/earphones when you press x, the recorder will be shown in the headphones/earphones when you last stopped playing. Playing an MD right away! After you operate on a rechargeable battery or dry battery, see "Power sources" (page 50). x VOL +/- 1 Press N (flip the ...
... 2 Press VOL +/- about 10 seconds when using AC power adaptor. - To use the buttons and control shown in parentheses. 1 Play an MD. When you operate the recorder with the supplied remote control, use the recorder on the remote control. A short beep sounds in the display. The... beep sounds in the headphones/earphones when you press x, the recorder will be shown in the headphones/earphones when you last stopped playing. Playing an MD right away! After you operate on a rechargeable battery or dry battery, see "Power sources" (page 50). x VOL +/- 1 Press N (flip the ...
Operating Instructions
Page 17
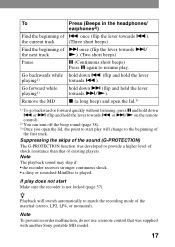
... > (flip and hold the lever towards . z Playback will change to match the recording mode of shock resistance than that was supplied with another Sony portable MD model. 17 Remove the MD x (a long beep) and open the lid, the point to provide a higher level of the material (stereo, LP2, LP4, or monaural). Go backwards...
... > (flip and hold the lever towards . z Playback will change to match the recording mode of shock resistance than that was supplied with another Sony portable MD model. 17 Remove the MD x (a long beep) and open the lid, the point to provide a higher level of the material (stereo, LP2, LP4, or monaural). Go backwards...

Operating Instructions
Page 18
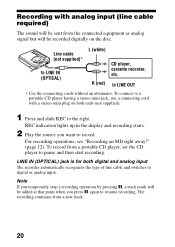
... The input jack of this recorder works as a CD) is connected, the signal sent to the recorder is analog. 18 To record, see "Recording an MD right away!" (page 12) to record using digital (optical) input, and "Recording with 2 phono plugs or a stereo-mini plug) (page 20) Signal from Digital the...
... The input jack of this recorder works as a CD) is connected, the signal sent to the recorder is analog. 18 To record, see "Recording an MD right away!" (page 12) to record using digital (optical) input, and "Recording with 2 phono plugs or a stereo-mini plug) (page 20) Signal from Digital the...

Operating Instructions
Page 19
... 2 • at the same positions as the source. You can erase level segment (with a unnecessary marks sound source other than after recording CD or MD). ("Erasing a track • when the recorder is digitally broadcast (e.g., digital TV) are recorded through the digital (optical) input. 19 paused while •...or • when the recorder is in normal play mode while recording using digital (optical) input. • when the source is an MD). Same as seconds of blank or low- seconds of blank or the source (when the low-level segment. Note Track marks may be ...
... 2 • at the same positions as the source. You can erase level segment (with a unnecessary marks sound source other than after recording CD or MD). ("Erasing a track • when the recorder is digitally broadcast (e.g., digital TV) are recorded through the digital (optical) input. 19 paused while •...or • when the recorder is in normal play mode while recording using digital (optical) input. • when the source is an MD). Same as seconds of blank or low- seconds of blank or the source (when the low-level segment. Note Track marks may be ...
Operating Instructions
Page 20
... type of line cable and switches to resume recording. Note If you press X again to digital or analog input. For recording operations, see "Recording an MD right away!" (page 12). The recording continues from the connected equipment as analog signal but will be added at that point when you temporarily stop...
... type of line cable and switches to resume recording. Note If you press X again to digital or analog input. For recording operations, see "Recording an MD right away!" (page 12). The recording continues from the connected equipment as analog signal but will be added at that point when you temporarily stop...
Operating Instructions
Page 21
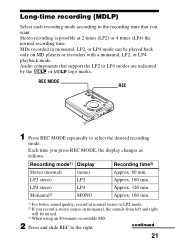
REC MODE REC 1 Press REC MODE repeatedly to select the desired recording mode. MDs recorded in monaural, the sounds from left and right will be played back only on MD players or recorders with a monaural, LP2, or LP4 playback mode. LP2 stereo LP2 Approx. 160 min. LP4 stereo LP4 Approx...stereo or LP2 mode. 2) If you record a stereo source in monaural, LP2, or LP4 mode can be mixed. 3) When using an 80-minute recordable MD. 2 Press and slide REC to the right. Recording mode1) Display Recording time3) Stereo (normal) (none) Approx. 80 min. continued 21 Each time you...
REC MODE REC 1 Press REC MODE repeatedly to select the desired recording mode. MDs recorded in monaural, the sounds from left and right will be played back only on MD players or recorders with a monaural, LP2, or LP4 playback mode. LP2 stereo LP2 Approx. 160 min. LP4 stereo LP4 Approx...stereo or LP2 mode. 2) If you record a stereo source in monaural, LP2, or LP4 mode can be mixed. 3) When using an 80-minute recordable MD. 2 Press and slide REC to the right. Recording mode1) Display Recording time3) Stereo (normal) (none) Approx. 80 min. continued 21 Each time you...

Operating Instructions
Page 22
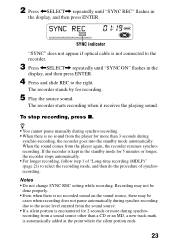
...digital source with certain sound sources. To start and "LP:" will appear on very rare occasions with a digital cable, and insert a recordable MD. This is recommended that you record the next time. REC MENU/ENTER CD players, etc. 3 Play the sound source. If noise is ...do not support these modes, playback will not start /stop recording, press x. The recorder remains the previous setting of a digital source on MD players or recorders that enables a recording time 4 times longer than normal. Before synchro-recording, make digital recordings of the recording mode when ...
...digital source with certain sound sources. To start and "LP:" will appear on very rare occasions with a digital cable, and insert a recordable MD. This is recommended that you record the next time. REC MENU/ENTER CD players, etc. 3 Play the sound source. If noise is ...do not support these modes, playback will not start /stop recording, press x. The recorder remains the previous setting of a digital source on MD players or recorders that enables a recording time 4 times longer than normal. Before synchro-recording, make digital recordings of the recording mode when ...
Operating Instructions
Page 23
2 Press
2 Press

Operating Instructions
Page 24
All new material will then be done if the connecting cord is not an optical cable, or if the cable is connected to avoid overwriting the current contents of the current contents. • Synchro-recording cannot be recorded from the end of an MD, do the following procedure. Recording without overwriting existing material If you wish to the MIC (PLUG IN POWER) jack. • You cannot manually change the recording mode or the recording level during synchro-recording.
All new material will then be done if the connecting cord is not an optical cable, or if the cable is connected to avoid overwriting the current contents of the current contents. • Synchro-recording cannot be recorded from the end of an MD, do the following procedure. Recording without overwriting existing material If you wish to the MIC (PLUG IN POWER) jack. • You cannot manually change the recording mode or the recording level during synchro-recording.
Operating Instructions
Page 25
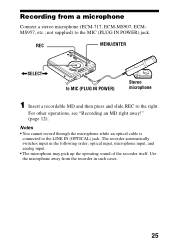
Recording from a microphone Connect a stereo microphone (ECM-717, ECM-MS907, ECMMS957, etc.; REC MENU/ENTER not supplied) to the MIC (PLUG IN POWER) jack.
Recording from a microphone Connect a stereo microphone (ECM-717, ECM-MS907, ECMMS957, etc.; REC MENU/ENTER not supplied) to the MIC (PLUG IN POWER) jack.

Operating Instructions
Page 38
The recorder plays the MD digitally and sends analog signals to i Stereo system, etc. Line cable (not supplied) L (white) 2 phono plugs When the recorder is analog. Connecting to a stereo system ...
The recorder plays the MD digitally and sends analog signals to i Stereo system, etc. Line cable (not supplied) L (white) 2 phono plugs When the recorder is analog. Connecting to a stereo system ...
Operating Instructions
Page 40
... in the display after editing. ∗ TOC = Table of the track you are erasing. 1 While playing the track you cannot retrieve it. Notes on an MD that once a recording has been erased, you want to erase, press MENU (EDIT for 2 seconds or more). 40 Make sure of Contents When you perform... an editing operation while playing, be edited. Premastered MDs cannot be sure not to turn the power off until "TOC Edit" disappears in the display. • The lid does not open until "TOC Edit...
... in the display after editing. ∗ TOC = Table of the track you are erasing. 1 While playing the track you cannot retrieve it. Notes on an MD that once a recording has been erased, you want to erase, press MENU (EDIT for 2 seconds or more). 40 Make sure of Contents When you perform... an editing operation while playing, be edited. Premastered MDs cannot be sure not to turn the power off until "TOC Edit" disappears in the display. • The lid does not open until "TOC Edit...

Operating Instructions
Page 41
..." flashes in the display, and then press ENTER (ENTER). To erase the whole disc You can quickly erase all the tracks and data of the MD at the beginning and the end of the part you want to erase. 1 While the recorder is erased and the next track starts to play...
..." flashes in the display, and then press ENTER (ENTER). To erase the whole disc You can quickly erase all the tracks and data of the MD at the beginning and the end of the part you want to erase. 1 While the recorder is erased and the next track starts to play...

Operating Instructions
Page 42
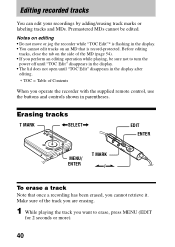
... is counted as follows. The track numbers will increase by one. Add a track mark 1 2 34 T MARK 12345 Track numbers increase 1 While playing or pausing an MD, press T MARK on the recorder at the point you want to add a track mark. 42 The track number will increase as a new track. To add...
... is counted as follows. The track numbers will increase by one. Add a track mark 1 2 34 T MARK 12345 Track numbers increase 1 While playing or pausing an MD, press T MARK on the recorder at the point you want to add a track mark. 42 The track number will increase as a new track. To add...


