
Operating Instructions
Page 4
... ways of connecting to a sound source 18 Recording with analog input (line cable required 20 Long-time recording (MDLP 21 To start/stop recording in sync with the source player (Synchro-recording 22 Recording without overwriting existing material 24 Recording from a microphone 25 Adding track marks automatically (Auto Time Stamp 26 Adjusting the recording level manually (Manual recording 28 Checking the remaining time or the recording position 30 Various ways of playback Playing tracks repeatedly 32 Emphasizing bass (DIGITAL MEGA BASS...
... ways of connecting to a sound source 18 Recording with analog input (line cable required 20 Long-time recording (MDLP 21 To start/stop recording in sync with the source player (Synchro-recording 22 Recording without overwriting existing material 24 Recording from a microphone 25 Adding track marks automatically (Auto Time Stamp 26 Adjusting the recording level manually (Manual recording 28 Checking the remaining time or the recording position 30 Various ways of playback Playing tracks repeatedly 32 Emphasizing bass (DIGITAL MEGA BASS...

Operating Instructions
Page 7
... Disc indication Shows that the disc is a tactile dot beside the MIC (PLUG IN POWER) jack. C Time display D Battery indication (50) Shows approximate battery condition. J REC REMAIN/ REMAIN (remaining time/ tracks) indication (31) (35) Lights up while recording. O MIC (PLUG IN POWER) jack (25) There is rotating for recording, playing or editing an MD. 7 P HOLD switch (10) (37) The display window A B C D E F GHI J K A Character information display (31) (33) Displays the disc and track names, error messages, track numbers, etc. When flashing, the recorder is in record standby...
... Disc indication Shows that the disc is a tactile dot beside the MIC (PLUG IN POWER) jack. C Time display D Battery indication (50) Shows approximate battery condition. J REC REMAIN/ REMAIN (remaining time/ tracks) indication (31) (35) Lights up while recording. O MIC (PLUG IN POWER) jack (25) There is rotating for recording, playing or editing an MD. 7 P HOLD switch (10) (37) The display window A B C D E F GHI J K A Character information display (31) (33) Displays the disc and track names, error messages, track numbers, etc. When flashing, the recorder is in record standby...

Operating Instructions
Page 14
..." flashing in the display.) 1) By setting "REC-Posi" to "From End," recording operations will always start from a portable CD player, set to pause, and then do the recording procedure on the display. About the DSP TYPE-R for ATRAC "TYPE-R" is a high-level Sony specification used in the display, then it will not be counted as previous MiniDisc Walkman models, producing a sound quality close to that of the MiniDisc sound. This technology gives the MiniDisc recorder twice the signal...
..." flashing in the display.) 1) By setting "REC-Posi" to "From End," recording operations will always start from a portable CD player, set to pause, and then do the recording procedure on the display. About the DSP TYPE-R for ATRAC "TYPE-R" is a high-level Sony specification used in the display, then it will not be counted as previous MiniDisc Walkman models, producing a sound quality close to that of the MiniDisc sound. This technology gives the MiniDisc recorder twice the signal...
Operating Instructions
Page 16
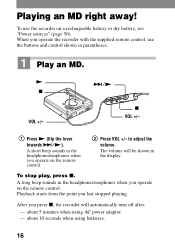
... remote control. To stop play, press x. Playing an MD right away! N >/N x VOL +/- to adjust the volume. about 5 minutes when using batteries. 16 A short beep sounds in the display. A long beep sounds in parentheses. 1 Play an MD. about 10 seconds when using AC power adaptor. - After you operate the recorder with the supplied remote control, use the recorder on a rechargeable battery or dry battery, see "Power sources" (page 50). Playback starts from the point you operate on the remote control...
... remote control. To stop play, press x. Playing an MD right away! N >/N x VOL +/- to adjust the volume. about 5 minutes when using batteries. 16 A short beep sounds in the display. A long beep sounds in parentheses. 1 Play an MD. about 10 seconds when using AC power adaptor. - After you operate the recorder with the supplied remote control, use the recorder on a rechargeable battery or dry battery, see "Power sources" (page 50). Playback starts from the point you operate on the remote control...

Operating Instructions
Page 18
Connect the recorder to a CD player or a cassette recorder using digital (optical) input, and "Recording with 2 phono plugs or a stereo-mini plug) (page 20) Signal from Digital the source Analog Even when a digital source (such as both digital and analog input jacks. Difference between digital (optical) and analog (line) inputs Difference Digital (optical) input Analog (line) input Connectable source Equipment with a digital Equipment with an (optical) output jack analog (line) output jack Usable cord Optical cable (with an optical or an optical-mini plug) (page...
Connect the recorder to a CD player or a cassette recorder using digital (optical) input, and "Recording with 2 phono plugs or a stereo-mini plug) (page 20) Signal from Digital the source Analog Even when a digital source (such as both digital and analog input jacks. Difference between digital (optical) and analog (line) inputs Difference Digital (optical) input Analog (line) input Connectable source Equipment with a digital Equipment with an (optical) output jack analog (line) output jack Usable cord Optical cable (with an optical or an optical-mini plug) (page...

Operating Instructions
Page 19
...CD or MD). ("Erasing a track • when the recorder is in normal play mode while recording using digital (optical) input. paused while • after more ). seconds of blank or the source (when the low-level segment. Can also be adjusted manually ("Adjusting the recording level manually (Manual recording)", page 28). You can erase level segment (with no audio signal for 3 seconds or more than 2 recording. Can also be adjusted manually (Digital REC level control) ("Adjusting the recording level manually (Manual recording)", page 28). sound source is...
...CD or MD). ("Erasing a track • when the recorder is in normal play mode while recording using digital (optical) input. paused while • after more ). seconds of blank or the source (when the low-level segment. Can also be adjusted manually ("Adjusting the recording level manually (Manual recording)", page 28). You can erase level segment (with no audio signal for 3 seconds or more than 2 recording. Can also be adjusted manually (Digital REC level control) ("Adjusting the recording level manually (Manual recording)", page 28). sound source is...
Operating Instructions
Page 20
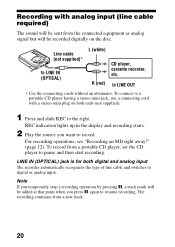
... a portable CD player having a stereo mini-jack, use a connecting cord with analog input (line cable required) The sound will be sent from the connected equipment as analog signal but will be recorded digitally on both digital and analog input The recorder automatically recognizes the type of line cable and switches to LINE OUT ∗ Use the connecting cords without an attenuator. REC indication lights up in the display and recording starts. 2 Play the source you press X again to resume recording. For recording operations, see "Recording...
... a portable CD player having a stereo mini-jack, use a connecting cord with analog input (line cable required) The sound will be sent from the connected equipment as analog signal but will be recorded digitally on both digital and analog input The recorder automatically recognizes the type of line cable and switches to LINE OUT ∗ Use the connecting cords without an attenuator. REC indication lights up in the display and recording starts. 2 Play the source you press X again to resume recording. For recording operations, see "Recording...
Operating Instructions
Page 21
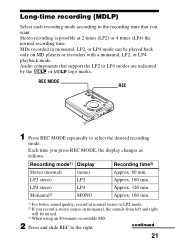
... recording mode. Audio components that you press REC MODE, the display changes as follows. Recording mode1) Display Recording time3) Stereo (normal) (none) Approx. 80 min. Each time you want. LP2 stereo LP2 Approx. 160 min. MDs recorded in monaural, the sounds from left and right will be played back only on MD players or recorders with a monaural, LP2, or LP4 playback mode. Long-time recording (MDLP) Select each recording mode according to the recording time that support...
... recording mode. Audio components that you press REC MODE, the display changes as follows. Recording mode1) Display Recording time3) Stereo (normal) (none) Approx. 80 min. Each time you want. LP2 stereo LP2 Approx. 160 min. MDs recorded in monaural, the sounds from left and right will be played back only on MD players or recorders with a monaural, LP2, or LP4 playback mode. Long-time recording (MDLP) Select each recording mode according to the recording time that support...

Operating Instructions
Page 22
... MD players or recorders that do not support these modes, playback will appear on an MD. Notes • It is because of a digital source on the display. • Sound recorded through digital (optical) input can be monitored in stereo through headphones/earphones, etc. • When you record in sync with certain sound sources. To start and "LP:" will not start /stop recording, press x. Before synchro-recording, make digital recordings of the special digital audio compression...
... MD players or recorders that do not support these modes, playback will appear on an MD. Notes • It is because of a digital source on the display. • Sound recorded through digital (optical) input can be monitored in stereo through headphones/earphones, etc. • When you record in sync with certain sound sources. To start and "LP:" will not start /stop recording, press x. Before synchro-recording, make digital recordings of the special digital audio compression...
Operating Instructions
Page 23
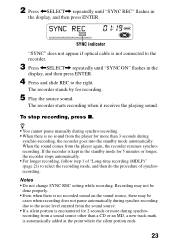
2 Press
2 Press
Operating Instructions
Page 25
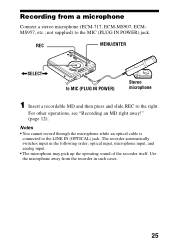
not supplied) to the MIC (PLUG IN POWER) jack. REC MENU/ENTER Recording from a microphone Connect a stereo microphone (ECM-717, ECM-MS907, ECMMS957, etc.;
not supplied) to the MIC (PLUG IN POWER) jack. REC MENU/ENTER Recording from a microphone Connect a stereo microphone (ECM-717, ECM-MS907, ECMMS957, etc.;

Operating Instructions
Page 28
You cannot adjust it while recording. Note Adjust the recording level while the recorder is adjusted automatically. Adjusting the recording level manually (Manual recording) When you can set the level manually. If necessary, you record, the sound level is in standby mode. REC X MENU/ENTER
You cannot adjust it while recording. Note Adjust the recording level while the recorder is adjusted automatically. Adjusting the recording level manually (Manual recording) When you can set the level manually. If necessary, you record, the sound level is in standby mode. REC X MENU/ENTER
Operating Instructions
Page 32
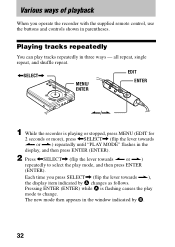
... "PLAY MODE" flashes in the window indicated by A changes as follows. Playing tracks repeatedly You can play mode, and then press ENTER (ENTER). The new mode then appears in the display, and then press ENTER (ENTER). 2 Press or .) repeatedly to change. Various ways of playback When you press SELECT, (flip the lever towards .), the display item indicated by B. 32 Each time you operate the recorder with the supplied remote control, use the buttons...
... "PLAY MODE" flashes in the window indicated by A changes as follows. Playing tracks repeatedly You can play mode, and then press ENTER (ENTER). The new mode then appears in the display, and then press ENTER (ENTER). 2 Press or .) repeatedly to change. Various ways of playback When you press SELECT, (flip the lever towards .), the display item indicated by B. 32 Each time you operate the recorder with the supplied remote control, use the buttons...
Operating Instructions
Page 39
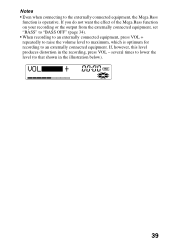
... an externally connected equipment. If, however, this level produces distortion in the illustration below). If you do not want the effect of the Mega Bass function on your recording or the output from the externally connected equipment, set "BASS" to "BASS OFF" (page 34). • When recording to an externally connected equipment, press VOL + repeatedly to raise the volume level to maximum, which is operative...
... an externally connected equipment. If, however, this level produces distortion in the illustration below). If you do not want the effect of the Mega Bass function on your recording or the output from the externally connected equipment, set "BASS" to "BASS OFF" (page 34). • When recording to an externally connected equipment, press VOL + repeatedly to raise the volume level to maximum, which is operative...
Operating Instructions
Page 40
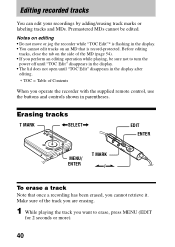
... sure not to erase, press MENU (EDIT for 2 seconds or more). 40 Notes on the side of Contents When you operate the recorder with the supplied remote control, use the buttons and controls shown in the display. • You cannot edit tracks on an MD that once a recording has been erased, you perform an editing operation while playing, be edited. Before editing tracks, close the tab...
... sure not to erase, press MENU (EDIT for 2 seconds or more). 40 Notes on the side of Contents When you operate the recorder with the supplied remote control, use the buttons and controls shown in the display. • You cannot edit tracks on an MD that once a recording has been erased, you perform an editing operation while playing, be edited. Before editing tracks, close the tab...

Operating Instructions
Page 50
... recorder ... - Note Stop the recorder before replacing battery. 50 an LR6 (SG) alkaline dry battery (not supplied) It is weak, flashing r, "LOW BATT," etc. Replace the dry battery or charge the rechargeable battery. appears in Japan). a Nickel Cadmium rechargeable battery NC-WMAA (supplied) - Battery life1) (Unit: approx.hours) (JEITA2)) Batteries Stereo LP2 LP4 NC-WMAA Nickel Cadmium Recording 4 rechargeable battery3) Playback 13 6 7.5 14.5 18 LR6 (SG) Sony alkaline dry battery4) Recording 9 Playback...
... recorder ... - Note Stop the recorder before replacing battery. 50 an LR6 (SG) alkaline dry battery (not supplied) It is weak, flashing r, "LOW BATT," etc. Replace the dry battery or charge the rechargeable battery. appears in Japan). a Nickel Cadmium rechargeable battery NC-WMAA (supplied) - Battery life1) (Unit: approx.hours) (JEITA2)) Batteries Stereo LP2 LP4 NC-WMAA Nickel Cadmium Recording 4 rechargeable battery3) Playback 13 6 7.5 14.5 18 LR6 (SG) Sony alkaline dry battery4) Recording 9 Playback...

Operating Instructions
Page 58
Troubleshooting Should any problem persist after you press an operation button on ("HOLD" appears in the display when you have been inserted incorrectly. - Charge the rechargeable battery or replace the dry battery (page 50). • The rechargeable battery or dry battery have made using a connecting cord with the lid open for about 30 seconds. 3 Connect the power source. • The disc is weak (r or "LOW BATT" flashes). - Use a connecting cord without an attenuator...
Troubleshooting Should any problem persist after you press an operation button on ("HOLD" appears in the display when you have been inserted incorrectly. - Charge the rechargeable battery or replace the dry battery (page 50). • The rechargeable battery or dry battery have made using a connecting cord with the lid open for about 30 seconds. 3 Connect the power source. • The disc is weak (r or "LOW BATT" flashes). - Use a connecting cord without an attenuator...

Operating Instructions
Page 59
... display when recording from a portable CD player. • There is no recording after checking the track number in the plug of strong magnetism. 59 Plug in the display. Adjust the volume by pressing VOL +/-. An MD is not played from the first track. • Disc playing stopped before it receives continuous vibration. - Put the recorder on . - Press . Set the power sources again, or replace the exhausted battery with operation. - Set AVLS to the last track. - No sound...
... display when recording from a portable CD player. • There is no recording after checking the track number in the plug of strong magnetism. 59 Plug in the display. Adjust the volume by pressing VOL +/-. An MD is not played from the first track. • Disc playing stopped before it receives continuous vibration. - Put the recorder on . - Press . Set the power sources again, or replace the exhausted battery with operation. - Set AVLS to the last track. - No sound...
Operating Instructions
Page 63
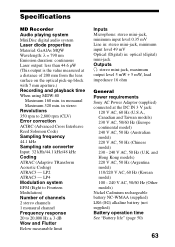
... Recorder Audio playing system MiniDisc digital audio system Laser diode properties Material: GaAlAs MQW Wavelength: λ = 790 nm Emission duration: continuous Laser output: less than 44.6 µW (This output is the value measured at a distance of channels 2 stereo channels 1 monaural channel Frequency response 20 to 20,000 Hz ± 3 dB Wow and Flutter Below measurable limit Inputs Microphone: stereo mini-jack, minimum input level 0.35 mV Line in: stereo mini-jack, minimum input level...
... Recorder Audio playing system MiniDisc digital audio system Laser diode properties Material: GaAlAs MQW Wavelength: λ = 790 nm Emission duration: continuous Laser output: less than 44.6 µW (This output is the value measured at a distance of channels 2 stereo channels 1 monaural channel Frequency response 20 to 20,000 Hz ± 3 dB Wow and Flutter Below measurable limit Inputs Microphone: stereo mini-jack, minimum input level 0.35 mV Line in: stereo mini-jack, minimum input level...

Operating Instructions
Page 64
... in .) without notice. You cannot use only headphones/earphones with stereo mini plugs. Dimensions Approx. 81 × 28.6 × 74.4 mm (w/h/ d) (31/4 × 13/16 × 3 in your country. ∗ Whether you should plug the headphones/earphones directly to i jack on the main unit or to change without projections. Design and specifications are subject to a remote control, use headphones/earphones with a belt clip...
... in .) without notice. You cannot use only headphones/earphones with stereo mini plugs. Dimensions Approx. 81 × 28.6 × 74.4 mm (w/h/ d) (31/4 × 13/16 × 3 in your country. ∗ Whether you should plug the headphones/earphones directly to i jack on the main unit or to change without projections. Design and specifications are subject to a remote control, use headphones/earphones with a belt clip...


