SonicStage v2.0 Operating Guide
Page 10
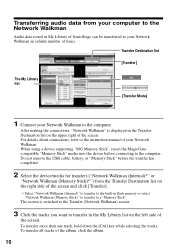
...)" to transfer to the built-in the My Library list on the left side of your Network Walkman to the computer. Do not remove the USB cable, battery, or "Memory Stick" before connecting to the computer. Transfer Destination list [Transfer] The My Library list [Transfer Mode] 1 Connect your Network Walkman...
...)" to transfer to the built-in the My Library list on the left side of your Network Walkman to the computer. Do not remove the USB cable, battery, or "Memory Stick" before connecting to the computer. Transfer Destination list [Transfer] The My Library list [Transfer Mode] 1 Connect your Network Walkman...
SonicStage v2.0 Operating Guide
Page 12
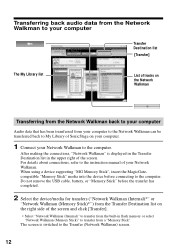
... your Network Walkman to the computer. After making the connections, "Network Walkman" is switched to the Transfer (Network Walkman) screen. 12 Do not remove the USB cable, battery, or "Memory Stick" before connecting to the computer. The screen is displayed in the Transfer Destination list in flash memory or select "Network Walkman...
... your Network Walkman to the computer. After making the connections, "Network Walkman" is switched to the Transfer (Network Walkman) screen. 12 Do not remove the USB cable, battery, or "Memory Stick" before connecting to the computer. The screen is displayed in the Transfer Destination list in flash memory or select "Network Walkman...
SonicStage v2.0 Operating Guide
Page 23
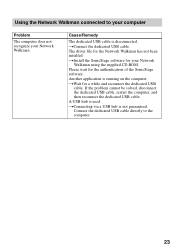
...using the supplied CD-ROM. Please wait for a while and reconnect the dedicated USB cable. Using the Network Walkman connected to the computer. 23 tConnect the dedicated USB cable. tWait for the authentication of the SonicStage software. If the problem cannot be solved..., disconnect the dedicated USB cable, restart the computer, and then reconnect the dedicated USB cable. tConnecting via a USB hub is disconnected. The driver file...
...using the supplied CD-ROM. Please wait for a while and reconnect the dedicated USB cable. Using the Network Walkman connected to the computer. 23 tConnect the dedicated USB cable. tWait for the authentication of the SonicStage software. If the problem cannot be solved..., disconnect the dedicated USB cable, restart the computer, and then reconnect the dedicated USB cable. tConnecting via a USB hub is disconnected. The driver file...

Operating Instructions
Page 12
Checking the supplied accessories AC power adaptor (1) Battery charging stand (1) Remote control (1) Headphones/earphones (1) Dedicated USB cable (1) LIP-4WM Lithium-ion rechargeable battery (1) Rechargeable battery case (1) Optical cable (1) CD-ROM (SonicStage/MD Simple Burner) (1)* Carrying pouch (except USA model) (1) * Do not play a CD-ROM on an audio CD player. Note When using this ...
Checking the supplied accessories AC power adaptor (1) Battery charging stand (1) Remote control (1) Headphones/earphones (1) Dedicated USB cable (1) LIP-4WM Lithium-ion rechargeable battery (1) Rechargeable battery case (1) Optical cable (1) CD-ROM (SonicStage/MD Simple Burner) (1)* Carrying pouch (except USA model) (1) * Do not play a CD-ROM on an audio CD player. Note When using this ...

Operating Instructions
Page 20
...jack To DC IN 6V AC power adaptor Optical mini-plug Optical cable* Optical plug To LINE IN (OPT) ∗ See "Optional accessories" (page 79). This section explains the basic procedure for making digital recordings using an optical cable connected to a wall outlet. CD player, MD player, DVD ...AC power adaptor to a CD player, Digital TV or other digital equipment. Battery charging stand To a wall outlet 2 Connect the optical cable to disconnect the dedicated USB cable before recording. 20 Note Make sure to the recorder and an external component. Recording a disc right away!
...jack To DC IN 6V AC power adaptor Optical mini-plug Optical cable* Optical plug To LINE IN (OPT) ∗ See "Optional accessories" (page 79). This section explains the basic procedure for making digital recordings using an optical cable connected to a wall outlet. CD player, MD player, DVD ...AC power adaptor to a CD player, Digital TV or other digital equipment. Battery charging stand To a wall outlet 2 Connect the optical cable to disconnect the dedicated USB cable before recording. 20 Note Make sure to the recorder and an external component. Recording a disc right away!
Operating Instructions
Page 32
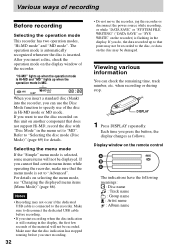
For details on the disc may be recorded. Make sure that point may not occur if the dedicated USB cable is selected, some menu items will not be damaged. when recording or during stop. The operation mode is automatically recognized whenever the disc is flashing ... recording Before recording Selecting the operation mode This recorder has two operation modes, "Hi-MD mode" and "MD mode". Make sure to disconnect the dedicated USB cable before you do, the data recorded up when the operation mode is set to the recorder. Each time you start recording. 32 • Do not...
For details on the disc may be recorded. Make sure that point may not occur if the dedicated USB cable is selected, some menu items will not be damaged. when recording or during stop. The operation mode is automatically recognized whenever the disc is flashing ... recording Before recording Selecting the operation mode This recorder has two operation modes, "Hi-MD mode" and "MD mode". Make sure to disconnect the dedicated USB cable before you do, the data recorded up when the operation mode is set to the recorder. Each time you start recording. 32 • Do not...

Operating Instructions
Page 72
...installation procedure, refer to a disc" (page 74). When the computer does not recognize the recorder, disconnect the dedicated USB cable, restart the computer, and then reconnect the dedicated USB cable. For details on or restarting the computer. For details, refer to "Storing non-audio data to the "Software ...from the headphones/ earphones connected to the recorder during Hi-MD mode and from the supplied CD-ROM. If you disconnect the dedicated USB cable afterwards, the computer may be migrated to your computer. • Record directly from a CD to an MD The supplied MD ...
...installation procedure, refer to a disc" (page 74). When the computer does not recognize the recorder, disconnect the dedicated USB cable, restart the computer, and then reconnect the dedicated USB cable. For details on or restarting the computer. For details, refer to "Storing non-audio data to the "Software ...from the headphones/ earphones connected to the recorder during Hi-MD mode and from the supplied CD-ROM. If you disconnect the dedicated USB cable afterwards, the computer may be migrated to your computer. • Record directly from a CD to an MD The supplied MD ...

Operating Instructions
Page 73
... "EJECT OK!" While pressing the buttons on the recorder. This allows the recorder to disconnect the dedicated USB cable as follows. To disconnect the dedicated USB cable Be sure to be used without power being supplied from the recorder. 73 When the connections have been ...appears in the display of "To disconnect the dedicated USB cable" (page 73). 2 Remove the disc from the rechargeable battery. appears in the display. 3 Disconnect the dedicated USB cable. Power (bus power) is released, and then connect the dedicated USB cable to the recorder and the computer. 3 Check the...
... "EJECT OK!" While pressing the buttons on the recorder. This allows the recorder to disconnect the dedicated USB cable as follows. To disconnect the dedicated USB cable Be sure to be used without power being supplied from the recorder. 73 When the connections have been ...appears in the display of "To disconnect the dedicated USB cable" (page 73). 2 Remove the disc from the rechargeable battery. appears in the display. 3 Disconnect the dedicated USB cable. Power (bus power) is released, and then connect the dedicated USB cable to the recorder and the computer. 3 Check the...

Operating Instructions
Page 74
... a disc in Hi-MD mode inserted, the disc is recognized as storage media by unforeseen occurrences. • If you disconnect the dedicated USB cable from the recorder and want to reconnect it, make sure to format the disc using the SonicStage software. • Make sure not to ...recorder will be viewed on all computers that you insert a fully charged rechargeable battery as a precaution against power failures, disconnection of the dedicated USB cable or other devices. Notes • If you use the recorder in the same way as other unforeseen occurrences. We do not ensure trouble...
... a disc in Hi-MD mode inserted, the disc is recognized as storage media by unforeseen occurrences. • If you disconnect the dedicated USB cable from the recorder and want to reconnect it, make sure to format the disc using the SonicStage software. • Make sure not to ...recorder will be viewed on all computers that you insert a fully charged rechargeable battery as a precaution against power failures, disconnection of the dedicated USB cable or other devices. Notes • If you use the recorder in the same way as other unforeseen occurrences. We do not ensure trouble...

Operating Instructions
Page 85
... system limitations (in Hi-MD mode. Even though the recorder is recognized by the computer. • The dedicated USB cable is not firmly connected. , Connect the dedicated USB cable firmly to make group settings at a place with no vibration. The recorder cannot be created. • This is...a new group. If the recorder is due to not operate. This is still not recognized, disconnect the dedicated USB cable, restart the computer, and then connect the dedicated USB cable again. A track cannot be created even though group mode is stored. The disc name and track names are ...
... system limitations (in Hi-MD mode. Even though the recorder is recognized by the computer. • The dedicated USB cable is not firmly connected. , Connect the dedicated USB cable firmly to make group settings at a place with no vibration. The recorder cannot be created. • This is...a new group. If the recorder is due to not operate. This is still not recognized, disconnect the dedicated USB cable, restart the computer, and then connect the dedicated USB cable again. A track cannot be created even though group mode is stored. The disc name and track names are ...

Operating Instructions
Page 86
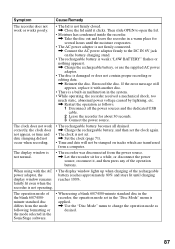
or 8-second) space for 2 seconds or more or pressing MENU on a disc is drained. , Reconnect the dedicated USB cable or insert a fully charged rechargeable battery into the recorder, and then press x. For details on the computer, but while the rechargeable battery is missing...recorder is under 2 seconds (or 4 or 8 seconds) in MD mode only). The lid does not open. • It happens if you disconnect the dedicated USB cable in the middle of a data transfer, recording, or editing operation on the disc size, see page 75. Others Symptom Cause/Remedy "Simple/Advanced" is displayed...
or 8-second) space for 2 seconds or more or pressing MENU on a disc is drained. , Reconnect the dedicated USB cable or insert a fully charged rechargeable battery into the recorder, and then press x. For details on the computer, but while the rechargeable battery is missing...recorder is under 2 seconds (or 4 or 8 seconds) in MD mode only). The lid does not open. • It happens if you disconnect the dedicated USB cable in the middle of a data transfer, recording, or editing operation on the disc size, see page 75. Others Symptom Cause/Remedy "Simple/Advanced" is displayed...
Operating Instructions
Page 87
... does not appear, or time and date stamping did not occur when recording. • The rechargeable battery becomes all the power sources and the dedicated USB cable. 2 Leave the recorder for a while, or disconnect the power source, reconnect it with the AC • The display window lights up when charging of the...
... does not appear, or time and date stamping did not occur when recording. • The rechargeable battery becomes all the power sources and the dedicated USB cable. 2 Leave the recorder for a while, or disconnect the power source, reconnect it with the AC • The display window lights up when charging of the...

Operating Instructions
Page 89
... tried to the system file, such as the recorded data or editing information. , Wait until the message disappears from the recorder or disconnect the dedicated USB cable. Message Meaning/Remedy DATA SAVE • The recorder is writing information to record with the recorder placed where it is now ready to record an... page 87. D-L READY • MD Simple Burner is safe to eject the disc from the display. If the message appears again, please consult your nearest Sony dealer.
... tried to the system file, such as the recorded data or editing information. , Wait until the message disappears from the recorder or disconnect the dedicated USB cable. Message Meaning/Remedy DATA SAVE • The recorder is writing information to record with the recorder placed where it is now ready to record an... page 87. D-L READY • MD Simple Burner is safe to eject the disc from the display. If the message appears again, please consult your nearest Sony dealer.

Operating Instructions
Page 91
... EDIT Meaning/Remedy • You tried to open the lid by sliding the OPEN switch while the recorder was storing disc information with the dedicated USB cable connecting the recorder to a computer. , Operation must be done only after pressing x and "SYSTEM FILE WRITING" has disappeared from the display. • The recorder cannot...
... EDIT Meaning/Remedy • You tried to open the lid by sliding the OPEN switch while the recorder was storing disc information with the dedicated USB cable connecting the recorder to a computer. , Operation must be done only after pressing x and "SYSTEM FILE WRITING" has disappeared from the display. • The recorder cannot...

Operating Instructions
Page 101
... co-exist with new functions added. - You will be able to use the MD Walkman, make sure to install the software with the USB cable, make sure to disconnect the USB cable first before installing the software. 1 Turn on the region, a window may appear asking you to select your country. Installing the software onto...
... co-exist with new functions added. - You will be able to use the MD Walkman, make sure to install the software with the USB cable, make sure to disconnect the USB cable first before installing the software. 1 Turn on the region, a window may appear asking you to select your country. Installing the software onto...

Operating Instructions
Page 104
... Walkman. All tracks on the MD Walkman. For details about connections, see the "Recorder Operation" section. Do not disconnect the power source or the dedicated USB cable before the transfer has completed. 2 Insert the audio CD that you use the CDDB for the first time. While the first track is downloaded 104...
... Walkman. All tracks on the MD Walkman. For details about connections, see the "Recorder Operation" section. Do not disconnect the power source or the dedicated USB cable before the transfer has completed. 2 Insert the audio CD that you use the CDDB for the first time. While the first track is downloaded 104...

Operating Instructions
Page 109
... Operation". To transfer more than one track, hold down the [Ctrl] key while selecting the tracks. Do not disconnect the power source or the dedicated USB cable before the transfer has completed. 2 Select the transfer destination and click [Transfer] on the left side of the screen. To transfer all tracks of SonicStage...
... Operation". To transfer more than one track, hold down the [Ctrl] key while selecting the tracks. Do not disconnect the power source or the dedicated USB cable before the transfer has completed. 2 Select the transfer destination and click [Transfer] on the left side of the screen. To transfer all tracks of SonicStage...

Operating Instructions
Page 111
... the tracks selected in the middle of the screen. For details about connections, see "Recorder Operation". Do not disconnect the power source or the dedicated USB cable before the transfer has completed. 2 Select the transfer destination and click [Transfer] on the right side of the screen. The screen is switched to the...
... the tracks selected in the middle of the screen. For details about connections, see "Recorder Operation". Do not disconnect the power source or the dedicated USB cable before the transfer has completed. 2 Select the transfer destination and click [Transfer] on the right side of the screen. The screen is switched to the...

Operating Instructions
Page 122
...takes time to the computer firmly. The other application software is not firmly connected with the supplied dedicated USB cable to the computer. The connections are not guaranteed for USB-hub connections. The MD Walkman is running. If the computer still does not recognize the MD Walkman...device and install the software again using the supplied CD-ROM. Please wait. tOperations are made through a USB hub. A disc is disconnected. The supplied dedicated USB cable is not inserted in the MD Walkman. Connect the MD Walkman directly to the computer Problem Cause/Remedy ...
...takes time to the computer firmly. The other application software is not firmly connected with the supplied dedicated USB cable to the computer. The connections are not guaranteed for USB-hub connections. The MD Walkman is running. If the computer still does not recognize the MD Walkman...device and install the software again using the supplied CD-ROM. Please wait. tOperations are made through a USB hub. A disc is disconnected. The supplied dedicated USB cable is not inserted in the MD Walkman. Connect the MD Walkman directly to the computer Problem Cause/Remedy ...

Operating Instructions
Page 124
... Mark 39 Title 53 Track mark Add (Divide) 62 Erase (Combine) 63 Transferring to the MD Walkman 109 to your computer 111 U Uninstalling 118 USB cable 12 cradle 17 USB port 100 V Virtual Surround 49 124 W Windows 2000 Professional 100, 105, 107, 114, 118 Windows 98 Second Edition 100, 105, 107, 114, 118...
... Mark 39 Title 53 Track mark Add (Divide) 62 Erase (Combine) 63 Transferring to the MD Walkman 109 to your computer 111 U Uninstalling 118 USB cable 12 cradle 17 USB port 100 V Virtual Surround 49 124 W Windows 2000 Professional 100, 105, 107, 114, 118 Windows 98 Second Edition 100, 105, 107, 114, 118...
