SonicStage v2.0 Operating Guide
Page 10
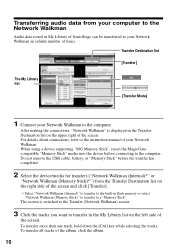
... computer. The screen is displayed in flash memory or select "Network Walkman (Memory Stick)" to transfer to a "Memory Stick". Do not remove the USB cable, battery, or "Memory Stick" before connecting to the computer. To transfer all tracks of the screen and click [Transfer]. ∗ Select "Network Walkman (Internal)" to transfer...
... computer. The screen is displayed in flash memory or select "Network Walkman (Memory Stick)" to transfer to a "Memory Stick". Do not remove the USB cable, battery, or "Memory Stick" before connecting to the computer. To transfer all tracks of the screen and click [Transfer]. ∗ Select "Network Walkman (Internal)" to transfer...
SonicStage v2.0 Operating Guide
Page 12
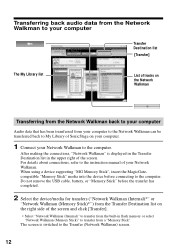
... Walkman Transferring from the Network Walkman back to your computer Audio data that has been transferred from a "Memory Stick". Do not remove the USB cable, battery, or "Memory Stick" before connecting to transfer from the built-in the upper right of the screen.
... Walkman Transferring from the Network Walkman back to your computer Audio data that has been transferred from a "Memory Stick". Do not remove the USB cable, battery, or "Memory Stick" before connecting to transfer from the built-in the upper right of the screen.

Operating Instructions
Page 2
... disc compartment lid and the model number is located at the rear of the apparatus with your Sony dealer regarding this product. Certain countries may regulate disposal of the battery used to them whenever you call upon your local authority. Please consult with news papers, table ... as a bookcase or built-in the USA Owner's Record The serial number is located at www.sony.com/walkmanreg Proper registration will increase eye hazard. Refer to power this product. MZ-NH1 Serial No. Thank you have any questions about software upgrades, new products, services and other important...
... disc compartment lid and the model number is located at the rear of the apparatus with your Sony dealer regarding this product. Certain countries may regulate disposal of the battery used to them whenever you call upon your local authority. Please consult with news papers, table ... as a bookcase or built-in the USA Owner's Record The serial number is located at www.sony.com/walkmanreg Proper registration will increase eye hazard. Refer to power this product. MZ-NH1 Serial No. Thank you have any questions about software upgrades, new products, services and other important...

Operating Instructions
Page 3
...However, there is legally enforced, mainly in accordance with the instructions, may cause undesired operation. RECYCLING LITHIUM-ION BATTERIES Lithium-ion batteries are cautioned that may cause harmful interference to radio or television reception, which the receiver is subject to the collection... rechargeable batteries to the following measures: - Declaration of the FCC Rules. If this equipment. Operation is connected. - This equipment has been tested and found to comply with Part 15 of Conformity Trade Name: SONY Model No.: MZ-NH1 Responsible Party: Sony Electronics ...
...However, there is legally enforced, mainly in accordance with the instructions, may cause undesired operation. RECYCLING LITHIUM-ION BATTERIES Lithium-ion batteries are cautioned that may cause harmful interference to radio or television reception, which the receiver is subject to the collection... rechargeable batteries to the following measures: - Declaration of the FCC Rules. If this equipment. Operation is connected. - This equipment has been tested and found to comply with Part 15 of Conformity Trade Name: SONY Model No.: MZ-NH1 Responsible Party: Sony Electronics ...

Operating Instructions
Page 12
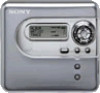
... stand (1) Remote control (1) Headphones/earphones (1) Dedicated USB cable (1) LIP-4WM Lithium-ion rechargeable battery (1) Rechargeable battery case (1) Optical cable (1) CD-ROM (SonicStage/MD Simple Burner) (1)* Carrying pouch (except USA model) (1) * Do not play a CD-ROM on an audio CD player. Note ...
... stand (1) Remote control (1) Headphones/earphones (1) Dedicated USB cable (1) LIP-4WM Lithium-ion rechargeable battery (1) Rechargeable battery case (1) Optical cable (1) CD-ROM (SonicStage/MD Simple Burner) (1)* Carrying pouch (except USA model) (1) * Do not play a CD-ROM on an audio CD player. Note ...

Operating Instructions
Page 13
... beside the MIC (PLUG IN POWER) jack. Looking at controls The recorder 1 9 0 2 qa qs qd 3 Recorder Operation 4 5 6 7 8 A x (stop) • CANCEL button B Display window C OPEN switch D Battery compartment E 5-way control key Operation Function Press NENT play, enter 1) Press towards FR Press towards FF find the beginning of the previous track, rewind find...
... beside the MIC (PLUG IN POWER) jack. Looking at controls The recorder 1 9 0 2 qa qs qd 3 Recorder Operation 4 5 6 7 8 A x (stop) • CANCEL button B Display window C OPEN switch D Battery compartment E 5-way control key Operation Function Press NENT play, enter 1) Press towards FR Press towards FF find the beginning of the previous track, rewind find...

Operating Instructions
Page 14
...-recording) indication D REC indication Lights up during recording or file transfers from being accidentally operated when you carry the recorder, use this function. B Battery indication Shows the approximate remaining battery power. G Track number display H "R" (Remain) indication Lights up when the operation mode is in record standby mode. E Group indication F Hi-MD/MD...
...-recording) indication D REC indication Lights up during recording or file transfers from being accidentally operated when you carry the recorder, use this function. B Battery indication Shows the approximate remaining battery power. G Track number display H "R" (Remain) indication Lights up when the operation mode is in record standby mode. E Group indication F Hi-MD/MD...

Operating Instructions
Page 16
The display window of the remote control 1 23 A Character information display B Battery level indication 4 C Disc indication D SND (sound), SUR (surround) indications 16
The display window of the remote control 1 23 A Character information display B Battery level indication 4 C Disc indication D SND (sound), SUR (surround) indications 16

Operating Instructions
Page 17
... has finished, press RELEASE to a wall outlet. Insert the battery starting with the front side facing forward. 2 Charging the rechargeable battery. 1 Connect the AC power adaptor to the battery charging stand and the AC power adaptor to remove the recorder ... battery charging stand. RELEASE continued 17 Battery charging stand To a wall outlet 2 Place the recorder on the battery charging stand. Press the recorder onto the battery charging stand. Getting started Charge the rechargeable battery before using. 1 Insert the rechargeable battery. 1 Slide the battery ...
... has finished, press RELEASE to a wall outlet. Insert the battery starting with the front side facing forward. 2 Charging the rechargeable battery. 1 Connect the AC power adaptor to the battery charging stand and the AC power adaptor to remove the recorder ... battery charging stand. RELEASE continued 17 Battery charging stand To a wall outlet 2 Place the recorder on the battery charging stand. Press the recorder onto the battery charging stand. Getting started Charge the rechargeable battery before using. 1 Insert the rechargeable battery. 1 Slide the battery ...

Operating Instructions
Page 18
... drained at the start of charging, it will be used. • If the CHG lamp turns off after a short time, the rechargeable battery is sufficiently charged. • If the battery is about 80% charged. z • Display changes as follows: "CHG:--min" t "CHG:60min" (60 minutes to end of charging) t ..."CHG:59min" t ...t "CHG:00min" t No display (CHG lamp goes off) When the CHG lamp goes off, the battery is about 80% charged and the recorder can then be fully charged. 3 Make connections and unlock the controls. 1 Connect the headphones/earphones with the remote...
... drained at the start of charging, it will be used. • If the CHG lamp turns off after a short time, the rechargeable battery is sufficiently charged. • If the battery is about 80% charged. z • Display changes as follows: "CHG:--min" t "CHG:60min" (60 minutes to end of charging) t ..."CHG:59min" t ...t "CHG:00min" t No display (CHG lamp goes off) When the CHG lamp goes off, the battery is about 80% charged and the recorder can then be fully charged. 3 Make connections and unlock the controls. 1 Connect the headphones/earphones with the remote...

Operating Instructions
Page 19
...or less than normal when it is used for the first time or after a long period of +5° C (+41° F) to charge the rechargeable battery You can be smaller than the indication depending on the operating condition or the operating environment. • By pressing the DISPLAY button on the remote... control to view the battery level. (Refer to use the AC plug adaptor. When powering the recorder with the AC plug adaptor If the AC power adaptor does not ...
...or less than normal when it is used for the first time or after a long period of +5° C (+41° F) to charge the rechargeable battery You can be smaller than the indication depending on the operating condition or the operating environment. • By pressing the DISPLAY button on the remote... control to view the battery level. (Refer to use the AC plug adaptor. When powering the recorder with the AC plug adaptor If the AC power adaptor does not ...

Operating Instructions
Page 20
...page 79). This section explains the basic procedure for making digital recordings using an optical cable connected to the recorder and an external component. Battery charging stand To a wall outlet 2 Connect the optical cable to a CD player, Digital TV or other digital equipment. Make sure ... optical cable. 1 Make connections. (Insert the cables firmly and completely into the appropriate jacks.) 1 Connect the AC power adaptor to the battery charging stand and the AC power adaptor to disconnect the dedicated USB cable before recording. 20 Recording a disc right away! Note Make sure...
...page 79). This section explains the basic procedure for making digital recordings using an optical cable connected to the recorder and an external component. Battery charging stand To a wall outlet 2 Connect the optical cable to a CD player, Digital TV or other digital equipment. Make sure ... optical cable. 1 Make connections. (Insert the cables firmly and completely into the appropriate jacks.) 1 Connect the AC power adaptor to the battery charging stand and the AC power adaptor to disconnect the dedicated USB cable before recording. 20 Recording a disc right away! Note Make sure...

Operating Instructions
Page 21
continued 21 Make sure to close. 2 Insert a recordable disc. 1 Slide OPEN to open the lid. 2 Insert a disc with the label side facing front, and press the lid down to check the record-protect tab is closed. 3 Place the recorder on the battery charging stand.
continued 21 Make sure to close. 2 Insert a recordable disc. 1 Slide OPEN to open the lid. 2 Insert a disc with the label side facing front, and press the lid down to check the record-protect tab is closed. 3 Place the recorder on the battery charging stand.

Operating Instructions
Page 24
... disc is not record-protected (pages 21, 78). • Premastered discs cannot be capable of digital out when the AC power adaptor is disconnected. the battery is removed or becomes exhausted or the AC power adaptor is disconnected) during a recording or editing operation, or while "DATA SAVE" or "SYS WRITE" appears...
... disc is not record-protected (pages 21, 78). • Premastered discs cannot be capable of digital out when the AC power adaptor is disconnected. the battery is removed or becomes exhausted or the AC power adaptor is disconnected) during a recording or editing operation, or while "DATA SAVE" or "SYS WRITE" appears...

Operating Instructions
Page 33
... domain. • Depending on the group settings, the operating conditions, and the disc settings, you may appear differently. • The remaining battery charge/battery status appears about one minute after the and disc name the current current track1) location in a group. While the recorder is stopped A/B/C A...• Group name and album name (HiMD) • Group name (MD) Track name Year, month Time and date "Clock" Remaining battery charge/ "Batt battery status Status" Notes • When using the disc in Hi-MD mode, the free space will show as "2.0MB" when the remaining ...
... domain. • Depending on the group settings, the operating conditions, and the disc settings, you may appear differently. • The remaining battery charge/battery status appears about one minute after the and disc name the current current track1) location in a group. While the recorder is stopped A/B/C A...• Group name and album name (HiMD) • Group name (MD) Track name Year, month Time and date "Clock" Remaining battery charge/ "Batt battery status Status" Notes • When using the disc in Hi-MD mode, the free space will show as "2.0MB" when the remaining ...

Operating Instructions
Page 43
... recording at +25° C. name (Hi- Various ways of the selected name3) Sound Mode Recorded Recorded year, month time and date "REC Date" Remaining battery charge/ "Batt Status" battery status4) • Codec • Track mode • "Codec" (Hi- (Hi-MD)3) and bit rate MD) • (none) (Hi-MD) • "TrackMode" (MD... the AC power adaptor is being used. 5) The disc name appears when the currently selected track is not in the display when the battery is sufficiently charged, while "Almost Empty" appears when the battery is almost exhausted. "Plenty" appears in a group. 43
... recording at +25° C. name (Hi- Various ways of the selected name3) Sound Mode Recorded Recorded year, month time and date "REC Date" Remaining battery charge/ "Batt Status" battery status4) • Codec • Track mode • "Codec" (Hi- (Hi-MD)3) and bit rate MD) • (none) (Hi-MD) • "TrackMode" (MD... the AC power adaptor is being used. 5) The disc name appears when the currently selected track is not in the display when the battery is sufficiently charged, while "Almost Empty" appears when the battery is almost exhausted. "Plenty" appears in a group. 43

Operating Instructions
Page 44
The remaining battery charge may not be able to select certain indications or the indications may not be accurately displayed due to enter the ...to tracks in Hi-MD mode. 44 The play mode: selects the type of playback. z If you may appear differently. • The remaining battery charge/battery status appears about one minute after the start of play • Repeat play: selects Repeat play Jog lever (NX • ENTER) Jog dial... played.) Program play (Tracks are played in a specified order.) 1) Appears only for discs used in various play (Tracks of the rechargeable battery.
The remaining battery charge may not be able to select certain indications or the indications may not be accurately displayed due to enter the ...to tracks in Hi-MD mode. 44 The play mode: selects the type of playback. z If you may appear differently. • The remaining battery charge/battery status appears about one minute after the start of play • Repeat play: selects Repeat play Jog lever (NX • ENTER) Jog dial... played.) Program play (Tracks are played in a specified order.) 1) Appears only for discs used in various play (Tracks of the rechargeable battery.

Operating Instructions
Page 69
... recorder is factory set to quickly start playback after the playback button is stopped or playing, enter the menu and select "Option" - When the rechargeable battery becomes completely drained, the internal power supply of the disc in Hi-MD mode or MD mode. "Quick Mode". 2 Turn the jog dial until "Hi... does not support Hi-MD, record the disc with "Disc Mode" in the display, and then press the control key to "MD". You can minimize battery drain while the recorder is set to enter the selection.
... recorder is factory set to quickly start playback after the playback button is stopped or playing, enter the menu and select "Option" - When the rechargeable battery becomes completely drained, the internal power supply of the disc in Hi-MD mode or MD mode. "Quick Mode". 2 Turn the jog dial until "Hi... does not support Hi-MD, record the disc with "Disc Mode" in the display, and then press the control key to "MD". You can minimize battery drain while the recorder is set to enter the selection.

Operating Instructions
Page 71
... when the clock is set the clock, it will be lost if the computer changes to system suspend, sleep or hibernation mode and the rechargeable battery is connected to enter the selection. To turn the setting to normal Select "Default" in the display, and then press to a power source, such as... is stopped or recording, enter the menu, and select "Display" - The digit of the recorder will keep correct time as long as the charged rechargeable battery or AC power adaptor. 2 Turn the jog dial until "Reverse" appears in step 2.
... when the clock is set the clock, it will be lost if the computer changes to system suspend, sleep or hibernation mode and the rechargeable battery is connected to enter the selection. To turn the setting to normal Select "Default" in the display, and then press to a power source, such as... is stopped or recording, enter the menu, and select "Display" - The digit of the recorder will keep correct time as long as the charged rechargeable battery or AC power adaptor. 2 Turn the jog dial until "Reverse" appears in step 2.

Operating Instructions
Page 73
... the display of "To disconnect the dedicated USB cable" (page 73). 2 Remove the disc from the recorder. 73 When removing the disc from the rechargeable battery. Computer To the USB port To the USB connecting jack 1 Insert a recordable disc into the recorder. 2 Make sure the recorder is stopped and HOLD is...
... the display of "To disconnect the dedicated USB cable" (page 73). 2 Remove the disc from the recorder. 73 When removing the disc from the rechargeable battery. Computer To the USB port To the USB connecting jack 1 Insert a recordable disc into the recorder. 2 Make sure the recorder is stopped and HOLD is...


