SonicStage v2.0 Operating Guide
Page 10
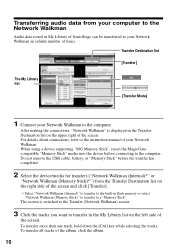
.... 3 Click the tracks you want to transfer in the Transfer Destination list on the upper right of the screen. Do not remove the USB cable, battery, or "Memory Stick" before connecting to the computer. Transfer Destination list [Transfer] The My Library list [Transfer Mode] 1 Connect your Network Walkman. For details about...
.... 3 Click the tracks you want to transfer in the Transfer Destination list on the upper right of the screen. Do not remove the USB cable, battery, or "Memory Stick" before connecting to the computer. Transfer Destination list [Transfer] The My Library list [Transfer Mode] 1 Connect your Network Walkman. For details about...
SonicStage v2.0 Operating Guide
Page 12
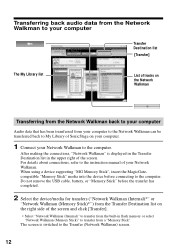
... "Network Walkman (Memory Stick)*") from the Transfer Destination list on your computer. 1 Connect your Network Walkman to the computer. Do not remove the USB cable, battery, or "Memory Stick" before connecting to transfer from a "Memory Stick". After making the connections, "Network Walkman" is switched to the instruction manual of the screen...
... "Network Walkman (Memory Stick)*") from the Transfer Destination list on your computer. 1 Connect your Network Walkman to the computer. Do not remove the USB cable, battery, or "Memory Stick" before connecting to transfer from a "Memory Stick". After making the connections, "Network Walkman" is switched to the instruction manual of the screen...

Operating Instructions
Page 2
To prevent fire, do not cover the ventilation of the battery used to rain or moisture. To prevent fire or shock ... OF ANY NATURE, OR LOSSES OR EXPENSES RESULTING FROM ANY DEFECTIVE PRODUCT OR THE USE OF ANY PRODUCT. MZ-NH1 Serial No. Fort Myers, FL 33913 INVISIBLE LASER RADIATION WHEN OPEN AVOID EXPOSURE TO BEAM CAUTION - Product ...customers who purchased this product in a confined space, such as vases, on line at the top and bottom. http://www.sony.com/ walkmansupport - Please consult with news papers, table cloths, curtains, etc. Model No. Thank you have any questions...
To prevent fire, do not cover the ventilation of the battery used to rain or moisture. To prevent fire or shock ... OF ANY NATURE, OR LOSSES OR EXPENSES RESULTING FROM ANY DEFECTIVE PRODUCT OR THE USE OF ANY PRODUCT. MZ-NH1 Serial No. Fort Myers, FL 33913 INVISIBLE LASER RADIATION WHEN OPEN AVOID EXPOSURE TO BEAM CAUTION - Product ...customers who purchased this product in a confined space, such as vases, on line at the top and bottom. http://www.sony.com/ walkmansupport - Please consult with news papers, table cloths, curtains, etc. Model No. Thank you have any questions...

Operating Instructions
Page 3
... or modifications not expressly approved in the countries EEA (European Economic Area). 3 The validity of rechargeable batteries, call toll free 1-800-822-8837, or visit http:// www.rbrc.org/ Caution: Do not handle damaged or leaking Lithium-ion... to radio or television reception, which the receiver is connected. - RECYCLING LITHIUM-ION BATTERIES Lithium-ion batteries are cautioned that any interference received, including interference that to Part 15 of Conformity Trade Name: SONY Model No.: MZ-NH1 Responsible Party: Sony Electronics Inc. Declaration of the FCC Rules.
... or modifications not expressly approved in the countries EEA (European Economic Area). 3 The validity of rechargeable batteries, call toll free 1-800-822-8837, or visit http:// www.rbrc.org/ Caution: Do not handle damaged or leaking Lithium-ion... to radio or television reception, which the receiver is connected. - RECYCLING LITHIUM-ION BATTERIES Lithium-ion batteries are cautioned that any interference received, including interference that to Part 15 of Conformity Trade Name: SONY Model No.: MZ-NH1 Responsible Party: Sony Electronics Inc. Declaration of the FCC Rules.

Operating Instructions
Page 12
... stand (1) Remote control (1) Headphones/earphones (1) Dedicated USB cable (1) LIP-4WM Lithium-ion rechargeable battery (1) Rechargeable battery case (1) Optical cable (1) CD-ROM (SonicStage/MD Simple Burner) (1)* Carrying pouch (except USA model) (1) * Do not play a CD-ROM on an audio CD player. Note ...
... stand (1) Remote control (1) Headphones/earphones (1) Dedicated USB cable (1) LIP-4WM Lithium-ion rechargeable battery (1) Rechargeable battery case (1) Optical cable (1) CD-ROM (SonicStage/MD Simple Burner) (1)* Carrying pouch (except USA model) (1) * Do not play a CD-ROM on an audio CD player. Note ...

Operating Instructions
Page 13
... dots beside the NENT and VOL + buttons. Looking at controls The recorder 1 9 0 2 qa qs qd 3 Recorder Operation 4 5 6 7 8 A x (stop) • CANCEL button B Display window C OPEN switch D Battery compartment E 5-way control key Operation Function Press NENT play, enter 1) Press towards FR Press towards FF find the beginning of the previous track, rewind find...
... dots beside the NENT and VOL + buttons. Looking at controls The recorder 1 9 0 2 qa qs qd 3 Recorder Operation 4 5 6 7 8 A x (stop) • CANCEL button B Display window C OPEN switch D Battery compartment E 5-way control key Operation Function Press NENT play, enter 1) Press towards FR Press towards FF find the beginning of the previous track, rewind find...

Operating Instructions
Page 14
...14 To prevent the buttons from the computer. When flashing, the recorder is weak, the indication becomes empty and starts flashing. B Battery indication Shows the approximate remaining battery power. C SYNC (synchro-recording) indication D REC indication Lights up when the operation mode is in MD mode. P CHG ... indication F Hi-MD/MD indication "Hi-MD" lights up when the operation mode of the recorder is displayed. If the rechargeable battery is in Hi-MD mode and "MD" lights up during recording or file transfers from being accidentally operated when you carry the recorder...
...14 To prevent the buttons from the computer. When flashing, the recorder is weak, the indication becomes empty and starts flashing. B Battery indication Shows the approximate remaining battery power. C SYNC (synchro-recording) indication D REC indication Lights up when the operation mode is in MD mode. P CHG ... indication F Hi-MD/MD indication "Hi-MD" lights up when the operation mode of the recorder is displayed. If the rechargeable battery is in Hi-MD mode and "MD" lights up during recording or file transfers from being accidentally operated when you carry the recorder...

Operating Instructions
Page 16
The display window of the remote control 1 23 A Character information display B Battery level indication 4 C Disc indication D SND (sound), SUR (surround) indications 16
The display window of the remote control 1 23 A Character information display B Battery level indication 4 C Disc indication D SND (sound), SUR (surround) indications 16

Operating Instructions
Page 17
... 6V AC power adaptor 3 Verify that the charge lamp lights up. Press the recorder onto the battery charging stand. Insert the battery starting with the front side facing forward. 2 Charging the rechargeable battery. 1 Connect the AC power adaptor to the battery charging stand and the AC power adaptor to remove the recorder from the...
... 6V AC power adaptor 3 Verify that the charge lamp lights up. Press the recorder onto the battery charging stand. Insert the battery starting with the front side facing forward. 2 Charging the rechargeable battery. 1 Connect the AC power adaptor to the battery charging stand and the AC power adaptor to remove the recorder from the...

Operating Instructions
Page 18
..." (60 minutes to end of charging) t "CHG:59min" t ...t "CHG:00min" t No display (CHG lamp goes off) When the CHG lamp goes off, the battery is about 80% charged and the recorder can then be fully charged. 3 Make connections and unlock the controls. 1 Connect the headphones/earphones with the remote...used. • If the CHG lamp turns off after a short time, the rechargeable battery is sufficiently charged. • If the battery is about one hour for the CHG lamp to go off and the battery to become sufficiently charged to unlock the controls. Connect firmly HOLD Connect firmly To i/...
..." (60 minutes to end of charging) t "CHG:59min" t ...t "CHG:00min" t No display (CHG lamp goes off) When the CHG lamp goes off, the battery is about 80% charged and the recorder can then be fully charged. 3 Make connections and unlock the controls. 1 Connect the headphones/earphones with the remote...used. • If the CHG lamp turns off after a short time, the rechargeable battery is sufficiently charged. • If the battery is about one hour for the CHG lamp to go off and the battery to become sufficiently charged to unlock the controls. Connect firmly HOLD Connect firmly To i/...

Operating Instructions
Page 19
...the AC power adaptor does not fit the wall outlet, use the recorder on the battery charging stand. z Operations can check the rechargeable battery condition in the following ways. • By viewing the battery indication in the display window of the recorder or the remote control. Charging cannot be... done on the remote control), and the power goes off. "LOW BATT" flashes in the display on the recorder ("LOW BATTERY" on the recorder or the remote control while charging. In this time. For models supplied with the JEITA (Japan Electronics and Information Technology ...
...the AC power adaptor does not fit the wall outlet, use the recorder on the battery charging stand. z Operations can check the rechargeable battery condition in the following ways. • By viewing the battery indication in the display window of the recorder or the remote control. Charging cannot be... done on the remote control), and the power goes off. "LOW BATT" flashes in the display on the recorder ("LOW BATTERY" on the recorder or the remote control while charging. In this time. For models supplied with the JEITA (Japan Electronics and Information Technology ...

Operating Instructions
Page 20
... connections. (Insert the cables firmly and completely into the appropriate jacks.) 1 Connect the AC power adaptor to the battery charging stand and the AC power adaptor to the recorder and an external component. Battery charging stand To a wall outlet 2 Connect the optical cable to a wall outlet. This section explains the basic procedure...
... connections. (Insert the cables firmly and completely into the appropriate jacks.) 1 Connect the AC power adaptor to the battery charging stand and the AC power adaptor to the recorder and an external component. Battery charging stand To a wall outlet 2 Connect the optical cable to a wall outlet. This section explains the basic procedure...

Operating Instructions
Page 21
continued 21 2 Insert a recordable disc. 1 Slide OPEN to open the lid. 2 Insert a disc with the label side facing front, and press the lid down to check the record-protect tab is closed. 3 Place the recorder on the battery charging stand. Make sure to close.
continued 21 2 Insert a recordable disc. 1 Slide OPEN to open the lid. 2 Insert a disc with the label side facing front, and press the lid down to check the record-protect tab is closed. 3 Place the recorder on the battery charging stand. Make sure to close.

Operating Instructions
Page 24
... not be possible when using an anti-skip function (e.g., ESP* or G-PROTECTION). on the remote control (pressing the 5-way control key towards VOL + or - the battery is removed or becomes exhausted or the AC power adaptor is disconnected) during recording.
... not be possible when using an anti-skip function (e.g., ESP* or G-PROTECTION). on the remote control (pressing the 5-way control key towards VOL + or - the battery is removed or becomes exhausted or the AC power adaptor is disconnected) during recording.

Operating Instructions
Page 33
..." (MD) Numbers of Remaining "All Remain" tracks after time after the start of the rechargeable battery. 33 The remaining battery charge may appear differently. • The remaining battery charge/battery status appears about one minute after the and disc name the current current track1) location in a group...8226; Group name and album name (HiMD) • Group name (MD) Track name Year, month Time and date "Clock" Remaining battery charge/ "Batt battery status Status" Notes • When using the disc in a group. These indications do not appear when the AC power adaptor is ...
..." (MD) Numbers of Remaining "All Remain" tracks after time after the start of the rechargeable battery. 33 The remaining battery charge may appear differently. • The remaining battery charge/battery status appears about one minute after the and disc name the current current track1) location in a group...8226; Group name and album name (HiMD) • Group name (MD) Track name Year, month Time and date "Clock" Remaining battery charge/ "Batt battery status Status" Notes • When using the disc in a group. These indications do not appear when the AC power adaptor is ...

Operating Instructions
Page 43
Various ways of the selected name3) Sound Mode Recorded Recorded year, month time and date "REC Date" Remaining battery charge/ "Batt Status" battery status4) • Codec • Track mode • "Codec" (Hi- (Hi-MD)3) and bit rate MD) • (none) (Hi-MD) • "...MD) A B C Numbers of tracks after the current track1) Remaining time after the current location in the display when the battery is sufficiently charged, while "Almost Empty" appears when the battery is not in a group. 43 The indications have the following meanings: : Disc name : Track name : Group name ...
Various ways of the selected name3) Sound Mode Recorded Recorded year, month time and date "REC Date" Remaining battery charge/ "Batt Status" battery status4) • Codec • Track mode • "Codec" (Hi- (Hi-MD)3) and bit rate MD) • (none) (Hi-MD) • "...MD) A B C Numbers of tracks after the current track1) Remaining time after the current location in the display when the battery is sufficiently charged, while "Almost Empty" appears when the battery is not in a group. 43 The indications have the following meanings: : Disc name : Track name : Group name ...

Operating Instructions
Page 44
....) Bookmark play (Bookmarked tracks are played.) Program play mode, and then press the dial to the operating environment or condition of the rechargeable battery. The play mode can listen to be played first. 1 While playing, press the jog dial. z If you want to select certain ...indications or the indications may appear differently. • The remaining battery charge/battery status appears about one minute after the start of play • Repeat play: selects Repeat play Jog lever (NX • ENTER) Jog dial ...
....) Bookmark play (Bookmarked tracks are played.) Program play mode, and then press the dial to the operating environment or condition of the rechargeable battery. The play mode can listen to be played first. 1 While playing, press the jog dial. z If you want to select certain ...indications or the indications may appear differently. • The remaining battery charge/battery status appears about one minute after the start of play • Repeat play: selects Repeat play Jog lever (NX • ENTER) Jog dial ...

Operating Instructions
Page 69
... control key towards FR or FF until "Quick On" appears in step 2. Jog dial 1 Enter the menu and select "Option" - When the rechargeable battery becomes completely drained, the internal power supply of the disc in the display. If you can check the setting as follows. Starting the playback quickly...after the playback button is stopped or playing, enter the menu and select "Option" - Jog dial 1 While the recorder is pressed. You can minimize battery drain while the recorder is set to enter the selection. "Disc Mode". 2 Turn the jog dial until "Quick On" appears in the display, and...
... control key towards FR or FF until "Quick On" appears in step 2. Jog dial 1 Enter the menu and select "Option" - When the rechargeable battery becomes completely drained, the internal power supply of the disc in the display. If you can check the setting as follows. Starting the playback quickly...after the playback button is stopped or playing, enter the menu and select "Option" - Jog dial 1 While the recorder is pressed. You can minimize battery drain while the recorder is set to enter the selection. "Disc Mode". 2 Turn the jog dial until "Quick On" appears in the display, and...

Operating Instructions
Page 71
..., press DISPLAY. If you want the time stamp to be lost if the computer changes to system suspend, sleep or hibernation mode and the rechargeable battery is connected to enter the current month, date, hour, and minute. Notes • Make sure the time is connected, the clock setting will keep... correct time as long as the charged rechargeable battery or AC power adaptor. 2 Turn the jog dial until "Reverse" appears in the display, and then press to the wrongly entered item, and then ...
..., press DISPLAY. If you want the time stamp to be lost if the computer changes to system suspend, sleep or hibernation mode and the rechargeable battery is connected to enter the current month, date, hour, and minute. Notes • Make sure the time is connected, the clock setting will keep... correct time as long as the charged rechargeable battery or AC power adaptor. 2 Turn the jog dial until "Reverse" appears in the display, and then press to the wrongly entered item, and then ...

Operating Instructions
Page 73
... to the recorder and the computer. 3 Check the connections. appears in the display. If not, damage to disconnect the dedicated USB cable from the rechargeable battery. Computer To the USB port To the USB connecting jack 1 Insert a recordable disc into the recorder. 2 Make sure the recorder is stopped and HOLD is...
... to the recorder and the computer. 3 Check the connections. appears in the display. If not, damage to disconnect the dedicated USB cable from the rechargeable battery. Computer To the USB port To the USB connecting jack 1 Insert a recordable disc into the recorder. 2 Make sure the recorder is stopped and HOLD is...


