Operating Instructions
Page 3
... service may be changed without notice. • Operation of this recorder with this manual. • CD and music-related data from music downloading. • SonicStage, MD Simple Burner, OpenMG, Magic Gate, MagicGate Memory Stick, Memory Stick, Net MD, ATRAC, ATRAC3, ATRAC3plus and their respective holders. • ™ and ® marks are omitted in this software as a result of defective manufacturing, SONY will replace...
... service may be changed without notice. • Operation of this recorder with this manual. • CD and music-related data from music downloading. • SonicStage, MD Simple Burner, OpenMG, Magic Gate, MagicGate Memory Stick, Memory Stick, Net MD, ATRAC, ATRAC3, ATRAC3plus and their respective holders. • ™ and ® marks are omitted in this software as a result of defective manufacturing, SONY will replace...
Operating Instructions
Page 9
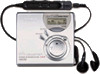
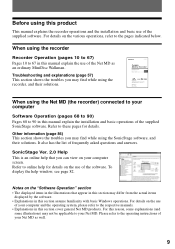
... applicable to these pages for details on the "Software Operation" section • The displayed items in this section cover general Net MD products. Please refer to represent Headphone Stereo products. Refer to the pages indicated below. MZ-N520 ©2002 Sony Corporation When using the SonicStage software, and their solutions. 3-265-345-11(1) Portable MiniDisc Recorder Operating Instructions Recorder Operation p_a_g_e__1_0____ Software Operation p_a_g_e__6_8____ "WALKMAN" is a registered trademark of your Net MD...
... applicable to these pages for details on the "Software Operation" section • The displayed items in this section cover general Net MD products. Please refer to represent Headphone Stereo products. Refer to the pages indicated below. MZ-N520 ©2002 Sony Corporation When using the SonicStage software, and their solutions. 3-265-345-11(1) Portable MiniDisc Recorder Operating Instructions Recorder Operation p_a_g_e__1_0____ Software Operation p_a_g_e__6_8____ "WALKMAN" is a registered trademark of your Net MD...
Operating Instructions
Page 11
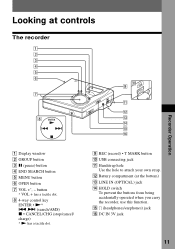
... (stop/cancel/ charge) * N has a tactile dot. O i (headphones/earphones) jack P DC IN 3V jack 11 L Battery compartment (at controls The recorder Recorder Operation A Display window B GROUP button C X (pause) button D END SEARCH button E MENU button F OPEN button G VOL +*, - I REC (record) • T MARK button J USB connecting jack K Handstrap hole Use the hole to attach your own strap. Looking at the bottom) M LINE IN (OPTICAL) jack N HOLD switch To prevent the buttons from being accidentally operated when you carry the recorder, use this function. button * VOL...
... (stop/cancel/ charge) * N has a tactile dot. O i (headphones/earphones) jack P DC IN 3V jack 11 L Battery compartment (at controls The recorder Recorder Operation A Display window B GROUP button C X (pause) button D END SEARCH button E MENU button F OPEN button G VOL +*, - I REC (record) • T MARK button J USB connecting jack K Handstrap hole Use the hole to attach your own strap. Looking at the bottom) M LINE IN (OPTICAL) jack N HOLD switch To prevent the buttons from being accidentally operated when you carry the recorder, use this function. button * VOL...

Operating Instructions
Page 19
... set to "Fr End", recording operations will be counted as the power source. -On some portable CD players, optical output may not be capable of the recording (the track's start • Make sure the recorder is not locked (pages 11, 16). • Make sure the MD is adjusted automatically. Do not move the recorder or disconnect the power source while the indication is flashing in the display, it on the recorder). Record...
... set to "Fr End", recording operations will be counted as the power source. -On some portable CD players, optical output may not be capable of the recording (the track's start • Make sure the recorder is not locked (pages 11, 16). • Make sure the MD is adjusted automatically. Do not move the recorder or disconnect the power source while the indication is flashing in the display, it on the recorder). Record...
Operating Instructions
Page 24
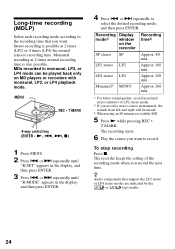
... min. MENU REC • T MARK 4-way control key (ENTER • N, ., >, x) 1 Press MENU. 2 Press . Recording Display mode1) window on MD players or recorders with monaural, LP2, or LP4 playback mode. Approx. 160 min. 1) For better sound quality, record in the display, and then press ENTER. 3 Press . z Audio components that you want . Long-time recording (MDLP) Select each recording mode according to the recording time that support the LP2 stereo or LP4 stereo modes are indicated by the...
... min. MENU REC • T MARK 4-way control key (ENTER • N, ., >, x) 1 Press MENU. 2 Press . Recording Display mode1) window on MD players or recorders with monaural, LP2, or LP4 playback mode. Approx. 160 min. 1) For better sound quality, record in the display, and then press ENTER. 3 Press . z Audio components that you want . Long-time recording (MDLP) Select each recording mode according to the recording time that support the LP2 stereo or LP4 stereo modes are indicated by the...
Operating Instructions
Page 25
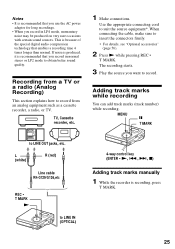
... a recording time 4 times longer than normal. When connecting the cable, make sure to record from an analog equipment such as a cassette recorder, a radio, or TV. Adding track marks while recording You can add track marks (track number) while recording. TV, Cassette recorder, etc. 1 Make connections. Use the appropriate connecting cord to LINE IN (OPTICAL) 4-way control key (ENTER • N, ., >, x) Adding track marks manually 1 While the recorder is recording, press T MARK. 25 L (white) R (red) Line cable RK-G129/G136,etc REC...
... a recording time 4 times longer than normal. When connecting the cable, make sure to record from an analog equipment such as a cassette recorder, a radio, or TV. Adding track marks while recording You can add track marks (track number) while recording. TV, Cassette recorder, etc. 1 Make connections. Use the appropriate connecting cord to LINE IN (OPTICAL) 4-way control key (ENTER • N, ., >, x) Adding track marks manually 1 While the recorder is recording, press T MARK. 25 L (white) R (red) Line cable RK-G129/G136,etc REC...
Operating Instructions
Page 26
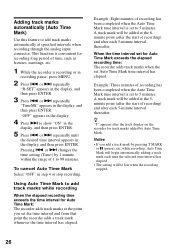
... 8minute point (after the start of recording) and after each 5-minute interval thereafter. Example: Three minutes of recording has been completed when the Auto Time Mark time interval is set to 5 minutes. This function is recording or in step 4 or stop recording. A track mark will be added at the point you set Auto Time Mark time interval has elapsed. or > changes the time setting (Time:) by Auto Time Mark. Example: Eight minutes...
... 8minute point (after the start of recording) and after each 5-minute interval thereafter. Example: Three minutes of recording has been completed when the Auto Time Mark time interval is set to 5 minutes. This function is recording or in step 4 or stop recording. A track mark will be added at the point you set Auto Time Mark time interval has elapsed. or > changes the time setting (Time:) by Auto Time Mark. Example: Eight minutes...
Operating Instructions
Page 27
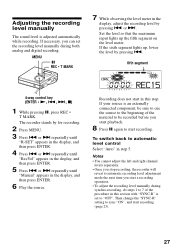
.... 6 Play the source. Notes • You cannot adjust the left and right channel levels separately. • Once you stop recording, the recorder will revert to automatic recording level adjustment mode the next time you start playback. 8 Press X again to start a recording operation. • To adjust the recording level manually during both analog and digital recording. If your source is an externally connected component, be recorded before you start recording. If necessary, you can set to "OFF". Adjusting the recording level manually The sound level is set...
.... 6 Play the source. Notes • You cannot adjust the left and right channel levels separately. • Once you stop recording, the recorder will revert to automatic recording level adjustment mode the next time you start playback. 8 Press X again to start a recording operation. • To adjust the recording level manually during both analog and digital recording. If your source is an externally connected component, be recorded before you start recording. If necessary, you can set to "OFF". Adjusting the recording level manually The sound level is set...
Operating Instructions
Page 31
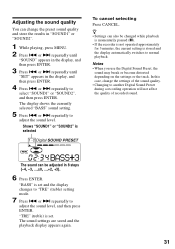
... adjust the sound level, and then press ENTER. The sound can change the settings of the sound quality. • Changing to another Digital Sound Preset during a recording operation will not affect the quality of recorded sound. Adjusting the sound quality You can be changed while playback is momentarily paused (X). • If the recorder is not operated approximately for 3 minutes, the current setting is stored and the display automatically switches to normal playback. or > repeatedly until "SOUND...
... adjust the sound level, and then press ENTER. The sound can change the settings of the sound quality. • Changing to another Digital Sound Preset during a recording operation will not affect the quality of recorded sound. Adjusting the sound quality You can be changed while playback is momentarily paused (X). • If the recorder is not operated approximately for 3 minutes, the current setting is stored and the display automatically switches to normal playback. or > repeatedly until "SOUND...
Operating Instructions
Page 35
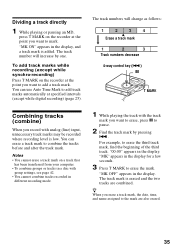
...) input, unnecessary track marks may be recorded where recording level is low. "MK" appears in the display for a few seconds. 3 Press T MARK to the mark are combined. z When you erase a track mark, the date, time, and name assigned to erase the mark. The track mark is added. You can erase a track mark to add track marks automatically at specified intervals (except while digital recording) (page 25). You can use Auto Time...
...) input, unnecessary track marks may be recorded where recording level is low. "MK" appears in the display for a few seconds. 3 Press T MARK to the mark are combined. z When you erase a track mark, the date, time, and name assigned to erase the mark. The track mark is added. You can erase a track mark to add track marks automatically at specified intervals (except while digital recording) (page 25). You can use Auto Time...
Operating Instructions
Page 48
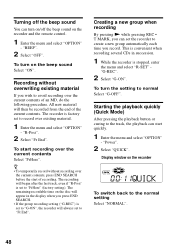
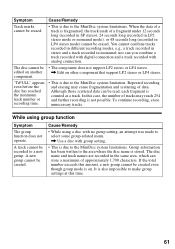
... group recording setting ("G-REC") is stopped, enter the menu and select "R-SET" "G-REC". 2 Select "G-ON". The remaining recordable time on the recorder and the remote control. 1 Enter the menu and select "OPTION" - Starting the playback quickly (Quick Mode) After pressing the playback button or cueing to the track, the playback can turn on/off the beep sound on the disc will appear in succession. 1 While the recorder is set to "Fr End". To turn the setting to avoid recording over...
... group recording setting ("G-REC") is stopped, enter the menu and select "R-SET" "G-REC". 2 Select "G-ON". The remaining recordable time on the recorder and the remote control. 1 Enter the menu and select "OPTION" - Starting the playback quickly (Quick Mode) After pressing the playback button or cueing to the track, the playback can turn on/off the beep sound on the disc will appear in succession. 1 While the recorder is set to "Fr End". To turn the setting to avoid recording over...
Operating Instructions
Page 50
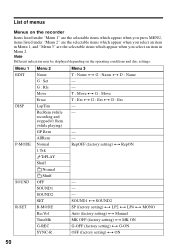
... when you select an item in Menu 2. Menu 1 Menu 2 Menu 3 EDIT Name G : Set T : Name y G : Name y D : Name - recording and stopped)/1 Rem (while playing) GP Rem - R-SET SET R-MODE RecVol TimeMk G-REC SYNC-R SOUND1 y SOUND2 SP (factory setting) y LP2 y LP4 y MONO Auto (factory setting) y Manual MK OFF (factory setting) y MK ON G-OFF (factory setting) y G-ON OFF (factory setting) y ON 50 AllRem - List of menus Menus on the operating conditions and disc settings. DISP Move Erase LapTim T : Move y G : Move T : Ers y G : Ers y D : Ers...
... when you select an item in Menu 2. Menu 1 Menu 2 Menu 3 EDIT Name G : Set T : Name y G : Name y D : Name - recording and stopped)/1 Rem (while playing) GP Rem - R-SET SET R-MODE RecVol TimeMk G-REC SYNC-R SOUND1 y SOUND2 SP (factory setting) y LP2 y LP4 y MONO Auto (factory setting) y Manual MK OFF (factory setting) y MK ON G-OFF (factory setting) y G-ON OFF (factory setting) y ON 50 AllRem - List of menus Menus on the operating conditions and disc settings. DISP Move Erase LapTim T : Move y G : Move T : Ers y G : Ers y D : Ers...
Operating Instructions
Page 52
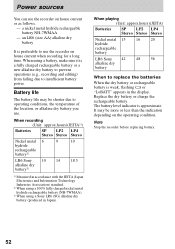
... charged nickel metal hydride rechargeable battery (NH-7WMAA). 3) When using a battery, make sure it is preferable to insufficient battery power. Note Stop the recorder before replacing battery. 52 Power sources You can use . a nickel metal hydride rechargeable battery NH-7WMAA - The battery level indicator is weak, flashing r or "LoBATT" appears in Japan). When playing (Unit: approx.hours)(JEITA) Batteries SP LP2 LP4 Stereo Stereo Stereo Nickel metal 15 16 20 hydride rechargeable battery LR6 Sony 42...
... charged nickel metal hydride rechargeable battery (NH-7WMAA). 3) When using a battery, make sure it is preferable to insufficient battery power. Note Stop the recorder before replacing battery. 52 Power sources You can use . a nickel metal hydride rechargeable battery NH-7WMAA - The battery level indicator is weak, flashing r or "LoBATT" appears in Japan). When playing (Unit: approx.hours)(JEITA) Batteries SP LP2 LP4 Stereo Stereo Stereo Nickel metal 15 16 20 hydride rechargeable battery LR6 Sony 42...
Operating Instructions
Page 53
... play . Caring for others Keep the volume at a temperature of time. Should you notice an abnormality in the recorder if it is designated for a long time, be considerate of the plug • Connect the AC power adaptor to +40° C (+104° F). • Though the battery and the recorder may become hot during the charging procedure, this recorder only. never pull the cord...
... play . Caring for others Keep the volume at a temperature of time. Should you notice an abnormality in the recorder if it is designated for a long time, be considerate of the plug • Connect the AC power adaptor to +40° C (+104° F). • Though the battery and the recorder may become hot during the charging procedure, this recorder only. never pull the cord...
Operating Instructions
Page 56
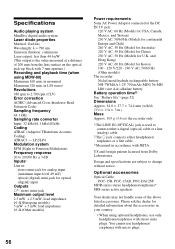
... use only headphones/earphones with stereo mini plugs. Specifications Audio playing system MiniDisc digital audio system Laser diode properties Material: GaAlAs Wavelength: λ = 790 nm Emission duration: continuous Laser output: less than 44.6 µW (This output is used to connect either a digital (optical) cable or a line (analog) cable. 2)The i jack connects either headphones/ earphones or a line cable. 3)Measured in accordance with JEITA. load impedance 16 Ω (Other models) Power requirements Sony AC Power Adaptor connected...
... use only headphones/earphones with stereo mini plugs. Specifications Audio playing system MiniDisc digital audio system Laser diode properties Material: GaAlAs Wavelength: λ = 790 nm Emission duration: continuous Laser output: less than 44.6 µW (This output is used to connect either a digital (optical) cable or a line (analog) cable. 2)The i jack connects either headphones/ earphones or a line cable. 3)Measured in accordance with JEITA. load impedance 16 Ω (Other models) Power requirements Sony AC Power Adaptor connected...
Operating Instructions
Page 59
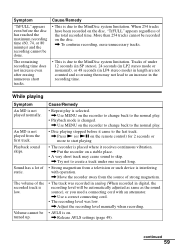
... the remote control) for 2 seconds or more to start playing • The recorder is placed where it receives continuous vibration. , Put the recorder on a stable place. • A very short track may not lead to an increase in the recording time. Cause/Remedy • Repeat play is selected. , Use MENU on the recorder to change back to the normal play. • Playback mode is interfering with operation. , Move the recorder away...
... the remote control) for 2 seconds or more to start playing • The recorder is placed where it receives continuous vibration. , Put the recorder on a stable place. • A very short track may not lead to an increase in the recording time. Cause/Remedy • Repeat play is selected. , Use MENU on the recorder to change back to the normal play. • Playback mode is interfering with operation. , Move the recorder away...
Operating Instructions
Page 60
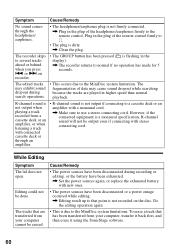
... specification, R-channel sound will not be output even if connecting with stereo connecting cord. The tracks that has been transferred from your computer, transfer it back first, and then erase it using the SonicStage software. 60 or > on the disc. While Editing Symptom The lid does not open. The recorder skips to the MiniDisc system limitations. To erase a track that are played in the plug of the remote control firmly to the remote control. Do...
... specification, R-channel sound will not be output even if connecting with stereo connecting cord. The tracks that has been transferred from your computer, transfer it back first, and then erase it using the SonicStage software. 60 or > on the disc. While Editing Symptom The lid does not open. The recorder skips to the MiniDisc system limitations. To erase a track that are played in the plug of the remote control firmly to the remote control. Do...
Operating Instructions
Page 61
... stereo mode) cannot be created. edited on another component. , Edit on . While using a disc with no group setting, an attempt was made to the area where the disc name is on other component that support LP2 stereo or LP4 stereo. A new group cannot be erased. The disc name and track names are recorded in the same area, which can you combine a track recorded with digital connection and a track recorded...
... stereo mode) cannot be created. edited on another component. , Edit on . While using a disc with no group setting, an attempt was made to the area where the disc name is on other component that support LP2 stereo or LP4 stereo. A new group cannot be erased. The disc name and track names are recorded in the same area, which can you combine a track recorded with digital connection and a track recorded...
Operating Instructions
Page 70
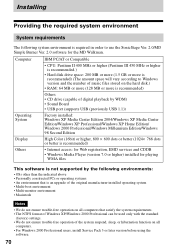
... (factory) settings. • We do not ensure trouble-free operation of the system suspend, sleep, or hibernation function on the hard disk.) • RAM: 64 MB or more (128 MB or more is recommended) (The amount space will vary according to Windows version and the number of digital playback by WDM) • Sound Board • USB port (supports USB (previously USB 1.1)) Operating System Display Factory installed: Windows XP Media Center Edition 2004/Windows...
... (factory) settings. • We do not ensure trouble-free operation of the system suspend, sleep, or hibernation function on the hard disk.) • RAM: 64 MB or more (128 MB or more is recommended) (The amount space will vary according to Windows version and the number of digital playback by WDM) • Sound Board • USB port (supports USB (previously USB 1.1)) Operating System Display Factory installed: Windows XP Media Center Edition 2004/Windows...
Operating Instructions
Page 84
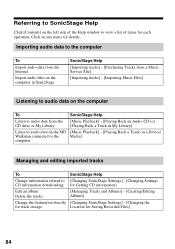
... to audio data on the MD [Music Playback] - [Playing Back a Track on a Device/ Walkman connected to the Media] computer Managing and editing imported tracks To SonicStage Help Change information related to view a list of the Help window to [Changing SonicStage Settings] - [Changing Settings CD information downloading for Getting CD information] Edit an album Delete the tracks [Managing Tracks and Albums] - [Creating/Editing Albums] Change the destination directly [Changing SonicStage Settings] - [Changing the for track storage Location for Saving Recorded Files...
... to audio data on the MD [Music Playback] - [Playing Back a Track on a Device/ Walkman connected to the Media] computer Managing and editing imported tracks To SonicStage Help Change information related to view a list of the Help window to [Changing SonicStage Settings] - [Changing Settings CD information downloading for Getting CD information] Edit an album Delete the tracks [Managing Tracks and Albums] - [Creating/Editing Albums] Change the destination directly [Changing SonicStage Settings] - [Changing the for track storage Location for Saving Recorded Files...


