Operating Instructions
Page 2
...at the top and bottom. Caution The use of the battery used to them whenever you . Record the serial number in the USA Owner's Record The serial number is located at the rear of the apparatus with your local authority. MZ-N1 Serial No. If you have any questions about this .... To prevent fire or shock hazard, do not cover the ventilation of the disc compartment lid and the model number is located at www.sony.com/productregistration Proper registration will increase eye hazard. Certain countries may call upon your product needs adjustment or modification. or write to rain or...
...at the top and bottom. Caution The use of the battery used to them whenever you . Record the serial number in the USA Owner's Record The serial number is located at the rear of the apparatus with your local authority. MZ-N1 Serial No. If you have any questions about this .... To prevent fire or shock hazard, do not cover the ventilation of the disc compartment lid and the model number is located at www.sony.com/productregistration Proper registration will increase eye hazard. Certain countries may call upon your product needs adjustment or modification. or write to rain or...

Operating Instructions
Page 3
... measures: - Reorient or relocate the receiving antenna. - SONY MZ-N1 Tested To Comply With FCC Standards FOR HOME OR OFFICE USE For customers in the European Union. 3 You can radiate radio frequency energy and, if not installed and used rechargeable batteries to Part 15 of rechargeable batteries, call tall free 1-800-822-8837 (the United...
... measures: - Reorient or relocate the receiving antenna. - SONY MZ-N1 Tested To Comply With FCC Standards FOR HOME OR OFFICE USE For customers in the European Union. 3 You can radiate radio frequency energy and, if not installed and used rechargeable batteries to Part 15 of rechargeable batteries, call tall free 1-800-822-8837 (the United...
Operating Instructions
Page 8
Other operation 67 Using the alarm (Melody Timer 67 Storing the settings for individual discs (Personal Disc Memory) .......69 Erasing the disc information 69 Protecting your hearing (AVLS 70 Turning off the beep sound 71 Adjusting the contrast of the display window (Contrast Adjustment) ..72 Locking the controls (HOLD 72 Power sources 73 Battery life 73 Additional information 74 Precautions 74 System limitations 77 Troubleshooting 79 List of menus 82 Messages 90 Specifications 93 Explanations 94 Index ...95 8
Other operation 67 Using the alarm (Melody Timer 67 Storing the settings for individual discs (Personal Disc Memory) .......69 Erasing the disc information 69 Protecting your hearing (AVLS 70 Turning off the beep sound 71 Adjusting the contrast of the display window (Contrast Adjustment) ..72 Locking the controls (HOLD 72 Power sources 73 Battery life 73 Additional information 74 Precautions 74 System limitations 77 Troubleshooting 79 List of menus 82 Messages 90 Specifications 93 Explanations 94 Index ...95 8
Operating Instructions
Page 11
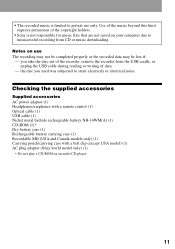
...AC power adaptor (1) Headphones/earphones with a remote control (1) Optical cable (1) USB cable (1) Nickel metal hydride rechargeable battery NH-14WM(A) (1) CD-ROM (1)* Dry battery case (1) Rechargeable battery carrying case (1) Recordable MD (USA and Canada models only) (1) Carrying pouch/carrying case with a belt clip (...except USA model) (1) AC plug adaptor (Sony world model only) (1) ∗ Do not play a CD-ROM...
...AC power adaptor (1) Headphones/earphones with a remote control (1) Optical cable (1) USB cable (1) Nickel metal hydride rechargeable battery NH-14WM(A) (1) CD-ROM (1)* Dry battery case (1) Rechargeable battery carrying case (1) Recordable MD (USA and Canada models only) (1) Carrying pouch/carrying case with a belt clip (...except USA model) (1) AC plug adaptor (Sony world model only) (1) ∗ Do not play a CD-ROM...
Operating Instructions
Page 12
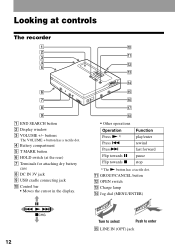
buttons The VOLUME + button has a tactile dot. D Battery compartment E T MARK button F HOLD switch (at controls The recorder 1 2 3 4 5 6 7 8 9 A END SEARCH button B Display window C VOLUME +/- J qa qs qd qf qg qh qj qk • Other ...> Flip towards X Flip towards x Function play/enter rewind fast forward pause stop 1) The N button has a tactile dot. Looking at the rear) G Terminals for attaching dry battery case H DC IN 3V jack I USB cradle connecting jack J Control bar • Moves the cursor in the display.
buttons The VOLUME + button has a tactile dot. D Battery compartment E T MARK button F HOLD switch (at controls The recorder 1 2 3 4 5 6 7 8 9 A END SEARCH button B Display window C VOLUME +/- J qa qs qd qf qg qh qj qk • Other ...> Flip towards X Flip towards x Function play/enter rewind fast forward pause stop 1) The N button has a tactile dot. Looking at the rear) G Terminals for attaching dry battery case H DC IN 3V jack I USB cradle connecting jack J Control bar • Moves the cursor in the display.
Operating Instructions
Page 13
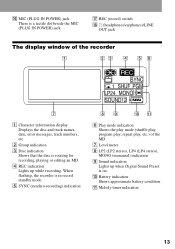
..., program play, repeat play, etc.) of the recorder 1 23 4 56 7 A Character information display Displays the disc and track names, date, error messages, track numbers, etc. J Battery indication Shows approximate...
..., program play, repeat play, etc.) of the recorder 1 23 4 56 7 A Character information display Displays the disc and track names, date, error messages, track numbers, etc. J Battery indication Shows approximate...
Operating Instructions
Page 14
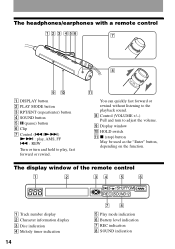
The display window of the remote control A B CD E F A Track number display B Character information display C Disc indication D Melody timer indication 14 G H E Play mode indication F Battery level indication G REC indication H SOUND indication I Display window J HOLD switch K x (stop) button May be used as the "Enter" button, depending on the function. The headphones/...
The display window of the remote control A B CD E F A Track number display B Character information display C Disc indication D Melody timer indication 14 G H E Play mode indication F Battery level indication G REC indication H SOUND indication I Display window J HOLD switch K x (stop) button May be used as the "Enter" button, depending on the function. The headphones/...
Operating Instructions
Page 15
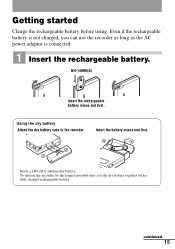
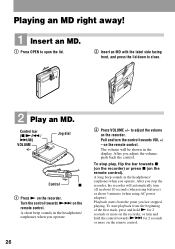
Getting started Charge the rechargeable battery before using. Using the dry battery Attach the dry battery case to the recorder. 2 1 Insert the battery minus end first. 3 4 Insert a LR6 (SG) alkaline dry battery. continued 15 NH-14WM(A) E e Insert the rechargeable battery minus end first. To operate the recorder for the longest possible time, use the recorder as long as the AC power adaptor is connected. 1 Insert the rechargeable battery. Even if the rechargeable battery is not charged, you can use the dry battery together with a fully charged rechargeable battery.
Getting started Charge the rechargeable battery before using. Using the dry battery Attach the dry battery case to the recorder. 2 1 Insert the battery minus end first. 3 4 Insert a LR6 (SG) alkaline dry battery. continued 15 NH-14WM(A) E e Insert the rechargeable battery minus end first. To operate the recorder for the longest possible time, use the recorder as long as the AC power adaptor is connected. 1 Insert the rechargeable battery. Even if the rechargeable battery is not charged, you can use the dry battery together with a fully charged rechargeable battery.
Operating Instructions
Page 16
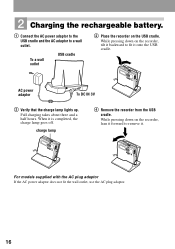
2 Charging the rechargeable battery. 1 Connect the AC power adaptor to the USB cradle and the AC adaptor to remove it is completed, the charge lamp goes off. For models ...
2 Charging the rechargeable battery. 1 Connect the AC power adaptor to the USB cradle and the AC adaptor to remove it is completed, the charge lamp goes off. For models ...

Operating Instructions
Page 17
... hot during the charging procedure, this recorder. This is stopped. Charging time may not charge up and charging starts. After you use and recharge the battery a few times, it . • If the recorder will not be charged. • Do not use the supplied AC power adaptor. If you place ...the recorder on the USB cradle. Notes • The supplied USB cradle can be recharged approximately 300 times. • When the battery life of time, disconnect the AC power adaptor from a wall outlet and remove the recorder from the next time you remove the recorder from the...
... hot during the charging procedure, this recorder. This is stopped. Charging time may not charge up and charging starts. After you use and recharge the battery a few times, it . • If the recorder will not be charged. • Do not use the supplied AC power adaptor. If you place ...the recorder on the USB cradle. Notes • The supplied USB cradle can be recharged approximately 300 times. • When the battery life of time, disconnect the AC power adaptor from a wall outlet and remove the recorder from the next time you remove the recorder from the...
Operating Instructions
Page 18
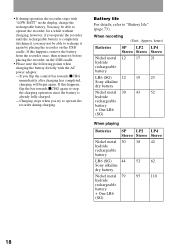
... to recharge it before placing the recorder on the USB cradle. When recording (Unit: Approx. hours) Batteries Nickel metal hydride rechargeable battery LR6 (SG) Sony alkaline dry battery Nickel metal hydride rechargeable battery + One LR6 (SG) SP LP2 Stereo Stereo 12 17 12 19 30 43 LP4 Stereo 21 23... 52 When playing Batteries SP LP2 LP4 Stereo Stereo Stereo Nickel metal 30 38 42 hydride rechargeable battery LR6 (SG) 44 52 62 Sony alkaline dry battery Nickel metal 79 95 110 hydride rechargeable battery + One LR6 (SG) 18 • If during ...
... to recharge it before placing the recorder on the USB cradle. When recording (Unit: Approx. hours) Batteries Nickel metal hydride rechargeable battery LR6 (SG) Sony alkaline dry battery Nickel metal hydride rechargeable battery + One LR6 (SG) SP LP2 Stereo Stereo 12 17 12 19 30 43 LP4 Stereo 21 23... 52 When playing Batteries SP LP2 LP4 Stereo Stereo Stereo Nickel metal 30 38 42 hydride rechargeable battery LR6 (SG) 44 52 62 Sony alkaline dry battery Nickel metal 79 95 110 hydride rechargeable battery + One LR6 (SG) 18 • If during ...
Operating Instructions
Page 21
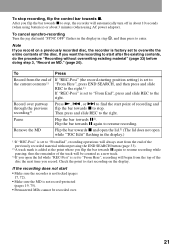
... (pages 19, 75). • Premastered MDs cannot be counted as a new track. 3) If you open while "TOC Edit" flashing in about 10 seconds (when using batteries) or about 3 minutes (when using AC power adaptor). Note If you flip the bar towards x to the right. To stop recording, flip the control bar...
... (pages 19, 75). • Premastered MDs cannot be counted as a new track. 3) If you open while "TOC Edit" flashing in about 10 seconds (when using batteries) or about 3 minutes (when using AC power adaptor). Note If you flip the bar towards x to the right. To stop recording, flip the control bar...
Operating Instructions
Page 22
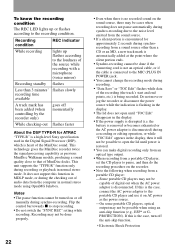
... indicator While recording lights up or flashes according to stop recording. • Do not switch the "SYNC REC" setting while recording. the battery is removed or becomes exhausted or the AC power adaptor is disconnected) during synchro-recording. To know the recording condition The REC LED lights ... due to the noise level emitted from the sound source. • If a silent portion is encountered for ATRAC "TYPE-R" is a high-level Sony specification used in the display. • If the power supply is the case, turn off the anti-skip function. ∗ Electronic Shock Protection ...
... indicator While recording lights up or flashes according to stop recording. • Do not switch the "SYNC REC" setting while recording. the battery is removed or becomes exhausted or the AC power adaptor is disconnected) during synchro-recording. To know the recording condition The REC LED lights ... due to the noise level emitted from the sound source. • If a silent portion is encountered for ATRAC "TYPE-R" is a high-level Sony specification used in the display. • If the power supply is the case, turn off the anti-skip function. ∗ Electronic Shock Protection ...

Operating Instructions
Page 24
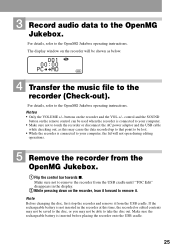
... MD before connecting the recorder to your computer. For details, refer to the OpenMG Jukebox operating instructions. 1Insert a disc into the recorder. 2Insert a charged rechargeable battery into the recorder. 3Connect the AC power adaptor to the USB cradle. 4Connect the recorder to install the "OpenMG Jukebox software" and "Net MD driver...
... MD before connecting the recorder to your computer. For details, refer to the OpenMG Jukebox operating instructions. 1Insert a disc into the recorder. 2Insert a charged rechargeable battery into the recorder. 3Connect the AC power adaptor to the USB cradle. 4Connect the recorder to install the "OpenMG Jukebox software" and "Net MD driver...
Operating Instructions
Page 25
... point to be shown as this may not be able to remove it from the OpenMG Jukebox. 1Flip the control bar towards x. If the rechargeable battery is not inserted in the display. 2While pressing down on the remote control can be used when the recorder is connected to your computer, the... connected to the OpenMG Jukebox. control and the SOUND button on the recorder, lean it forward to take the disc out. Make sure the rechargeable battery is inserted before placing the recorder onto the USB cradle. 25 3 Record audio data to your computer. • Make sure not to touch the recorder...
... point to be shown as this may not be able to remove it from the OpenMG Jukebox. 1Flip the control bar towards x. If the rechargeable battery is not inserted in the display. 2While pressing down on the remote control can be used when the recorder is connected to your computer, the... connected to the OpenMG Jukebox. control and the SOUND button on the recorder, lean it forward to take the disc out. Make sure the rechargeable battery is inserted before placing the recorder onto the USB cradle. 25 3 Record audio data to your computer. • Make sure not to touch the recorder...
Operating Instructions
Page 26
... sounds in the headphones/ earphones when you operate. 2 Press VOLUME +/- To stop the recorder, the recorder will be shown in about 10 seconds (when using batteries) or about 3 minutes (when using AC power adaptor). Pull and turn off in the display. To start playback from the point you adjust the volume...
... sounds in the headphones/ earphones when you operate. 2 Press VOLUME +/- To stop the recorder, the recorder will be shown in about 10 seconds (when using batteries) or about 3 minutes (when using AC power adaptor). Pull and turn off in the display. To start playback from the point you adjust the volume...
Operating Instructions
Page 27
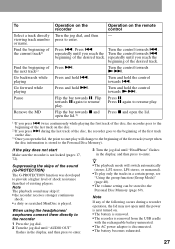
... removed. • The recorder is removed from the USB cradle with the rechargeable battery uninserted. • The AC power adaptor is played. Turn the control towards . Turn and hold the control towards .. Press and hold .. Flip the... a recorder operation, the lid may skip if: • the recorder receives stronger continuous shock. • a dirty or scratched MiniDisc is disconnected. • The battery becomes exhausted. 27 Turn and hold the control towards X. Press X. To Select a track directly viewing track number or name. z • The playback mode will ...
... removed. • The recorder is removed from the USB cradle with the rechargeable battery uninserted. • The AC power adaptor is played. Turn the control towards . Turn and hold the control towards .. Press and hold .. Flip the... a recorder operation, the lid may skip if: • the recorder receives stronger continuous shock. • a dirty or scratched MiniDisc is disconnected. • The battery becomes exhausted. 27 Turn and hold the control towards X. Press X. To Select a track directly viewing track number or name. z • The playback mode will ...
Operating Instructions
Page 39
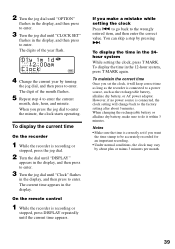
... appears. On the remote control 1 While the recorder is connected, the clock setting will keep correct time as long as the rechargeable battery, alkaline dry battery, or AC power adaptor. The current time appears in the 24hour system While setting the clock, press T MARK. The digit of ...accurately recorded for an important recording. • Under normal conditions, the clock may vary by about 3 minutes. When changing the rechargeable battery or alkaline dry battery, make a mistake while setting the clock Press . To display the time in the 12-hour system, press T MARK again.
... appears. On the remote control 1 While the recorder is connected, the clock setting will keep correct time as long as the rechargeable battery, alkaline dry battery, or AC power adaptor. The current time appears in the 24hour system While setting the clock, press T MARK. The digit of ...accurately recorded for an important recording. • Under normal conditions, the clock may vary by about 3 minutes. When changing the rechargeable battery or alkaline dry battery, make a mistake while setting the clock Press . To display the time in the 12-hour system, press T MARK again.
Operating Instructions
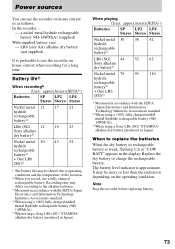
Page 73
... and Information Technology Industries Association) standard. 4) When using a 100% fully charged nickel metal hydride rechargeable battery (NH14WM(A)). 5) When using a Sony LR6 (SG) "STAMINA" alkaline dry battery (produced in the display. Battery life1) When recording2) (Unit: approx.hours)(JEITA3)) Batteries SP LP2 LP4 Stereo Stereo Stereo Nickel metal 12 17 21 hydride rechargeable battery4) LR6 (SG...
... and Information Technology Industries Association) standard. 4) When using a 100% fully charged nickel metal hydride rechargeable battery (NH14WM(A)). 5) When using a Sony LR6 (SG) "STAMINA" alkaline dry battery (produced in the display. Battery life1) When recording2) (Unit: approx.hours)(JEITA3)) Batteries SP LP2 LP4 Stereo Stereo Stereo Nickel metal 12 17 21 hydride rechargeable battery4) LR6 (SG...

Operating Instructions
Page 74
... AC power adaptor supplied with the AC power adaptor. never pull the cord. Heat build-up in your house: For the supplied battery charging stand, use headphones/earphones while driving, cycling, or operating any motorized vehicle. It may cause the recorder to malfunction. To ...8226; Do not place the cartridge where it will be potentially dangerous to disconnect the power supply (AC power adaptor, dry battery, rechargeable battery, or car battery cord). Additional information Precautions On safety Do not put any foreign objects in the space designated for it on the disc. ...
... AC power adaptor supplied with the AC power adaptor. never pull the cord. Heat build-up in your house: For the supplied battery charging stand, use headphones/earphones while driving, cycling, or operating any motorized vehicle. It may cause the recorder to malfunction. To ...8226; Do not place the cartridge where it will be potentially dangerous to disconnect the power supply (AC power adaptor, dry battery, rechargeable battery, or car battery cord). Additional information Precautions On safety Do not put any foreign objects in the space designated for it on the disc. ...


