

Operating Instructions
Page 3
... need to be sure to the provision of your nearest Sony service station. For the Customers in the text, for example, "MVC-FD90 only." Otherwise, the model name is fitted to record... UNLESS THE BLADES CAN BE FULLY INSERTED TO PREVENT BLADE EXPOSURE. Press DISPLAY. Precaution on the camera are clearly indicated in Germany Directive:EMC Directive 89/336/EEC.92/ 31...the camera In addition to malfunctions and inability to this equipment for your camera Operating instructions Before operating the unit, please read this manual thoroughly, and retain it for the two models: MVC-FD85, MVC-...
... need to be sure to the provision of your nearest Sony service station. For the Customers in the text, for example, "MVC-FD90 only." Otherwise, the model name is fitted to record... UNLESS THE BLADES CAN BE FULLY INSERTED TO PREVENT BLADE EXPOSURE. Press DISPLAY. Precaution on the camera are clearly indicated in Germany Directive:EMC Directive 89/336/EEC.92/ 31...the camera In addition to malfunctions and inability to this equipment for your camera Operating instructions Before operating the unit, please read this manual thoroughly, and retain it for the two models: MVC-FD85, MVC-...
Operating Instructions
Page 5
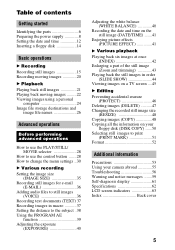
... the information on your floppy disk (DISK COPY) ......50 Selecting still images to print (PRINT MARK 51 Format 52 Additional information Precautions 53 Using your camera abroad 55 Troubleshooting 56 Warning and notice messages .......59 Self-diagnosis display 61 Specifications 62 LCD screen indicators 63 Index Back cover 5
... the information on your floppy disk (DISK COPY) ......50 Selecting still images to print (PRINT MARK 51 Format 52 Additional information Precautions 53 Using your camera abroad 55 Troubleshooting 56 Warning and notice messages .......59 Self-diagnosis display 61 Specifications 62 LCD screen indicators 63 Index Back cover 5

Operating Instructions
Page 7
buttons (23) C LCD BACKLIGHT switch (16) D PLAY/STILL/MOVIE selector (28) E ON/CHG (Charge) lamp (9) F (Flash) button (19) G FOCUS button (37, 38) (MVCFD85) / (Macro) button (37) (MVC-FD90) H PROGRAM AE button (39) I Hooks for LCD screen The LCD screen becomes brighter when exposed to sunlight. Getting started Attaching the shoulder strap A Photocell window for strap J LCD screen K Floppy disk slot (14) L ACCESS lamp (16) M DISK EJECT lever (14) N Speaker O POWER switch (12) P Battery cover/PUSH button (8) Q Control button (28) R DISPLAY button (18) 7 B VOLUME +/-
buttons (23) C LCD BACKLIGHT switch (16) D PLAY/STILL/MOVIE selector (28) E ON/CHG (Charge) lamp (9) F (Flash) button (19) G FOCUS button (37, 38) (MVCFD85) / (Macro) button (37) (MVC-FD90) H PROGRAM AE button (39) I Hooks for LCD screen The LCD screen becomes brighter when exposed to sunlight. Getting started Attaching the shoulder strap A Photocell window for strap J LCD screen K Floppy disk slot (14) L ACCESS lamp (16) M DISK EJECT lever (14) N Speaker O POWER switch (12) P Battery cover/PUSH button (8) Q Control button (28) R DISPLAY button (18) 7 B VOLUME +/-

Operating Instructions
Page 13
... / 7 / 1 12 : 00 AM ENTER SELECT/ADJUST CANCEL OK 8 Select [ENTER] with B on the control button, then press the center z. Getting started 5 Select the desired date display format with v/V on the control button, then press the center z at the desired moment to begin clock movement. After entering the number, v/V moves to set...
... / 7 / 1 12 : 00 AM ENTER SELECT/ADJUST CANCEL OK 8 Select [ENTER] with B on the control button, then press the center z. Getting started 5 Select the desired date display format with v/V on the control button, then press the center z at the desired moment to begin clock movement. After entering the number, v/V moves to set...

Operating Instructions
Page 18
Shutter button Self-timer lamp Control button Select on the LCD screen with b/B/v/V on the LCD screen are not recorded. DISPLAY Notes • You cannot turn on/off the (self-timer) indicator and some of the indicators. Using the self-timer When you use the self-... after you press the shutter button until the image is recorded 10 seconds after you press the shutter button. LCD screen indicators during recording Press DISPLAY to turn off the indicators on the LCD screen, and the subject is recorded. 18
Shutter button Self-timer lamp Control button Select on the LCD screen with b/B/v/V on the LCD screen are not recorded. DISPLAY Notes • You cannot turn on/off the (self-timer) indicator and some of the indicators. Using the self-timer When you use the self-... after you press the shutter button until the image is recorded 10 seconds after you press the shutter button. LCD screen indicators during recording Press DISPLAY to turn off the indicators on the LCD screen, and the subject is recorded. 18

Operating Instructions
Page 20
... button momentarily The image and sound are not recorded. However, when [IMAGE SIZE] in the menu settings (page 32). LCD screen indicators during recording Press DISPLAY to [320×240], the maximum recording time is set to MOVIE. 2 Press the shutter button fully down for up to 18. These indicators are...
... button momentarily The image and sound are not recorded. However, when [IMAGE SIZE] in the menu settings (page 32). LCD screen indicators during recording Press DISPLAY to [320×240], the maximum recording time is set to MOVIE. 2 Press the shutter button fully down for up to 18. These indicators are...
Operating Instructions
Page 21
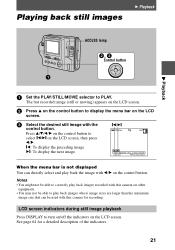
...that can directly select and play back images recorded with this camera for a detailed description of the indicators. 21 LCD screen indicators during still image playback Press DISPLAY to correctly play back the image with this camera on the LCD screen. 3 Select the desired still image ...with the control button. "b: To display the preceding image. Notes • You might not be able to...
...that can directly select and play back images recorded with this camera for a detailed description of the indicators. 21 LCD screen indicators during still image playback Press DISPLAY to correctly play back the image with this camera on the LCD screen. 3 Select the desired still image ...with the control button. "b: To display the preceding image. Notes • You might not be able to...

Operating Instructions
Page 22
...PLAY. Press v/V/b/B on the control button to select "b/B" on the control button, then press the center z. The moving image and sound are displayed one size smaller than still images. B (playback)/ X (pause) button 120min 160 6/8 0:05 INDEX DELETE FILE TOOL SETUP SELECT OK Playback bar 22 ...Moving images are played back. The last recorded image (still or moving) appears on the LCD screen. 2 Press v on the control button to display the menu bar on the LCD screen. 3 Select the desired moving images ACCESS lamp 2-4 Control button 1 1 Set the PLAY/STILL/MOVIE selector ...
...PLAY. Press v/V/b/B on the control button to select "b/B" on the control button, then press the center z. The moving image and sound are displayed one size smaller than still images. B (playback)/ X (pause) button 120min 160 6/8 0:05 INDEX DELETE FILE TOOL SETUP SELECT OK Playback bar 22 ...Moving images are played back. The last recorded image (still or moving) appears on the LCD screen. 2 Press v on the control button to display the menu bar on the LCD screen. 3 Select the desired moving images ACCESS lamp 2-4 Control button 1 1 Set the PLAY/STILL/MOVIE selector ...

Operating Instructions
Page 23
... button, then press the center z. See page 65 for a detailed description of the indicators. 23 When you press the center z during moving image playback Press DISPLAY to adjust the volume. Adjusting the volume Press VOLUME +/- to turn on/off the indicators on the LCD screen. B Playback To pause playback Select X (pause...
... button, then press the center z. See page 65 for a detailed description of the indicators. 23 When you press the center z during moving image playback Press DISPLAY to adjust the volume. Adjusting the volume Press VOLUME +/- to turn on/off the indicators on the LCD screen. B Playback To pause playback Select X (pause...

Operating Instructions
Page 24
Make sure that applications that support these file formats are installed on your camera is stored in the following formats. To display the image list, double-click [Mavica.htm] in TEXT mode : GIF format. Note Data recorded with your personal computer. • Still image (except TEXT mode) : JPEG format • Moving image/Voice ...
Make sure that applications that support these file formats are installed on your camera is stored in the following formats. To display the image list, double-click [Mavica.htm] in TEXT mode : GIF format. Note Data recorded with your personal computer. • Still image (except TEXT mode) : JPEG format • Moving image/Voice ...

Operating Instructions
Page 26
...mode image data Folder containing voice memo audio data Location 31/2 Floppy [A:] E-mail folder Voice folder File MVC-sssf.JPG MVC-sssf.411 MVC-sssf.MPG MVC-sssT.GIF MVC-sssE.JPG MVC-sssA.MPG Meaning • Still image file recorded normally • Still image file recorded in E-MAIL ...mode (page 36) • Still image file recorded in VOICE mode (page 36) • INDEX display file This file can only be played back on your camera...
...mode image data Folder containing voice memo audio data Location 31/2 Floppy [A:] E-mail folder Voice folder File MVC-sssf.JPG MVC-sssf.411 MVC-sssf.MPG MVC-sssT.GIF MVC-sssE.JPG MVC-sssA.MPG Meaning • Still image file recorded normally • Still image file recorded in E-MAIL ...mode (page 36) • Still image file recorded in VOICE mode (page 36) • INDEX display file This file can only be played back on your camera...

Operating Instructions
Page 27
... file 27 An image file recorded in E-MAIL mode and its corresponding audio file - The numerical portion of the following files are the same. - INDEX display files cannot be played back on other equipment.
... file 27 An image file recorded in E-MAIL mode and its corresponding audio file - The numerical portion of the following files are the same. - INDEX display files cannot be played back on other equipment.
Operating Instructions
Page 28
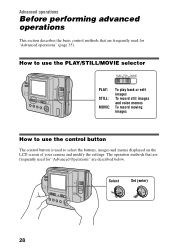
... use the control button The control button is used for "Advanced Operations" are frequently used to select the buttons, images and menus displayed on the LCD screen of your camera and modify the settings. Advanced operations Before performing advanced operations This section describes the basic control methods that are frequently used for...
... use the control button The control button is used for "Advanced Operations" are frequently used to select the buttons, images and menus displayed on the LCD screen of your camera and modify the settings. Advanced operations Before performing advanced operations This section describes the basic control methods that are frequently used for...

Operating Instructions
Page 29
... [item name]." Repeat steps 1 and 2 to clear the menu bar from blue to yellow. 2 Press the center z to display. Turning on/off the operation buttons (menu bar) on the LCD screen Press v to display the menu bar on the INDEX screen (page 42). Before performing advanced operations 29 Selecting items or images...
... [item name]." Repeat steps 1 and 2 to clear the menu bar from blue to yellow. 2 Press the center z to display. Turning on/off the operation buttons (menu bar) on the LCD screen Press v to display the menu bar on the INDEX screen (page 42). Before performing advanced operations 29 Selecting items or images...
Operating Instructions
Page 30
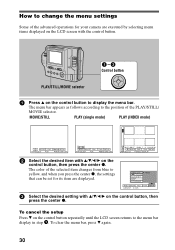
...(single mode) PLAY (INDEX mode) EFFECT FILE CAMERA SETUP SELECT OK MENU BAR OFF INDEX DELETE FILE TOOL SETUP SELECT OK MENU BAR OFF MVC-001F 2000 7 4 10:30PM DELETE FILE TOOL SETUP SELECT SINGLE DISPLAY 2 Select the desired item with v/V/b/B on the...z. How to change the menu settings Some of the advanced operations for its item are executed by selecting menu items displayed on the LCD screen with the control button. 1-3 Control button PLAY/STILL/MOVIE selector 1 Press v on the ...when you press the center z, the settings that can be set for your camera are displayed.
...(single mode) PLAY (INDEX mode) EFFECT FILE CAMERA SETUP SELECT OK MENU BAR OFF INDEX DELETE FILE TOOL SETUP SELECT OK MENU BAR OFF MVC-001F 2000 7 4 10:30PM DELETE FILE TOOL SETUP SELECT SINGLE DISPLAY 2 Select the desired item with v/V/b/B on the...z. How to change the menu settings Some of the advanced operations for its item are executed by selecting menu items displayed on the LCD screen with the control button. 1-3 Control button PLAY/STILL/MOVIE selector 1 Press v on the ...when you press the center z, the settings that can be set for your camera are displayed.
Operating Instructions
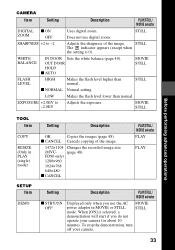
Page 33
...215;1104 Changes the recorded image size (MVC- (page 48). LOW Makes the flash level lower than normal. x CANCEL Cancels copying of the image. When [ON] is 0). CAMERA Item Setting Description PLAY/STILL/ MOVIE selector DIGITAL x ON ZOOM OFF Uses digital zoom. STILL The indicator appears (except when...;480 x CANCEL PLAY/STILL/ MOVIE selector PLAY PLAY Setting x STBY/ON OFF Description PLAY/STILL/ MOVIE selector Displayed only when you do not operate your camera. 33 Does not use the AC MOVIE power adaptor in PLAY (single) mode) SETUP Item DEMO Setting Description ...
...215;1104 Changes the recorded image size (MVC- (page 48). LOW Makes the flash level lower than normal. x CANCEL Cancels copying of the image. When [ON] is 0). CAMERA Item Setting Description PLAY/STILL/ MOVIE selector DIGITAL x ON ZOOM OFF Uses digital zoom. STILL The indicator appears (except when...;480 x CANCEL PLAY/STILL/ MOVIE selector PLAY PLAY Setting x STBY/ON OFF Description PLAY/STILL/ MOVIE selector Displayed only when you do not operate your camera. 33 Does not use the AC MOVIE power adaptor in PLAY (single) mode) SETUP Item DEMO Setting Description ...

Operating Instructions
Page 34
... menu items in PLAY (single) mode) Displays six images at a time (PLAY (INDEX) mode). Adjusts the LCD screen brightness using -/+ on the beep/shutter sound (when you press the shutter button.) x ON ... (single) mode. 34 Item VIDEO OUT / LANGUAGE CLOCK SET BEEP LCD BRIGHT Setting Description x NTSC Sets the video output signal to PAL mode (e.g., Europe). /JPN Displays the menu items in Japanese. PAL Sets the video output signal to NTSC mode (e.g., Japan, the USA). PLAY/STILL/MOVIE selector PLAY (Return) (Only in...
... menu items in PLAY (single) mode) Displays six images at a time (PLAY (INDEX) mode). Adjusts the LCD screen brightness using -/+ on the beep/shutter sound (when you press the shutter button.) x ON ... (single) mode. 34 Item VIDEO OUT / LANGUAGE CLOCK SET BEEP LCD BRIGHT Setting Description x NTSC Sets the video output signal to PAL mode (e.g., Europe). /JPN Displays the menu items in Japanese. PAL Sets the video output signal to NTSC mode (e.g., Japan, the USA). PLAY/STILL/MOVIE selector PLAY (Return) (Only in...

Operating Instructions
Page 42
... each image according to normal playback (single image) • Select the desired image with the control button. • Select (Return). Displays the previous index screen. B Various playback Playing back six images at once (index screen). To return to the image type and settings. : Moving image ...file : Voice memo file : E-mail file : Print mark -: Protect mark TEXT: TEXT file (No mark): Normal recording (no settings) 42 TEXT MVC-001F 2000 7 4 12:30PM DELETE FILE TOOL SETUP SELECT SINGLE DISPLAY This shows the position of the LCD screen. Six images are...
... each image according to normal playback (single image) • Select the desired image with the control button. • Select (Return). Displays the previous index screen. B Various playback Playing back six images at once (index screen). To return to the image type and settings. : Moving image ...file : Voice memo file : E-mail file : Print mark -: Protect mark TEXT: TEXT file (No mark): Normal recording (no settings) 42 TEXT MVC-001F 2000 7 4 12:30PM DELETE FILE TOOL SETUP SELECT SINGLE DISPLAY This shows the position of the LCD screen. Six images are...

Operating Instructions
Page 43
... the LCD screen returns to trim the image. Enlarging a part of the still image (Zoom and trimming) 3 1 4 1 Set the PLAY/STILL/MOVIE selector to PLAY. 2 Display the image to 5× regardless of the original image size. • The quality of enlarged images may be enlarged. 3 Zoom in/out the image with...
... the LCD screen returns to trim the image. Enlarging a part of the still image (Zoom and trimming) 3 1 4 1 Set the PLAY/STILL/MOVIE selector to PLAY. 2 Display the image to 5× regardless of the original image size. • The quality of enlarged images may be enlarged. 3 Zoom in/out the image with...

Operating Instructions
Page 46
...ENTER CANCEL SELECT OK To release protection If you selected [ALL] in step 2, select [OFF]. The displayed image is protected and the - In INDEX mode 1 Set the PLAY/STILL/MOVIE selector to PLAY, then display the INDEX screen. 2 Select [FILE], [PROTECT], and then [ALL] or [SELECT] from the ... Preventing accidental erasure (PROTECT) The - (protect) indicator appears on protected images. 1 2, 3 In single mode 1 Set the PLAY/STILL/MOVIE selector to PLAY, then display the image to be protected. 2 Select [FILE], [PROTECT], and then [ON] from the menu. 3 When you select [ALL] Select [ON].
...ENTER CANCEL SELECT OK To release protection If you selected [ALL] in step 2, select [OFF]. The displayed image is protected and the - In INDEX mode 1 Set the PLAY/STILL/MOVIE selector to PLAY, then display the INDEX screen. 2 Select [FILE], [PROTECT], and then [ALL] or [SELECT] from the ... Preventing accidental erasure (PROTECT) The - (protect) indicator appears on protected images. 1 2, 3 In single mode 1 Set the PLAY/STILL/MOVIE selector to PLAY, then display the image to be protected. 2 Select [FILE], [PROTECT], and then [ON] from the menu. 3 When you select [ALL] Select [ON].


