Operating Instructions
Page 4
... using your camera This digital still camera uses 8 cm CD-Rs/CDRWs as "CD-R" or "CD-RW." However, there may be compensated for Camera File system universal standard established by the JEITA (Japan Electronics and Information Technology Industries Association). • Playback of images recorded or edited with the Design rule for if recording or playback is an 8 cm CD-R/CD-RW with...
... using your camera This digital still camera uses 8 cm CD-Rs/CDRWs as "CD-R" or "CD-RW." However, there may be compensated for Camera File system universal standard established by the JEITA (Japan Electronics and Information Technology Industries Association). • Playback of images recorded or edited with the Design rule for if recording or playback is an 8 cm CD-R/CD-RW with...
Operating Instructions
Page 6
... screen 34 Deleting still images Deleting images 36 Formatting a CD-RW 39 Before advanced operations How to setup and operate your camera 15 How to use the jog dial 42 Deciding the still image quality 43 Creating or selecting a folder 43 Creating a new folder 44 Changing the recording folder 44 Advanced still image shooting Shooting with...
... screen 34 Deleting still images Deleting images 36 Formatting a CD-RW 39 Before advanced operations How to setup and operate your camera 15 How to use the jog dial 42 Deciding the still image quality 43 Creating or selecting a folder 43 Creating a new folder 44 Changing the recording folder 44 Advanced still image shooting Shooting with...
Operating Instructions
Page 7
...computer - Confirm before write 66 Using an external flash 67 Using the Sony HVL-F32X Flash ......67 Using the Sony HVL-F1000 Flash .....68 Using a commercially available external flash 68 Advanced still image viewing Selecting the folder and playing back images - Introduction 84 ... 91 Installing "ImageMixer 92 Connecting the camera to record images - Scene Selection 64 Adding special effects - Playback zoom 70 Recording an enlarged image - Delete 82 Enjoying images on your computer Viewing images on your computer .....96 Creating a Video CD 96 For Mac OS X users (v10...
...computer - Confirm before write 66 Using an external flash 67 Using the Sony HVL-F32X Flash ......67 Using the Sony HVL-F1000 Flash .....68 Using a commercially available external flash 68 Advanced still image viewing Selecting the folder and playing back images - Introduction 84 ... 91 Installing "ImageMixer 92 Connecting the camera to record images - Scene Selection 64 Adding special effects - Playback zoom 70 Recording an enlarged image - Delete 82 Enjoying images on your computer Viewing images on your computer .....96 Creating a Video CD 96 For Mac OS X users (v10...
Operating Instructions
Page 8
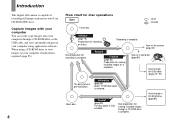
Introduction This digital still camera is fully available. View on your computer using a CD-ROM drive to view images on your computer through the USB cable (pages 91, 97) The disc status is complete. Blank disc Format (page 39) The disc space is capable of recording still images and movies onto 8 cm CD-R/CD-RW discs. Capture images with...
Introduction This digital still camera is fully available. View on your computer using a CD-ROM drive to view images on your computer through the USB cable (pages 91, 97) The disc status is complete. Blank disc Format (page 39) The disc space is capable of recording still images and movies onto 8 cm CD-R/CD-RW discs. Capture images with...
Operating Instructions
Page 18
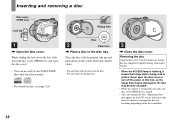
...image data may be damaged or the disc may become unusable. • While the camera is writing data on a disc, the disc cover OPEN lever is locked. •...remove the disc. • When the ACCESS lamp is being read or written. Shooting still images Inserting and removing a disc Disc cover OPEN lever Lock tab Pickup lens 1 ...disc tray. Never open the disc cover. • You can use only 8 cm CD-R/CD-RW discs that image data is flashing, it may take about 10 minutes to the left... to prepare the disc for recording depending on the disc. • Do not touch the pickup lens. 3 , Close ...
...image data may be damaged or the disc may become unusable. • While the camera is writing data on a disc, the disc cover OPEN lever is locked. •...remove the disc. • When the ACCESS lamp is being read or written. Shooting still images Inserting and removing a disc Disc cover OPEN lever Lock tab Pickup lens 1 ...disc tray. Never open the disc cover. • You can use only 8 cm CD-R/CD-RW discs that image data is flashing, it may take about 10 minutes to the left... to prepare the disc for recording depending on the disc. • Do not touch the pickup lens. 3 , Close ...

Operating Instructions
Page 19
... S, A, M, SCN or . • You can also perform initialization using your camera to view images through a CD-ROM drive, initialization is set the mode dial to , then turn on a disc....from step 1. • You can continue to record images. Initialization starts. Do not shake or strike the camera during initialization. 19 When you can also carry ...Images recorded before finalization remain on the LCD screen. "Initialize Place on level surface" appears on the disc. Initialization is initialization? Shooting still images Initializing a disc What is required to record images...
... S, A, M, SCN or . • You can also perform initialization using your camera to view images through a CD-ROM drive, initialization is set the mode dial to , then turn on a disc....from step 1. • You can continue to record images. Initialization starts. Do not shake or strike the camera during initialization. 19 When you can also carry ...Images recorded before finalization remain on the LCD screen. "Initialize Place on level surface" appears on the disc. Initialization is initialization? Shooting still images Initializing a disc What is required to record images...
Operating Instructions
Page 21
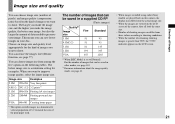
...Resize function, see page 43. • When images recorded using earlier Sony models are played back on this camera, the display may differ from the actual image size...camera, they all look the same size. • Number of shooting images can differ from among the five options in the following tables. When you make the image size and the higher you want to [Normal] For the number of images that can be saved in a supplied CD...×480 Creating home pages 1) This option records images in your image. Image size and quality Shooting still images You can choose image size (number of...
...Resize function, see page 43. • When images recorded using earlier Sony models are played back on this camera, the display may differ from the actual image size...camera, they all look the same size. • Number of shooting images can differ from among the five options in the following tables. When you make the image size and the higher you want to [Normal] For the number of images that can be saved in a supplied CD...×480 Creating home pages 1) This option records images in your image. Image size and quality Shooting still images You can choose image size (number of...
Operating Instructions
Page 36
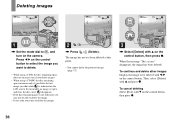
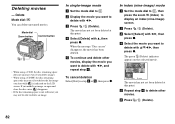
...deleting Select [Exit] with v on the control button, then press z. To continue and delete other images Display the image to , and turn on the camera. Then, select [Delete] with v and press z. When the message "Disc access" disappears, the image has been deleted. If you may take some ...CD-RW, the disc remaining space increases only if you delete the last image you shot while is not sufficient, you modify an image, or open and close the disc cover, disappears. • If the disc remaining space is indicated on the LCD screen. Deleting images 60min VGA 101 2/9 Deleting still...
...deleting Select [Exit] with v on the control button, then press z. To continue and delete other images Display the image to , and turn on the camera. Then, select [Delete] with v and press z. When the message "Disc access" disappears, the image has been deleted. If you may take some ...CD-RW, the disc remaining space increases only if you delete the last image you shot while is not sufficient, you modify an image, or open and close the disc cover, disappears. • If the disc remaining space is indicated on the LCD screen. Deleting images 60min VGA 101 2/9 Deleting still...
Operating Instructions
Page 39
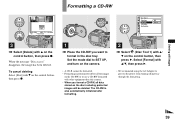
... deleting Select [Exit] with V on the control button, then press B. The CD-RW is performed to delete all the images on the CD-RW or to use a CD-RW formatted with other equipment than this camera. • When you want to prevent the power from turning off partway through ... recommend using the AC Adaptor to format in the disc tray. Set the mode dial to SET UP, and turn on the camera. • A CD-R cannot be deleted. Deleting still images Formatting a CD-RW Delete Exit 101-0002 2003 7 4 10:30PM OK BACK/NEXT Disc Tool 1 1 Finalize: 2 Format: 1 Initialize: Unfinalize: 2 1 2 OK...
... deleting Select [Exit] with V on the control button, then press B. The CD-RW is performed to delete all the images on the CD-RW or to use a CD-RW formatted with other equipment than this camera. • When you want to prevent the power from turning off partway through ... recommend using the AC Adaptor to format in the disc tray. Set the mode dial to SET UP, and turn on the camera. • A CD-R cannot be deleted. Deleting still images Formatting a CD-RW Delete Exit 101-0002 2003 7 4 10:30PM OK BACK/NEXT Disc Tool 1 1 Finalize: 2 Format: 1 Initialize: Unfinalize: 2 1 2 OK...

Operating Instructions
Page 40
... , Select [OK] with v on level surface All data will be used with this camera cannot be erased Ready? Format Place on the control button, then press z. Format the disc again with this camera. O K Cancel OK Format Avoid any vibration Format in progress" disappears, formatting has been ...completed. • It may take some time to format a CD-RW. • A CD-RW can be formatted about 300 times. • A CD-RW formatted using other equipment than...
... , Select [OK] with v on level surface All data will be used with this camera cannot be erased Ready? Format Place on the control button, then press z. Format the disc again with this camera. O K Cancel OK Format Avoid any vibration Format in progress" disappears, formatting has been ...completed. • It may take some time to format a CD-RW. • A CD-RW can be formatted about 300 times. • A CD-RW formatted using other equipment than...
Operating Instructions
Page 82
... the movie you want to delete an image. Mode dial Zoom button Control button • When using a CD-R, the disc remaining space does not increase even if you delete images. • When using a CD-RW, the disc remaining space only increases if you delete the last image you may not be able...
... the movie you want to delete an image. Mode dial Zoom button Control button • When using a CD-R, the disc remaining space does not increase even if you delete images. • When using a CD-RW, the disc remaining space only increases if you delete the last image you may not be able...

Operating Instructions
Page 84
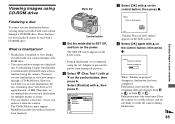
... computer may not operate depending on your computer You can copy images using a CD-ROM drive (page 85). (Windows only) - Viewing images on the type of discs using the CD-ROM drive. Operation is possible. Introduction There are not guaranteed for viewing images ...the recommended computer environments mentioned above. Communication with your computer When your computer resumes from the suspend or sleep mode, communication between your camera and your computer through a USB connection (page 91, 97). (Windows and Mac OS X only) Recommended computer environment x Recommended ...
... computer may not operate depending on your computer You can copy images using a CD-ROM drive (page 85). (Windows only) - Viewing images on the type of discs using the CD-ROM drive. Operation is possible. Introduction There are not guaranteed for viewing images ...the recommended computer environments mentioned above. Communication with your computer When your computer resumes from the suspend or sleep mode, communication between your camera and your computer through a USB connection (page 91, 97). (Windows and Mac OS X only) Recommended computer environment x Recommended ...
Operating Instructions
Page 85
... button, then press B. Finalize Place on the LCD screen. Finalize Avoid any vibration Finalize in progress When "Finalize in order to view images recorded with v/ 1 V on a finalized disc by approximately 13 MB. What is finalization? • Finalization is finalized using the AC Adaptor to...8226; You can finalize a disc later, even if you execute finalization, the disc remaining space will decrease by initializing it from the camera. • The CD-ROM drive must execute finalization to SET UP, and turn on the control button, then press z. Discs that have not been finalized...
... button, then press B. Finalize Place on the LCD screen. Finalize Avoid any vibration Finalize in progress When "Finalize in order to view images recorded with v/ 1 V on a finalized disc by approximately 13 MB. What is finalization? • Finalization is finalized using the AC Adaptor to...8226; You can finalize a disc later, even if you execute finalization, the disc remaining space will decrease by initializing it from the camera. • The CD-ROM drive must execute finalization to SET UP, and turn on the control button, then press z. Discs that have not been finalized...

Operating Instructions
Page 86
RW Unfinalization may take some time. Once finalization starts, you record a new image or edit an image on a CDRW after executing...the unfinalization Select [Cancel] with V on the control button in step 3 or 4, then press z. Place the camera on level surface Ready? To unfinalize again after canceling the unfinalization Set the mode dial to P, S, A, M, SCN...] with V on the control button in step 1, then press z. Canceling finalization (Unfinalize) (CD-RW only) a Place the CD-RW you want to unfinalize in progress" disappears, unfinalization has been completed. Once canceled, the disc...
RW Unfinalization may take some time. Once finalization starts, you record a new image or edit an image on a CDRW after executing...the unfinalization Select [Cancel] with V on the control button in step 3 or 4, then press z. Place the camera on level surface Ready? To unfinalize again after canceling the unfinalization Set the mode dial to P, S, A, M, SCN...] with V on the control button in step 1, then press z. Canceling finalization (Unfinalize) (CD-RW only) a Place the CD-RW you want to unfinalize in progress" disappears, unfinalization has been completed. Once canceled, the disc...
Operating Instructions
Page 87
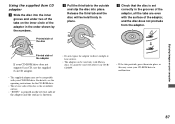
...may not be used only with Mavica discs. c Check that the disc is printed on the inner circle of the adaptor in place. For details, see the operating instructions for the CD-ROM drive. • The reverse side of the disc is the recordable surface. • "SONY" is set correctly in the ...grooves of the adaptor, all the tabs are even with other 8 cm CD-R/ CD-RW. • If the tabs protrude, press them ...
...may not be used only with Mavica discs. c Check that the disc is printed on the inner circle of the adaptor in place. For details, see the operating instructions for the CD-ROM drive. • The reverse side of the disc is the recordable surface. • "SONY" is set correctly in the ...grooves of the adaptor, all the tabs are even with other 8 cm CD-R/ CD-RW. • If the tabs protrude, press them ...

Operating Instructions
Page 88
... file opens. • Copying a file to the hard disk of your drive supports MultiRead. • This section describes how to view images through a CD-ROM drive - If you play back the file directly from the disc, the image and sound may differ depending on your computer. The required operations... 88 d Double-click the desired image file. 11 11 • To view images on your OS. • You can use for Sony" software to view images on a CD-RW using Windows Me as to view. 101 The folder contents are displayed. c Double-click "DCIM," then double-click the folder containing ...
... file opens. • Copying a file to the hard disk of your drive supports MultiRead. • This section describes how to view images through a CD-ROM drive - If you play back the file directly from the disc, the image and sound may differ depending on your computer. The required operations... 88 d Double-click the desired image file. 11 11 • To view images on your OS. • You can use for Sony" software to view images on a CD-RW using Windows Me as to view. 101 The folder contents are displayed. c Double-click "DCIM," then double-click the folder containing ...

Operating Instructions
Page 91
Windows 98/98SE/2000/Me • When using Windows 2000 or XP, log on your computer Do not connect your camera to the InstallShield Wizard for PTP Manager" screen appears. • This section describes the English screen. If it does not appear, double-... the destination folder, then click [Next]. The installing menu screen appears. "Select Program Folder" screen appears. 91 Enjoying images on as administrator. b Click [CD Mavica] on the installing menu screen. The "Choose Setup Language" screen appears. c Click [PTP Manager USB Driver] on the model selection screen. d Select the...
Windows 98/98SE/2000/Me • When using Windows 2000 or XP, log on your computer Do not connect your camera to the InstallShield Wizard for PTP Manager" screen appears. • This section describes the English screen. If it does not appear, double-... the destination folder, then click [Next]. The installing menu screen appears. "Select Program Folder" screen appears. 91 Enjoying images on as administrator. b Click [CD Mavica] on the installing menu screen. The "Choose Setup Language" screen appears. c Click [PTP Manager USB Driver] on the model selection screen. d Select the...
Operating Instructions
Page 93
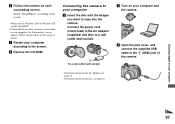
...the supplied USB cable to copy into the camera. Install "ImageMixer" according to the screen. • When you want to the (USB) jack of the camera. • For further details on the screen to a wall outlet (wall socket). d Remove the CD-ROM. Follow the procedure on the AC... Adaptor, see page 18. c Restart your computer and the camera. To a wall outlet (wall socket) b Turn on the disc, see page 14. Connecting the camera to the screen. SONY • For further details on your ...
...the supplied USB cable to copy into the camera. Install "ImageMixer" according to the screen. • When you want to the (USB) jack of the camera. • For further details on the screen to a wall outlet (wall socket). d Remove the CD-ROM. Follow the procedure on the AC... Adaptor, see page 18. c Restart your computer and the camera. To a wall outlet (wall socket) b Turn on the disc, see page 14. Connecting the camera to the screen. SONY • For further details on your ...

Operating Instructions
Page 95
... [Finish]. Enjoying images on the "System Properties" screen. 2 Check whether the other device is already installed. 1 Click [Device Manager]. 2 Check for a [ Sony PTP] with a mark. 3 If the device is installed, remove it. 1 Click [ Sony PTP]. (When using the supplied CD-ROM (page 91). 95 Try PTP Manager installation again using Windows 2000, rightclick...
... [Finish]. Enjoying images on the "System Properties" screen. 2 Check whether the other device is already installed. 1 Click [Device Manager]. 2 Check for a [ Sony PTP] with a mark. 3 If the device is installed, remove it. 1 Click [ Sony PTP]. (When using the supplied CD-ROM (page 91). 95 Try PTP Manager installation again using Windows 2000, rightclick...

Operating Instructions
Page 96
...Double-click the desired folder and image file. For details, see the "ImageMixer" help files. Creating a Video CD You can use the "ImageMixer Ver. 1.5 for Sony" software to your computer and remove the checkmark, then click [Next]. b Click [Next]. e Select [...Nothing. The "Completing the Scanner and Camera Wizard" screen appears. Viewing images on your computer a Double-click [My Documents] on your pictures, then click [Next]. Copying images using commercially available 12 cm CD...
...Double-click the desired folder and image file. For details, see the "ImageMixer" help files. Creating a Video CD You can use the "ImageMixer Ver. 1.5 for Sony" software to your computer and remove the checkmark, then click [Next]. b Click [Next]. e Select [...Nothing. The "Completing the Scanner and Camera Wizard" screen appears. Viewing images on your computer a Double-click [My Documents] on your pictures, then click [Next]. Copying images using commercially available 12 cm CD...


